

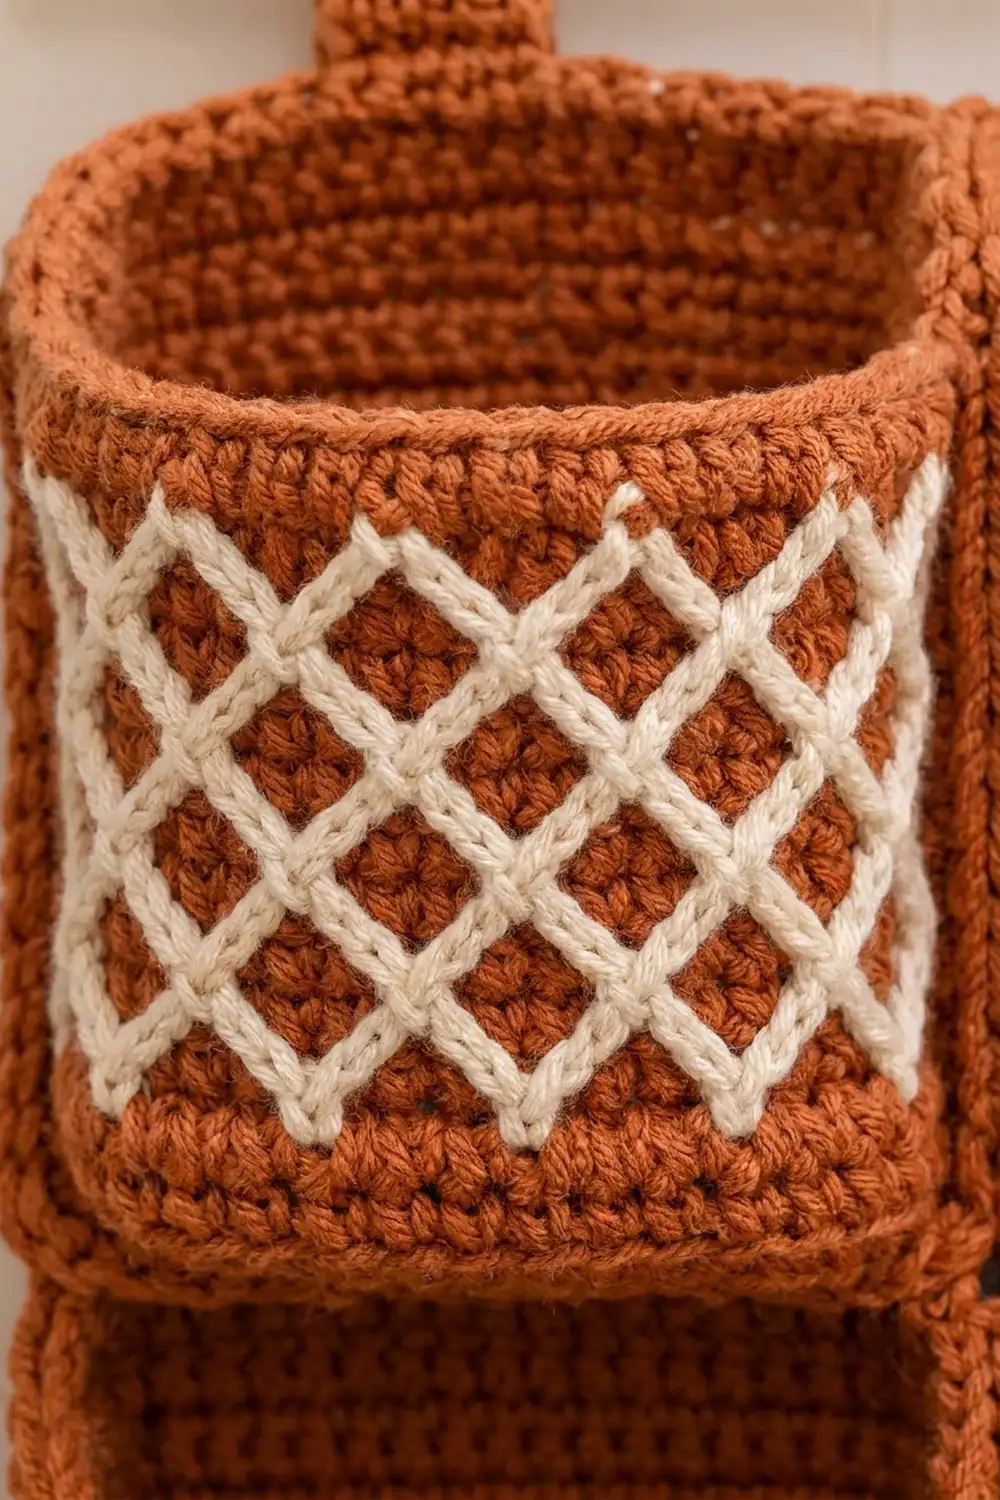
This hanging organizer has four pockets in warm rust single crochet. Each pocket has a raised band of cream diamond lattice. It hangs from a wooden dowel on two tabs and holds four standard toilet rolls in a neat 2 × 2 grid, so the spare rolls are within reach and off the floor.
The look is simple and a little rustic: solid terracotta, crisp cream crossing lines, and rims finished in reverse single crochet so they look like twisted cord. The lattice is added afterward with surface slip stitch, so every pocket is worked in one color only.
The pattern uses US crochet terms. The finished organizer measures about 12.3 in (31.2 cm) wide × 10.8 in (27.4 cm) tall, and the pockets stand out 4.4 in (11.2 cm) from the panel.
Construction: you make one back panel in rows and four pockets that each start with a flat rectangular base and continue into walls worked in rounds. You add the lattice, sew the pockets to the panel stitch-to-stitch, work a border around the panel, and attach the two tabs.
Finished Size and Construction
- Finished size: 12.3 in × 10.8 in (31.2 cm × 27.4 cm), plus the tab loops
- Skill level: Intermediate
- Terminology: US
- Yarn weight: Worsted (#4)
- Hook: 4.5 mm (US 7)
- Number of pieces: 7 (1 panel, 4 pockets, 2 tabs)
- Layout: 2 × 2 pockets on one panel
- Pocket size: 5.5 in (14.0 cm) wide × 4.4 in (11.2 cm) deep × 3.8 in (9.7 cm) tall
- Panel size before border: 11.5 in × 10 in (29.2 cm × 25.4 cm)
- Border depth: 0.4 in (1.0 cm) on each side
Materials
Use a smooth, firm worsted-weight cotton/acrylic blend at about 100 g / 180 m. Dense single crochet in a fiber with little stretch helps the pockets keep their shape when full.
- Rust (MC): 560 g (1,008 m)
- Cream (CC): 50 g (90 m)
Both quantities include a margin of about 10%.
Tools:
– 4.5 mm (US 7) crochet hook
– Tapestry needle
– 8 locking stitch markers
– Wooden dowel, 16 in (40.6 cm) long and 0.75 in (1.9 cm) in diameter
– Two wall hooks
– Measuring tape, pins, and a cardboard roll core or plastic-wrapped toilet roll for blocking
Abbreviations (US Terms)
- ch – chain
- sc – single crochet
- sl st – slip stitch
- BLO – back loop only
- rev sc – reverse single crochet (crab stitch)
- st(s) – stitch(es)
- RS / WS – right side / wrong side
- MC / CC – main color / contrast color
Reverse single crochet: Work from left to right (right-handed). Insert the hook into the next stitch to the right, yarn over, pull up a loop, then yarn over and pull through both loops.
Surface slip stitch: Hold the yarn on the inside (WS) of the fabric. Insert the hook from the RS through the fabric, pull up a loop, and pull it through the loop on the hook.
Gauge and Checkpoints
Gauge: 16 sc × 18 rows = 4 in × 4 in (10.2 cm × 10.2 cm), which is 4 sts and 4.5 rows per inch.
Make one pocket before anything else. It is the best gauge swatch because the roll has to fit inside it.
Checkpoints:
– Pocket base after Row 20: 5.5 in × 4.4 in (14.0 cm × 11.2 cm)
– Pocket after Wall Rnd 4: circumference 20 in (50.8 cm)
– Finished pocket wall: 3.8 in (9.7 cm) tall
– Panel before border: 11.5 in × 10 in (29.2 cm × 25.4 cm)
If your piece is too big, go down 0.5 mm in hook size. If it is too small and a roll won’t slide in, go up 0.5 mm. Don’t change the stitch counts, because the joining relies on matching them.
Back Panel
With MC, ch 47.
Row 1 (RS): Sc in 2nd ch from hook and in each ch across. (46 sts)
Rows 2–45: Ch 1, turn, sc in each st across. (46 sts)
Do not fasten off yet if you like, but most makers fasten off here and come back for the border later.
Checkpoint: 11.5 in (29.2 cm) wide × 10 in (25.4 cm) tall.
Pockets (make 4)
Base
With MC, ch 23.
Row 1: Sc in 2nd ch from hook and in each ch across. (22 sts)
Rows 2–20: Ch 1, turn, sc in each st across. (22 sts)
Checkpoint: 5.5 in × 4.4 in (14.0 cm × 11.2 cm).
Walls
Now work in joined rounds without turning, with the RS facing.
Rnd 1 (base edge): Ch 1. Sc in each of the 22 sts of Row 20. Work down the side as follows: sc in next 9 row-ends, skip 1, sc in next 9 row-ends, skip 1 (18 sc). Sc in each of the 22 foundation ch loops. Work up the other side as before (18 sc). Join with sl st to the first sc. (80 sts)
Place a marker at each end of the 22 sts worked into the foundation chain. This is the back wall, which gets sewn to the panel.
Rnd 2 (fold round): Ch 1, sc in BLO of each st around, join. (80 sts) The unworked front loops make a crisp edge where the base turns up into the walls.
Rnds 3–17: Ch 1, sc in each st around, join. (80 sts)
Rnd 18 (rim): Ch 1, rev sc in each st around, join. (80 sts)
Fasten off and weave in the ends on the inside.
The base has no corner increases, so the walls rise into a rounded rectangle. The 80-stitch round matches the base perimeter exactly: 22 + 18 + 22 + 18 = 80.
Checkpoint: wall 3.8 in (9.7 cm) tall; circumference 20 in (50.8 cm).
Cream Lattice (surface slip stitch)
The lattice fills Wall Rnds 5–16, which is a band of 12 rounds about 2.7 in (6.9 cm) deep. Rnds 2–4 stay plain rust below the band and Rnds 17–18 stay plain above it.
Starting at the first stitch of the round, mark every 4th stitch at the bottom of Rnd 5. That gives you 20 starting points: sts 1, 5, 9, and so on up to 77.
Rising-right lines (20): Cut 45 cm (17.7 in) of CC for each line. Starting at a marked point, pull up a loop from the inside. Then make 12 surface sl sts, moving 1 st to the right and 1 round up for each one. The line ends at the top of Rnd 16, 12 sts to the right of where it started. Pull the tail to the inside.
Rising-left lines (20): Start at the same 20 points and work the same way, moving 1 st to the left for each step.
Lines that start 4 sts apart cross every 2 rounds. Each diamond is 4 sts wide × 4 rounds tall, about 1 in × 0.9 in (2.5 cm × 2.3 cm). Each pocket gets 40 lines.
Knot the tails in pairs on the inside and weave them in. Keep your surface stitches about the same size as an MC sc so the pocket doesn’t pucker.
Make All Pieces
- Back panel: 1 (MC)
- Pockets: 4 (MC, with CC lattice)
- Hanging tabs: 2 (MC)
Tabs: With MC, ch 7. Row 1: sc in 2nd ch from hook and across (6 sts). Rows 2–28: ch 1, turn, sc across (6 sts). Each tab is 1.5 in × 6.2 in (3.8 cm × 15.7 cm). Fasten off.
Layout (front view, panel stitches 1–46):
Rows 40–45:  top margin (tabs attach here)
Rows 22–39:  [Pocket C sts 2–23] [Pocket D sts 24–45]
Row 21:      gap row
Rows 3–20:   [Pocket A sts 2–23] [Pocket B sts 24–45]
Rows 1–2:    bottom margin
Joining
Lay the panel flat with the RS up and Row 1 at the bottom. Use MC and a tapestry needle, whipstitching through both loops.
Stitch-to-stitch logic:
– Each pocket’s back wall is 22 sts wide, which matches 22 panel sts. For pockets A and C, that is sts 2–23; for pockets B and D, sts 24–45.
– For pockets A and B, Wall Rnd 1 along the back wall sits on panel Row 3. Wall Rnds 2–18 (17 rounds) then line up with panel Rows 4–20 (17 rows), one round to one row.
– For pockets C and D, Wall Rnd 1 sits on Row 22, and the walls line up with Rows 23–39.
Method for each pocket:
1. Pin the four corners of the back wall to the panel.
2. Sew the base edge 1 st to 1 st across all 22 sts.
3. Sew up each side of the back wall, 1 round to 1 row.
4. Sew the rim across, catching the rev sc.
The back wall is now flat against the panel and the rest of the pocket bulges forward.
Where neighboring pockets meet, sew their side walls together with 3 stitches just under the rim.
Tension: pull each stitch snug but not tight. If the panel ripples between the pins, you are pulling too hard.
Checkpoint: the panel should still measure 11.5 in (29.2 cm) across between the pockets. The two pockets in each row span 11 in (27.9 cm) together.
Border
Border gauge: 4 sc per inch along both edges. The panel rows run at 4.5 per inch, so the sides need fewer stitches than rows.
With MC and the RS facing, join in the last st of Row 45.
Rnd 1:
– Top: 3 sc in the corner st, sc in next 44 sts, 3 sc in the last st (corner).
– Left side: work across the 43 row-ends of Rows 44–2 as [sc in next 13 row-ends, skip 1] 3 times, then sc in the last row-end. (40 sc)
– Bottom: 3 sc in the first foundation ch (corner), sc in next 44 ch, 3 sc in the last ch (corner).
– Right side: work Rows 2–44 the same way as the left side. (40 sc)
– Join.
Rnd 1 total: 4 corners × 3 sc + 2 × 44 + 2 × 40 = 12 + 88 + 80 = 180 sts
Rnd 2: Ch 1, rev sc in each st around, join. (180 sts) Fasten off.
Why the math works:
– The top and bottom each have 46 panel sts, which is 11.5 in at 4 sts per inch. The 44 straight sts plus the two end sts carry that over 1:1, and the extra 2 sc at each corner let the border turn without cupping.
– Each side is 10 in long. At 4 sc per inch that calls for 40 sc. Working into every one of the 43 row-ends would make the sides ruffle.
Attach the tabs: fold each tab in half.
– Center the tabs on panel sts 10–15 and sts 32–37. Each tab is then centered 3 in (7.6 cm) in from its side edge, directly above a pocket column.
– Sew one end to the RS in the top margin and the other end to the WS directly behind it, each overlapping 1.25 in (3.2 cm).
– This leaves a loop about 3.7 in (9.4 cm) around, which slides easily over the dowel.
Final Blocking
- Lightly mist the whole organizer with water.
- Pin the panel flat to 12.3 in × 10.8 in (31.2 cm × 27.4 cm).
- Slip a plastic-wrapped roll into each pocket so the walls set square.
- Steam the lattice lightly from 1 in (2.5 cm) above, without pressing.
- Let it dry completely, then remove the pins and rolls.
Final Quality-Control Checklist
- [ ] Every pocket has 80 sts per round and a 3.8 in (9.7 cm) wall.
- [ ] The lattice diamonds are even, and every line has 12 steps.
- [ ] All back walls are sewn flat on all four edges.
- [ ] The pocket rims line up in each row.
- [ ] The border has 180 sts and the corners lie flat.
- [ ] The tabs are 24 sts (6 in / 15.2 cm) apart, center to center.
- [ ] All tails are woven in on the WS or inside the pockets.
Troubleshooting
- Roll won’t fit: your gauge is too tight. Remake the pocket with a 5.0 mm hook.
- Pocket sags forward: the top rim isn’t sewn down. Whipstitch the rim of the back wall.
- Lattice puckers: your surface slip stitches are too short. Rework them looser.
- Border sides ruffle: you’ve worked too many row-ends. Recount to 40 sc per side.
- Panel curls at the top: the tabs are pulling it. Re-sew them with the full 1.25 in (3.2 cm) overlap on both faces.
Care
Hand wash in cool water, press out the water in a towel, and dry flat with rolls inside the pockets to hold their shape. Avoid the dryer, which can distort the lattice.

Final Notes
Each stage depends on the one before it:
– The 16 sc × 18 rows gauge gives a 5.5 in × 4.4 in (14.0 cm × 11.2 cm) base.
– That base gives an 80-stitch wall, 20 in (50.8 cm) around, which fits a standard roll.
– Each 22-stitch back wall sews 1:1 onto 22 panel stitches.
– The 46-stitch, 45-row panel measures 11.5 in × 10 in (29.2 cm × 25.4 cm).
– A 180-stitch border brings it to 12.3 in × 10.8 in (31.2 cm × 27.4 cm).
Check these numbers as you go and your four pockets will hang straight and line up. Happy crocheting!