

This hanging wall basket is shaped like a soft teardrop. It has a rounded oval bottom, a deep open front, and a back panel that narrows into a slim hanging loop. A cream pocket with vertical ribs sits on the front and holds glasses or a charger. The main basket holds a phone, a comb, or small bottles.
The body is warm terracotta and the pocket is natural cream. Dense single crochet in bulky yarn gives the basket a firm, pebbly texture, so it keeps its shape on a hook. The style is simple and modern, and it works by a bed, in a bathroom, or by the door.
This pattern uses US crochet terms. The finished basket is about 7.3 in (18.5 cm) wide and 10.5 in (26.7 cm) tall without the loop. With the loop, it is about 13 in (33.0 cm) tall.
You crochet an oval base, then work the walls in even rounds. Next, you work rows over the back half only, decreasing at both edges to make the teardrop top, and that panel narrows into a strap. One border goes around the whole opening. Last, you crochet a separate ribbed pocket sideways and sew it on.
Finished Size and Construction
- Finished size: 7.3 in (18.5 cm) wide x 10.5 in (26.7 cm) tall, or 13 in (33.0 cm) with the loop
- Skill level: Easy / advanced beginner
- Terminology: US crochet terms
- Yarn weight: Bulky (#5)
- Hook: 6 mm (US J-10)
- Number of pieces: One item made from 2 crocheted parts. The body is one continuous piece (base, walls, back panel, and strap), and the pocket is a separate appliqué.
- Layout: Single basket with the pocket centered on the front wall
- Base size: 6.25 in x 2.5 in (15.9 cm x 6.4 cm)
- Pocket size: 5.5 in (14.0 cm) wide x 3.7 in (9.4 cm) tall
- Size before border: Front wall 5.5 in (14.0 cm) tall above the base ridge
- Border depth: about 0.25 in (0.6 cm), 2 rounds
Materials
Yarn: Use a bulky cotton or cotton-blend yarn with clear stitch definition. Cotton holds its structure better than acrylic and sags less when the basket is full. You can also hold two strands of worsted together, but check gauge first.
- Terracotta (main color): 150 g, about 210 m (230 yd)
- Cream (pocket): 25 g, about 35 m (38 yd)
These quantities include a margin of about 15% for swatching and adjustments.
Tools:
- 6 mm (US J-10) crochet hook
- 4 locking stitch markers
- Tapestry needle
- Scissors and measuring tape
- Rust-proof pins
- Spray bottle
Abbreviations (US Terms)
- ch – chain
- sc – single crochet
- sl st – slip stitch
- st(s) – stitch(es)
- rnd – round
- inc – 2 sc in the same stitch
- blo – back loop only
- RS / WS – right side / wrong side
Special stitches
- sc blo: Work a sc into the back loop only. When you work it in rows, it leaves a raised ridge, and those ridges make the vertical ribbing.
- sc2tog: Insert the hook in the next stitch and pull up a loop. Do the same in the following stitch. Yarn over and pull through all 3 loops. This turns 2 stitches into 1.
Gauge and Checkpoints
Gauge: 12 sts and 13 rnds of sc = 4 in (10.2 cm).
Make the base first and use it as your test piece. The walls copy the base’s perimeter, so fix any size problem before you go on.
- After Base Rnd 4: 44 sts, 6.25 in x 2.5 in (15.9 cm x 6.4 cm)
- After Wall Rnd 22: front wall 5.5 in (14.0 cm) tall, flattened width 7.3 in (18.5 cm)
- After Back Panel Row 12: panel 3.7 in (9.4 cm) tall
- After Strap Row 28: strap 4.9 in (12.4 cm) long
- Pocket: 5.5 in x 3.7 in (14.0 cm x 9.4 cm)
If the base is too big, switch to a 5.5 mm hook. If it’s too small, switch to a 6.5 mm hook. Firm, even tension matters more than an exact size, because a loose basket will sag.
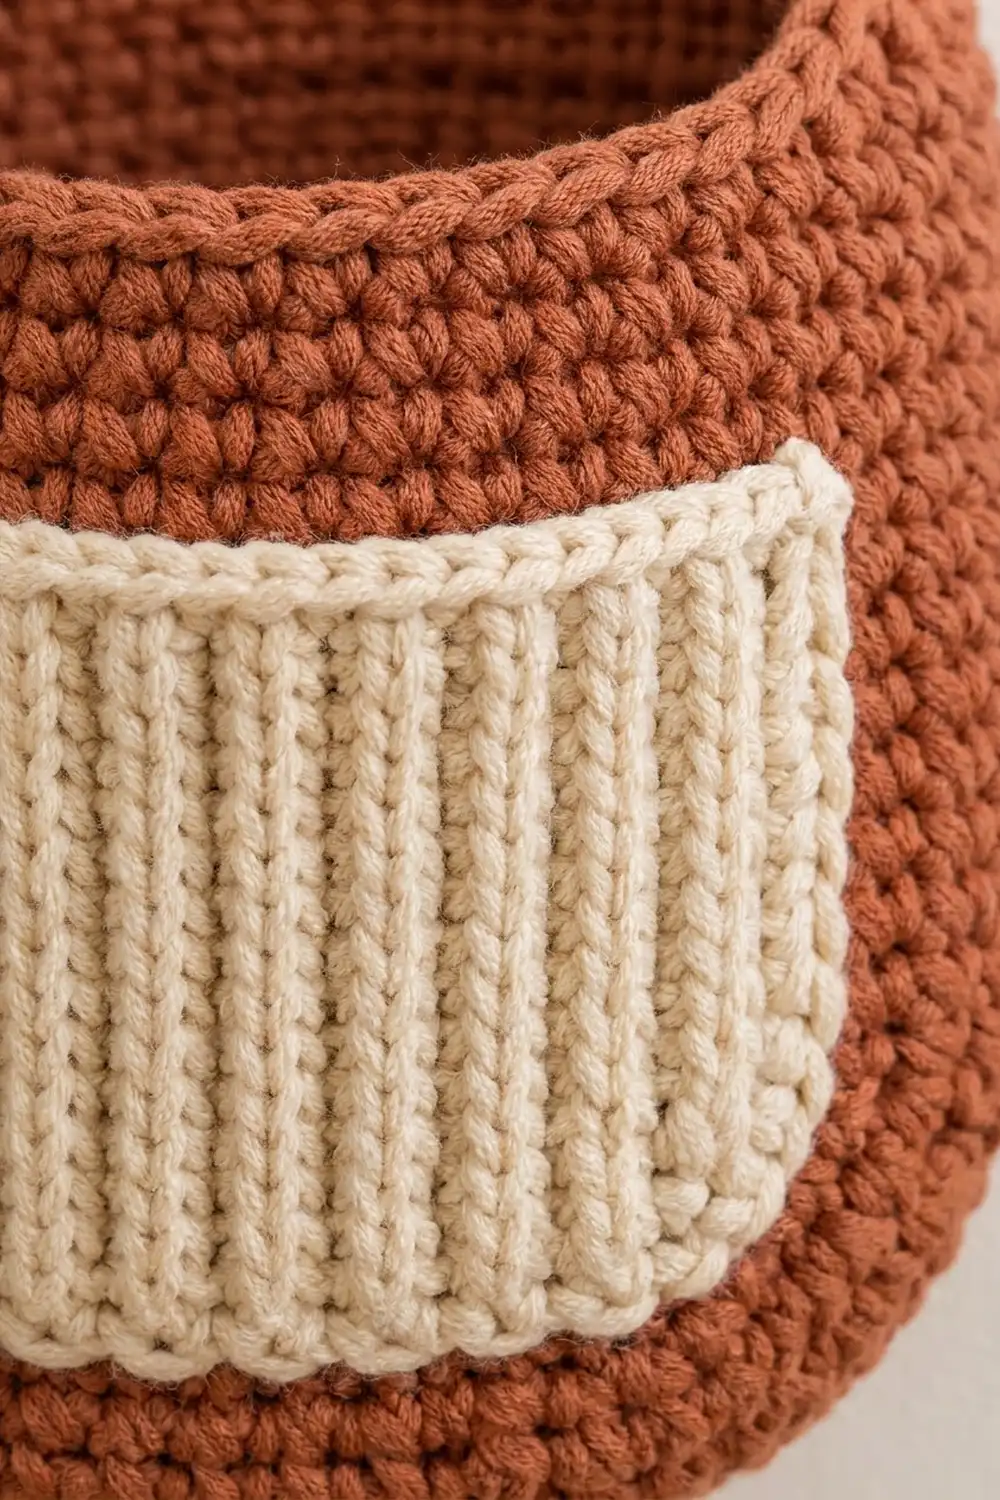
Basket Body
Oval Base
Use terracotta. Work in continuous rounds without joining, and move the marker up each round.
Foundation: Ch 13.
Rnd 1: Sc in 2nd ch from hook, sc in next 10 ch, 3 sc in last ch. Continue along the other side of the chain: sc in next 10 ch, then 2 sc in the first ch (it already holds 1 sc). (26 sts)
Rnd 2: Inc in next st, sc in next 10 sts, inc in next 3 sts, sc in next 10 sts, inc in next 2 sts. (32 sts)
Rnd 3: [Sc in next st, inc] once, sc in next 10 sts, [sc in next st, inc] 3 times, sc in next 10 sts, [sc in next st, inc] 2 times. (38 sts)
Rnd 4: [Sc in next 2 sts, inc] once, sc in next 10 sts, [sc in next 2 sts, inc] 3 times, sc in next 10 sts, [sc in next 2 sts, inc] 2 times. (44 sts)
Checkpoint: the base lies flat at 6.25 in x 2.5 in (15.9 cm x 6.4 cm). If it cups, your tension is too tight. If it ripples, it’s too loose.
Walls
Rnd 5: Sc blo in each st around. (44 sts) This makes the turning ridge that defines the oval bottom.
Rnds 6–22: Sc in each st around. (44 sts each round)
You now have 18 wall rounds, about 5.5 in (14.0 cm) tall. Don’t fasten off.
Mark the halves: Flatten the basket so the long sides of the base are the front and back. Put marker A at the left side fold and marker B at the right side fold. There should be 22 sts on each half. If needed, sc to marker A along the back half.
Back Panel (Teardrop Top)
Now work in rows over the 22 back stitches only. The 22 front stitches stay unworked and become the front rim.
Row 1 (RS): Sc in next 22 sts, ending at marker B. Turn. (22 sts)
Rows 2–3: Ch 1 (does not count as a st), sc in each st across. Turn. (22 sts)
Row 4: Ch 1, sc2tog, sc in each st to the last 2 sts, sc2tog. Turn. (20 sts)
Rows 5–11: Repeat Row 4. The counts are 18, 16, 14, 12, 10, 8, and then 6 sts after Row 11.
Row 12: Ch 1, sc2tog, sc in next 2 sts, sc2tog. Turn. (4 sts)
Checkpoint: the panel is 3.7 in (9.4 cm) tall, and its sides curve smoothly inward.
Hanging Strap
Rows 13–28: Ch 1, sc in each st across. Turn. (4 sts each row)
The strap is 16 rows, about 4.9 in (12.4 cm) long. Don’t fasten off. Go straight on to the border.
Use cream. You work the pocket sideways, so each row runs from the top edge to the bottom edge. Work every stitch after the foundation in blo, including increases and decreases, to make vertical ribs. All the shaping happens at the bottom end of the rows. That rounds the two lower corners and keeps the top edge straight.
Foundation: Ch 9.
Row 1 (top to bottom): Sc in 2nd ch from hook and in each ch across. Turn. (8 sts)
Row 2 (bottom to top): Ch 1, 2 sc blo in first st, sc blo in next 7 sts. Turn. (9 sts)
Row 3 (top to bottom): Ch 1, sc blo in next 8 sts, 2 sc blo in last st. Turn. (10 sts)
Row 4 (bottom to top): Ch 1, 2 sc blo in first st, sc blo in next 9 sts. Turn. (11 sts)
Rows 5–15: Ch 1, sc blo in each st across. Turn. (11 sts each row)
Row 16 (bottom to top): Ch 1, sc2tog in blo, sc blo in next 9 sts. Turn. (10 sts)
Row 17 (top to bottom): Ch 1, sc blo in next 8 sts, sc2tog in blo. Turn. (9 sts)
Row 18 (bottom to top): Ch 1, sc2tog in blo, sc blo in next 7 sts. (8 sts)
Fasten off and leave a 30 in (76.2 cm) tail for sewing.
Checkpoint: the pocket is 18 rows wide, about 5.5 in (14.0 cm), and 11 sts tall at the center, about 3.7 in (9.4 cm). The row counts are symmetric (8, 9, 10, 11 … 11, 10, 9, 8), so both bottom corners curve the same way.
Border
Border gauge matches the body: 1 sc per stitch along stitch tops, and 1 sc per row end along the sides. A sc row is almost as tall as a stitch is wide, so one stitch per row lies flat.
Rnd 1 (RS): With the strap loop still on your hook, ch 1 and work around the whole opening:
- Strap tip: 2 sc in first st, sc in next 2 sts, 2 sc in last st (6 sts)
- First strap edge: 1 sc in each row end, Rows 28–13 (16 sts)
- First panel edge: 1 sc in each row end, Rows 12–1 (12 sts)
- Front rim: 1 sc in each of the 22 unworked front sts (22 sts)
- Second panel edge: 1 sc in each row end, Rows 1–12 (12 sts)
- Second strap edge: 1 sc in each row end, Rows 13–28 (16 sts)
Sl st to the first sc. Total: 6 + 16 + 12 + 22 + 12 + 16 = 84 sts.
Rnd 2: Sl st loosely in each st around. (84 sts) Fasten off.
Why the math works: The front rim keeps the same 22 stitches as the front half of every wall round, so it won’t flare or pucker. Each side edge gets one stitch per row: 12 panel rows and 16 strap rows per side. The only added stitches are the 2 increases at the strap tip, which turn its tight corners. The slip stitch round firms the edge without adding much height, so the front rim ends up about 5.75 in (14.6 cm) tall.
Form the loop: Fold the strap to the back so its tip meets the WS of the panel at Row 12. Whipstitch it through both layers with terracotta. The loop stands about 2.5 in (6.4 cm) tall.
Attach the pocket: Flatten the basket. Center the pocket on the front with its straight edge on top, 1 in (2.5 cm) below the rim, along Rnd 19. Pin it in place. Whipstitch the sides and curved bottom to the front wall only, keeping one hand inside the basket so you don’t catch the back. Leave the top open, and add 2 extra stitches at each top corner to reinforce them.
Final Blocking
- Mist the basket until it is damp, not soaked.
- Stuff the body firmly with a folded towel to round out the base and front.
- Smooth the back panel so both curved sides match.
- Press the pocket flat and straighten its ribs so they run vertically.
- Lay the loop flat and check that it is 2.5 in (6.4 cm) tall.
- Let it dry for at least 24 hours.
- Remove the towel and measure: 7.3 in (18.5 cm) wide and 10.5 in (26.7 cm) tall without the loop.
Final Quality-Control Checklist
- Base Rnd 4 has 44 sts and lies flat.
- Every wall round has 44 sts, and the blo ridge is even all around.
- The back panel goes 22, 20, 18, 16, 14, 12, 10, 8, 6, 4 sts, with smooth edges.
- The strap is 16 rows of 4 sts.
- Border Rnd 1 has 84 sc, and Rnd 2 has 84 sl sts.
- The pocket rows are 8, 9, 10, 11 (x12), 10, 9, 8.
- The pocket is centered and sewn on three sides through the front only.
- The loop is secure and holds weight.
- All ends are woven in on the WS.
Troubleshooting
The base cups: Increases are too tight. Rework them with a larger hook.
The walls flare: You’ve added stitches by mistake. Count to 44 every round.
The panel edges are jagged: Work each sc2tog right at the edge, not one stitch in.
The front rim ripples: You have more than 22 border sts across the front. Rework them one per stitch.
The ribs are horizontal: The pocket has been turned the wrong way. Sew it so the rows run vertically.
The basket sags: Use a 5.5 mm hook and tighter tension, and avoid heavy items.
Care
Hand wash in cool water with mild soap and press out the water gently. Dry flat with a towel stuffed inside to hold the shape.
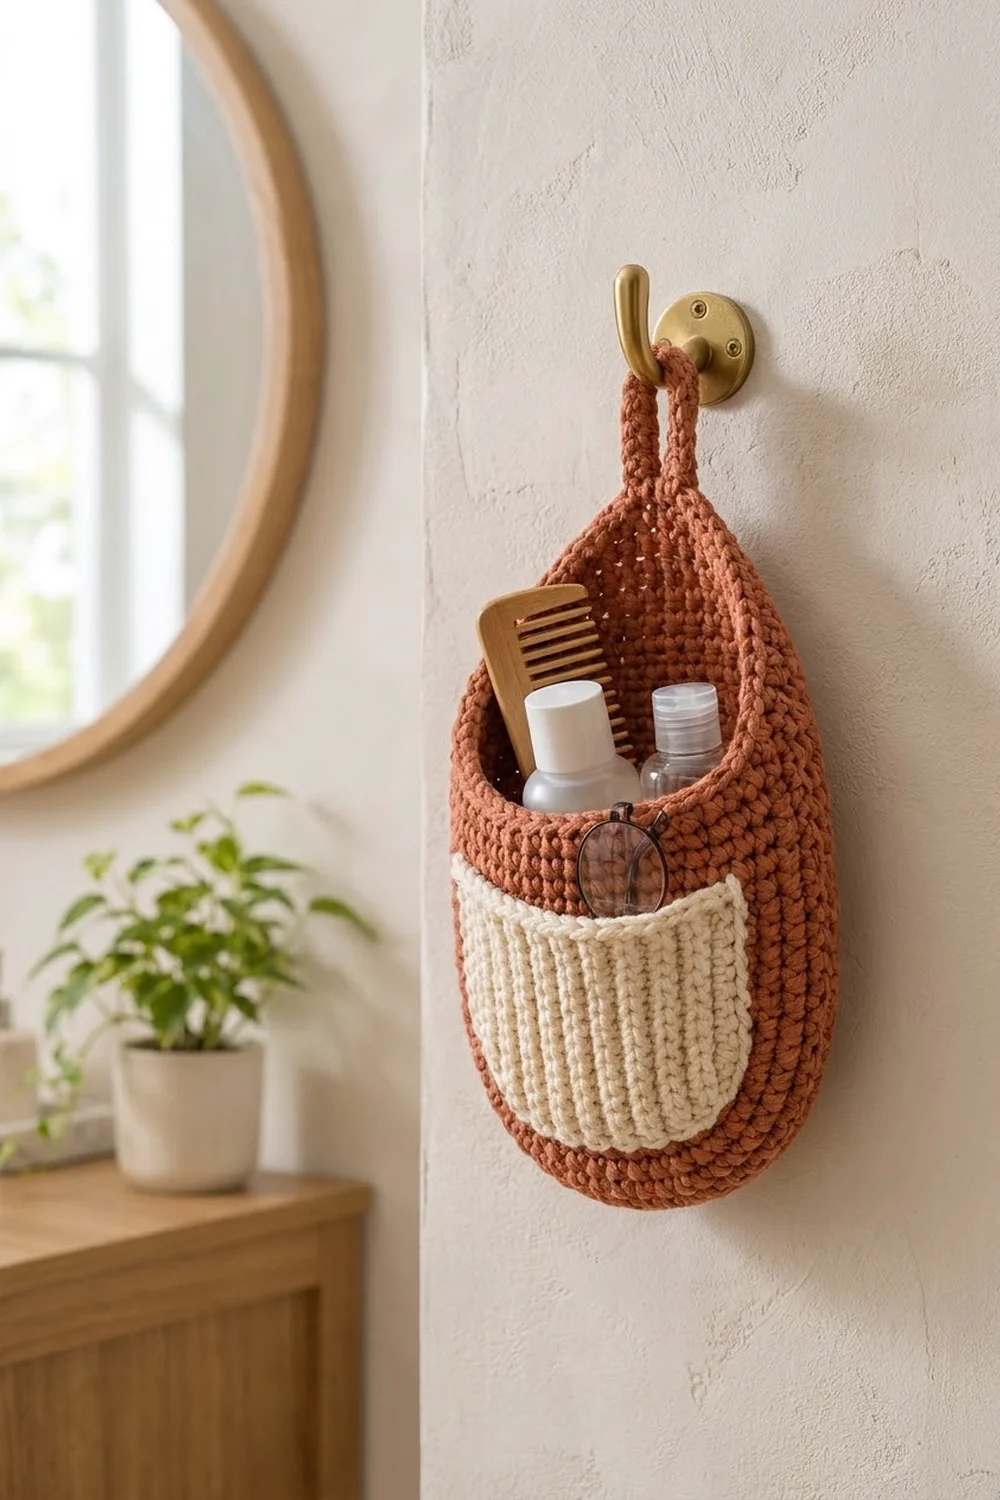
Final Notes
Everything comes from the base. At 12 sts and 13 rnds per 4 in (10.2 cm), the 44-st base measures 6.25 in x 2.5 in (15.9 cm x 6.4 cm). That gives walls 7.3 in (18.5 cm) wide and 5.5 in (14.0 cm) tall. The back panel adds 3.7 in (9.4 cm), and the 4.9 in (12.4 cm) strap folds into a 2.5 in (6.4 cm) loop. The 84-st border finishes the opening, and the 5.5 in x 3.7 in (14.0 cm x 9.4 cm) pocket completes the front. If each checkpoint matches, the basket will measure 10.5 in (26.7 cm) tall, or 13 in (33.0 cm) with the loop.
Happy crocheting!