

These curtain panels bring a soft, retro ripple into a room without blocking the light. Open double crochet posts and chain spaces zigzag up the fabric in sharp peaks and valleys, so daylight shows through every stripe.
The palette is two colors only: a deep plum and a dusty rose, worked in alternating 3-row stripes. A solid plum header band holds clip rings neatly, and a narrow single crochet edging keeps the long sides straight. The bottom edge is left pointed for a classic chevron finish.
This pattern uses US crochet terms. Each finished panel measures 31.25 in (79.4 cm) wide by 82 in (208.3 cm) long. Standard clip rings add about 2 in (5.1 cm), for a drop of about 84 in (213.4 cm) from the rod.
Each panel is one piece, worked bottom up in rows. You chain a foundation and work 159 rows of chevron lace. Then you add one straightening row to level the top, work a 9-row single crochet header, and edge both long sides. Make two panels for the pair shown.
Finished Size and Construction
- Finished size (one panel): 31.25 in x 82 in (79.4 cm x 208.3 cm)
- Skill level: Intermediate (easy stitches, long project, careful counting)
- Terminology: US crochet terms
- Yarn weight: Worsted (#4), cotton or cotton blend
- Hook: 5.0 mm (US H-8)
- Number of pieces: 2 identical panels, not joined
- Layout: Panels hang side by side on one rod
- Piece size before border: 30.25 in x 82 in (76.8 cm x 208.3 cm)
- Border depth: 0.5 in (1.3 cm) on each long side only
- Repeat: 24 stitches + 1, worked as 5 chevron valleys across
Materials
Choose a smooth, mercerized or combed cotton, or a cotton-acrylic blend. Cotton drapes well and does not stretch much when hanging. Avoid fuzzy yarns, because they blur the open lace. The estimates below assume about 200 m per 100 g.
- Color A, Plum: 650 g / 1,300 m per panel (1,300 g / 2,600 m for the pair)
- Color B, Dusty Rose: 520 g / 1,040 m per panel (1,040 g / 2,080 m for the pair)
These amounts include a margin of roughly 10% for swatching and tension differences. Buy all skeins of each color from the same dye lot.
Tools:
- 5.0 mm (US H-8) crochet hook
- Tapestry needle
- Stitch markers (at least 10)
- Measuring tape
- Blocking mats or a large clean floor area with towels, rustproof pins, and a spray bottle
- 9 curtain clip rings per panel (18 for the pair)
Abbreviations (US Terms)
- ch chain
- sl st slip stitch
- sc single crochet
- hdc half double crochet
- dc double crochet
- tr treble crochet
- dtr double treble crochet
- sk skip
- sp(s) space(s)
- st(s) stitch(es)
- rep repeat
- RS / WS right side / wrong side
Special stitch: dc3tog (double crochet 3 together). *Yarn over, insert hook in next dc, yarn over and pull up a loop, yarn over and pull through 2 loops; rep from * in each of the next 2 dc, skipping the ch-1 sps between them (4 loops on hook); yarn over and pull through all 4 loops. This forms the valley point and counts as 1 dc.
Posts: In this pattern, “post” means any dc, dc3tog, or turning chain that counts as a dc.
Gauge and Checkpoints
Lace gauge: One 24-st repeat = 6 in (15.2 cm) wide, measured flat between two valley points. 6 rows = 3 in (7.6 cm) tall.
Single crochet gauge: 16 sc and 16 rows = 4 in (10.2 cm).
Test swatch: Ch 51. Work Row 1 as written below, but work the * section 1 time instead of 4 times (2 valleys, 1 full peak). Each row then has 24 posts, 22 ch-1 sps, and 1 ch-3 sp (49 sts). Work 6 rows, block lightly, and measure. The swatch should be 12.25 in (31.1 cm) wide and 3 in (7.6 cm) tall.
- If one repeat measures more than 6.25 in (15.9 cm), go down half a hook size.
- If one repeat measures less than 5.75 in (14.6 cm), go up half a hook size.
- If the width is right but the rows are too tall, pull each dc loop snug before finishing the stitch.
Checkpoints while working (measure on a flat surface, from a bottom point straight up):
- After Row 12: 6 in (15.2 cm)
- After Row 60: 30 in (76.2 cm)
- After Row 120: 60 in (152.4 cm)
- After Row 159: 79.5 in (201.9 cm)
- Width at every checkpoint: 30.25 in (76.8 cm)
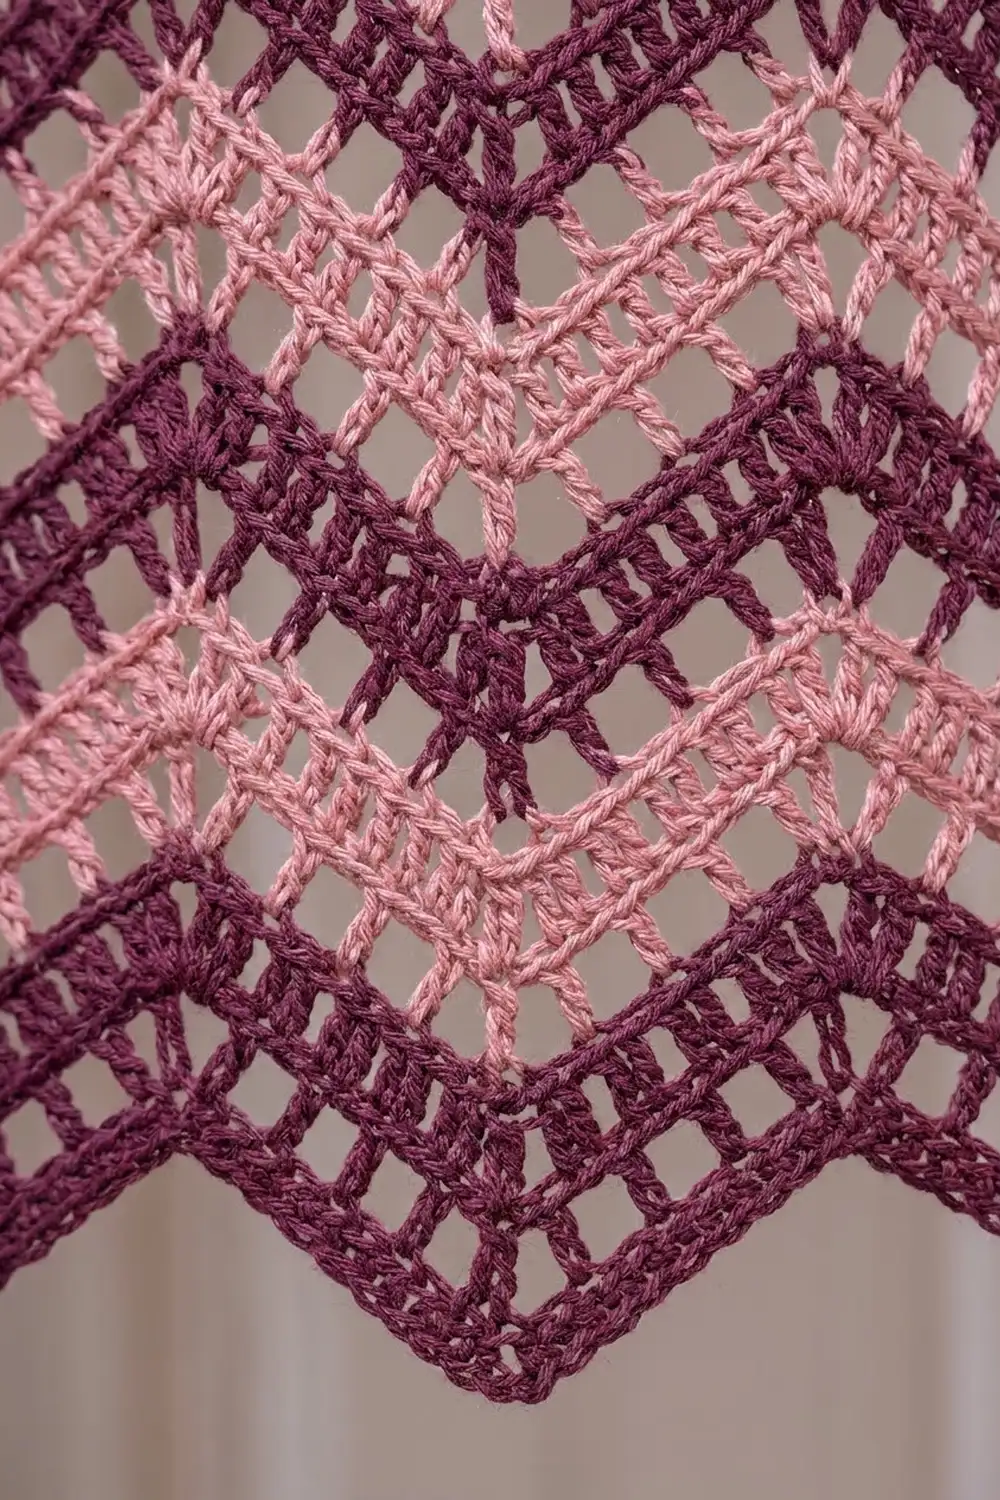
Panel Pattern
Stripe sequence: Rows 1–3 in A, Rows 4–6 in B. Work these 6 rows 26 times in total (Rows 1–156), then work Rows 157–159 in A. To change color, work the last yarn-over of the final dc in the new color. Cut the old color, leaving a 6 in (15.2 cm) tail to weave into the side edge later. The edging hides it.
Foundation: With A, ch 123.
Row 1: Dc in 5th ch from hook (skipped 4 ch count as dc and ch-1 sp). *[Ch 1, sk 1 ch, dc in next ch] 10 times, ch 3, sk 3 ch, dc in next ch; rep from * 3 more times. [Ch 1, sk 1 ch, dc in next ch] 10 times, ch 1, sk 1 ch, dc in last ch. Turn.
Count: 57 dc, 52 ch-1 sps, 4 ch-3 sps (121 sts). Place a marker in the 6th dc of each 10-dc section. These 5 marked dc are the valley centers.
Row 2 (pattern row): Ch 4 (counts as dc and ch-1 sp), dc in first dc at base of ch-4, ch 1, [dc in next dc, ch 1] 4 times, dc3tog over next 3 dc (the center leg goes in the marked valley dc; move the marker up). *Ch 1, [dc in next dc, ch 1] 4 times, (dc, ch 3, dc) in next ch-3 sp, ch 1, [dc in next dc, ch 1] 4 times, dc3tog over next 3 dc; rep from * 3 more times. Ch 1, [dc in next dc, ch 1] 4 times, dc in 3rd ch of turning ch, ch 1, dc in same ch. Turn.
Count: 52 dc and 5 dc3tog (57 posts), 52 ch-1 sps, 4 ch-3 sps (121 sts).
How the shaping balances:
– Each dc3tog removes 2 posts, so the 5 valleys remove 10.
– Each (dc, ch 3, dc) peak adds 2 posts, so the 4 peaks add 8.
– Each edge works 2 posts into 1, so the 2 edges add 2.
The total stays at 57 posts in every row, and the chevrons sharpen from Row 2 onward. The foundation edge bends into points as soon as Row 2 is done.
Rows 3–159: Rep Row 2, following the stripe sequence. Every row has 57 posts, 52 ch-1 sps, and 4 ch-3 sps (121 sts). Check the count at the end of each stripe and the measurement at each checkpoint. Do not fasten off after Row 159.
Straightening Row and Header
The straightening row fills each valley with taller stitches so the top edge becomes level with the peaks. Work 1 st into each dc and each ch-1 sp, and 3 sts into each ch-3 sp.
Row 160 (A): Ch 1, sc in first dc, sc in next ch-1 sp. Work the 21-st valley sequence below 5 times across. Between sequences, work 3 sc in each ch-3 sp. End with sc in next ch-1 sp, sc in 3rd ch of turning ch. Turn.
Valley sequence (21 sts, starting in the dc before the descent and ending in the dc after the ascent):
sc, sc, hdc, hdc, dc, dc, tr, tr, tr, dtr, dtr (in the dc3tog), dtr, tr, tr, tr, dc, dc, hdc, hdc, sc, sc.
The sequence alternates between dc and ch-1 sps, so the 11th st always lands in the dc3tog.
Count: 2 + (21 x 5) + (3 x 4) + 2 = 121 sts. The row adds 0.25 in (0.6 cm) at the peak columns, so the panel now measures 79.75 in (202.6 cm).
Rows 161–169 (A): Ch 1, sc in each st across. Turn. Count: 121 sc each row.
The 9 header rows add 2.25 in (5.7 cm). The panel now measures 82 in (208.3 cm) long and 30.25 in (76.8 cm) wide. Fasten off.
Clip placement: Attach 9 clip rings along the top edge: one at each corner and one every 15 sts, which is every 3.75 in (9.5 cm).
Make All Pieces
Make 2 panels. Each panel uses 81 lace rows plus 10 header rows in A, and 78 lace rows in B. The panels are never joined. Each one hangs on its own clip rings.
Layout on the rod (viewed from inside the room):
[ Panel 1 ]  [ Panel 2 ]
  window opening between
The two flat panels together span 62.5 in (158.8 cm) after borders. Use a rod at least that long, or longer if you want the panels to stack off the glass when open.
Border (Side Edging)
Border gauge: 16 sc = 4 in (10.2 cm), worked into row ends.
The border goes on the two long sides only. The bottom edge stays unbordered so the chevron points remain crisp, and the header already finishes the top.
Side Row 1 (A): With RS facing, join A at the top corner of one long side. Work down the row ends: 1 sc in each of the 10 sc row ends (Rows 169–160), then 2 sc in each of the 159 dc row ends (Rows 159–1). Turn.
Count: 10 + (159 x 2) = 328 sc.
Side Row 2: Ch 1, sc in each sc across. Fasten off. Count: 328 sc.
Repeat Side Rows 1–2 on the other long side. This time start at the bottom corner and work up: 2 sc in each of the 159 dc row ends, then 1 sc in each of the 10 sc row ends. Count: 328 sc on each row.
Why the math works:
– Each lace row is 0.5 in (1.3 cm) tall. 2 sc in each of those row ends matches the border gauge of 4 sc per inch.
– Each sc row is 0.25 in (0.6 cm) tall. 1 sc per row end is also 4 sc per inch.
– 328 sc divided by 4 is 82 in (208.3 cm), which is exactly the panel length, so the edge will neither ruffle nor pull in.
– The 2 border rows add 0.5 in (1.3 cm) per side, bringing the width from 30.25 in (76.8 cm) to 31.25 in (79.4 cm).
Weave all stripe tails in through the border stitches.
Final Blocking
- Weave in any remaining ends before blocking.
- Soak the panel in cool water for 10 minutes, or spray it until it is damp all the way through.
- Roll the panel in towels to press out the water. Do not wring it.
- Lay the panel flat on mats or towels, RS up.
- Pin the two long sides straight, 31.25 in (79.4 cm) apart.
- Pin the header straight, then measure 82 in (208.3 cm) down each side and pin.
- Pin each of the 5 bottom points so all the points sit on one straight line. Open each ch-3 peak sp evenly.
- Let the panel dry completely before unpinning.
- Repeat for the second panel, matching it to the first.
Final Quality-Control Checklist
- Every lace row has 57 posts and 121 sts.
- The valley dc3tog clusters line up vertically in 5 straight columns.
- The peaks line up vertically in 4 columns, with a half-peak at each edge.
- Stripes alternate 3 rows A and 3 rows B, beginning and ending with A.
- The straightening row and all 9 header rows have 121 sts each.
- Each side border has 328 sc in both rows.
- The panel measures 31.25 in x 82 in (79.4 cm x 208.3 cm).
- The two panels match within 0.5 in (1.3 cm) in length.
- No tails show on the RS.
Troubleshooting
Chevrons look rounded instead of pointed. Make sure the center leg of the dc3tog goes into the valley post, and work each peak into the ch-3 sp, not into a stitch.
The stitch count drifts. Usually the last edge was missed. Both edges get 2 dc separated by ch 1, worked into a single post.
Side edges wave. Check that every lace row starts with ch 4 and ends in the turning ch. Use 2 sc per dc row end, never 3.
The top edge is not level after Row 160. Check that the 11th st of each valley sequence sits in the dc3tog. Work the tall stitches exactly as written and do not shorten them.
The panel grows longer when hung. Cotton relaxes slightly. Measure after blocking and after hanging for 24 hours. If needed, remove the last 2 header rows on both panels.
The panels differ in length. Compare row counts first, then gauge. Re-block the longer panel with firmer pinning.
Care
Hand wash, or machine wash on a cool, gentle cycle in a mesh laundry bag. Reshape and dry flat. Do not hang the panels wet, because the weight will stretch the lace.
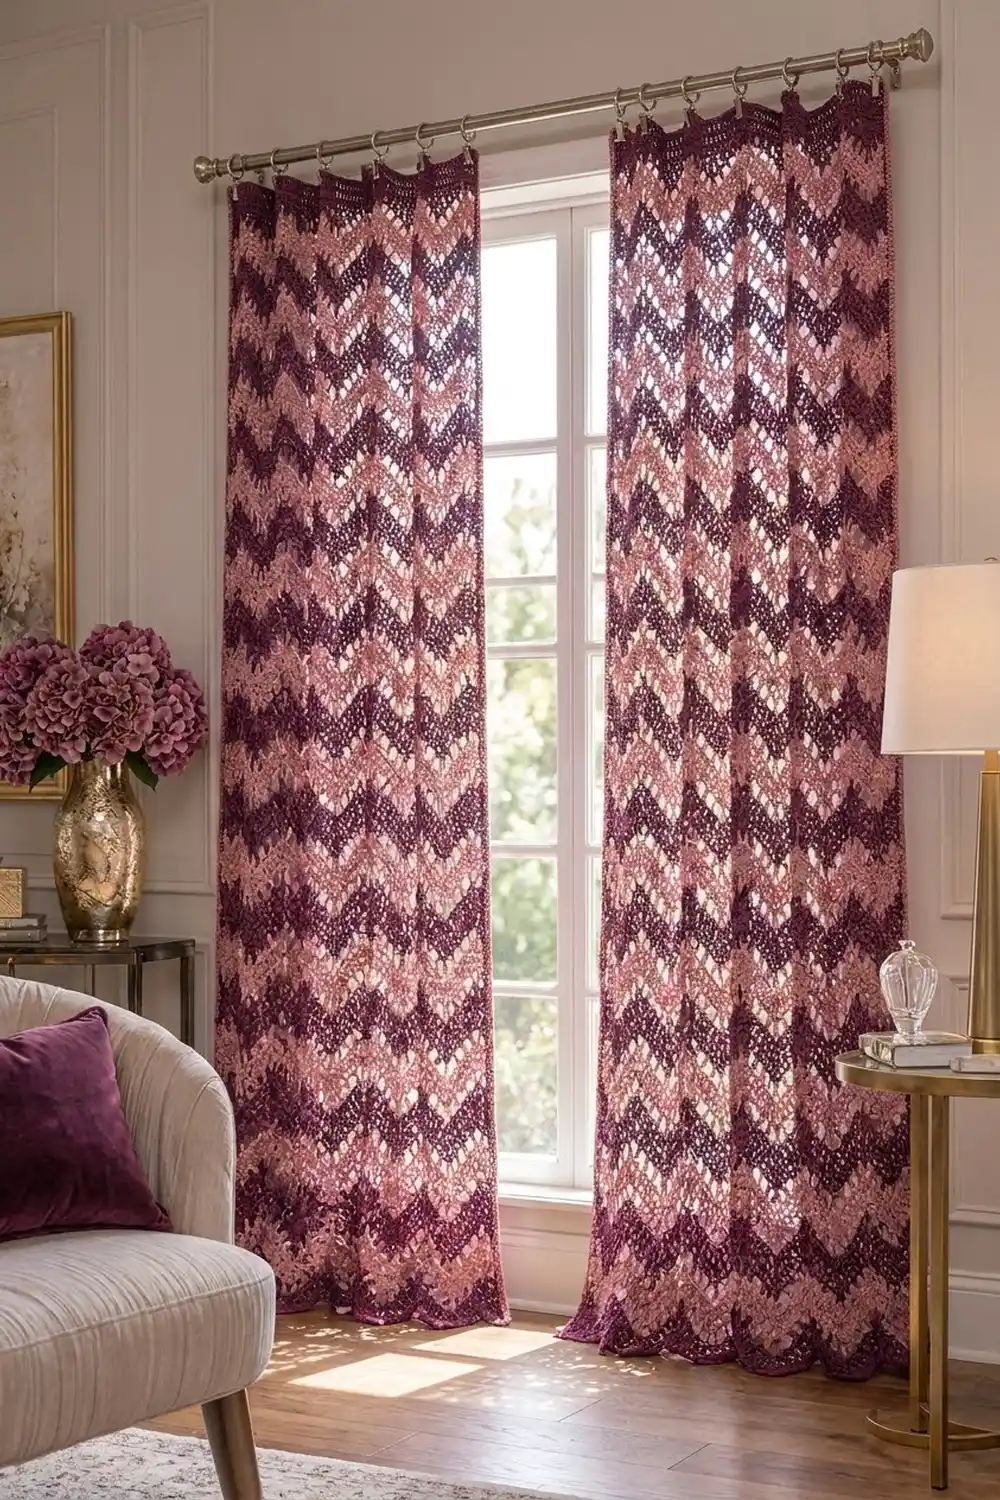
Final Notes
Here is the full measurement chain:
– One 24-st repeat equals 6 in (15.2 cm), so 5 repeats plus 1 st give 30.25 in (76.8 cm).
– Six rows equal 3 in (7.6 cm), so 159 rows give 79.5 in (201.9 cm).
– The straightening row and 9-row header add 2.5 in (6.4 cm), for a length of 82 in (208.3 cm).
– Two border rows per side bring the width to 31.25 in (79.4 cm).
– 328 sc per side match the 82 in (208.3 cm) length exactly.
Keep your gauge steady and check your counts at each stripe, and both panels will hang straight and even.
Happy crocheting!