

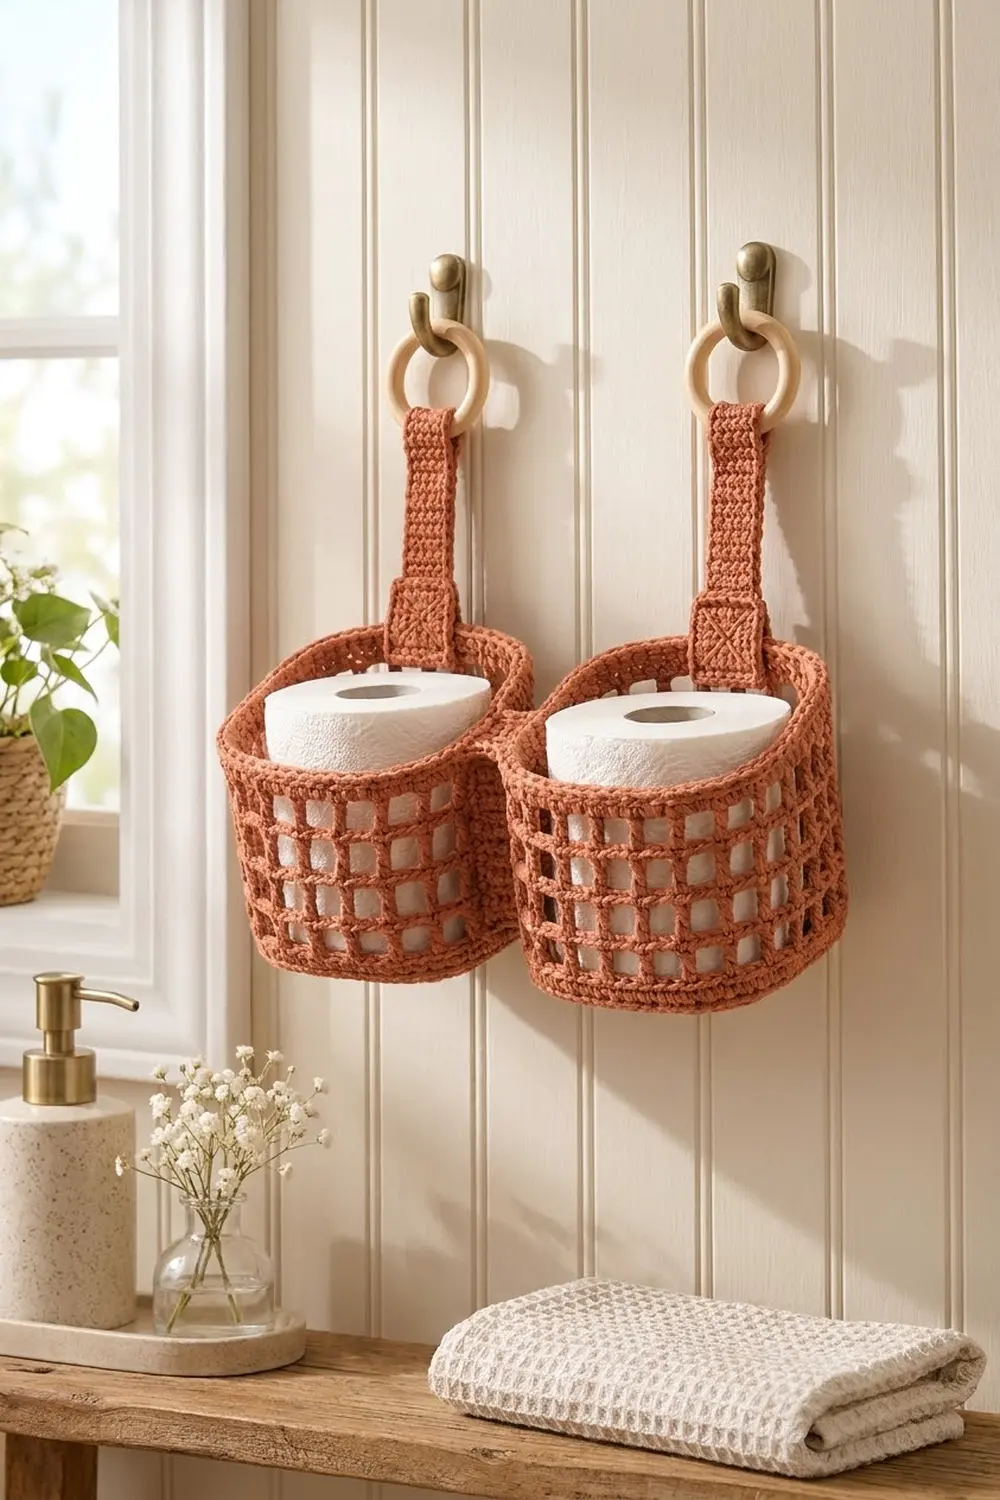
The Terracotta Twin is a double hanging holder made from two open-mesh baskets joined side by side. Each basket holds one standard toilet roll. The pair hangs from two wooden rings on wall hooks, which keeps spare rolls off the floor and within reach.
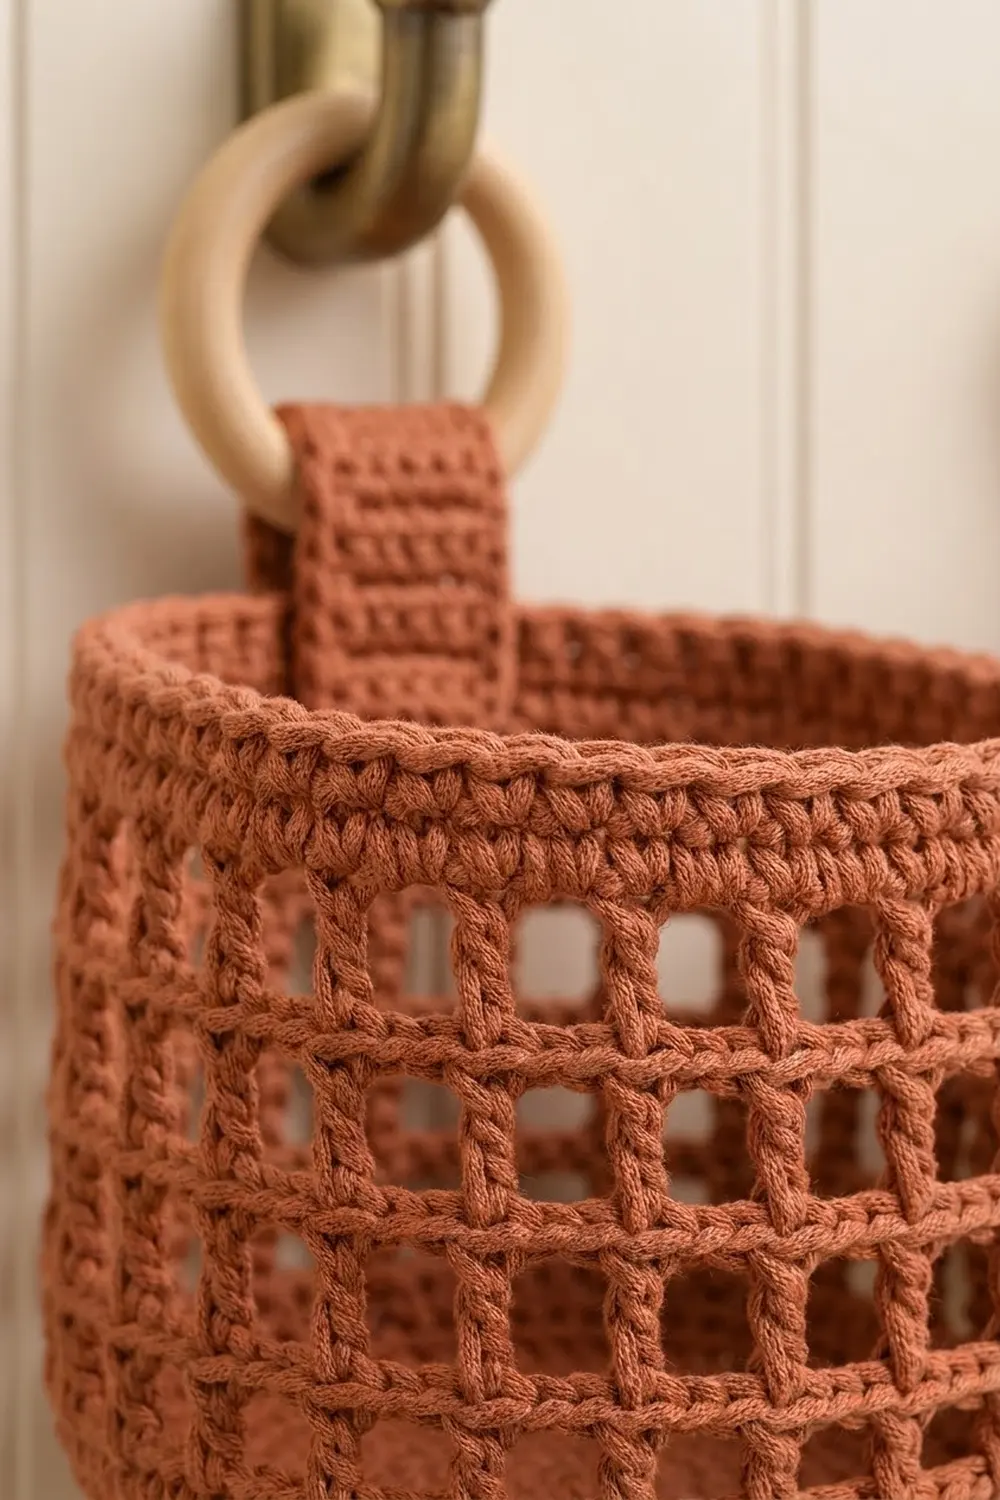
The whole piece is worked in one warm terracotta (rust) shade. The bases are solid single crochet in joined concentric rounds, the walls are a square filet-style mesh, and the top rim is a thick corded edge. The look is clean and a little rustic, and it suits a bathroom with natural wood and linen.
This pattern uses US crochet terms. The finished holder measures about 12⅓ in (31.3 cm) wide, 5½ in (14.0 cm) deep and 4¾ in (12.1 cm) tall at the basket rim. The straps add another 4⅓ in (11.0 cm) above the rim, plus the rings.
Construction is simple. You crochet each basket base in the round, turn the wall up with a back-loop round and work mesh rounds straight up. Two small solid panels join the baskets, and a corded rim finishes each top edge. Last, two straps fold around wooden rings and are sewn to the back walls.
Finished Size and Construction
- Finished size: 12⅓ in (31.3 cm) wide x 5½ in (14.0 cm) deep x 4¾ in (12.1 cm) tall
- Skill level: Easy to intermediate
- Terminology: US crochet terms
- Yarn weight: Bulky (#5) cotton or cotton blend
- Hook: 5.5 mm (I-9)
- Number of pieces: 6 crocheted pieces (2 baskets, 2 bridge panels, 2 straps) plus 2 wooden rings
- Layout: 2 baskets side by side in 1 row, with the bridge between them
- Piece size: each base is 5⅓ in (13.5 cm) square; each wall has 16 sts per side
- Size before border: each basket is 5⅓ in (13.5 cm) square x 4 in (10.2 cm) tall
- Border depth: 2 rim rounds, ¾ in (1.9 cm) tall including the cord
Materials
Choose a firm, smooth bulky cotton or cotton blend. Cotton holds its shape when the baskets are full and copes with bathroom humidity. Avoid fuzzy or very stretchy yarn, because the mesh walls need crisp bars to stand up.
- Terracotta (rust): 220 g / 264 m (289 yd), based on a yarn of about 120 m (131 yd) per 100 g
Tools:
- 5.5 mm (I-9) crochet hook
- 2 wooden rings, 2 in (5.1 cm) outer diameter
- Tapestry needle
- 4 locking stitch markers
- Rigid ruler or tape measure
- Spray bottle and pins for blocking
The quantity includes a margin of roughly 25 percent over the measured total of about 174 g, so you won’t run short if your tension is a little loose.
Abbreviations (US Terms)
- ch – chain
- sl st – slip stitch
- sc – single crochet
- dc – double crochet
- BLO – back loop only
- sk – skip
- sp – space
- st(s) – stitch(es)
- rev sc – reverse single crochet (crab stitch)
Special stitch – rev sc: Work from left to right (if you crochet right-handed). Insert the hook into the next st to the right, yarn over, pull up a loop, then yarn over and pull through both loops. This twists each stitch, which creates the corded rim.
Corner group: 3 sc worked in one st. The middle sc of the group is the corner st for the next round.
Gauge and Checkpoints
Gauge: 12 sc and 12 sc rows = 4 in (10.2 cm). One mesh round (dc with ch 1) = ¾ in (1.9 cm) tall.
Make one base first and measure it before you commit to the full project. The whole size chain depends on 3 sc per inch.
- After Rnd 4: 8 sts per side, 2⅔ in (6.8 cm) across
- After Rnd 6: 12 sts per side, 4 in (10.2 cm) across
- After Rnd 8: 16 sts per side, 5⅓ in (13.5 cm) across
- After Rnd 14: wall 4 in (10.2 cm) tall from the base edge
If your base is larger than 5⅓ in (13.5 cm), go down to a 5.0 mm (H-8) hook. If it is smaller than 5 in (12.7 cm), go up to a 6.0 mm (J-10) hook. Don’t add or remove rounds, because the wall, bridge and rim counts all depend on 64 stitches.
Pattern
Basket Base (make 2)
Work in joined rounds and don’t turn. The ch 1 at the start of each round does not count as a stitch.
Rnd 1: Make a magic ring, ch 1, work 8 sc in the ring, sl st to the first sc. (8 sts)
Rnd 2: Ch 1, 3 sc in next st, sc in next st, repeat from * 3 more times, sl st to the first sc. (16 sts: 4 corner groups + 1 sc per side)
Rnd 3: Ch 1, sc in each st around, working 3 sc in the middle sc of each corner group, sl st to the first sc. (24 sts: 4 corner groups + 3 sc per side)
Rnd 4: Repeat Rnd 3. (32 sts: 4 corner groups + 5 sc per side)
Rnd 5: Repeat Rnd 3. (40 sts: 4 corner groups + 7 sc per side)
Rnd 6: Repeat Rnd 3. (48 sts: 4 corner groups + 9 sc per side)
Rnd 7: Repeat Rnd 3. (56 sts: 4 corner groups + 11 sc per side)
Rnd 8: Repeat Rnd 3. (64 sts: 4 corner groups + 13 sc per side)
Each round adds exactly 8 sts, 2 at each corner. Count each side as its 13 straight sc plus one 3-sc corner group: that gives 16 sts per side, and 4 x 16 = 64. Place a marker in the middle sc of each corner group. The base should lie flat and show clear concentric rings.
Basket Wall (continue on each base)
Rnd 9 (turning round): Ch 1, sc in BLO of each st around, sl st to the first sc. (64 sts)
This round has no corner increases, so the fabric turns upward. The unworked front loops form a neat ridge around the base edge, and the corners soften into rounded curves.
Rnd 10 (first mesh round): Ch 4 (counts as dc + ch 1), sk next st, dc in next st, ch 1, sk next st, repeat from * 30 more times, sl st to the 3rd ch of the beginning ch-4. (32 dc + 32 ch-1 sps = 64 sts)
Rnds 11–14: Ch 4 (counts as dc + ch 1), sk next ch-1 sp, dc in next dc, ch 1, sk next ch-1 sp, repeat from * 30 more times, sl st to the 3rd ch of the beginning ch-4. (32 dc + 32 ch-1 sps = 64 sts)
Stacking dc on dc builds straight vertical bars, and the ch-1 spaces line up into square windows. That gives 32 windows per round, 8 per side, 5 rounds high. Fasten off and weave in the tail.
Checkpoint: Each basket is 5⅓ in (13.5 cm) square and 4 in (10.2 cm) tall. That is ⅓ in (0.8 cm) for Rnd 9 plus 3¾ in (9.5 cm) for the 5 mesh rounds.
Bridge Panel (make 2)
Row 1: Ch 5, sc in 2nd ch from hook and in each ch across, turn. (4 sts)
Rows 2–12: Ch 1, sc in each st across, turn. (4 sts)
Fasten off, leaving a 16 in (40.6 cm) tail. Each panel measures 1⅓ in (3.4 cm) wide x 4 in (10.2 cm) tall, which matches the wall height before the rim.
Strap (make 2)
Row 1: Ch 6, sc in 2nd ch from hook and in each ch across, turn. (5 sts)
Rows 2–24: Ch 1, sc in each st across, turn. (5 sts)
Fasten off, leaving a 20 in (50.8 cm) tail. Each strap measures 1⅔ in (4.2 cm) wide x 8 in (20.3 cm) long.
Make All Pieces
All pieces use the single terracotta color.
- Baskets (base + wall): 2, about 75 g each
- Bridge panels: 2, about 4 g each
- Straps: 2, about 8 g each
- Wooden rings: 2, purchased
Layout, seen from the front:
[ Ring ]                 [ Ring ]
[Strap ]                 [Strap ]
[ Basket A ][Bridge][ Basket B ]
Basket A and Basket B sit side by side. One bridge panel lines up with the front walls, and the other lines up with the back walls.
Joining
Join with the bridge panels, whipstitching through the outer loops of the wall bars. Join before you work the rim so the rim stays free.
- Place the baskets side by side with the base edges level and 1⅓ in (3.4 cm) between the facing walls.
- On the facing wall of each basket, mark the second dc column in from the front corner. Then mark the second dc column in from the back corner.
- Hold one bridge panel flush with the front walls. Each of its long edges has 12 row-ends.
- Sew one long edge to the marked front column of Basket A. Match 1 panel row-end to Rnd 9, then 2, 2, 3, 2 and 2 row-ends to Rnds 10–14. That is 1 + 11 = 12 row-ends over 6 rounds.
- Sew the other long edge to Basket B the same way.
- Repeat Steps 3–5 with the second panel on the back columns.
- Whipstitch the bottom edge of each panel (4 sts) to the base ridge of each basket where they meet.
Keep the whipstitch snug but not tight. Pull each stitch until the edges meet without puckering. If the panel ripples, you are fitting too many panel rows into one round.
Checkpoint: The joined holder measures 12⅓ in (31.3 cm) wide. That is 5½ in (14.0 cm) per basket, including wall thickness, plus 1⅓ in (3.4 cm) of bridge.
Border (Top Rim)
Border gauge: The rim uses the same 3 sc per inch as the base, so 16 sts per side keep each side at 5⅓ in (13.5 cm).
Work the rim on each basket separately. Join the yarn with a sl st in any dc at the top of Rnd 14.
Border Rnd 1: Ch 1, sc in dc, sc in next ch-1 sp, repeat from * around, sl st to the first sc. (32 sc in dc + 32 sc in sps = 64 sts; 16 per side)
Border Rnd 2: Ch 1, rev sc in each st around, sl st to the first st. (64 sts; 16 per side)
Fasten off and weave in the ends.
Why the math works: Rnd 14 has 32 dc and 32 ch-1 sps, 8 of each per side. One sc in each dc and in each space gives 8 + 8 = 16 sts per side. That matches the 16 sts per side of the base after Rnd 8, so the rim doesn’t flare or pull in. The rev sc round works 1 st into each st, so the count stays at 64, and the twist creates the thick corded top. The rim adds ¾ in (1.9 cm), which brings each basket to 4¾ in (12.1 cm) tall.
Attach the Straps
- Fold the top 5 rows (1⅔ in / 4.2 cm) of each strap over a wooden ring. Sew the fold down across the full width.
- Center the lower end of each strap on the inside of a back wall, overlapping 6 rows (2 in / 5.1 cm) down from the top of the rim.
- Sew around the overlap in a box, then stitch an X from corner to corner through the box. The boxed X carries the weight of full rolls.
That leaves 13 rows, or 4⅓ in (11.0 cm), of strap showing above the rim on each basket.
Final Blocking
- Fill each basket with a toilet roll or a folded towel so the walls stand straight.
- Mist the whole holder with water until it is damp but not soaked.
- Shape the walls square and press the corners into soft curves with your fingers.
- Line up the mesh bars so the windows are square and vertical.
- Lay the straps flat and pin them straight.
- Measure for 12⅓ in (31.3 cm) wide and 4¾ in (12.1 cm) tall, and ease into shape if needed.
- Let it dry completely, at least 24 hours, before you remove the fillers.
Final Quality-Control Checklist
- Each base has 64 sts and measures 5⅓ in (13.5 cm) across.
- Each wall has 5 mesh rounds with 32 square windows per round.
- The dc bars stack straight up with no spiral or slant.
- Both bridge panels have 12 rows and are sewn level with the base.
- Each rim has 64 sts and sits straight, with no flare.
- The holder measures 12⅓ in (31.3 cm) wide and 4¾ in (12.1 cm) tall.
- The straps are the same length, with 4⅓ in (11.0 cm) showing above the rim.
- The boxed-X stitching is secure, and all ends are woven in.
Troubleshooting
The base curls up like a bowl. Your corner increases are too tight. Check that you worked 3 sc in each corner st, or go up a hook size.
The base ripples. You added extra sts. Recount: each round should have exactly 8 more than the last.
The mesh bars lean. You worked the dc into the ch-1 sp. Always work the dc into the top of the dc below.
The walls slump. The yarn is too soft or your tension is loose. Go down a hook size, or block the basket over a roll.
The rim flares. You worked 2 sc into some spaces. Recount to 64.
The baskets tilt when hung. The straps are different lengths or off center. Re-sew them so both straps sit at the center of the back walls.
Care
Hand wash in cool water with mild soap. Press the water out in a towel and dry the holder flat over a roll to keep its shape. Don’t put it in the dryer.
Final Notes
The measurement chain is short and reliable. At 3 sc per inch, 16 sts per side give a 5⅓ in (13.5 cm) base. Rnd 9 plus five mesh rounds at ¾ in (1.9 cm) each give a 4 in (10.2 cm) wall. Two bridge panels, 4 sts by 12 rows, join the baskets at 12⅓ in (31.3 cm) wide. The 64-stitch corded rim brings the height to 4¾ in (12.1 cm). Check your base first, and everything after it will fall into place.
Happy crocheting!