

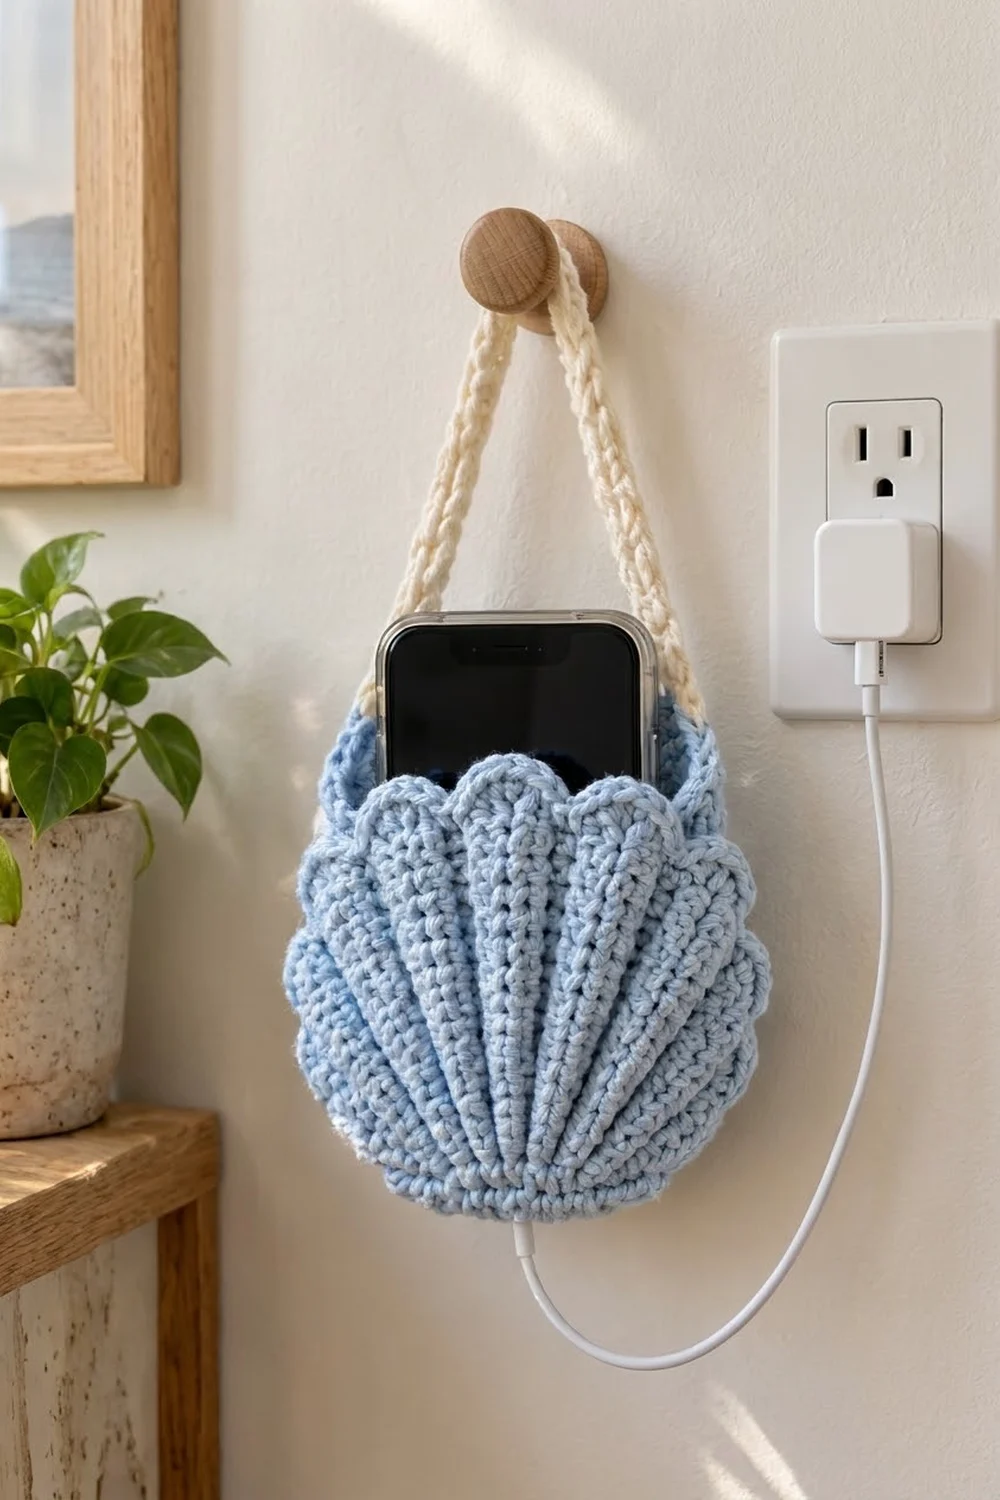
This little wall pocket is a scallop seashell in soft powder blue. Grooves fan out from a hinge at the bottom. A plain back panel rises a little higher behind the front and shows its own row of scallops. A cream cord loops over a wall peg, so your phone can charge upright beside the outlet instead of lying on the floor.
The palette has just two colors: light powder blue for both shell panels and the edging, and cream for the hanging strap. The look is calm and coastal, and the texture comes from simple post stitches.
All instructions use US crochet terms. The finished holder is about 7.25 in (18.4 cm) wide and 5.5 in (14.0 cm) tall, plus a 13 in (33.0 cm) hanging loop. It holds a standard smartphone, with the top of the phone standing above the back scallops.
You work two fan-shaped panels in turned rows from a magic ring: a grooved front and a taller plain back. You then join them with a single border round that sews the sides and bottom together, leaving the front scallops open as the pocket mouth. Last, you make the cream strap and sew it inside the upper corners of the back.
Finished Size and Construction
- Finished size: 7.25 in (18.4 cm) wide x 5.5 in (14.0 cm) tall, not counting the strap
- Skill level: Intermediate (post stitches, working from a magic ring)
- Terminology: US
- Yarn weight: Worsted (#4), cotton
- Hook: 4.5 mm (US 7)
- Number of pieces: 3 (front panel, back panel, strap)
- Layout: front panel stacked on the back panel, hinges aligned, joined along the sides and bottom
- Front panel size: 6.5 in (16.5 cm) wide x 4.25 in (10.8 cm) tall
- Back panel size before border: 6.75 in (17.1 cm) wide x 5 in (12.7 cm) tall
- Border depth: 0.25 in (0.6 cm), one round of sc
- Strap: 15 in (38.1 cm) long before sewing
Materials
Choose a smooth, firm cotton or cotton blend. Cotton holds the grooves crisply and won’t stretch under the weight of a phone. Avoid fuzzy or very soft acrylics, which blur the post-stitch lines and sag.
- Light powder blue: about 85 g / 145 m (front, back, and border)
- Cream: about 15 g / 26 m (strap)
These amounts assume a cotton of about 170 m per 100 g. They include a comfortable margin for your gauge swatch and tails.
Tools:
- 4.5 mm (US 7) crochet hook
- Tapestry needle
- 4 locking stitch markers
- Scissors
- Measuring tape
- Pins and a blocking mat
Abbreviations (US Terms)
- ch – chain
- sl st – slip stitch
- sc – single crochet
- hdc – half double crochet
- dc – double crochet
- FPdc – front post double crochet
- BPdc – back post double crochet
- st(s) – stitch(es)
- sk – skip
- RS / WS – right side / wrong side
Special stitches:
- Groove stitch: on RS rows, work a BPdc around the groove stitch below. On WS rows, work a FPdc around it. Either way, the post is pushed to the WS, so a sunken line forms on the RS.
- Front shell: (hdc, dc) in next st, 3 dc in next st, (dc, hdc) in next st. That’s 7 sts worked over 3 sts.
- Back shell: (hdc, dc) in next st, 2 dc in each of next 2 sts, (dc, hdc) in next st. That’s 8 sts worked over 4 sts.
The ch 2 at the start of a dc row does not count as a stitch. The ch 1 at the start of a sc or shell row does not count either.
Gauge and Checkpoints
Gauge: 14 dc x 8 rows = 4 in (10.2 cm) in plain dc rows. Border gauge: 16 sc = 4 in (10.2 cm), which is 4 sc per inch.
Make the front panel first. It’s the smallest piece and the best test of your tension. Measure from the center of the ring straight up to the top edge of each row:
- After Row 1: 0.5 in (1.3 cm)
- After Row 4: 2 in (5.1 cm)
- After Row 7: 3.5 in (8.9 cm)
- Back panel after Row 9: 4.5 in (11.4 cm)
If your fan is too big: go down to a 4 mm (US 6) hook. If it’s too small: go up to a 5 mm (US 8) hook.
Row height matters most here, because the front and back need matching row ends for the join. If the panel ripples, your increases are fine but your tension is loose. Change the hook rather than leaving out increases.

Front Panel (Grooved Shell)
Use light powder blue. The panel has 9 dc sections (the shell ribs) separated by 8 groove stitches. Row 1 is a WS row.
Row 1 (WS): Make a magic ring. Ch 2, then work 9 dc in the ring. Pull the ring snug but not fully closed, so the row lies as a small fan. (9 sts)
Row 2 (RS): Ch 2, turn. Dc in first st, *BPdc around next st, dc in top of same st; repeat from * 7 more times. (17 sts: 9 sections of 1 dc, 8 groove sts)
Each time you work a dc into the top of the stitch you just posted around, you add a stitch. That increase is what creates the groove.
Row 3 (WS): Ch 2, turn. Dc in first st, *FPdc around next st, dc in next st; repeat from * 7 more times. (17 sts)
Row 4 (RS): Ch 2, turn. 2 dc in first st, *BPdc around next st, 2 dc in next st; repeat from * 7 more times. (26 sts: 9 sections of 2 dc, 8 groove sts)
Row 5 (WS): Ch 2, turn. Dc in next 2 sts, *FPdc around next st, dc in next 2 sts; repeat from * 7 more times. (26 sts)
Row 6 (RS): Ch 2, turn. Dc in next st, 2 dc in next st, *BPdc around next st, dc in next st, 2 dc in next st; repeat from * 7 more times. (35 sts: 9 sections of 3 dc, 8 groove sts)
Row 7 (WS): Ch 2, turn. Dc in next 3 sts, *FPdc around next st, dc in next 3 sts; repeat from * 7 more times. (35 sts)
Checkpoint: the panel should measure 3.5 in (8.9 cm) from the ring to the top edge, with 8 clear sunken lines on the RS.
Row 8 (RS, scallops): Ch 1, turn. Front shell over next 3 sts, *sl st in next groove st, front shell over next 3 sts; repeat from * 7 more times. (71 sts: 9 shells of 7 sts + 8 sl sts)
Each groove ends in a sl st, so the valleys between the scallops line up with the grooves.
Row 9 (WS, edging): Ch 1, turn. *Sc in next 3 sts, 2 sc in next st (the center dc of the shell), sc in next 3 sts, sk next sl st; repeat from * across. The last shell has no sl st after it to skip. (72 sc: 9 scallops x 8 sc)
Fasten off, leaving a 6 in (15.2 cm) tail. Weave the ring tail through Row 1 and pull the hinge firmly closed. The front panel should measure 6.5 in (16.5 cm) wide x 4.25 in (10.8 cm) tall.
Back Panel (Plain Shell)
Use light powder blue. The back uses the same increase plan as the front, but in plain dc. It has two extra rows, so it rises above the front.
From Row 2 on, the stitches that line up with the front’s grooves are called separator sts. Mark the 8 separators on Row 2 (sts 2, 4, 6, 8, 10, 12, 14, and 16) and move the markers up as you go, or count carefully.
The back is reversible. Pick the neater side to face the front panel when you join.
Row 1: Make a magic ring. Ch 2, then work 9 dc in the ring. (9 sts)
Row 2: Ch 2, turn. Dc in first st, 2 dc in each of next 8 sts. (17 sts)
Row 3: Ch 2, turn. Dc in each st across. (17 sts)
Row 4: Ch 2, turn. 2 dc in first st, *dc in next st, 2 dc in next st; repeat from * 7 more times. (26 sts)
Row 5: Ch 2, turn. Dc in each st across. (26 sts)
Row 6: Ch 2, turn. Dc in next st, 2 dc in next st, *dc in next 2 sts, 2 dc in next st; repeat from * 7 more times. (35 sts)
Row 7: Ch 2, turn. Dc in each st across. (35 sts)
Row 8: Ch 2, turn. Dc in next 2 sts, 2 dc in next st, *dc in next 3 sts, 2 dc in next st; repeat from * 7 more times. (44 sts: 9 sections of 4 dc, 8 separators)
Row 9: Ch 2, turn. Dc in each st across. (44 sts)
Checkpoint: the back should measure 4.5 in (11.4 cm) from the ring to the top edge. Lay the front on top with the hinges together. The row ends of front Rows 1–7 should line up with back Rows 1–7.
Row 10 (scallops): Ch 1, turn. Back shell over next 4 sts, *sl st in next separator st, back shell over next 4 sts; repeat from * 7 more times. (80 sts: 9 shells of 8 sts + 8 sl sts)
Fasten off. Weave the ring tail through Row 1 and pull the hinge closed. The back should measure 6.75 in (17.1 cm) wide x 5 in (12.7 cm) tall.
Make All Pieces
- Light powder blue: 1 front panel, 1 back panel
- Cream: 1 strap (instructions below)
Layout as seen from the front:
   (  B  B  B  B  B  B  B  B  B  )    back scallops, Row 10
  (  F  F  F  F  F  F  F  F  F  )     front scallops, open pocket mouth
  |  front Rows 1-7 over back     |   sides joined through both layers
   \          Rows 1-7           /
                 *                    hinges aligned, joined
Block both panels lightly before joining (see Final Blocking). This helps the scallops lie flat and makes the row ends easier to see.
Joining
The border round is also the join.
- Hold the back with its chosen front-facing side toward you.
- Place the front panel on top, RS facing you, so the WS of the front rests against the back.
- Line up the two hinges and match the row ends of Rows 1–7 on both sides.
- Pin at every row end.
Stitch logic: each dc row end is 0.5 in (1.3 cm) tall. At 4 sc per inch, 2 sc per row end covers exactly that height. To work through both layers, insert the hook through the front row end and then the matching back row end, and work 1 sc through both.
Tension: keep the joining sc the same size as your border gauge. If you pull too tight, the sides pucker and the pocket gets too shallow for the phone. If you work too loose, the seam gapes.
Border
Work with light powder blue, with the RS of the front panel facing you. Each segment’s count stands alone. No corner stitches are shared or counted twice.
Border Round: Join yarn in the first st of back Row 10 (the first hdc of the first back shell). Then work the segments in this order:
- Back top: sc in each of the 8 sts of each back shell, sk each sl st. (72 sc: 9 shells x 8)
- Back-only side 1: 2 sc in each row end of back Rows 9 and 8. (4 sc)
- Joined side 1: working through both layers, 2 sc in each row end of Rows 7 down to 1. (14 sc)
- Hinge: 3 sc into the closed hinge point, through both layers. (3 sc)
- Joined side 2: working through both layers, 2 sc in each row end of Rows 1 up to 7. (14 sc)
- Back-only side 2: 2 sc in each row end of back Rows 8 and 9. (4 sc)
Sl st to the first sc. Round total: 111 sc (72 + 4 + 14 + 3 + 14 + 4). Fasten off and weave in the ends.
Why the math works:
- Each joined side uses 14 sc, which is exactly the front panel’s own row ends (7 rows x 2 sc). No extra stitches are added at the seam.
- At 4 sc per inch, 14 sc covers 3.5 in (8.9 cm). That matches the 3.5 in (8.9 cm) Row 7 checkpoint.
- Each back-only segment adds 4 sc for the 1 in (2.5 cm) of Rows 8–9.
- The top uses 1 sc per shell stitch, so the scallops keep their shape without ruffling.
Front Rows 8 and 9 are never sewn. They stay open and form the pocket mouth.
Hanging Strap
Use cream. Leave a 12 in (30.5 cm) starting tail before your first chain.
Row 1: Ch 61. Sc in 2nd ch from hook and in each ch across. (60 sc)
Row 2: Ch 1, turn. Sl st in each st across. (60 sl sts)
Fasten off, leaving another 12 in (30.5 cm) tail. The strap should measure 15 in (38.1 cm). The sl st row firms up the strap and gives it a cord-like look.
To attach it:
- Lay one strap end on the inside of the back panel at each upper side, over back Rows 8–9, overlapping 1 in (2.5 cm).
- Check that the strap isn’t twisted.
- Whipstitch all around each overlap, going through the back panel only.
That leaves a 13 in (33.0 cm) loop.
Final Blocking
- Wet the holder in cool water and gently squeeze it out in a towel. Don’t wring it.
- Lay it face up on the blocking mat.
- Pin the outer edge to 7.25 in (18.4 cm) wide and 5.5 in (14.0 cm) tall.
- Pin the tip of each back scallop, then each front scallop, so the valleys line up with the grooves.
- Run a finger down each groove to deepen the sunken lines.
- Slip a folded piece of card inside the pocket so the layers don’t dry stuck together.
- Let it dry completely, then hang it from the strap for a day to settle.
Final Quality-Control Checklist
- Front shows 9 ribs, 8 sunken grooves, and 9 scallops
- Back shows 9 scallops above the front scallops
- Front panel measures 6.5 in (16.5 cm) x 4.25 in (10.8 cm)
- Border round counts 111 sc
- Finished holder measures 7.25 in (18.4 cm) x 5.5 in (14.0 cm)
- Hinge is closed with no hole
- Strap is untwisted and sewn securely on the inside
- Phone slides in easily and stands upright
Troubleshooting
Grooves pop out instead of sinking in: you used FPdc on a RS row. Groove stitches are BPdc on RS rows and FPdc on WS rows.
Fan ruffles: your tension is loose. Go down a hook size, and check that you’re increasing only on Rows 2, 4, and 6 (and Row 8 on the back).
Fan cups: you missed increases. Recount each row against its stitch total.
Row ends don’t line up: make the front and back with the same hook, ideally in the same sitting, so your row heights match.
Hole at the hinge: pull the ring tail tighter and add a stitch or two through both hinges.
Pocket is too tight: the border is too firm. Redo it a little looser.
Care
Hand wash in cool water and lay flat to dry, reshaping the scallops while damp. Don’t tumble dry, because the heat can shrink the cotton and flatten the grooves.
Final Notes
The measurement chain is short. Get gauge first. Then confirm 3.5 in (8.9 cm) at front Row 7 and 4.5 in (11.4 cm) at back Row 9.
Those checkpoints give you matching row ends and 14 sc on each joined side. That leads to a 111 sc border and a finished shell of 7.25 in (18.4 cm) x 5.5 in (14.0 cm), plus a 13 in (33.0 cm) loop. Hang it by the outlet and enjoy a tidy little tidepool on the wall.
Happy crocheting!