

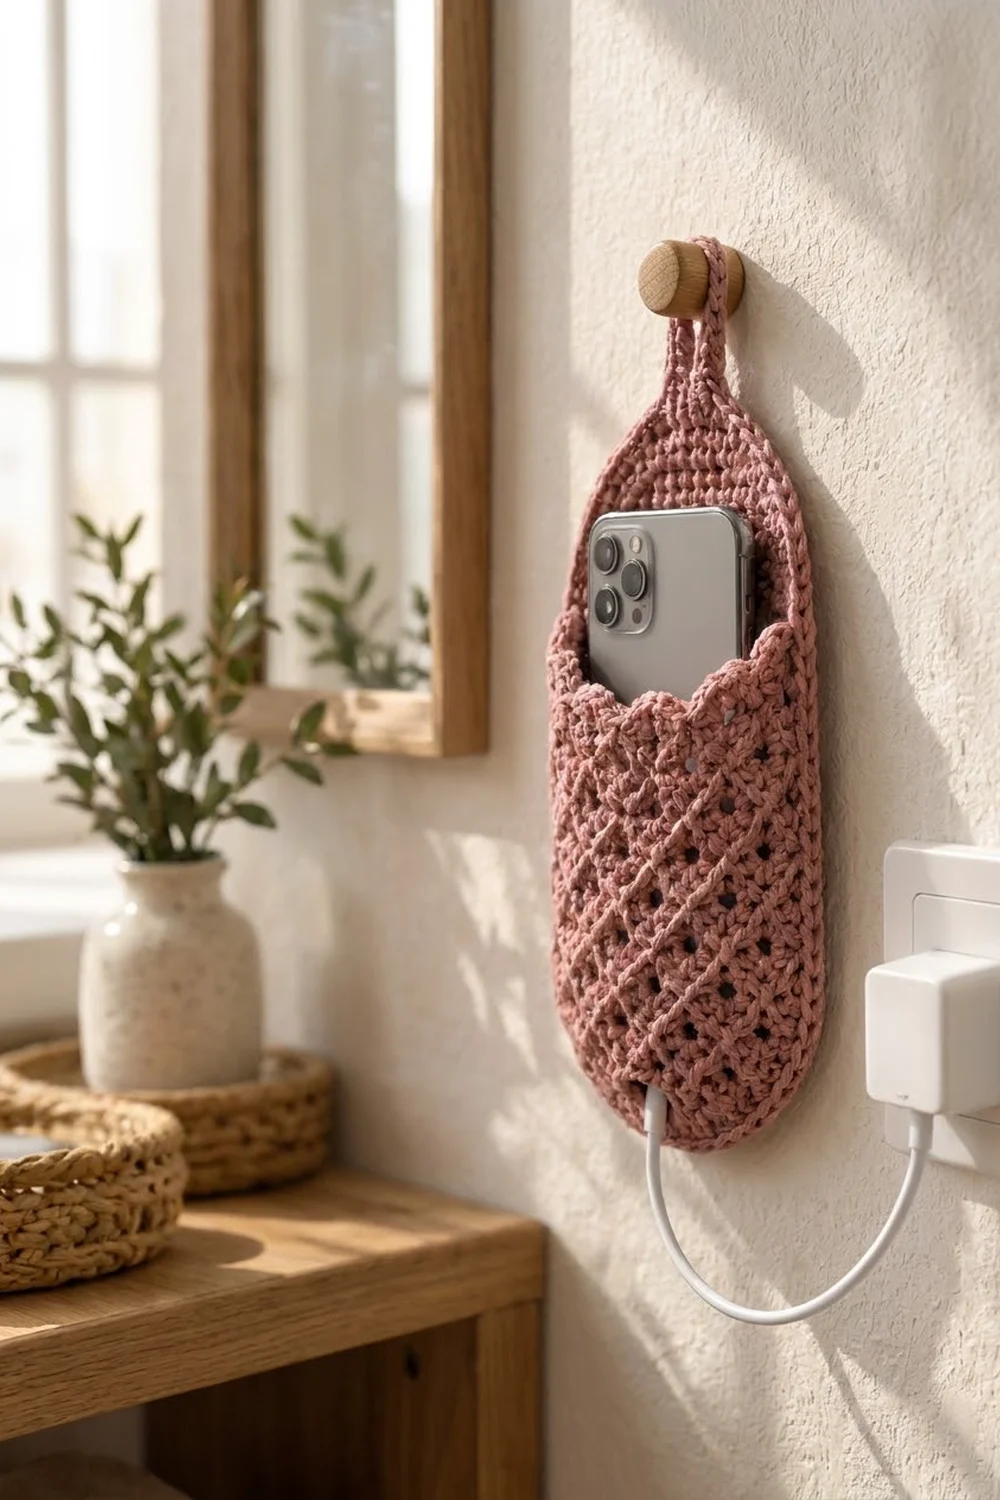
This wall-hanging phone holder gives your phone a soft place to rest while it charges. It has a solid oval back panel and a front pocket in a diagonal eyelet lattice. The pocket has a gently scalloped top edge, and a narrow strap loops over a wall peg. The charging cable exits through a small slot at the bottom center.
The sample uses one dusty rose cotton yarn. Cotton gives crisp stitch definition, so the diamond lattice reads clearly, and it holds its shape on the wall. The style is calm and modern and suits a bedside, entryway, or desk corner.
The pattern uses US crochet terms. The finished holder measures 5.5 in (14.0 cm) wide and 9.5 in (24.1 cm) tall without the strap. It is about 11.5 in (29.2 cm) tall including the hanging loop.
The construction has four steps:
1. Work the back panel in rounds around a foundation chain.
2. Work the pocket flat in rows from the bottom up, finish it with scallops, and edge it.
3. Work one round that joins the pocket to the panel and leaves a cord slot.
4. Work a final border round and add the strap.
Finished Size and Construction
- Finished size: 5.5 in (14.0 cm) x 9.5 in (24.1 cm); 11.5 in (29.2 cm) with loop
- Skill level: Easy-intermediate
- Terminology: US crochet terms
- Yarn weight: Worsted (#4) cotton or cotton blend
- Hook: 4.5 mm (US 7)
- Number of pieces: 2 (back panel and front pocket), joined into one holder
- Layout: Pocket over the lower half of the back panel, with the bottom edges aligned
- Back panel size before border: 4.5 in (11.4 cm) x 8.5 in (21.6 cm)
- Pocket size: 5.25 in (13.3 cm) wide x 5 in (12.7 cm) tall including scallops
- Border depth: 2 rounds, 0.5 in (1.3 cm): the joining round plus one finishing round
Materials
Yarn: Choose a smooth worsted-weight cotton or cotton blend. Pure cotton gives the sharpest lattice and the firmest panel. Fuzzy or very stretchy yarns blur the eyelets and let the pocket sag under a phone’s weight.
- Dusty rose: about 60 g / 110 m (120 yd)
This quantity includes a margin of roughly 25 percent for your gauge swatch and for differences in tension.
Tools:
- 4.5 mm (US 7) crochet hook
- Tapestry needle
- 2 locking stitch markers
- Scissors
- Measuring tape
- Blocking mat and rust-proof pins
- Spray bottle with water
Abbreviations (US Terms)
- ch: chain
- sc: single crochet
- hdc: half double crochet
- dc: double crochet
- sl st: slip stitch
- sk: skip
- st(s): stitch(es)
- sp: space
- inc: 2 sc in the same st
- sc2tog: single crochet 2 together
- RS / WS: right side / wrong side
Scallop: Work (hdc, 3 dc, hdc) in the same st. One scallop is 5 sts.
Joined sc: Insert the hook through the pocket edging st, then through the matching back panel st. Complete a sc through both layers.
Gauge and Checkpoints
Gauge: 16 sc and 16 rows = 4 in (10.2 cm). The eyelet lattice matches this gauge because each ch-1 replaces exactly one skipped st.
Work a 20-st swatch before you start. Stitch gauge matters most, because it sets the panel width and the depth of the pocket.
Checkpoints:
- Back panel, Rnd 1: 4.5 in (11.4 cm) long x 0.5 in (1.3 cm) wide
- Back panel, Rnd 3: 5.5 in (14.0 cm) long x 1.5 in (3.8 cm) wide
- Back panel, Rnd 9: 8.5 in (21.6 cm) long x 4.5 in (11.4 cm) wide
- Pocket, Row 5: 5.25 in (13.3 cm) wide
- Pocket, Row 18: 4.5 in (11.4 cm) tall
- Finished holder: 5.5 in (14.0 cm) x 9.5 in (24.1 cm)
Too big: Go down to a 4.0 mm hook. Too small: Go up to a 5.0 mm hook. Fix the size at the swatch or at Rnd 3. The stitch counts are fixed, so only the hook changes the size.

Back Panel
The back panel is a flat oval worked in joined rounds. Each round has two straight sides of 14 sts and two curved ends. End A is the top of the holder and End B is the bottom. Every round starts at the first st of End A.
Ch 17.
Rnd 1: Work 3 sc in the 2nd ch from the hook (End A), sc in the next 14 ch, and 3 sc in the last ch (End B). Rotate the work and sc in the next 14 ch along the underside. Sl st to the first sc. (34 sts: 3 + 14 + 3 + 14)
Mark the first st of End A. Move the marker up each round.
Rnd 2: Ch 1, [2 sc in each of next 3 sts, sc in next 14] twice. Sl st to first sc. (40 sts: ends 6 each, sides 14 each)
Rnd 3: Ch 1, [(sc in next st, inc) 3 times, sc in next 14] twice. Sl st to first sc. (46 sts: ends 9 each)
Rnd 4: Ch 1, [(sc in next 2 sts, inc) 3 times, sc in next 14] twice. Sl st to first sc. (52 sts: ends 12 each)
Rnd 5: Ch 1, [(sc in next 3 sts, inc) 3 times, sc in next 14] twice. Sl st to first sc. (58 sts: ends 15 each)
Rnd 6: Ch 1, [(sc in next 4 sts, inc) 3 times, sc in next 14] twice. Sl st to first sc. (64 sts: ends 18 each)
Rnd 7: Ch 1, [(sc in next 5 sts, inc) 3 times, sc in next 14] twice. Sl st to first sc. (70 sts: ends 21 each)
Rnd 8: Ch 1, [(sc in next 6 sts, inc) 3 times, sc in next 14] twice. Sl st to first sc. (76 sts: ends 24 each)
Rnd 9: Ch 1, [(sc in next 7 sts, inc) 3 times, sc in next 14] twice. Sl st to first sc. (82 sts: ends 27 each, sides 14 each)
Fasten off and weave in the starting tail.
Each round adds 0.5 in (1.3 cm) of width, so 9 rounds give 4.5 in (11.4 cm). The length is the 4 in (10.2 cm) chain plus the same 4.5 in (11.4 cm), for a total of 8.5 in (21.6 cm). Three increases on each curved end per round is the standard rate for a flat sc semicircle, so the panel lies flat.
Front Pocket
The pocket is worked flat in rows from the bottom up. At 21 sts it is 0.75 in (1.9 cm) wider than the back panel, and that extra width gives the phone room once the pocket is joined.
Lattice logic: Eyelets fall only on RS rows.
– Lattice A has holes at sts 3, 7, 11, 15, and 19.
– Lattice B has holes at sts 5, 9, 13, and 17.
The holes shift 2 sts every 2 rows. The solid fabric between them forms diagonal lines in both directions, which makes a diamond lattice with one eyelet in each diamond. Both hole sets are symmetric on 21 sts, so the pattern is centered.
Ch 14.
Row 1 (RS): Sc in the 2nd ch from the hook and in each ch across. Turn. (13 sts)
Row 2 (WS): Ch 1, inc in the first st, sc across to the last st, inc in the last st. Turn. (15 sts)
Row 3: Repeat Row 2. (17 sts)
Row 4: Repeat Row 2. (19 sts)
Row 5: Repeat Row 2. (21 sts)
Rows 2–5 round off the bottom corners.
Row 6 (WS): Ch 1, sc in each st across. Turn. (21 sts)
Row 7 (RS, Lattice A): Ch 1, sc in first 2 sts, [ch 1, sk next st, sc in next 3 sts] 4 times, ch 1, sk next st, sc in last 2 sts. Turn. (21 sts: 16 sc + 5 ch-1 sps)
Row 8 (WS): Ch 1, sc in each sc and each ch-1 sp across. Turn. (21 sts)
Row 9 (RS, Lattice B): Ch 1, sc in first 4 sts, [ch 1, sk next st, sc in next 3 sts] 4 times, sc in last st. Turn. (21 sts: 17 sc + 4 ch-1 sps)
Row 10 (WS): Repeat Row 8. (21 sts)
Rows 11–18: Repeat Rows 7–10 twice. (21 sts)
You now have 6 eyelet rows. The pocket measures 5.25 in (13.3 cm) wide x 4.5 in (11.4 cm) tall.
Row 19 (RS, scallop edge): Ch 1, sc in first st, [sk next st, scallop in next st, sk next st, sc in next st] 5 times. (31 sts: 5 scallops x 5 sts + 6 sc)
The scallops add 0.5 in (1.3 cm), so the pocket is now 5 in (12.7 cm) tall. Do not fasten off.
Pocket edging: This edging runs around the sides and bottom of the pocket in a U shape.
1. Ch 1 and rotate to work down the side edge. Work 1 sc in the end of each row from Row 18 down to Row 1. (18 sc)
2. Along the underside of the foundation chain, skip the first ch, sc in each of the next 11 ch, and leave the last ch unworked. (11 sc)
3. Work up the second side, 1 sc in the end of each row from Row 1 to Row 18. (18 sc)
Fasten off. Leave the scallop edge unworked. (47 edging sts: 18 + 11 + 18)
Make All Pieces
Make one of each piece, both in dusty rose:
- Back panel: 1 (82 sts at Rnd 9)
- Front pocket: 1 (47 edging sts)
Layout from the front:
        [ strap / loop ]
   +-------------------------+
   |   back panel, End A     |
   |   (exposed: 27 end sts  |
   |    + top 4 side sts)    |
   |~~~~~ scallop edge ~~~~~~|
   |   lattice pocket        |
   |   (47 sts joined)       |
   +------[ cord slot ]------+
          End B (bottom)
Joining
The joining round also counts as the first border round. Each joined sc pairs exactly one pocket edging st with one back panel st.
Matching map: The 47 pocket edging sts cover 47 back panel sts:
– the last 10 sts of the first straight side
– all 27 sts of End B
– the first 10 sts of the second straight side
That gives 10 + 27 + 10 = 47. On each side, the top 4 straight sts stay uncovered.
Lay the back panel RS up and place the pocket RS up on top, with the bottom edges aligned. Then pin three points:
– one end of the pocket edging to the 5th st of the first side
– pocket st 24 to End B st 14
– the other end of the pocket edging to the 10th st of the second side
Rnd 10 (joining round): Join the yarn in the first st of End A.
- End A: Ch 1, (sc in next 8 sts, inc) 3 times. (30 sts)
- First side: Sc in the next 4 sts through the back panel only, then joined sc in the next 10 sts. (14 sts)
- End B: Work (sc in next 8 sts, inc) 3 times as joined sts. For back panel sts 12–16 of End B, work through the back panel only and leave pocket sts 22–26 free. This makes the cord slot. When an inc falls on a joined st (End B sts 9, 18, and 27), work both sc into the same joined pair. (30 sts)
- Second side: Joined sc in the next 10 sts, then sc in the next 4 sts through the back panel only. (14 sts)
Sl st to the first sc. (88 sts: 30 + 14 + 30 + 14)
Tension: Make the joined sts the same height as the single-layer sts. Insert the hook straight through both layers so the pocket edge does not twist. The extra pocket width gathers gently along the bottom curve.
Size checkpoint: The holder should now measure 5 in (12.7 cm) x 9 in (22.9 cm). The cord slot should be 1.25 in (3.2 cm) wide.
Border
Border gauge: Work the border at the main gauge, 16 sc = 4 in (10.2 cm). Each round adds 0.25 in (0.6 cm) to every edge.
Rnd 11: Ch 1, [(sc in next 9 sts, inc) 3 times, sc in next 14] twice. Sl st to the first sc. (94 sts: End A 33, side 14, End B 33, side 14)
Work across the cord slot as normal. The slot stays open between the layers.
Why the math works: The straight sides stay at 14 sts in every round. Each curved end grows by exactly 3 sts per round (27, then 30, then 33), which keeps the flat-oval rate. Two border rounds add 0.5 in (1.3 cm) to each edge. The width grows from 4.5 in (11.4 cm) to 5.5 in (14.0 cm), and the height from 8.5 in (21.6 cm) to 9.5 in (24.1 cm).
Strap: The center of End A is st 17 of 33. With RS facing, join the yarn in st 15.
- Row 1: Ch 1, sc in sts 15–19. Turn. (5 sts)
- Rows 2–3: Ch 1, sc in each st. Turn. (5 sts)
- Row 4: Ch 1, sc2tog, sc in next st, sc2tog. Turn. (3 sts)
- Rows 5–16: Ch 1, sc in each st. Turn. (3 sts)
The strap is 4 in (10.2 cm) long. Fasten off, leaving a 10 in (25.4 cm) tail. Fold the strap in half toward the back and sew the last row to the WS of Row 1. This forms a loop that stands 2 in (5.1 cm) above the border.
Final Blocking
- Weave in all ends on the WS of the back panel.
- Mist the holder until it is damp but not dripping.
- Pin the back panel flat at 5.5 in (14.0 cm) x 9.5 in (24.1 cm).
- Let the pocket’s extra width puff slightly forward. Do not press it flat.
- Pin each of the 5 scallops into a smooth arc.
- Open each eyelet gently with a fingertip.
- Let the holder dry completely, at least 12 hours, before you hang it.
Final Quality-Control Checklist
- Back panel Rnd 9 has 82 sts and lies flat.
- The pocket has 21 sts per row and 6 offset eyelet rows.
- The pocket top has 5 even scallops.
- The pocket edging has exactly 47 sts.
- The joining round has 88 sts, and the cord slot is open.
- Border Rnd 11 has 94 sts.
- The strap is centered and sewn securely.
- The holder measures 5.5 in (14.0 cm) x 9.5 in (24.1 cm).
Troubleshooting
- Panel cups: Your stitches are too tight at the curved ends. Go up a hook size, or confirm that each end gets 3 increases per round.
- Panel ruffles: There are extra increases. Recount each end against the counts above.
- Eyelets don’t form diagonals: Alternate Lattice A and Lattice B, with a solid WS row between them.
- Edging isn’t 47 sts: Work exactly 1 sc per row end and add nothing at the corners.
- Phone fits tightly: While the holder is still damp, block the pocket over a phone-sized box so the lattice relaxes forward.
- Strap leans: Recount End A and rejoin at st 15 of 33.
Care
Hand wash in cool water with mild soap, roll the holder in a towel to remove water, and dry it flat. Reshape the scallops while it is damp.
Final Notes
Here is how the measurements build up:
– A 4 in (10.2 cm) chain plus 9 rounds makes a 4.5 in x 8.5 in (11.4 cm x 21.6 cm) back panel of 82 sts.
– The 21-st pocket is 5.25 in (13.3 cm) wide, and its 47 edging sts pair one-to-one with 47 back panel sts.
– The joining round brings the count to 88 sts, and the border round brings it to 94 sts.
– The finished holder is 5.5 in x 9.5 in (14.0 cm x 24.1 cm).
Check your gauge, count every round, and the holder will hang straight and hold your phone securely.
Happy crocheting!