

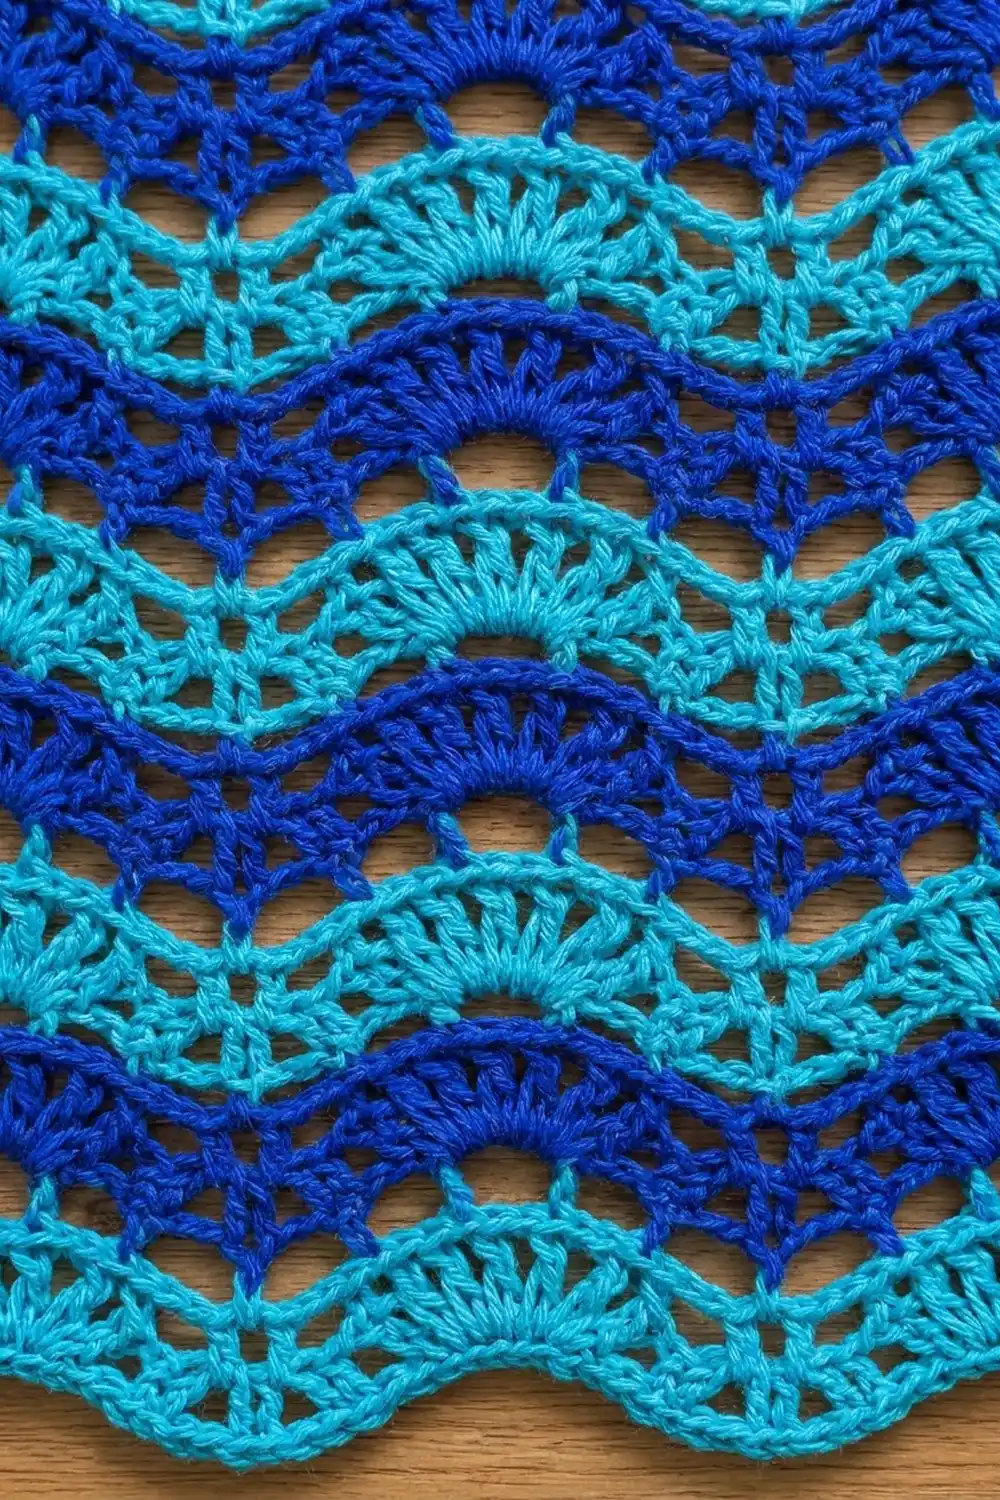
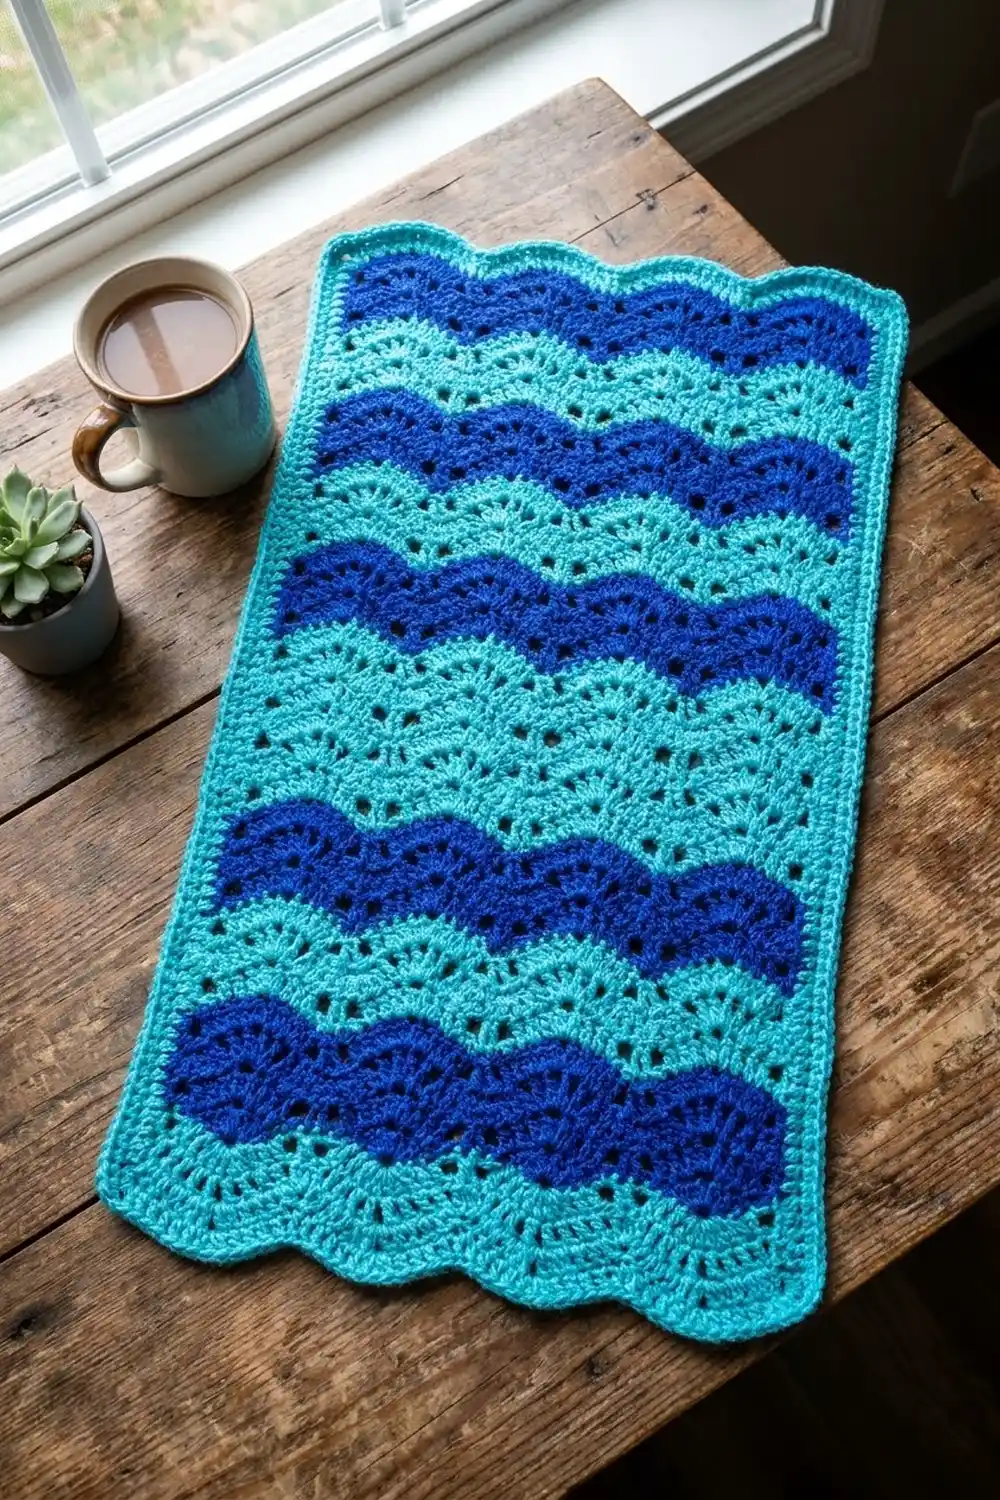
The Tidewater Ripple Panel is a single rectangle of lacy wave stitch in two shades of blue. Each wave holds a small fan of double crochets at its crest, with a chain-1 eyelet on each side. Above every fan row is an open row of spaced double crochets that rises to a V at each peak. The waves run parallel all the way up, so the top and bottom edges ripple while the two long sides stay straight.
The colors are Turquoise and Royal Blue in two-row stripes. The panel starts in Turquoise, ends in Royal Blue, and finishes with a slim Royal Blue single crochet edging. Use it as a wall hanging, a dresser scarf or place mat, or as a practice piece for the stitch.
This pattern uses US crochet terms. After edging and blocking, the panel measures 8.75 in wide x 13 in tall (22.2 cm x 33.0 cm).
Construction is simple. You chain a foundation and work 20 rows of a two-row ripple repeat, changing color every 2 rows. Then you work 1 round of single crochet around the whole piece. There is no joining and no sewing.
Finished Size and Construction
- Finished size: 8.75 in x 13 in (22.2 cm x 33.0 cm)
- Skill level: Easy to Intermediate
- Terminology: US crochet terms
- Yarn weight: Worsted (medium, #4)
- Hook: 5.0 mm (US H-8)
- Number of pieces: 1
- Layout: One rectangular panel worked in rows from the bottom up, 2 wave repeats wide and 10 stripes tall
- Piece size before border: 8.25 in x 12.5 in (21.0 cm x 31.8 cm)
- Border depth: 0.25 in (0.6 cm) on every side
Materials
Choose a smooth worsted-weight yarn. Mercerized cotton or a cotton blend shows the fans and eyelets best and blocks crisply. Fuzzy or very loose acrylic hides the lace.
- Color A, Turquoise: 25 g (about 43 m)
- Color B, Royal Blue: 30 g (about 52 m), including the edging
Both amounts include a margin of roughly 15 percent to cover your gauge check and yarn tails.
Tools:
- 5.0 mm (US H-8) crochet hook
- Tapestry needle
- Scissors
- Stitch markers (2 or 3)
- Measuring tape or ruler
- Blocking mat and rust-proof pins
- Spray bottle with clean water
Abbreviations (US Terms)
- ch: chain
- sl st: slip stitch
- sc: single crochet
- dc: double crochet
- sk: skip
- st(s): stitch(es)
- sp: space
- RS / WS: right side / wrong side
- rep: repeat
Special stitches:
- dc2tog (double crochet 2 together): [Yarn over, insert hook in next st, yarn over and pull up a loop, yarn over and draw through 2 loops] 2 times, then yarn over and draw through all 3 loops on hook. Uses 2 sts, makes 1.
- dc3tog (double crochet 3 together): Work as dc2tog, but do the bracket 3 times, then yarn over and draw through all 4 loops on hook. Uses 3 sts, makes 1. This makes the dip in each wave.
- 5-dc fan: Work 5 dc in the same st or sp. This makes the fan at each crest.
Counting rule: From Row 2 on, every dc, every decrease, and every ch-1 space counts as 1 st. The ch-2 at the start of each row does not count as a st.
Gauge and Checkpoints
Gauge in pattern: 16 sts = 4 in (10.2 cm), measured across one full wave from dip to dip. 8 rows = 5 in (12.7 cm), measured straight up a column. Each row is about 0.625 in (1.6 cm) tall.
Test the start of the piece first. Work the foundation and Rows 1 to 4 (two stripes). Lay the work flat without stretching it and check:
- After Row 1: 33 sts, 8.25 in (21.0 cm) wide.
- After Row 4: 2.5 in (6.4 cm) tall, still 8.25 in (21.0 cm) wide.
- After Row 10: 6.25 in (15.9 cm) tall.
- After Row 20: 12.5 in (31.8 cm) tall.
- After the border and blocking: 8.75 in x 13 in (22.2 cm x 33.0 cm).
If your piece is too big (wider than 8.25 in / 21.0 cm after Row 1), switch to a 4.5 mm hook and start again.
If your piece is too small (narrower than 8.25 in / 21.0 cm), switch to a 5.5 mm hook.
If only the height is off, check your yarn overs: pull each dc up to its full height before you finish it. Don’t change the stitch count to fix the size. The ripple only works on a multiple of 16 sts plus 1.
Pattern
The stitch pattern is a multiple of 16 sts plus 1. This panel uses 33 sts (2 repeats plus 1). Every row has exactly 33 sts, because the decreases at the dips balance the increases at the crests.
Odd rows are fan rows and even rows are open rows. Each stripe is one fan row plus one open row in the same color.
A tip before you start: put a stitch marker in the center dc of each fan as you make it. On the next row, that marked stitch is where the V goes, so the markers help you keep the waves lined up while you learn the repeat.
Foundation and Row 1 (RS, Turquoise)
With Turquoise, ch 35. The first 2 chs from the hook act as the turning chain, leaving 33 base chs.
Row 1 (fan row): Dc2tog over the 3rd and 4th chs from hook, [dc in each of next 4 chs, ch 1, sk 2 chs, 5 dc in next ch, ch 1, sk 2 chs, dc in each of next 4 chs], dc3tog over next 3 chs, rep [ ] once, dc2tog over last 2 chs, turn. (33 sts)
Stitch check for one repeat: 4 dc + ch 1 + 5 dc + ch 1 + 4 dc = 15 sts. Total: 1 (dc2tog) + 15 + 1 (dc3tog) + 15 + 1 (dc2tog) = 33 sts.
The 5-dc fans sit at the crests and the decreases pull down the dips, so the bottom edge waves from the first row.
Row 2 (WS, Turquoise)
Row 2 (open row): Ch 2 (does not count), dc2tog over first 2 sts, [(ch 1, sk 1 st, dc in next st) 3 times, (dc, ch 1, dc) in next st, (dc in next st, ch 1, sk 1 st) 3 times], dc3tog over next 3 sts, rep [ ] once, dc2tog over last 2 sts, turn. (33 sts)
The “(dc, ch 1, dc) in next st” lands in the center dc of the fan below, which makes the V at each crest. The dc3tog is centered over the dc3tog of the row below.
Stitch check for one repeat: 6 + 3 + 6 = 15 sts. Total: 1 + 15 + 1 + 15 + 1 = 33 sts.
Change to Royal Blue on the last yarn over of Row 2. Don’t cut the Turquoise. Carry it loosely up the side edge, where the border will cover it.
Row 3 (RS, Royal Blue)
Row 3 (fan row): Ch 2 (does not count), dc2tog over first 2 sts, [dc in each of next 4 sts, ch 1, sk 2 sts, 5 dc in next ch-1 sp, ch 1, sk 2 sts, dc in each of next 4 sts], dc3tog over next 3 sts, rep [ ] once, dc2tog over last 2 sts, turn. (33 sts)
The “next ch-1 sp” is the center of the V from Row 2, so each fan stacks directly above the fan below.
Row 4 (WS, Royal Blue)
Row 4: Work as Row 2. (33 sts)
Change to Turquoise on the last yarn over and carry the Royal Blue up the side.
Checkpoint: The piece should measure 8.25 in (21.0 cm) wide and 2.5 in (6.4 cm) tall.
Rows 5 to 20
Keep alternating fan rows (worked as Row 3) and open rows (worked as Row 2), changing color every 2 rows:
- Rows 5 to 6: Turquoise
- Rows 7 to 8: Royal Blue
- Rows 9 to 10: Turquoise (checkpoint: 6.25 in / 15.9 cm tall)
- Rows 11 to 12: Royal Blue
- Rows 13 to 14: Turquoise
- Rows 15 to 16: Royal Blue
- Rows 17 to 18: Turquoise
- Rows 19 to 20: Royal Blue
Every row ends with 33 sts. After Row 20 you have 10 stripes, 5 Turquoise and 5 Royal Blue, with Turquoise at the bottom and Royal Blue at the top.
Fasten off Turquoise after Row 18. Fasten off Royal Blue after Row 20.
Checkpoint: 8.25 in x 12.5 in (21.0 cm x 31.8 cm). Every crest should line up vertically with the crests below it.
Border
Border gauge: 16 sc = 4 in (10.2 cm), the same as the pattern, so 1 sc = 0.25 in (0.6 cm).
Round 1 (RS, Royal Blue)
With RS facing, join Royal Blue with a sl st in the first st of the top edge at the right-hand corner.
- Top edge: Ch 1, sc in each of the 33 sts across, following the waves. (33 sc) Ch 1 for the corner.
- First side: Working into the row ends, (2 sc in next row end, 3 sc in next row end) 10 times. (50 sc) Ch 1 for the corner.
- Bottom edge: Working into the free loops of the foundation chain, sc in each of the 33 base chs. (33 sc) Ch 1 for the corner.
- Second side: (2 sc in next row end, 3 sc in next row end) 10 times. (50 sc) Ch 1 for the corner.
Sl st to the first sc to join, then fasten off. (166 sc and 4 corner ch-1 sps)
The corner ch-1 spaces are not included in the per-side counts. Each side count is sc only. Work over the carried strands on the side edge as you go so they are hidden inside the sc.
Why the Math Works
The top and bottom edges each get 1 sc per st, which is 33 sc. At 4 sc per in, 33 sc = 8.25 in (21.0 cm), which matches the panel width. Because you aren’t adding or removing sts, the waves keep their shape.
Each 2-row stripe is 1.25 in (3.2 cm) tall. At 4 sc per in, that much edge needs 5 sc, so you work 2 sc in one row end and 3 in the next. Ten stripes x 5 sc = 50 sc, and 50 sc at 4 sc per in = 12.5 in (31.8 cm), which matches the panel height. The sides lie flat with no ruffling or pulling.
The round adds 0.25 in (0.6 cm) on every side. The width becomes 8.25 + 0.5 = 8.75 in (22.2 cm) and the height becomes 12.5 + 0.5 = 13 in (33.0 cm).
Final Blocking
- Weave in all ends along the side edges, inside the border sc.
- Soak the panel in cool water for 10 minutes, or spray it until it is damp all the way through.
- Press out the extra water by rolling the panel in a towel. Don’t wring it.
- Lay the panel RS up on a blocking mat.
- Pin the 4 corners to 8.75 in x 13 in (22.2 cm x 33.0 cm).
- Pin each straight side edge every 1 in (2.5 cm).
- Pin each crest and each dip on the top and bottom edges so the waves are even.
- Use your fingertips to open each 5-dc fan and V so the eyelets show.
- Let the panel dry completely before you take out the pins.
Final Quality-Control Checklist
- Every row has 33 sts.
- Each row has 2 full fans and 3 dips: one at each side edge and one in the center.
- Every fan sits directly above the V of the row below.
- Stripes alternate cleanly, with Turquoise at the bottom and Royal Blue at the top.
- The carried yarn is hidden under the border on one side.
- Border counts are 33 sc on the top, 33 sc on the bottom, and 50 sc on each side.
- The side edges are straight and don’t ruffle.
- The blocked size is 8.75 in x 13 in (22.2 cm x 33.0 cm).
Troubleshooting
The waves drift sideways. The fan isn’t landing in the right place. Check that each fan goes into the center ch-1 sp of the V below, and that each V goes into the center dc of the fan below.
My row has 34 or 32 sts. You probably counted the ch-2 as a st or missed a ch-1 sp. Count again using the counting rule above.
The sides ruffle after the border. There are too many sc on the sides. Work 2 sc in every row end instead of alternating 2 and 3.
The sides pull in. There are too few sc. Work 3 sc in every row end, or loosen your tension.
The dips look lumpy. Pull every loop of the dc3tog up to full dc height before you close it.
The fans cup or curl. Your 5-dc fans may be tighter than the rest of the row. Relax your tension on the fans, or block the crests a little more firmly.
The color changes leave bumps. Change color on the last yarn over of the previous row, and keep the carried strand loose.
Care
Hand wash in cool water with mild soap, then lay flat to dry, reshaping the waves as you go. Cotton can be pressed lightly with a warm iron under a damp cloth.
Final Notes
The whole size depends on one gauge: 16 sts = 4 in (10.2 cm) and 8 rows = 5 in (12.7 cm). That gives a width of 33 sts = 8.25 in (21.0 cm) and a height of 20 rows = 12.5 in (31.8 cm). One round of sc adds 0.25 in (0.6 cm) on each side, bringing the panel to 8.75 in x 13 in (22.2 cm x 33.0 cm). Check the width after Row 1, the height after Row 4, and the full size before the border. If those three match, the edging will lie flat and the panel will block cleanly.
Happy crocheting!