

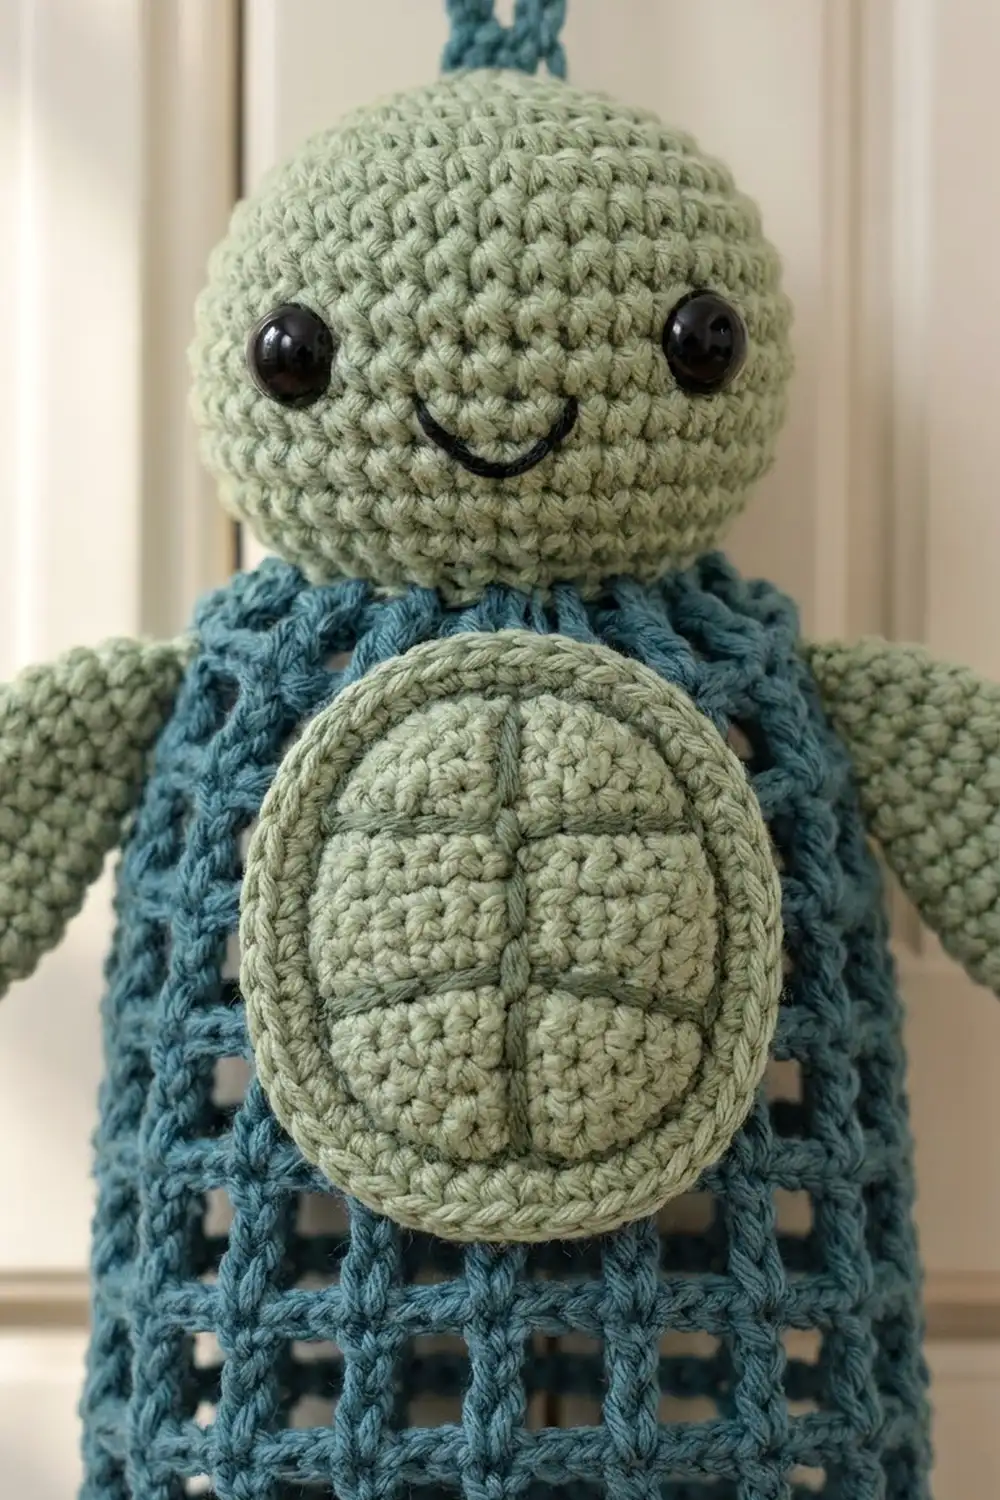
Tilly the Turtle is a cheerful plastic bag holder that keeps your grocery bags in one place. The body is an open teal mesh tube, so you can always see how many bags are left. A round sage-green head with a sweet smile sits on top, and an oval shell and four leaf-shaped flippers turn the tube into a turtle.
The palette is simple: deep teal for the mesh, the hanging loop and the drawstring; soft sage green for the head, shell and flippers; and a little black for the eyes and smile. The style is cozy and practical. The open mesh lets air through, and the drawstring at the bottom lets you pull bags out one at a time.
This pattern uses US crochet terms. When hanging, the finished holder measures about 6 in (15.2 cm) wide and about 23.5 in (59.7 cm) from the top of the loop to the tips of the cord ends. The mesh body alone is 16.2 in (41.1 cm) long.
Construction overview: You crochet the mesh tube in joined rounds, starting from a foundation ring at the top. Then you add a solid top band and a bottom drawstring band, which serve as the border. The head, shell, flippers, loop, drawstring and cord-end balls are made separately and sewn on, so the result is one assembled holder.
Finished Size and Construction
- Finished size (hanging): about 6 in (15.2 cm) wide × 23.5 in (59.7 cm) long
- Skill level: Easy–Intermediate
- Terminology: US crochet terms
- Yarn weight: Worsted (#4), cotton or cotton blend
- Hooks: 5.0 mm (H-8) for the mesh body; 4.0 mm (G-6) for all sage parts and small teal parts
- Number of pieces: one finished holder (1 mesh body + 1 head + 1 shell + 4 flippers + loop, drawstring and 2 cord balls, all sewn together)
- Layout: a vertical tube with the head at the top center, the shell on the upper front, front flippers at the upper sides and back flippers at the lower sides
- Body size: 12 in (30.5 cm) around, 6 in (15.2 cm) wide when flat
- Size before border: 6 in × 14.4 in (15.2 cm × 36.6 cm)
- Border depth: top band 0.6 in (1.5 cm); bottom drawstring band 1.2 in (3.0 cm)
Materials
Choose a smooth worsted-weight cotton. It holds its shape, doesn’t stretch much under the weight of the bags, and makes crisp mesh squares. Acrylic also works, but the mesh will stretch more over time.
- Color A – Deep Teal: 100 g, about 170 m (186 yd)
- Color B – Sage Green: 40 g, about 70 m (77 yd)
- Color C – Black: 2 m (2 yd), for the smile
Tools:
- 5.0 mm (H-8) and 4.0 mm (G-6) crochet hooks
- Two 9 mm black safety eyes
- Fiberfill stuffing, a small handful
- Tapestry needle
- Stitch markers
- Scissors and a measuring tape
- Rust-proof pins for blocking
These quantities include a margin of about 15% for gauge swatches and differences in tension.
Abbreviations (US Terms)
- ch – chain
- sl st – slip stitch
- sc – single crochet
- hdc – half double crochet
- dc – double crochet
- inc – 2 sc in the same stitch
- sc2tog – single crochet 2 together
- MR – magic ring
- BLO – back loop only
- sp – space
- st(s) – stitch(es)
Special stitch – Mesh: dc, ch 2. One mesh square is 3 stitches wide: 1 dc plus 2 chains.
Surface slip stitch: Hold the yarn behind the work. Insert the hook from front to back, pull up a loop, and draw it through the loop on the hook. This makes a raised chain line on the front.
Gauge and Checkpoints
Mesh gauge (5.0 mm hook): 4 mesh squares × 4 rounds = 3 in wide × 2.4 in tall (7.6 cm × 6.1 cm). One mesh is 0.75 in (1.9 cm) wide, and one round is 0.6 in (1.5 cm) tall.
Amigurumi gauge (4.0 mm hook): 9 sc × 10 rounds = 2 in (5.1 cm) square.
Make the head first, since it is the quickest test of your tension with the 4.0 mm hook. Then work the first 4 mesh rounds of the body and measure them before you go on.
Checkpoints:
- Foundation ring (48 ch): 12 in (30.5 cm) around, unstretched
- After Round 4: 6 in (15.2 cm) wide when flat, 2.4 in (6.1 cm) tall
- After Round 24: 6 in × 14.4 in (15.2 cm × 36.6 cm)
- After the border: 6 in × 16.2 in (15.2 cm × 41.1 cm)
If your piece is too big, use a hook 0.5 mm smaller. If it is too small, use a hook 0.5 mm larger. Don’t change the stitch counts, because the border math depends on 48 stitches.
Mesh Body
With Color A and the 5.0 mm hook, ch 48. Join with a sl st into the first ch to form a ring, taking care not to twist the chain. You’ll work in joined rounds without turning.
Round 1: Ch 5 (counts as dc + ch 2 throughout). Skip next 2 ch, dc in next ch, ch 2. Repeat from * 14 more times. Skip the last 2 ch and sl st into the 3rd ch of the beginning ch-5.
Count: 16 dc + 16 ch-2 sps = 16 mesh squares (48 sts).
Round 2: Ch 5. Dc in next dc, ch 2. Repeat from * 14 more times. Sl st into the 3rd ch of the beginning ch-5.
Count: 16 mesh squares (48 sts).
Rounds 3–24: Repeat Round 2.
Count each round: 16 mesh squares (48 sts).
Stack each dc directly on the dc below so the squares line up in straight vertical columns. Fasten off.
Checkpoint: The tube measures 6 in (15.2 cm) wide flat and 14.4 in (36.6 cm) long (24 rounds × 0.6 in).
Flatten the tube with the beginning-of-round seam at the center back. This gives 8 mesh squares (24 sts) on the front and 8 mesh squares (24 sts) on the back.
Head
With Color B and the 4.0 mm hook, work in continuous spiral rounds. Mark the first stitch of each round.
Round 1: 6 sc in MR. (6)
Round 2: Inc in each st around. (12)
Round 3: [Sc 1, inc] 6 times. (18)
Round 4: [Sc 2, inc] 6 times. (24)
Round 5: [Sc 3, inc] 6 times. (30)
Round 6: [Sc 4, inc] 6 times. (36)
Rounds 7–12: Sc in each st around. (36)
Insert the safety eyes between Rounds 9 and 10, with 6 stitches between them. With Color C, embroider a small U-shaped smile that spans 3 stitches, centered between Rounds 11 and 12.
Round 13: [Sc 4, sc2tog] 6 times. (30)
Round 14: [Sc 3, sc2tog] 6 times. (24)
Round 15: [Sc 2, sc2tog] 6 times. (18)
Stuff the head firmly.
Round 16: [Sc 1, sc2tog] 6 times. (12)
Round 17: Sc2tog 6 times. (6)
Fasten off, leaving a 12 in (30.5 cm) tail. Close the hole. The head is about 2.75 in (7.0 cm) across.
Shell Appliqué
With Color B and the 4.0 mm hook, ch 8.
Round 1: Sc in 2nd ch from hook, sc in next 5 ch, 3 sc in last ch. Rotate the work and, along the opposite side of the chain, sc in next 5 ch, then 2 sc in the same ch as the first sc. Join with a sl st into the first sc.
Count: 1 + 5 + 3 + 5 + 2 = 16 sc (3 sts at each end, 5 along each side).
Round 2: Ch 1, 2 sc in first st, sc in next 5, 2 sc in each of next 3, sc in next 5, 2 sc in each of last 2. Join.
Count: 22 sc.
Round 3: Ch 1, [sc in next, 2 sc in next] 2 times, sc in next 5, [sc in next, 2 sc in next] 3 times, sc in next 5, sc in next, 2 sc in next. Join.
Count: 28 sc.
Round 4: Ch 1, [sc in next 2, 2 sc in next] 2 times, sc in next 5, [sc in next 2, 2 sc in next] 3 times, sc in next 5, sc in next 2, 2 sc in next. Join.
Count: 34 sc.
Round 5 (raised rim): Ch 1, sl st in BLO of each st around. Join.
Count: 34 sl sts.
Fasten off, leaving a long tail. The shell measures about 3.5 in × 2.75 in (8.9 cm × 7.0 cm).
Shell plates: With a length of Color B, surface sl st an inner oval along the line between Rounds 2 and 3. Then surface sl st one line down the center along the foundation chain, from rim to rim. Finally, surface sl st one line across the middle, perpendicular to the first. Together these make a cross inside an inner oval.
Flippers (Make 4)
Front Flippers (make 2): With Color B and the 4.0 mm hook, ch 10.
Round 1: Sc in 2nd ch from hook, hdc in next, dc in next 4, hdc in next, sc in next, 3 sc in last ch. Along the opposite side of the chain: sc in next, hdc in next, dc in next 4, hdc in next, sc in the last ch (the same ch as the first sc). Join.
Count: 8 + 3 + 8 = 19 sts.
Round 2: Ch 1, sc in next 9 sts, (sc, ch 2, sc) in the center st of the 3-sc tip, sc in next 9 sts. Join.
Count: 20 sc + 1 ch-2 sp at the point.
Each front flipper is about 2.25 in × 1.25 in (5.7 cm × 3.2 cm).
Back Flippers (make 2): Ch 7.
Round 1: Sc in 2nd ch from hook, hdc in next, dc in next, hdc in next, sc in next, 3 sc in last ch. Along the opposite side: sc in next, hdc in next, dc in next, hdc in next, sc in last ch. Join.
Count: 5 + 3 + 5 = 13 sts.
Round 2: Ch 1, sc in next 6, (sc, ch 2, sc) in the center tip st, sc in next 6. Join.
Count: 14 sc + 1 ch-2 sp.
Each back flipper is about 1.75 in × 1 in (4.4 cm × 2.5 cm). Leave a sewing tail on every flipper.
Loop, Drawstring and Cord Balls
Hanging loop: With Color A and the 4.0 mm hook, ch 19. Sl st in 2nd ch from hook and in each ch across. (18 sl sts, about 4.5 in / 11.4 cm long)
Drawstring: With Color A and the 5.0 mm hook, ch 48. Sl st in 2nd ch from hook and in each ch across. (47 sl sts, about 12 in / 30.5 cm long)
Cord balls (make 2): With Color A and the 4.0 mm hook:
Round 1: 6 sc in MR. (6)
Round 2: Inc in each st around. (12)
Round 3: Sc in each st around. (12)
Round 4: Sc2tog 6 times. (6)
Stuff the ball with yarn scraps and close it. Each ball is about 0.75 in (1.9 cm) across.
Border
The border is worked in Color A with the 5.0 mm hook, using the same gauge as the body. In sc rounds, 48 sts measure 12 in (30.5 cm) around, which is 4 sts per inch.
Top Band (worked into the foundation chain):
Join Color A at the beginning-of-round seam, working into the free loops of the foundation chain.
Top Round 1: Ch 1, sc in each ch around. Join.
Count: 48 sc worked one per existing chain + 0 extra = 48 (24 front + 24 back).
Top Round 2: Ch 1, sc in each st around. Join and fasten off.
Count: 48 sc (24 front + 24 back).
Bottom Band (worked into Round 24):
Join Color A at the seam of Round 24.
Bottom Round 1 (conversion): Ch 1. Sc in each dc and 2 sc in each ch-2 sp. Join.
Count: 16 sc in the 16 dc + 32 sc in the 16 ch-2 sps = 48 sc (24 front + 24 back). The previous round also had 48 sts (16 dc + 32 ch), so this is one stitch per existing stitch with 0 extra.
Bottom Round 2 (eyelets): Ch 4 (counts as dc + ch 1). Skip next sc, dc in next sc, ch 1. Repeat from * 22 more times. Skip the last sc and sl st into the 3rd ch of the ch-4.
Count: 24 dc + 24 ch-1 sps = 48 sts (12 eyelets front + 12 eyelets back).
Bottom Round 3: Ch 1, sc in each dc and in each ch-1 sp. Join and fasten off.
Count: 24 + 24 = 48 sc (24 front + 24 back).
Why the math works: Each mesh is 3 sts wide, and 16 meshes × 3 = 48. Every border round therefore keeps exactly 48 sts, with 24 per flat side. No stitches are added, so the bands stay flat and don’t flare or pull in. The eyelet round splits 48 sts evenly into 24 pairs, so the drawstring weaves in and out symmetrically.
Checkpoint: The body now measures 6 in × 16.2 in (15.2 cm × 41.1 cm). That is 14.4 in of mesh, plus a 0.6 in (1.5 cm) top band, plus a 1.2 in (3.0 cm) bottom band.
Assembly
- Drawstring: Starting at the center front, weave the drawstring over and under through the 24 eyelets of Bottom Round 2 so both ends come out at the center front. Pull until the opening is about 2 in (5.1 cm) across, then tie a single overhand knot. Each end should hang about 2.25 in (5.7 cm). Sew one cord ball to each end.
- Head: Pin the head to the back half of the top band so that 1 in (2.5 cm) of the head overlaps the band. Sew it in place across the 24 back stitches only. The front 24 stitches stay open for loading bags.
- Loop: Fold the loop strip in half and sew both ends to the top center of the head. The finished loop stands about 2 in (5.1 cm) tall.
- Shell: Center the shell on the front, with its top edge 0.5 in (1.3 cm) below the top band (around mesh Rounds 2–6). Whipstitch around the rim.
- Front flippers: Sew the base of one flipper to each side fold at Rounds 2–3, with the points angled upward and outward.
- Back flippers: Sew the base of one flipper to each side fold at Round 23 and the bottom band, with the points angled downward and outward.
Final Blocking
- Wet the body only, gently squeezing out the water. Don’t wring it.
- Roll it in a towel to remove the extra moisture.
- Lay it flat and pin it to 6 in × 16.2 in (15.2 cm × 41.1 cm), keeping the mesh columns straight.
- Pin the shell and flippers flat if they curl.
- Let everything dry completely before loading bags.
Final Quality-Control Checklist
- Every mesh round has 16 squares, and the columns run straight.
- Each border round has 48 sts.
- The body measures 6 in × 16.2 in (15.2 cm × 41.1 cm).
- The safety eyes are secure and the backs are locked.
- The head is sewn only to the back half, so the front opening is free.
- The shell is centered and the flippers are symmetrical.
- The drawstring cinches to 2 in (5.1 cm) and stays tied.
- All ends are woven in securely.
Troubleshooting
- The mesh slants in a spiral: You probably placed a dc into a ch-2 sp. Always work the dc into the top of the dc below.
- The foundation ring is tight: Chain with a 5.5 mm hook, then switch back to the 5.0 mm hook.
- The tube stretches too long when loaded: Use cotton, or work only 22 mesh rounds (13.2 in / 33.5 cm).
- The shell cups: Block it flat. If it still cups, add one more stitch to each end group in Round 4.
- The flippers curl: Steam-block them, or work Round 2 more loosely.
- The head droops forward: Add a few stitches from the lower back of the head into the band.
Care
Hand wash in cool water with mild soap, reshape, and dry flat. Fill the holder only after it is completely dry.

Final Notes
The measurement chain is simple: 1 mesh = 0.75 in (1.9 cm), and 16 meshes = 12 in (30.5 cm) around, or 6 in (15.2 cm) flat. Twenty-four rounds at 0.6 in (1.5 cm) each give 14.4 in (36.6 cm). The border adds 0.6 in (1.5 cm) at the top and 1.2 in (3.0 cm) at the bottom, for 16.2 in (41.1 cm). With the head, loop and cords added, Tilly hangs about 23.5 in (59.7 cm). Check your measurements at each stage and the rest will fall into place.
Happy crocheting!