

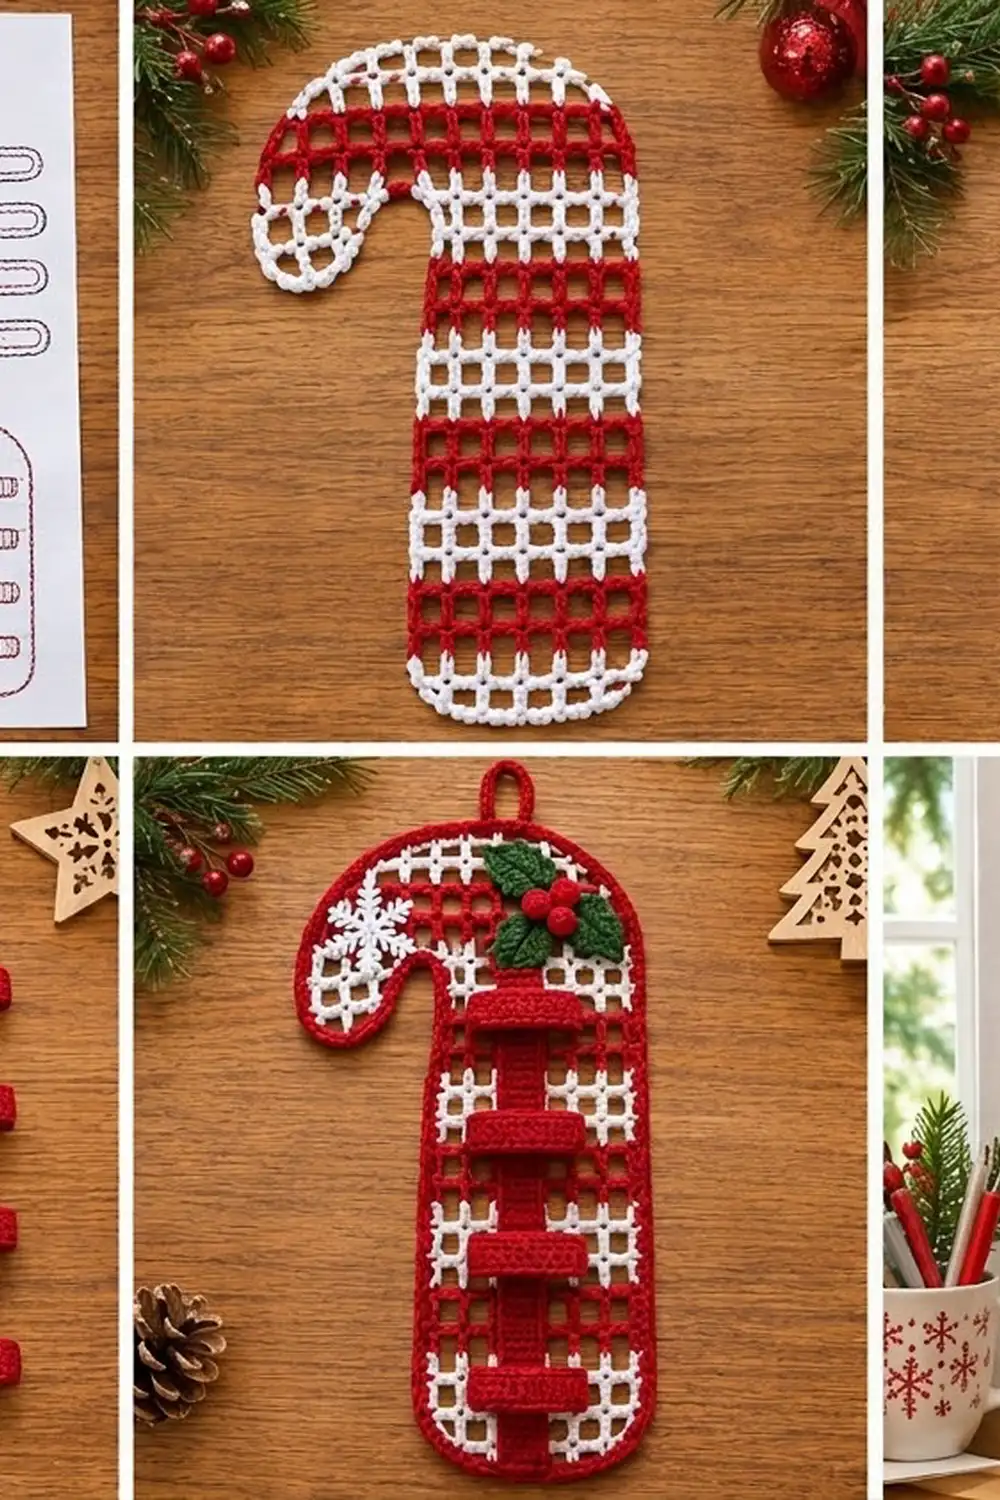
This candy cane hangs on the wall and keeps your charging cables tidy. The body is an open filet mesh in classic peppermint stripes of bright red and white. A solid red border finishes the outline, and a small loop at the top lets it hang from a hook or peg.
A red strap runs down the center of the shaft and carries four tube-shaped bands. Each band holds one coiled cable. A green holly sprig with three red berries and a white picot snowflake add a festive touch to the crook.
The finished organizer measures 8 in (20.3 cm) wide and 14 in (35.6 cm) tall, not counting the hanging loop. This pattern uses US crochet terms.
You work the shaft from the bottom up in mesh rows. Next you make a short leg, bridge it to the shaft with a chain, and work the crook across both. A two-round border adds the loop. Finally, you sew on the strap, the bands and the appliqués.
Finished Size and Construction
- Finished size: 8 in × 14 in (20.3 cm × 35.6 cm); the shaft is 5 in (12.7 cm) wide
- Skill level: Intermediate
- Terminology: US
- Yarn weight: Worsted (#4) cotton
- Hooks: 4.5 mm (US 7) for the mesh and border; 4.0 mm (US G-6) for the solid parts
- Number of pieces: 1 mesh panel, plus 1 strap, 4 bands, 2 leaves, 3 berries and 1 snowflake sewn onto it
- Layout: a single candy-cane panel (no grid)
- Panel size before border: 7 in × 13 in (17.8 cm × 33.0 cm)
- Border depth: 0.5 in (1.3 cm) on every edge
Materials
Use a smooth, mercerized or matte worsted cotton. Cotton blocks crisply and keeps the mesh square. Avoid acrylic, because it lets the panel sag under the weight of the cables.
- Red: 30 g, about 48 m (mesh stripes, border, loop, strap, bands, berries)
- White: 15 g, about 24 m (mesh stripes, snowflake)
- Green: 5 g, about 8 m (holly leaves)
All quantities include a margin of about 20 percent.
Tools: 4.5 mm and 4.0 mm hooks, tapestry needle, 4 locking stitch markers, scissors, ruler, blocking mat, rust-proof pins and a spray bottle.
Abbreviations (US Terms)
- ch: chain
- sl st: slip stitch
- sc: single crochet
- hdc: half double crochet
- dc: double crochet
- sc2tog: single crochet 2 together
- sp: space
- st(s): stitch(es)
- MR: magic ring
- rep: repeat
Special stitches
- Mesh: ch 1, skip the next st or ch-1 sp, dc in the next dc. Each mesh is one open square.
- Inc-mesh (start of row): ch 5, dc in the first dc (the dc at the base of the ch-5). The ch-5 forms the bottom bar (1 ch), the outer post (3 ch) and the top bar (1 ch). It counts as 1 mesh.
- Dec-mesh (start of row): sl st in the first ch-1 sp and in the next dc, then ch 4 (counts as dc + ch 1).
- Picot: ch 3, sl st in the 3rd ch from the hook.
Row-end rule: End each row with a dc in the 3rd ch of the turning ch-4. If the row below began with an inc-mesh or with the foundation’s skipped ch-5, end with a dc in the 4th ch of that ch-5 instead.
Gauge and Checkpoints
Mesh gauge (4.5 mm hook): 4 mesh and 4 rows = 2 in (5.1 cm). Each mesh is 0.5 in (1.3 cm) square.
Solid gauge (4.0 mm hook): 16 sc and 18 rows = 4 in (10.2 cm).
Border gauge (4.5 mm hook): 4 sc = 1 in (2.5 cm).
Test before you start. Ch 16, then work Row 1 below (6 mesh). Work 5 more rows of plain mesh and block the swatch. It should measure 3 in × 3 in (7.6 cm × 7.6 cm).
- If it is too big: go down 0.5 mm.
- If it is too small: go up 0.5 mm.
- If the squares are taller than they are wide: pull each dc’s first loop up a little less.
Checkpoints:
- After Row 3, the shaft is 4 in (10.2 cm) wide.
- After Row 21, the shaft is 10.5 in (26.7 cm) tall.
- The finished leg is 1.5 in (3.8 cm) wide and 1.5 in (3.8 cm) tall.
- After Row 22, the crook is 7 in (17.8 cm) wide.
- After Row 26, the panel is 13 in (33.0 cm) tall.
Pattern
Stripe Sequence
Work in 2-row bands, starting with white:
- White: Rows 1–2, 5–6, 9–10, 13–14, 17–18, 21–22 and 25–26
- Red: Rows 3–4, 7–8, 11–12, 15–16, 19–20 and 23–24
To change color, finish the last dc of the previous row with the new color. Every color change falls at the end of an even row, on the left edge. Carry the unused yarn loosely up that edge; the border will hide it.
Edge names used below:
- Edge A: the outer right edge of the shaft
- Edge B: the left edge of the shaft, which faces the leg
Shaft
With the 4.5 mm hook and white, ch 16.
Row 1: Dc in the 6th ch from the hook (the skipped chs count as dc + ch 1, plus 1 base ch). Work (ch 1, skip 1 ch, dc in next ch) 5 times. You have 6 mesh (7 dc and 6 ch-1 sp, 13 sts). The row ends at Edge A.
Row 2: Turn. Work an inc-mesh, then work 6 mesh across. You have 7 mesh (15 sts). Edge A now steps out by one square.
Row 3: Change to red at the end of Row 2. Turn. Work an inc-mesh, then work 7 mesh across. You have 8 mesh (17 sts). The stepped bottom corners form the rounded end of the cane.
Rows 4–21: Ch 4, turn, and work 7 mesh across. Each row is 8 mesh (17 sts). Follow the stripe sequence. After Row 20, cut red and leave a 6 in (15.2 cm) tail. Row 21 is white and ends at Edge A.
Do not fasten off. Put the live loop on a stitch marker.
Leg
With the 4.5 mm hook and red, ch 6.
L1: Dc in the 6th ch from the hook. You have 1 mesh (3 sts).
L2: Turn. Work an inc-mesh, ch 1, skip the sp, and dc in the 4th ch of the skipped ch-5. You have 2 mesh (5 sts).
L3: Change to white. Turn. Work an inc-mesh, then work 2 mesh. You have 3 mesh (7 sts).
L1 and L2 match the red Rows 19–20, and L3 matches the white Row 21.
Bridge: Lay the leg to the left of the shaft, with the last dc of L3 facing Edge B. Ch 5, then sl st in the 3rd ch of the turning ch-4 at the start of Row 21 on Edge B. Fasten off. The 5 chains are the base for 3 mesh: sp, post, sp, post, sp.
Crook
Row 22 (white): Put the shaft’s live loop back on the hook.
- Ch 4, turn, and work 7 mesh to Edge B, ending in the st holding the bridge sl st.
- Over the bridge, work (ch 1, skip 1 ch, dc in next ch) twice.
- Ch 1, skip the last bridge ch, and dc in the last dc of L3.
- Work 3 mesh across the leg.
You have 14 mesh (8 + 3 + 3; 15 dc and 14 ch-1 sp, 29 sts). The row ends at the far left edge.
Rows 23–24 (red): Ch 4, turn, and work 13 mesh. Each row is 14 mesh (29 sts).
Row 25 (white): Turn. Work a dec-mesh, then work 12 mesh. You have 13 mesh (27 sts).
Row 26: Turn. Work a dec-mesh, then work 11 mesh. You have 12 mesh (25 sts). Fasten off and weave in all ends along the edges.
Strap
With the 4.0 mm hook and red, ch 41.
Row 1: Sc in the 2nd ch from the hook and in each ch across. You have 40 sc.
Rows 2–4: Ch 1, turn, and sc in each st. Each row is 40 sc.
The strap measures 10 in × 0.9 in (25.4 cm × 2.3 cm). Fasten off and leave a 40 in (101.6 cm) tail for sewing.
Cable Bands (make 4)
With the 4.0 mm hook and red, ch 8.
Row 1: Sc in the 2nd ch from the hook and in each ch across. You have 7 sc.
Rows 2–10: Ch 1, turn, and sc in each st. Each row is 7 sc.
The flat piece measures 1.75 in × 2.2 in (4.4 cm × 5.6 cm). Whipstitch Row 10 to the foundation to make a tube. Flatten it with the seam centered at the back. Each band is 1.75 in (4.4 cm) wide and 1.1 in (2.8 cm) tall, and is open at both sides.
Holly Leaves (make 2)
With the 4.0 mm hook and green, ch 10.
- First side: Sl st in the 2nd ch from the hook, then work:
- sc in next ch
- hdc in next ch
- (dc, picot, dc) in next ch
- dc in next ch
- (dc, picot, dc) in next ch
- hdc in next ch
- sc in next ch
- Tip: Work (sc, picot, sc) in the last ch.
- Second side: Working along the other side of the chain, work:
- sc in next ch
- hdc in next ch
- (dc, picot, dc) in next ch
- dc in next ch
- (dc, picot, dc) in next ch
- hdc in next ch
- sc in next ch
- Sl st in the first sl st. Fasten off.
Each leaf has 5 points and is about 2 in × 1 in (5.1 cm × 2.5 cm).
Berries (make 3)
With the 4.0 mm hook and red:
- Rnd 1: 6 sc in a MR. You have 6 sc.
- Rnd 2: Sc in each st. You have 6 sc.
- Rnd 3: Sc2tog 3 times. You have 3 sts.
Push the tails inside to stuff the berry and pull it closed. Each berry is about 0.4 in (1.0 cm) across.
Snowflake
With the 4.0 mm hook and white:
- Rnd 1: Ch 1, then 6 sc in a MR. Sl st in the first sc. You have 6 sc.
- Rnd 2: *Ch 7. Sl st in the 4th ch from the hook to make the tip loop. Sl st in the next ch. Work 2 picots in a row so they fan to either side, then sl st in the last 2 ch of the arm. Sl st in the next sc.* Rep from * to * 5 more times. You have 6 arms.
Fasten off. The snowflake is about 2 in (5.1 cm) across.
Border
The border is worked at 4 sc per inch, so each 0.5 in (1.3 cm) mesh or row-end takes exactly 2 sc. On a dc row-end, work 2 sc around the post. On a top or bottom edge, work 1 sc in each dc and 1 sc in each ch-1 sp, skipping the last dc of each run so that every mesh gets 2 sc.
Rnd 1 (red, 4.5 mm hook): Join red at the left end of the shaft’s bottom edge. Work along the bottom, then up the outer right side. Use the counts below and sl st in the first sc to close the round.
| # | Segment | Sc |
|---|---|---|
| 1 | Shaft bottom (6 mesh) | 12 |
| 2 | Bottom-right step (1 row-end + 1 mesh bar) | 4 |
| 3 | Right side, Rows 2–25 | 48 |
| 4 | Top-right step | 4 |
| 5 | Crook top, Row 26 (12 mesh) | 24 |
| 6 | Top-left step (2 row-ends + 1 mesh) | 6 |
| 7 | Outer left side, Rows 24–21 | 8 |
| 8 | Leg-tip left step | 6 |
| 9 | Leg tip (1 mesh) | 2 |
| 10 | Leg-tip right step | 4 |
| 11 | Inner leg edge | 4 |
| 12 | Notch ceiling (bridge, 3 mesh) | 6 |
| 13 | Shaft Edge B, Rows 21–3 | 38 |
| 14 | Bottom-left step | 6 |
Rnd 1 has 172 sc in total.
Rnd 2: Ch 1, then sc in each st around, with these changes:
- Work 2 sc in the middle st of each of the 6 rounded corners (segments 2, 4, 6, 8, 10 and 14).
- Sc2tog where segment 11 meets segment 12, and again where segment 12 meets segment 13.
- Hanging loop: after the 12th sc of segment 5, ch 12 and keep going. The loop chains are not counted.
Rnd 2 has 176 sc (172 + 6 − 2). Fasten off.
Why the math works: The perimeter is 28 mesh across the top and bottom edges plus 58 row-ends up the sides, for 86 units of 0.5 in. At 2 sc per unit, that gives 172 sc, so the border lies flat without stretching or ruffling.
The six increases let the outer curves grow, and the two decreases keep the notch from flaring. The two rounds add 0.5 in (1.3 cm) on every edge:
- crook: 7 in (17.8 cm) becomes 8 in (20.3 cm)
- height: 13 in (33.0 cm) becomes 14 in (35.6 cm)
- shaft: 4 in (10.2 cm) becomes 5 in (12.7 cm)
- notch: 1.5 in (3.8 cm) becomes 0.5 in (1.3 cm)
Final Blocking
- Wet the panel, press out the water in a towel and lay it on the mat.
- Pin the outline to 8 in × 14 in (20.3 cm × 35.6 cm), with the shaft at 5 in (12.7 cm).
- Pin along each grid line so every square is 0.5 in (1.3 cm), and ease the stepped corners into smooth curves.
- Pin the notch open to 0.5 in (1.3 cm) and pin the loop upright.
- Let it dry completely, at least 12 hours.
- Attach the bands. Mark points on the strap 1.5, 3.75, 6 and 8.25 in (3.8, 9.5, 15.2 and 21.0 cm) up from its bottom end. Center a band over each mark. Sew a straight line through the band’s back layer and the strap, leaving both side openings free.
- Attach the strap. Center the strap on the shaft, with its bottom end 2 in (5.1 cm) above the bottom edge of the mesh. Its top end will sit 1 in (2.5 cm) below the top of the mesh. Whipstitch both long edges to the mesh posts, then stitch through the strap and mesh behind each band for extra support.
- Add the holly. Sew the leaves in a V on the top right of the crook so they cover the top of the strap. Sew the berries in a triangle where the leaves meet.
- Add the snowflake. Sew it on the top left of the crook by its center and arm tips.
Final Quality-Control Checklist
- The panel measures 8 in × 14 in (20.3 cm × 35.6 cm).
- The mesh squares are even, and the stripes alternate white and red with white at both ends.
- Rnd 2 has 176 sc and lies flat.
- The notch is open and the curves are smooth.
- The hanging loop is secure.
- All 4 bands are level, open at both sides and stitched through to the mesh.
- The appliqués are flat and every end is woven in.
Troubleshooting
- The squares lean or look like diamonds: your turning ch is too tight. Block hard along the grid lines.
- The panel is too long: your dc are too tall. Wrap the yarn less loosely or go down a hook size.
- The border ruffles: you added extra sc. Recount each segment against the table.
- The border cups: you missed an increase on a corner, or you are working too tightly.
- The notch closed up: you worked too many sc on the inner edges. Keep 4 sc on the inner leg edge and 6 on the notch ceiling.
- The bands sag: sew them through to the mesh, not just to the strap.
Care
Hand wash in cool water and lay flat to dry, then re-pin to size if needed. Remove the cables before washing.

Final Notes
The size depends on one measurement: a 0.5 in (1.3 cm) mesh square. Eight squares make a 4 in (10.2 cm) shaft, 14 squares make a 7 in (17.8 cm) crook, and 26 rows make 13 in (33.0 cm). The 0.5 in (1.3 cm) border brings these to 5 in, 8 in and 14 in (12.7 cm, 20.3 cm and 35.6 cm). Check your gauge first and the rest of the numbers will follow.
Happy crocheting!