

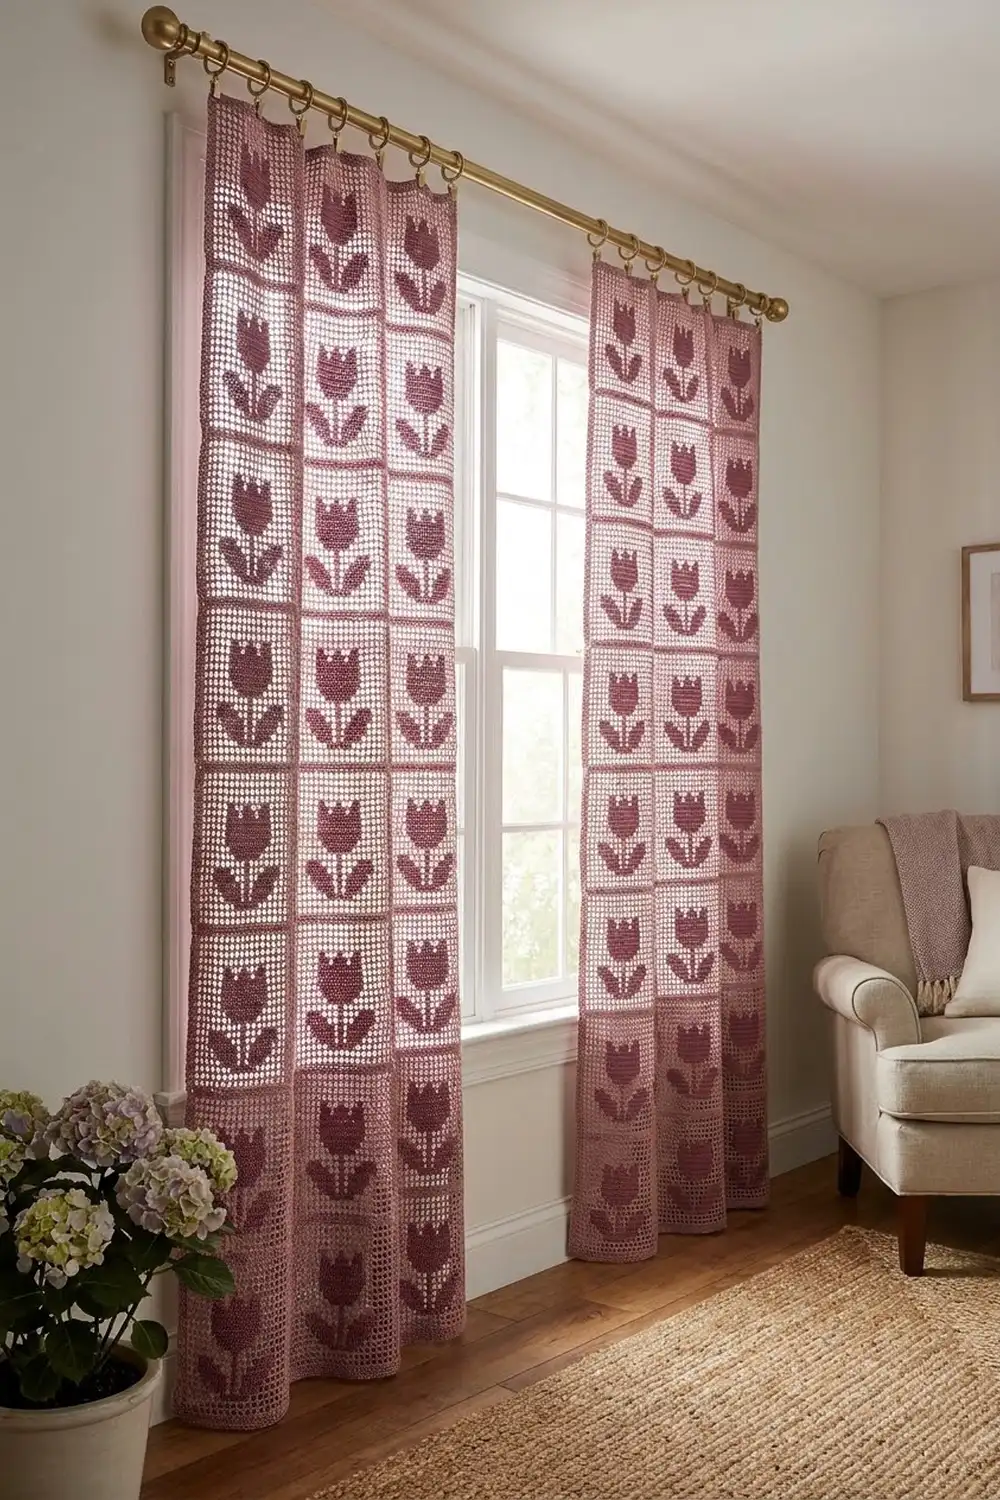
Tulip Lane is a filet crochet curtain panel covered in rows of upright tulips. Each tulip is made of solid filled squares on a light, open mesh ground. In daylight the mesh glows and the dense tulips stand out as a deeper rose, so the panel looks two-toned even though it uses only one color.
The sample is worked in a dusty rose-mauve cotton. The style is vintage-cottage: clean geometric tulips, straight mesh channels between the columns, and a narrow solid border. The pattern uses US crochet terms throughout.
One finished panel measures 19.75 in × 83.5 in (50.2 cm × 212.1 cm). The photo shows a matching pair, so the materials are given per panel and per pair.
For construction, you work 30 identical rectangular filet blocks from the bottom up and give each one a single-crochet edging round. Then you whipstitch the blocks into a grid 3 blocks wide and 10 blocks tall, add a 3-round border, and block the panel. You hang it with ring clips, so no rod pocket is needed.
Finished Size and Construction
- Finished panel size: 19.75 in × 83.5 in (50.2 cm × 212.1 cm)
- Skill level: Intermediate (filet crochet and simple counting)
- Terminology: US crochet terms
- Yarn weight: Sport (CYC 2), mercerized or matte cotton
- Hook: 3.0 mm (US C/2 or D/3)
- Number of pieces: 30 blocks per panel (60 for a pair)
- Layout: 3 blocks across × 10 blocks down
- Block size: 6 in × 8 in (15.2 cm × 20.3 cm) before edging, 6.25 in × 8.25 in (15.9 cm × 21.0 cm) after edging
- Size before border: 18.75 in × 82.5 in (47.6 cm × 209.6 cm)
- Border depth: 0.5 in (1.3 cm) on each side
Materials
Use a smooth cotton or cotton blend in sport weight so the filet squares stay crisp and the tulips stay readable from across the room. Avoid fuzzy or very splitty yarns. Choose a medium or dusty shade: very pale yarn makes the tulips harder to see, and very dark yarn hides the mesh.
- Dusty rose-mauve, one panel: 550 g, about 1,650 m (1,804 yd). That is 11 balls of 50 g / 150 m (164 yd).
- Dusty rose-mauve, pair of panels: 1,100 g, about 3,300 m (3,609 yd). That is 22 balls.
These quantities include a margin of roughly 15% for your gauge swatch, joining, and differences in tension. Buy all the yarn from one dye lot.
Tools:
- 3.0 mm crochet hook
- Tapestry needle
- Stitch markers
- Tape measure
- Rust-proof pins and blocking mats (or a clean carpet covered with a towel)
- Spray bottle
- 7 curtain ring clips per panel
Abbreviations (US Terms)
- ch: chain
- sc: single crochet
- hdc: half double crochet
- dc: double crochet
- sk: skip
- sp: space
- st(s): stitch(es)
- tch: turning chain
- RS / WS: right side / wrong side
- OS: open square
- FS: filled square
Special stitches:
- Post: every dc (or tch) that separates squares. Each row of a block has 16 posts and 15 squares. That makes 46 sts per row: 16 posts + (15 × 2) sts between them.
- Open square (OS): ch 2, sk the next 2 sts (or the ch-2 sp), dc in the next post.
- Filled square (FS): dc in each of the next 2 sts (or 2 dc in the ch-2 sp), dc in the next post.
- Row start: If the first square is an OS, ch 5 (this counts as a post plus ch 2), sk 2 sts, and dc in the next post. If the first square is an FS, ch 3 (this counts as a post), dc in the next 2 sts, and dc in the next post.
- Row end: Work the last square as usual. The final post goes into the 3rd ch of the ch-5 or into the top of the ch-3.
Gauge and Checkpoints
Gauge: 10 squares and 10 rows = 4 in (10.2 cm) in filet mesh. One square is 0.4 in (1.0 cm) wide and one row is 0.4 in (1.0 cm) tall.
Make one complete block before you start the rest. It is your gauge swatch, so check it at each stage:
- After Row 1: The width is 6 in (15.2 cm).
- After Row 10: The height is 4 in (10.2 cm).
- After Row 20: The block is 6 in × 8 in (15.2 cm × 20.3 cm).
- After the edging: The block is 6.25 in × 8.25 in (15.9 cm × 21.0 cm).
If the block is more than 0.25 in (0.6 cm) too big in either direction, go down a hook size (0.25–0.5 mm). If it is too small, go up a size. If only the height is off, check how you work your dc. Pull up the first loop to the same height every time, and keep the ch-5 at row starts loose but not loopy.
Tulip Block (Make 30 per Panel)
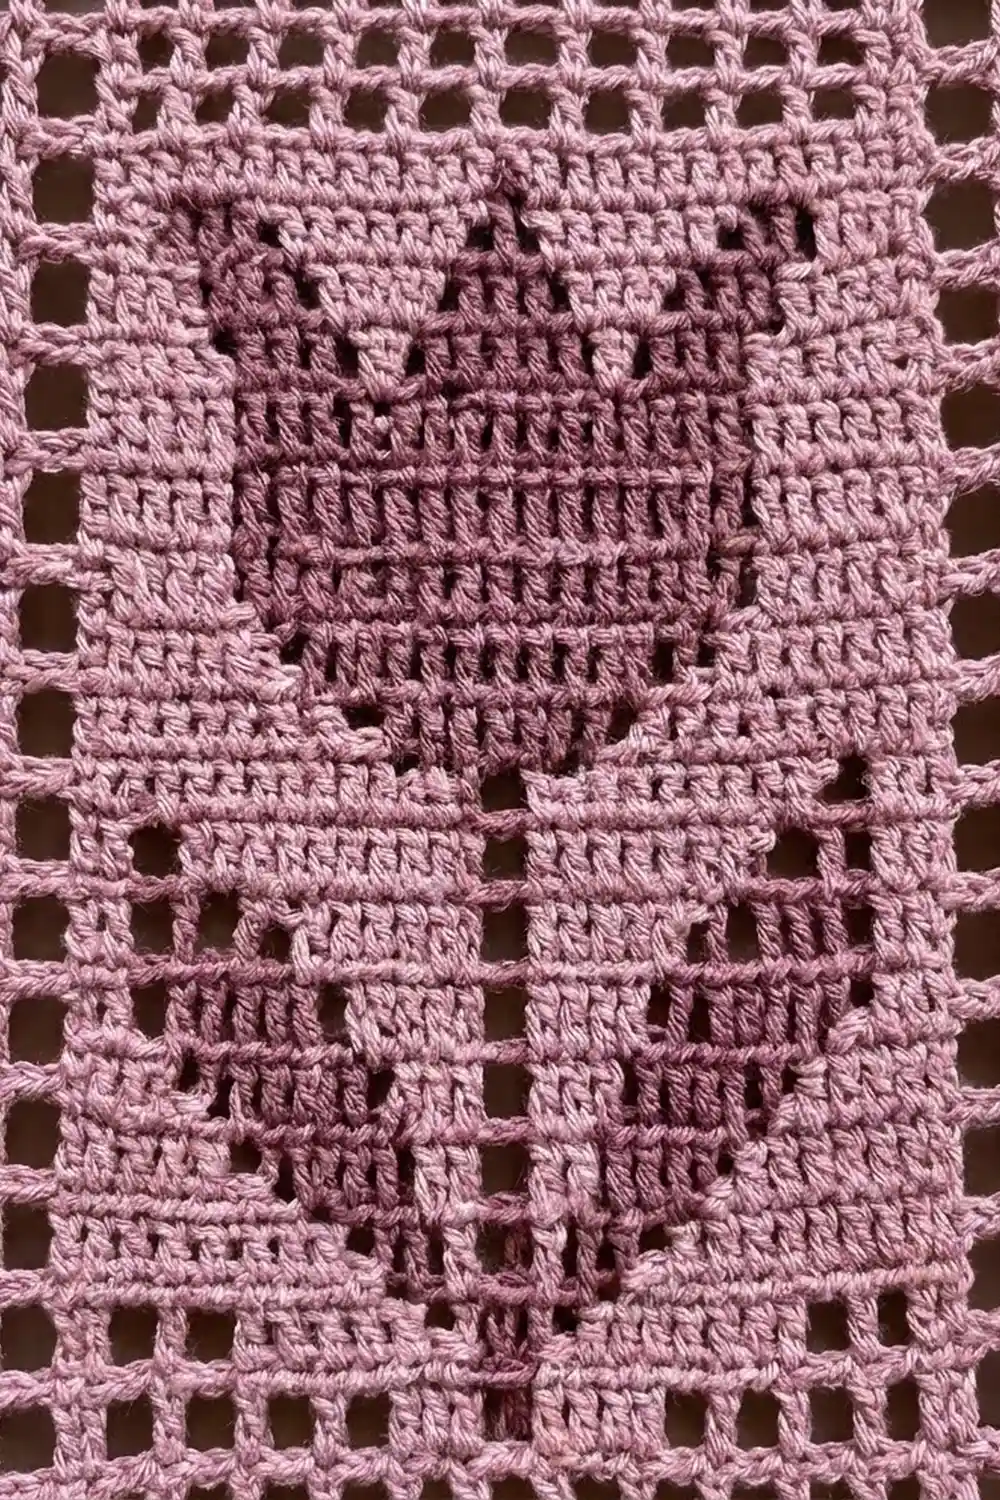
The block is 15 squares wide and 20 rows tall. Every row is symmetrical, so you read each row the same way in both directions. Columns 1–2 and 14–15 stay open on every row, which forms the mesh channels between the tulip columns.
Foundation: Ch 50.
Row 1 (RS): Dc in the 8th ch from the hook (this makes 1 OS). Work ch 2, sk 2 ch, dc in the next ch 14 times. Turn. (15 OS; 16 posts; 46 sts)
Row 2: 15 OS. Turn. (46 sts)
Stem and leaves:
Row 3: 7 OS, 1 FS, 7 OS. (1 FS, 14 OS)
Row 4: 6 OS, 3 FS, 6 OS. (3 FS, 12 OS)
Row 5: 5 OS, 5 FS, 5 OS. (5 FS, 10 OS)
Row 6: 3 OS, 3 FS, 1 OS, 1 FS, 1 OS, 3 FS, 3 OS. (7 FS, 8 OS)
Row 7: 2 OS, 3 FS, 2 OS, 1 FS, 2 OS, 3 FS, 2 OS. (7 FS, 8 OS)
Row 8: 2 OS, 2 FS, 3 OS, 1 FS, 3 OS, 2 FS, 2 OS. (5 FS, 10 OS)
Row 9: 2 OS, 1 FS, 4 OS, 1 FS, 4 OS, 1 FS, 2 OS. (3 FS, 12 OS)
Rows 4–9 build the leaves. Rows 4–5 form a solid V that widens from the stem. On Rows 6–9 the leaves split away from the center and step outward one square per row, ending in single-square tips at columns 3 and 13.
Rows 10–11: 7 OS, 1 FS, 7 OS. (1 FS, 14 OS on each row)
Tulip cup:
Row 12: 6 OS, 3 FS, 6 OS. (3 FS, 12 OS)
Row 13: 5 OS, 5 FS, 5 OS. (5 FS, 10 OS)
Rows 14–17: 4 OS, 7 FS, 4 OS. (7 FS, 8 OS on each row)
Row 18: 4 OS, 1 FS, 2 OS, 1 FS, 2 OS, 1 FS, 4 OS. (3 FS, 12 OS)
Row 18 makes the three petal points, with an open square between each pair of points.
Rows 19–20: 15 OS. (46 sts on each row). Do not fasten off.
Edging round (RS): You will now work around the block. Corners are ch-1 sps, and they are not counted in the side totals.
- Ch 1. Along the top, work 1 sc in each post and 2 sc in each ch-2 sp, for 46 sc. Ch 1.
- Down the side, work 3 sc in each row-end, for 60 sc. Ch 1.
- Along the bottom, work into the foundation: 1 sc at the base of each post and 2 sc in each ch-2 sp, for 46 sc. Ch 1.
- Up the other side, work 3 sc in each row-end, for 60 sc. Ch 1.
- Sl st to the first sc and fasten off.
Total: 212 sc plus 4 corner ch-1 sps. Each short side has 46 sc and each long side has 60 sc.
The block now measures 6.25 in × 8.25 in (15.9 cm × 21.0 cm). Weave in the ends along the solid stitches of the stem so they stay hidden.
Make All Pieces
- One panel: 30 tulip blocks in dusty rose-mauve
- Pair of panels: 60 tulip blocks in dusty rose-mauve
Layout for one panel (the RS faces you and all tulips point up):
Row A:   T  T  T
Row B:   T  T  T
Row C:   T  T  T
Row D:   T  T  T
Row E:   T  T  T
Row F:   T  T  T
Row G:   T  T  T
Row H:   T  T  T
Row I:   T  T  T
Row J:   T  T  T
         (T = tulip block, 3 across x 10 down)
Lightly steam or wet-block all blocks to 6.25 in × 8.25 in (15.9 cm × 21.0 cm) before joining. Matching sizes make the seams much easier.
Joining
Method: Use a flat whipstitch through the outer loops only, worked with the RS facing up. This keeps the seam flat and makes a fine solid line that frames each tulip column.
Stitch-to-stitch logic:
- Join each row of 3 blocks. Place the blocks side by side with their long edges touching. Match 60 sc to 60 sc, starting in the first sc after the corner sp and ending in the last sc before the next corner sp. The corner ch-1 sps are not joined. Each row of 3 blocks measures 18.75 in × 8.25 in (47.6 cm × 21.0 cm).
- Join the rows. Place each row above the next and match the short edges: 3 × 46 = 138 sc on one row to 138 sc on the other. Pass over the corner ch-1 sps at each block junction with one stitch, without working into them.
Tension: Each whipstitch should snug the 2 loops together without bunching them. Every 20 sts, lay the seam flat. If it puckers, loosen the stitches. If you can see gaps, tighten them.
Checkpoints:
- 2 rows joined: 18.75 in × 16.5 in (47.6 cm × 41.9 cm)
- 4 rows joined: 18.75 in × 33 in (47.6 cm × 83.8 cm)
- All 10 rows joined: 18.75 in × 82.5 in (47.6 cm × 209.6 cm)
Border
Border gauge: Along the edges you have about 7.4 sc per inch (2.9 sc per cm), which is the same density as the block edgings. One sc round adds 0.125 in (0.3 cm) and one hdc round adds 0.25 in (0.6 cm).
Starting counts: The top and bottom edges each have 3 blocks × 46 sc = 138 sts. The long sides each have 10 blocks × 60 sc = 600 sts. No stitches are added at the seams: the corner ch-1 sps at the block junctions are skipped. Corners on the border are ch-2 sps, and they are not counted in the side totals.
Rnd 1 (RS): Join the yarn in the first sc after any panel corner. Work sc in each sc along the side. In each panel corner sp, work (sc, ch 2, sc). Join with a sl st.
- Top/bottom: 138 + 2 = 140 sc
- Long sides: 600 + 2 = 602 sc
Rnd 2: Ch 2 (does not count as a st). Work hdc in each sc. In each corner ch-2 sp, work (hdc, ch 2, hdc). Join with a sl st.
- Top/bottom: 140 + 2 = 142 hdc
- Long sides: 602 + 2 = 604 hdc
Rnd 3: Ch 1. Work sc in each hdc. In each corner ch-2 sp, work (sc, ch 2, sc). Join with a sl st and fasten off.
- Top/bottom: 142 + 2 = 144 sc
- Long sides: 604 + 2 = 606 sc
Why the math works: Each round works 1 stitch into each stitch of the previous round, at the same density as the edge it sits on. The only extra stitches are the 2 per side placed at the corners, and they turn each corner flat. The border adds 0.125 + 0.25 + 0.125 = 0.5 in (1.3 cm) per side. That gives 18.75 + 1 = 19.75 in (50.2 cm) across and 82.5 + 1 = 83.5 in (212.1 cm) long.
Final Blocking
- Weave in all the remaining ends through solid stitches and trim them.
- Soak the panel in cool water for 15 minutes, then press out the water. Do not wring it.
- Roll the panel in towels to remove extra moisture.
- Lay it flat with the RS up. A panel this long can be blocked in two halves.
- Pin the outer corners to 19.75 in × 83.5 in (50.2 cm × 212.1 cm).
- Pin along each seam line so the tulip columns run straight and the mesh channels stay parallel.
- Ease every open square into a true square, and keep the petal points crisp.
- Let the panel dry completely before you unpin it.
Final Quality-Control Checklist
- The panel measures 19.75 in × 83.5 in (50.2 cm × 212.1 cm), within 0.25 in (0.6 cm).
- All 30 tulips point the same way and line up in 3 straight columns.
- Every block has 2 open columns on each side and 2 open rows at the top and bottom.
- Each tulip has 3 petal points, a 2-square stem section between the leaves and the cup, and matching leaves.
- The seams are flat, with no gaps or puckers.
- The border counts per side are correct, and the corners lie flat.
- No ends are visible from either side.
Troubleshooting
- The tulips look lopsided: Recount the row against the pattern. Every row should total exactly 15 squares.
- The block is narrower at the top: The ch-5 row starts are too tight. Chain more loosely.
- The open squares are taller than they are wide: Use a smaller hook, or pull your dc loops up less.
- A seam ripples: You matched the stitches unevenly. Take out the seam and match the stitches 1:1.
- The border flares: Check that you worked 1 stitch per stitch, or go down a hook size for the border.
- The border pulls in: Use a hook 0.25 mm larger for the border.
- The panel sags when hung: Space the clips evenly, about 3.3 in (8.4 cm) apart, using 7 clips across the top.
Care
Hand wash cool with mild detergent, roll the panel in towels, and dry it flat. Reshape it lightly while damp to keep the squares even.
Final Notes
Everything rests on the measurement chain:
- 1 square = 0.4 in (1.0 cm)
- 15 × 20 squares = a 6 in × 8 in (15.2 cm × 20.3 cm) block
- The edging brings it to 6.25 in × 8.25 in (15.9 cm × 21.0 cm)
- 3 × 10 blocks = 18.75 in × 82.5 in (47.6 cm × 209.6 cm)
- The 0.5 in (1.3 cm) border finishes the panel at 19.75 in × 83.5 in (50.2 cm × 212.1 cm)
If your first block hits its checkpoints, the rest of the panel will follow. Make a second panel to complete the pair.
Happy crocheting!