

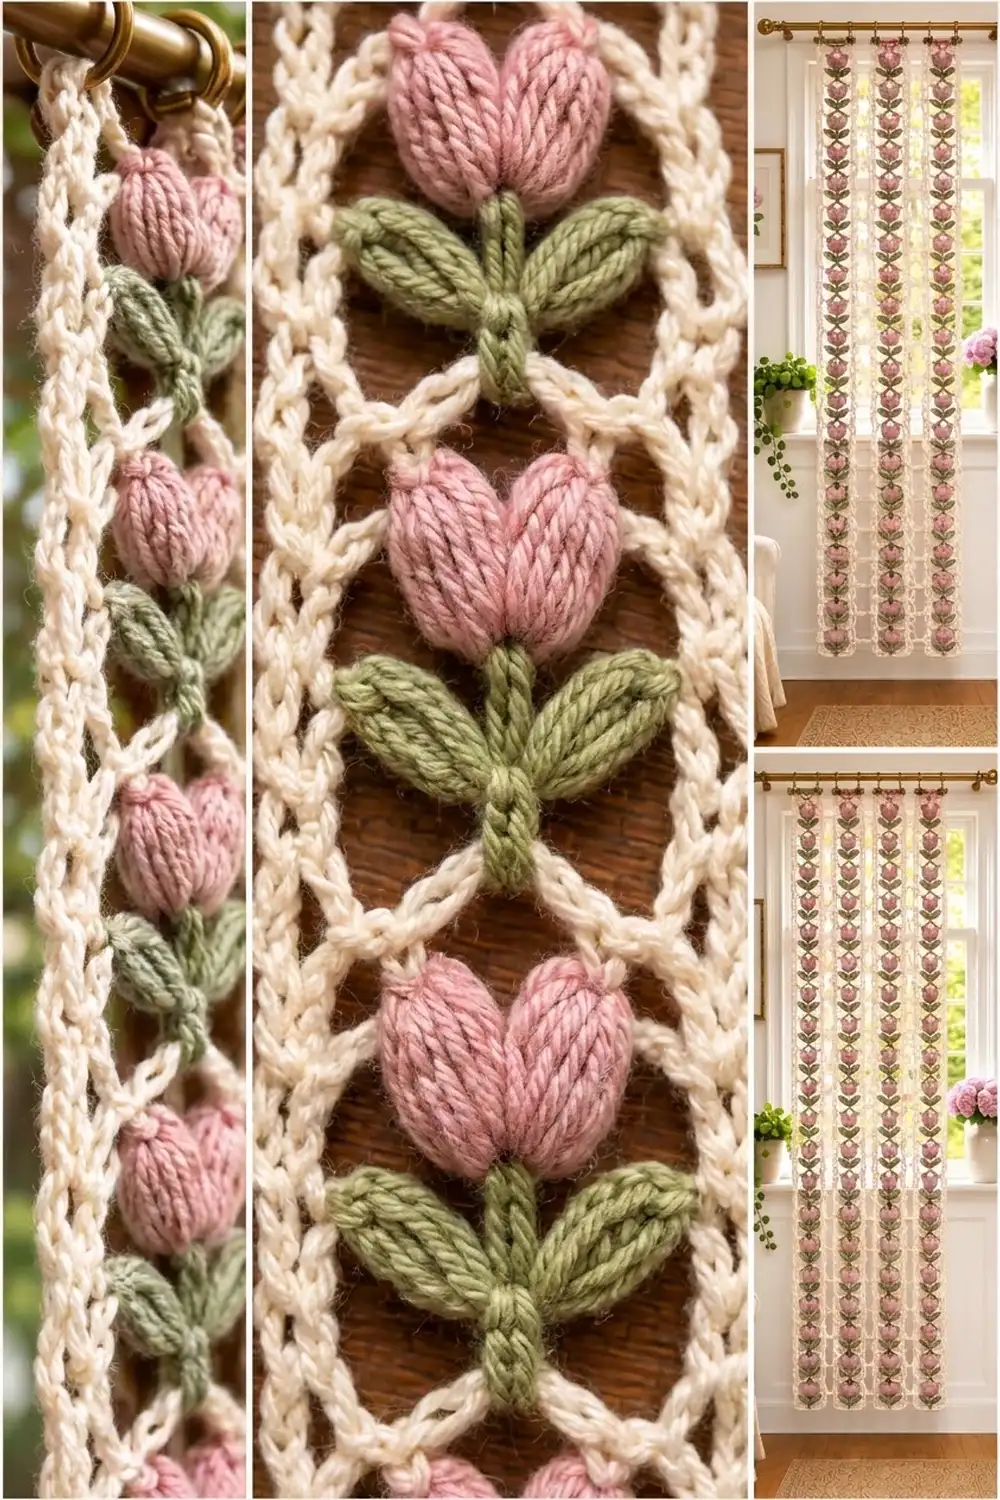
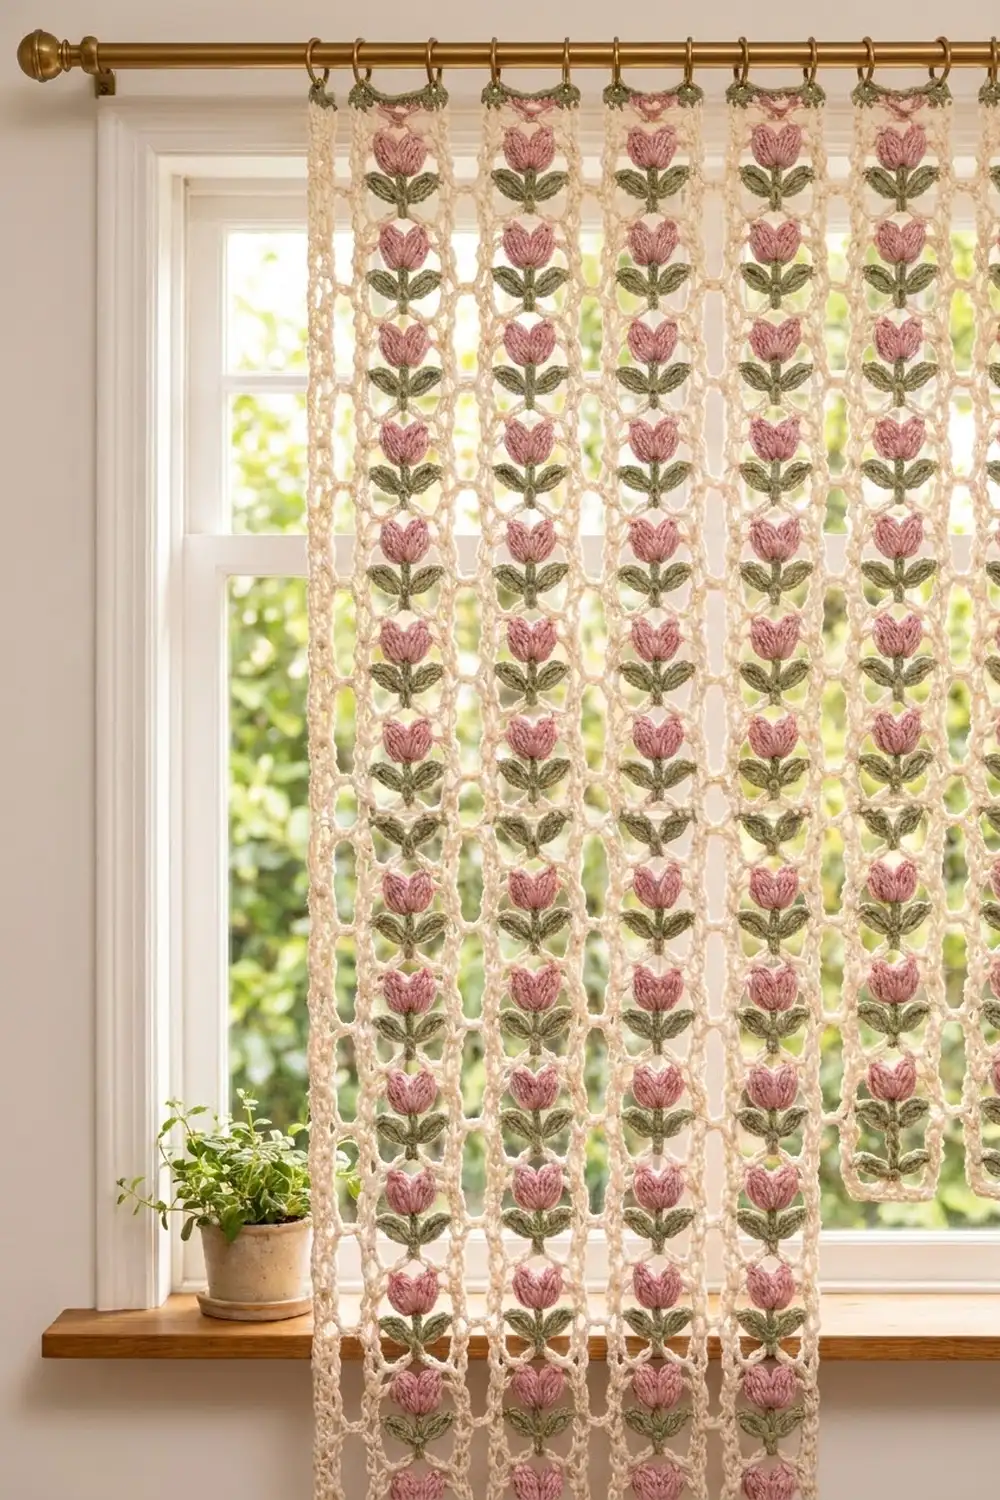
This curtain is a tall, airy panel of cream openwork windows. A small pink tulip with two sage leaves hangs inside each window. Light passes through every open frame, so the tulips seem to float in a soft lattice. It looks especially good in a sunny window or a doorway.
The palette is cream, dusty rose and sage green. The tulip heads are three-petal puff stitch fans. The leaves are plump tr clusters, and each frame is a firm cord of single crochet. The style is cottage-romantic but simple, with one motif repeated 84 times.
The pattern uses US crochet terms. The finished curtain measures 25 in wide × 71 in long (63.5 × 180.3 cm) after the border and blocking.
Construction is modular. First you make a cream rectangular frame. Then you make a separate tulip (pink head with green leaves and stem) and attach it inside the frame. Next you join the motifs into 6 vertical strips of 14, join the strips side by side, and finish with a 2-round border.
Finished Size and Construction
- Finished size: 25 × 71 in (63.5 × 180.3 cm)
- Skill level: Intermediate
- Terminology: US
- Yarn weight: Worsted (#4) cotton
- Hook: 4.5 mm (US 7)
- Number of pieces: 84 framed tulip motifs
- Layout: 6 columns × 14 rows
- Motif size: 4 × 5 in (10.2 × 12.7 cm)
- Size before border: 24 × 70 in (61.0 × 177.8 cm)
- Border depth: 0.5 in (1.3 cm) on each side, 2 rounds of sc
Materials
Yarn: Use a smooth worsted-weight cotton or cotton blend. Cotton holds the frame shape, shows the puff texture well, and doesn’t stretch much while hanging. The amounts below assume about 85 m per 50 g.
- Cream (A): 450 g / 765 m, for frames, tethers, joining and border
- Dusty rose (B): 60 g / 102 m, for tulip heads
- Sage green (C): 70 g / 119 m, for leaves and stems
All quantities include a margin of roughly 15–20% for gauge differences and swatching.
Tools:
– 4.5 mm (US 7) crochet hook
– 5.0 mm (US H-8) hook, optional, for loose joining
– Tapestry needle
– Locking stitch markers
– Blocking mats, rust-proof pins and a spray bottle
– 12 curtain clip rings and a rod
Abbreviations (US Terms)
- ch – chain
- sl st – slip stitch
- sc – single crochet
- tr – treble crochet
- st(s) – stitch(es)
- sp – space
- RS / WS – right side / wrong side
- rep – repeat
Special stitches:
- Puff st: (Yo, insert hook into ring, pull up a loop to 0.75 in / 1.9 cm) 5 times, so you have 11 loops on the hook. Yo and pull through all 11 loops.
- 4-tr cluster (4-tr cl): [Yo twice, insert hook into indicated place, pull up a loop, (yo, pull through 2 loops) twice] 4 times, so you have 5 loops on the hook. Yo and pull through all 5 loops.
- Leaf: (Ch 4, 4-tr cl, ch 4, sl st) all into the same place.
Gauge and Checkpoints
Gauge: 16 sc and 16 rows = 4 in (10.2 cm) with the 4.5 mm hook. One sc is 0.25 in (0.6 cm) wide and tall.
Make one complete motif (frame plus tulip) before you start production, and measure it at each stage:
- After frame Rnd 2: 3.5 × 4.5 in (8.9 × 11.4 cm)
- After frame Rnd 3: 4 × 5 in (10.2 × 12.7 cm)
- Tulip head: about 1.5 in (3.8 cm) wide × 1.25 in (3.2 cm) tall
- Each leaf: about 1.25 in (3.2 cm) long
- Stem: about 2.5 in (6.4 cm)
If the motif is too big, go down 0.5 mm in hook size. If it is too small, go up 0.5 mm. Fix the size here: an error of 0.25 in (0.6 cm) per motif adds up to 3.5 in (8.9 cm) over the curtain’s length.
Part 1: Cream Frame (make 84)
The frame starts as a chain ring with 4 corner chains. It grows by 3-sc corners on each round. “Stitches per side” always includes that side’s 2 corner stitches.
Rnd 1 (foundation): With A, ch 52 loosely. Sl st into the first ch to form a ring, taking care not to twist it. (52 ch)
Rnd 2: Ch 1, 3 sc in the same ch as the join (corner). Then work around:
- sc in next 10 ch
- 3 sc in next ch
- sc in next 14 ch
- 3 sc in next ch
- sc in next 10 ch
- 3 sc in next ch
- sc in next 14 ch
Sl st to the first sc. Place a marker in the middle sc of each 3-sc group; these are the corner sts.
Count: 52 sts worked 1 into each ch + 8 extra from the corners = 60 sts. The top and bottom have 14 sts per side; the two long sides have 18 sts per side.
Rnd 3: Ch 1, sc in the first st. *3 sc in the corner st, sc in each st to the next corner st; rep from * around. Sc in any remaining sts and sl st to the first sc. Move the markers up to the new corner sts.
Count: 60 sts worked 1 into each st + 8 extra from the corners = 68 sts. The top and bottom have 16 sts per side; the long sides have 20 sts per side.
Check: 16 sts ÷ 4 sts per in = 4 in (10.2 cm), and 20 sts ÷ 4 = 5 in (12.7 cm). Fasten off and weave in the ends.
Part 2: Tulip (make 84)
Tulip head: With B, make a magic ring.
Row 1 (RS): Ch 2 (does not count as a st). In the ring, work (puff st, ch 1) twice, then puff st. Ch 2 and sl st into the ring. (3 puff sts, 2 ch-1 sps)
Pull the ring only partly closed so you can still work into it. Fasten off B. The three puffs fan upward like a tulip cup, and the ch-1 sps form the two notches between the petals.
Leaves and stem: With RS facing, join C with a sl st into the ring at the base of the head, between the two ch-2 ends.
- Leaf 1: Work a Leaf into the ring.
- Leaf 2: Work a Leaf into the ring.
- Stem: Ch 10. Fasten off and leave a 8 in (20.3 cm) tail.
Now pull the magic ring tail tight to close the base and weave it in.
Shape the leaves so they spread in a V, angled slightly upward, with their tips tucked just under the outer petals. The stem hangs straight down from the center.
Part 3: Attach the Tulip
Lay a frame RS up with a short side at the top. The tulip goes inside the opening, which measures about 2.8 × 3.8 in (7.1 × 9.7 cm).
Top tethers: Count the 10 non-corner chs of Rnd 1 along the top side. With A, join with a sl st in the free loop of the 4th ch. Then:
- Ch 3, sl st into the first ch-1 sp of the tulip head.
- Ch 2, sl st into the second ch-1 sp.
- Ch 3, sl st into the 7th ch of the top side.
Fasten off. These two cream chains drop into the petal notches and hold the head centered.
Stem: Thread the stem tail through the free loops of the 5th and 6th chs on the bottom side of Rnd 1. Pull just until the stem hangs straight without bowing, then secure and weave in.
Optional: Tack each leaf tip to the nearest side bar with one stitch of C so the tulip stays flat on the rod.
Make All Pieces
- Cream frames: 84
- Pink tulip heads: 84
- Green leaf-and-stem sets: 84 (worked onto the heads)
- Completed framed motifs: 84
Layout (T = one framed tulip motif; all tulips point up):
Col: 1 2 3 4 5 6
R1   T T T T T T
R2   T T T T T T
R3   T T T T T T
R4   T T T T T T
R5   T T T T T T
R6   T T T T T T
R7   T T T T T T
R8   T T T T T T
R9   T T T T T T
R10  T T T T T T
R11  T T T T T T
R12  T T T T T T
R13  T T T T T T
R14  T T T T T T
Lightly steam or wet-block each motif to 4 × 5 in (10.2 × 12.7 cm) before joining. Uniform motifs make the seams line up.
Joining
Method: Hold two motifs WS together with their edges and corner sts aligned. With A, sl st through both loops of both layers in each matched pair of sts. This leaves a raised cream ridge on the RS that matches the cord look of the frames.
Step 1 – Build the strips. Join 14 motifs end to end, bottom side to top side, to make one strip. Each seam joins 16 sts to 16 sts, from corner st to corner st, for 16 sl sts per seam. A strip has 13 seams. Make 6 strips, each 4 × 70 in (10.2 × 177.8 cm).
Step 2 – Join the strips. Hold two strips WS together along a long edge. Each strip edge has 14 motifs × 20 sts = 280 sts. Match them 1 to 1 for 280 sl sts per seam. Where two motifs meet within a strip, their corner sts sit side by side; work each one once into its partner. Add no extra sts. Join all 6 strips with 5 seams.
Tension: Keep the sl sts as loose as your sc. If a seam puckers or is shorter than the motif edge, switch to the 5.0 mm hook for joining.
Checkpoint: The joined panel should measure 24 × 70 in (61.0 × 177.8 cm), which is 6 × 4 in by 14 × 5 in.
Border
Border gauge: 4 sc per in (per 2.5 cm), the same as the motif edges. One sc goes into each edge st, so the border lies flat without ruffling or cupping.
Starting counts: The top and bottom edges each have 6 motifs × 16 sts = 96 sts. The side edges each have 14 motifs × 20 sts = 280 sts. These counts include each motif’s corner sts and add nothing at the seams.
Rnd 1: With RS facing, join A in the top-right outer corner st. Ch 1 and work 3 sc in that corner st. Sc in each st around, working 3 sc in each of the other 3 outer corner sts. Sl st to the first sc and mark the 4 new corner sts.
- Top and bottom: 96 + 2 = 98 sts per side
- Long sides: 280 + 2 = 282 sts per side
- Total: 2 × 98 + 2 × 282 − 4 shared corners = 756 sts (748 edge sts worked 1 each + 8 corner extras)
Rnd 2: Ch 1. Sc in each st around, with 3 sc in each corner st. Sl st to the first sc and fasten off.
- Top and bottom: 100 sts per side
- Long sides: 284 sts per side
- Total: 764 sts (756 + 8)
Why the math works: 100 sts ÷ 4 = 25 in (63.5 cm) and 284 sts ÷ 4 = 71 in (180.3 cm). Each round adds 0.25 in (0.6 cm) on every side, so the 2 rounds add 0.5 in (1.3 cm) per side and 1 in (2.5 cm) to each total dimension.
Hanging: Clip 12 rings onto the top border at sts 1, 10, 19, 28, 37, 46, 55, 64, 73, 82, 91 and 100. That puts one ring every 9 sts, or 2.25 in (5.7 cm).
Final Blocking
- Weave in all remaining ends along the frame cords, not across the open windows.
- Soak the curtain in cool water for 15 minutes. Press out the water; do not wring.
- Roll it in towels to remove excess moisture.
- Lay it flat on blocking mats and pin the four outer corners to 25 × 71 in (63.5 × 180.3 cm).
- Pin along each strip seam so the columns run straight and parallel.
- Check that every window is square-cornered, about 4 × 5 in (10.2 × 12.7 cm) on center.
- Fluff the puffs and leaves with your fingers and center each tulip.
- Let it dry completely before you unpin.
Final Quality-Control Checklist
- All 84 motifs measure 4 × 5 in (10.2 × 12.7 cm).
- Every tulip points up, with both tethers seated in the petal notches.
- Stems hang straight without bowing.
- Strip seams have 280 sl sts; motif seams have 16.
- Border Rnd 2 counts 100 / 284 / 100 / 284.
- The curtain measures 25 × 71 in (63.5 × 180.3 cm).
- No ends are visible through the windows.
Troubleshooting
- Frame corners curl: The chain ring was too tight. Re-chain more loosely or use a hook 0.5 mm larger for Rnd 1 only.
- Puffs look flat: Pull every loop up to the full 0.75 in (1.9 cm) before closing the puff.
- Leaves twist: Keep the ch-4 sides loose and shape the leaves while damp.
- Tulip sags: Shorten the tethers to ch 2 / ch 2 / ch 2.
- Strips are uneven in length: One strip has a motif off gauge. Find it, then replace it or block it to size.
- Border ruffles: You’ve worked extra sts at the seams. Work only 1 sc per edge st.
- Border pulls in: Go up 0.5 mm in hook size for the border.
Care
Hand wash cool or machine wash on a gentle cycle in a mesh bag, then reshape and dry flat. Don’t tumble dry; the heat can distort the frames and flatten the puffs.
Final Notes
The measurement chain is simple. One sc equals 0.25 in (0.6 cm), so frame Rnd 3 gives 16 × 20 sts, or 4 × 5 in (10.2 × 12.7 cm). Six columns by 14 rows make 24 × 70 in (61.0 × 177.8 cm), and two border rounds bring it to 25 × 71 in (63.5 × 180.3 cm). Check your first motif carefully and the rest of the curtain will follow.
Happy crocheting!