

This hanging holder stores three rolls of toilet paper in three stacked tulip baskets. Each basket has a flat round base, ribbed walls, and a rim of ten rounded, slightly pointed petals. Sage green leaves are sewn around the lower wall. A diamond mesh net holds the baskets behind and at the sides, then narrows into a triangle at the top that hangs from a wooden ring.
The sample uses dusty raspberry pink for the baskets, mesh, and hanging loop, with sage green leaves. It also looks soft and calm in light gray with the same green leaves. The style is cottage-garden and practical. The front of each basket stays open, so you can pull a roll out with one hand.
All terms are US crochet terms. The finished holder is about 10.5 in (26.7 cm) wide when the mesh is laid flat and 31 in (78.7 cm) long from the bottom edge to the mesh tip. The total hanging length, including the ring, is about 34.75 in (88.3 cm). Each basket is 5 in (12.7 cm) across the base and 3.25 in (8.3 cm) tall.
Here is the construction in short. You crochet three baskets in the round, make 30 small leaves, and work one flat mesh panel in rows. Then you add a border, sew the leaves to the baskets, tack the baskets to the mesh, and attach the ring.
Finished Size and Construction
- Finished size: 10.5 in x 31 in (26.7 cm x 78.7 cm) mesh with border; 34.75 in (88.3 cm) total hanging length
- Skill level: Intermediate
- Terminology: US
- Yarn weight: Worsted (#4) cotton
- Hook: 4.5 mm (US 7)
- Number of pieces: 3 baskets, 30 leaves, 1 mesh panel, 1 wooden ring
- Layout: 3 baskets stacked in 1 column, 10 mesh rows (7.5 in / 19.1 cm) apart
- Piece size: each basket has a 5 in (12.7 cm) base, a 16 in (40.6 cm) wall circumference, and a height of 3.25 in (8.3 cm)
- Size before border: mesh 10 in x 30.75 in (25.4 cm x 78.1 cm)
- Border depth: 0.25 in (0.6 cm)
Materials
Pick a firm cotton or cotton blend in worsted weight, about 170 m per 100 g. Cotton holds the basket shape well and can be washed. Avoid acrylic for the baskets, because it stretches and sags under the weight of a roll.
- Raspberry pink (Color A): 230 g, about 390 m
- Sage green (Color B): 50 g, about 85 m
- Gray is a good alternative to pink. Use the same amount.
Tools:
- 4.5 mm (US 7) crochet hook
- 1 wooden ring, 2.75 in (7.0 cm) outer diameter
- Tapestry needle
- 12 locking stitch markers
- Rustproof pins and a blocking board
- A jar or can about 5 in (12.7 cm) wide, for shaping
All quantities include a margin of about 15%.
Abbreviations (US Terms)
- ch – chain
- sl st – slip stitch
- sc – single crochet
- hdc – half double crochet
- dc – double crochet
- FPdc – front post double crochet: yo, insert the hook from front to back to front around the post of the stitch, then finish as a dc
- BLO – back loop only
- sk – skip
- sp – space
- st(s) – stitch(es)
- yo – yarn over
Special stitch: Shell – 7 dc worked into the same stitch.
Gauge and Checkpoints
- Basket fabric: 15 dc and 8 rounds = 4 in (10.2 cm)
- Border: 16 sc = 4 in (10.2 cm)
- Mesh: 10 ch-5 loops = 10 in (25.4 cm) wide; 4 rows = 3 in (7.6 cm) tall
Make one basket first and measure it before you make the rest:
- After Rnd 3, the base measures 3 in (7.6 cm) across.
- After Rnd 5, the base measures 5 in (12.7 cm) across and lies flat.
- After Rnd 10, the wall is 16 in (40.6 cm) around and 2.25 in (5.7 cm) tall.
- After 8 mesh rows, the mesh is 6 in (15.2 cm) tall.
If your base is too big, go down 0.5 mm. If it is too small, go up 0.5 mm. If the base ruffles, go down a hook size. If it cups, go up one. The basket must fit a roll about 4.5 in (11.4 cm) wide, so don’t let the base shrink below 4.75 in (12.1 cm).
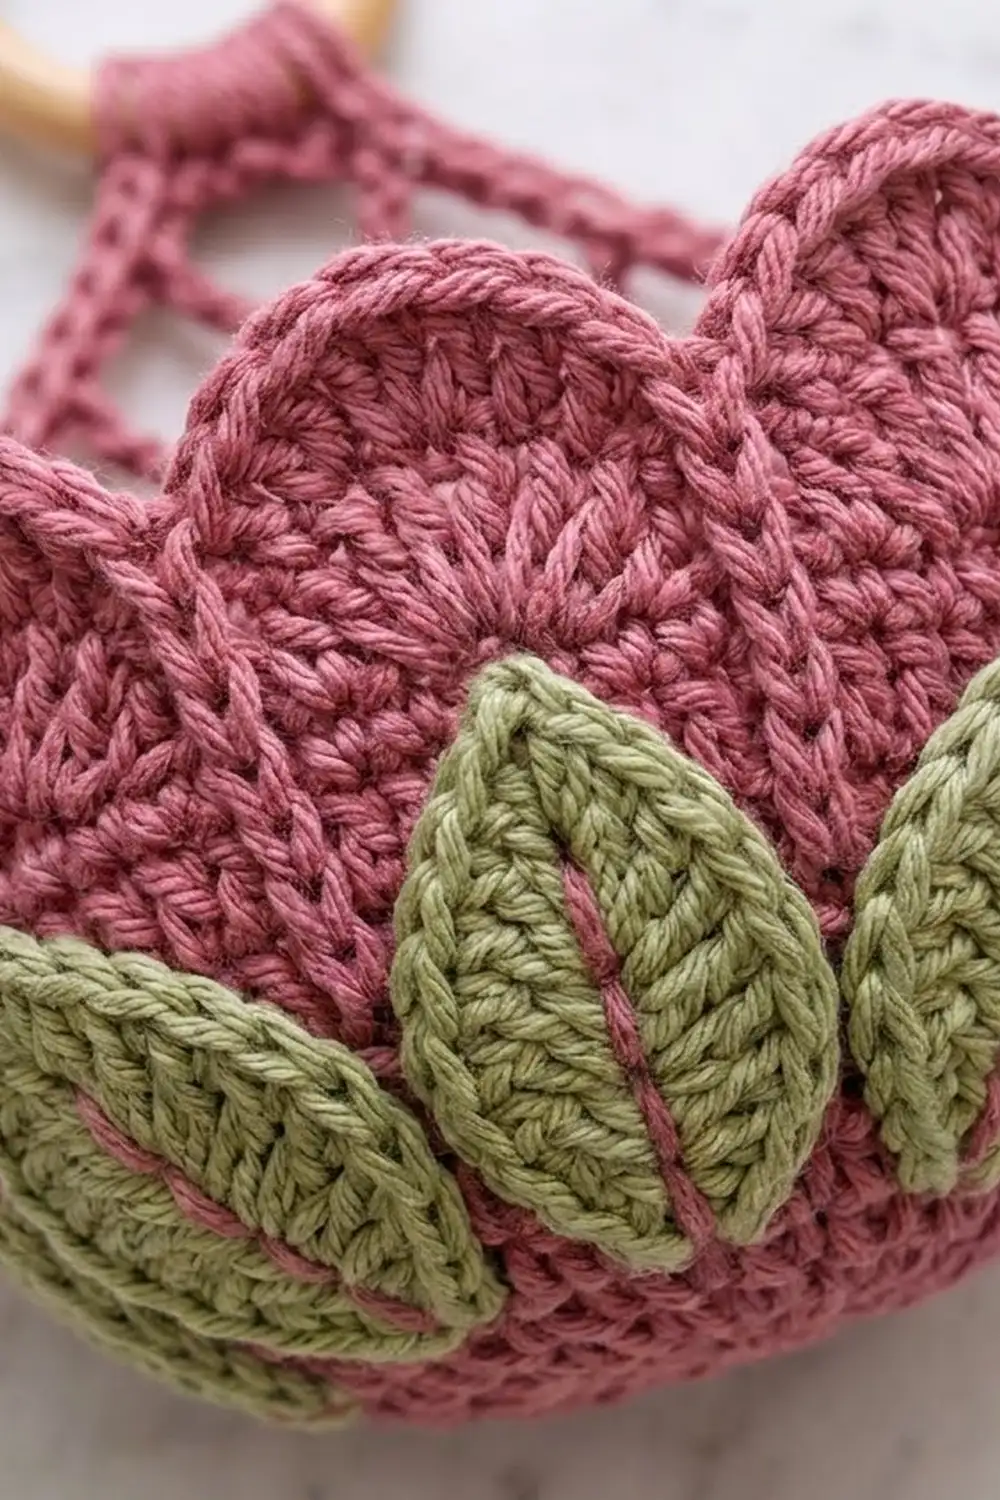
Basket (make 3, Color A)
Rnd 1: Make a magic ring. Ch 3 (counts as dc throughout), 11 dc in ring, sl st to top of ch-3. (12 dc)
Rnd 2: Ch 3, dc in same st, 2 dc in each st around, sl st to join. (24 dc)
Rnd 3: Ch 3, dc in same st, dc in next st, 2 dc in next st, dc in next st; repeat from * around, sl st to join. (36 dc)
Rnd 4: Ch 3, dc in same st, dc in next 2 sts, 2 dc in next st, dc in next 2 sts; repeat around, sl st to join. (48 dc)
Rnd 5: Ch 3, dc in same st, dc in next 3 sts, 2 dc in next st, dc in next 3 sts; repeat around, sl st to join. (60 dc)
Checkpoint: the base is 5 in (12.7 cm) across.
Rnd 6 (turning round): Ch 1, sc in BLO of each st around, sl st to first sc. (60 sc)
The unused front loops make a ridge, and the wall starts to stand up from it.
Rnd 7: Ch 3, FPdc around next st, dc in next st; repeat from * 28 more times, FPdc around last st, sl st to join. (30 dc + 30 FPdc = 60 sts)
Rnds 8–10: Ch 3, FPdc around the next FPdc, dc in the next dc; repeat around, ending with FPdc, sl st to join. (60 sts each round)
These rounds make the ribbed wall texture. Checkpoint: the wall is 2.25 in (5.7 cm) tall and 16 in (40.6 cm) around.
Rnd 11 (petal round): Ch 1, sc in first st, sk 2 sts, shell in next st, sk 2 sts, sc in next st; repeat from * 8 more times, sk 2 sts, shell in next st, sk 2 sts, sl st to first sc. (10 shells: 10 sc + 70 dc = 80 sts)
Each petal covers 6 wall stitches, about 1.6 in (4.1 cm).
Rnd 12 (petal edging, trim round): Ch 1, sc in sc, sc in next 3 dc, (sc, ch 1, sc) in next dc, sc in next 3 dc; repeat around, sl st to first sc. (80 sc worked 1 per stitch + 10 extra sc at the tips = 90 sc, plus 10 ch-1 sps)
The extra sc and ch-1 at each center dc give every rounded petal a soft tulip point. Fasten off and weave in the ends. The basket is now 3.25 in (8.3 cm) tall.
Leaf (make 30, Color B)
Ch 8.
Side 1: Sc in 2nd ch from hook, hdc in next ch, dc in next 3 ch, hdc in next ch, (sc, ch 2, sc) in last ch for the tip.
Side 2: Working along the other side of the chain, hdc in next ch, dc in next 3 ch, hdc in next ch, sc in last ch, sl st to first sc. (14 sts plus 1 ch-2 tip)
Leave a 10 in (25.4 cm) tail. Use it to make a straight-stitch center vein from base to tip. Each leaf is about 1.75 in (4.4 cm) long and 1 in (2.5 cm) wide.
Mesh Panel (make 1, Color A)
Ch 42.
Row 1: Sc in 6th ch from hook (the skipped chains form the first loop), ch 5, sk 3 ch, sc in next ch; repeat from * 8 more times. (10 loops)
Rows 2–32: Ch 5, turn, sc in first ch-5 sp, ch 5, sc in next ch-5 sp; repeat from * 8 more times. (10 loops)
Checkpoint: after Row 32, the panel is 10 in (25.4 cm) wide and 24 in (61.0 cm) tall.
Rows 33–41 (triangle): Ch 5, turn, sk first ch-5 sp, sc in next ch-5 sp, ch 5, sc in next ch-5 sp; repeat to the end. Each row has 1 loop fewer than the one before: Row 33 has 9 loops, Row 34 has 8, and so on until Row 41 has 1 loop.
Fasten off. Checkpoint: the triangle is 6.75 in (17.1 cm) tall, and the whole panel is 30.75 in (78.1 cm) long.
Make All Pieces
- Color A: 3 baskets, 1 mesh panel
- Color B: 30 leaves (10 per basket)
Layout, viewed from the front with the mesh behind:
        [ring]
         ^^^^       Rows 33-41 triangle
        |    |      Rows 25-32 open mesh
     [Basket 3]     base Row 21, rim Row 24
        |    |
     [Basket 2]     base Row 11, rim Row 14
        |    |
     [Basket 1]     base Row 1, rim Row 4
Joining
Work the Border section before you tack on the baskets, so the mesh edges are easy to reach.
Leaves to baskets: Place 1 leaf under the center of each petal, with the tip pointing up and the base sitting on the Rnd 6 ridge. The tips overlap the petal bases slightly. Whipstitch around each leaf edge with the green tail. Keep the stitches snug, but not so tight that the wall puckers.
Baskets to mesh: Lay the mesh flat with the wrong side up. Choose 40 stitches in a row on Rnd 10 as the back of the basket and place a marker every 4 stitches. That gives 10 sections of 4 stitches, which matches the 10 loops in a mesh row. With Color A, tack the sc between each pair of mesh loops to one marked point. The other 20 stitches, about 5.25 in (13.3 cm), stay free at the front so you can reach the roll.
Repeat with the back 40 stitches of Rnd 5 on the base. For Basket 1, tack the base to Row 1 and the rim to Row 4. For Basket 2, use Rows 11 and 14. For Basket 3, use Rows 21 and 24.
Tension: tack firmly enough that each basket hangs level, but let the mesh curve around the back of the basket. Size checkpoint: the baskets sit 7.5 in (19.1 cm) apart from base to base, and the bordered panel still measures 31 in (78.7 cm) long.
Border
Border gauge: 16 sc = 4 in (10.2 cm), or 4 sc per inch.
Rnd 1: With Color A, join at the bottom-right corner and work (sc, ch 1, sc) there. Then work:
- Bottom edge: 4 sc in each of the 10 foundation loops. (40 sc)
- Bottom-left corner: (sc, ch 1, sc)
- Left side, Rows 1–32: 3 sc in each row end. (96 sc)
- Left triangle edge, Rows 33–41: alternate 4 sc and 3 sc per row end, starting with 4. (32 sc)
- Tip: 3 sc in the Row 41 loop.
- Right triangle edge: alternate 4 and 3 again. (32 sc)
- Right side: 3 sc in each row end. (96 sc)
Sl st to the first sc. (40 + 96 + 32 + 3 + 32 + 96 = 299 edge sc, plus 4 corner sc = 303 sc, plus 2 ch-1 sps)
Rnd 2: Sl st in BLO of each sc around, and sl st in each ch-1 sp. Fasten off.
Why the math works: one mesh row is 0.75 in (1.9 cm) tall, and 3 sc at 4 sc per inch also measure 0.75 in. So the straight sides get 96 sc for 24 in (61.0 cm), with no ruffling or pulling. The bottom gets 40 sc for 10 in (25.4 cm). Each triangle edge is about 8 in (20.3 cm) on the diagonal, and 32 sc cover exactly 8 in.
Ring: Join Color A at the center tip sc. Ch 8, pass the chain through the ring, and sl st back into the same tip sc. Work 12 sc over the chain loop to cover it fully, sl st to the tip, and fasten off.
Final Blocking
- Wet all the pieces and gently squeeze out the water in a towel.
- Slide each basket over the 5 in (12.7 cm) jar. Pull the walls straight up and pinch each petal tip outward.
- Pin the mesh flat to 10.5 in x 31 in (26.7 cm x 78.7 cm), opening every diamond evenly.
- Press the leaves flat with your fingers.
- Let everything dry completely, which takes about 24 hours.
- Hang the holder, load the rolls, and check that each basket sits level.
Final Quality-Control Checklist
- Each basket has 60 wall stitches, 10 petals, and 90 sc plus 10 ch-1 sps in Rnd 12.
- Each base lies flat at 5 in (12.7 cm).
- Each basket has 10 leaves, centered under the petals.
- The mesh has 10 loops in Rows 1–32 and narrows to 1 loop at Row 41.
- The border has 303 sc and lies flat.
- The baskets are 7.5 in (19.1 cm) apart, and each front stays open.
- The ring loop is fully covered and secure.
- All ends are woven in at least 1.5 in (3.8 cm).
Troubleshooting
- Basket too tight for the roll: remake it with a hook 0.5 mm larger.
- Walls flare out: your FPdc are too loose, so go down a hook size for Rnds 7–10.
- Petals curl inward: block them over the jar with the tips pinned outward.
- Mesh too long: remove whole rows from Rows 25–32 only, and keep the basket rows the same.
- Border ruffles: use 3 sc on every triangle row end instead of alternating.
- Basket tilts forward: add more tacking points along the base.
Care
Hand wash in cool water, or machine wash on a gentle cycle in a mesh bag. Reshape the holder while it is damp and dry it flat.

Final Notes
Here is how the measurements connect. Five dc rounds make a 5 in (12.7 cm) base. The wall has 60 stitches, measures 16 in (40.6 cm) around, and carries 10 petals of 6 stitches each. Forty of those stitches line up with the 10 mesh loops, which are 10 in (25.4 cm) wide. Each mesh row is 0.75 in (1.9 cm) tall, and 3 border sc per row keep the 31 in (78.7 cm) edge flat. If you check each stage against its numbers, the holder will hang straight and hold all three rolls.
Happy crocheting!