

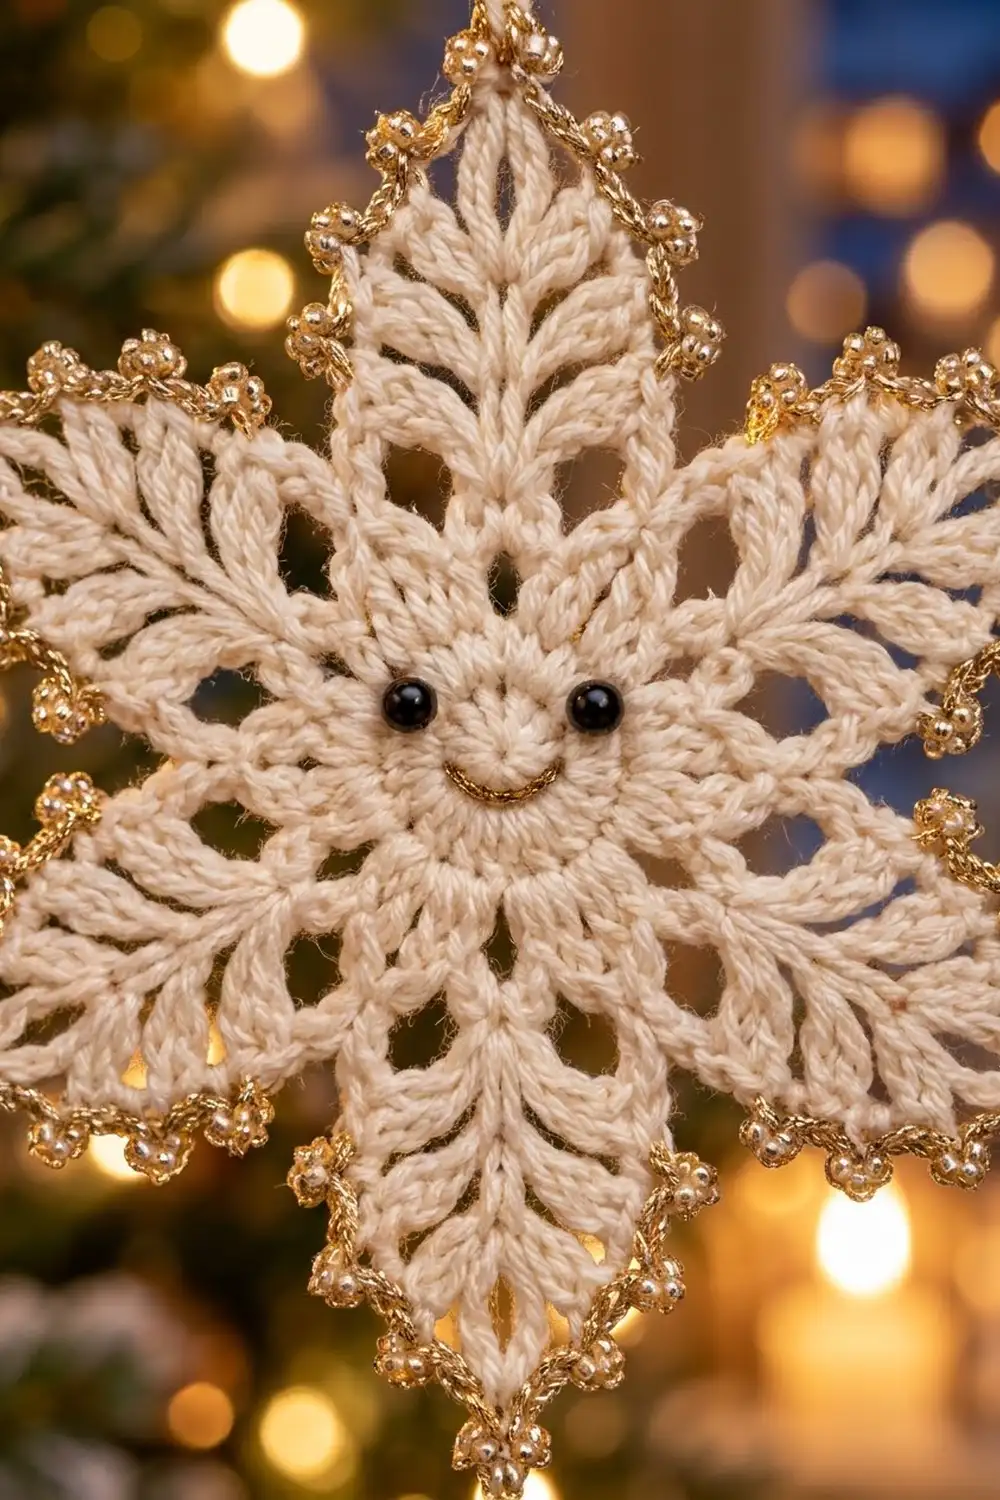
This little snowflake has a friendly face and fern-like arms. Six leaf-shaped arms grow from a small round center. Each arm has a chain spine with pairs of short branches angling toward the tip, so you get rows of small V shapes with gaps of light between them. A gold metallic picot edge outlines every branch tip, and a three-picot cluster finishes each point.
The body is worked in cream cotton thread. The edging and the embroidered smile are gold metallic thread, and two small black beads make the eyes. It looks great on a tree, in a window, or tied onto a gift.
The pattern uses US crochet terms. The finished snowflake measures 5 in (12.7 cm) from point to opposite point, including the gold border.
You work the whole ornament in the round as one piece. Two rounds of double crochet make the center disc. A round of chain arches makes the small windows between the arms. The six fern arms are made in a single round, chaining out along the spine and working the branches on the way back down. One gold round adds the picot border. After that you add the face, attach a hanging loop, and block.
Finished Size and Construction
- Finished size: 5 in (12.7 cm) point to point
- Skill level: Intermediate
- Terminology: US crochet terms
- Yarn weight: Size 3 cotton crochet thread (light fingering) plus fine gold metallic thread
- Hook: 2.25 mm (US B-1)
- Number of pieces: 1 (single motif, no joining)
- Layout: One six-pointed snowflake, worked in the round
- Piece size: 5 in (12.7 cm) point to point
- Size before border: 4.5 in (11.4 cm) point to point
- Border depth: 0.25 in (0.6 cm) on each side
Materials
Choose a mercerized cotton thread in size 3 (light fingering). It shows stitches clearly and holds its shape well after starching. For the edge, pick a metallic thread that runs smoothly and isn’t scratchy, roughly the thickness of size 10 thread or a little heavier. If your metallic thread is very fine, hold two strands together.
Yarn:
– Cream (body and hanging loop): 5 g, about 14 m
– Gold metallic (border and smile): 3 g, about 20 m
These amounts include a margin of about 25% for your gauge swatch and tails.
Tools and notions:
– 2.25 mm (US B-1) crochet hook
– Two 4 mm round black beads (or black buttons of the same size)
– Fine sewing needle and black sewing thread for the beads
– Tapestry needle with a small eye
– Scissors
– Rustproof pins and a foam blocking board
– Spray starch or fabric stiffener
– Tape measure or ruler marked in inches and cm
Abbreviations (US Terms)
- ch – chain
- sl st – slip stitch
- sc – single crochet
- hdc – half double crochet
- dc – double crochet
- st(s) – stitch(es)
- sp – space
- MR – magic ring
- rep – repeat
Special stitch – picot: Ch 3, sl st in the 3rd ch from the hook. That makes one picot.
Special term – branch tip ch: When you make a branch, the ch you skip at the far end (the “2nd ch from hook” instruction skips it) becomes the branch tip ch. The border goes into this ch later.
Gauge and Checkpoints
Gauge isn’t critical for an ornament, but it controls the final size and how crisp the arms look. Work the center first and measure it before you commit to the arms.
Gauge: Rounds 1–2 make a disc 1.25 in (3.2 cm) across. 10 ch = 1 in (2.5 cm) when relaxed.
Checkpoints:
– After Round 2: disc is 1.25 in (3.2 cm) across.
– After Round 3: about 1.75 in (4.4 cm) across the arches.
– After Round 4: 4.5 in (11.4 cm) point to point once lightly pinned. Each arm extends about 1.375 in (3.5 cm) past the arches.
– After Round 5: 5 in (12.7 cm) point to point after blocking.
If too big: Switch to a 2 mm hook, or chain more tightly along the spine.
If too small: Switch to a 2.5 mm hook.
Let all measurements land within 1/8 in (0.3 cm) of the target, then move on.
Snowflake Pattern
Center (Cream)
Round 1: Make a MR. Ch 3 (counts as first dc), 17 dc in the ring. Pull the ring closed. Join with sl st to the top of the beginning ch-3. (18 dc)
Round 2: Ch 3 (counts as first dc), dc in the same st, dc in each of the next 2 sts. 2 dc in the next st, dc in each of the next 2 sts. Rep from * to * 4 more times. Join with sl st to the top of the beginning ch-3. (24 dc)
Checkpoint: 1.25 in (3.2 cm) across. The disc should lie flat.
Round 3 (arches): Ch 1, sc in the same st as the join. Ch 5, skip the next 3 sts, sc in the next st. Rep from * to * 4 more times. Ch 5, skip the last 3 sts, then join with sl st to the first sc. (6 sc and 6 ch-5 arches)
Each arch sits over 3 skipped stitches, which leaves a small open window between the arms. The 6 sc are where the arms start.
Checkpoint: about 1.75 in (4.4 cm) across.
Fern Arms (Cream)
Each arm starts from one sc of Round 3. First you chain the spine, then you work down it. At each of 4 branch points (nodes), make one branch, then a second branch from the same spine ch. Lay one branch to the left and one to the right so they form a V that opens toward the tip.
Arm sequence (we’ll call this “make arm” in Round 4):
- Ch 13 (spine).
- Tip loop: Sl st in the 4th ch from the hook. The first 3 ch form a ch-3 tip loop.
- Node 1 (short branches): Sl st in each of the next 2 spine ch. Ch 3, sc in the 2nd ch from the hook, sc in the next ch, sl st in the same spine ch. Rep from * to * once more. (2 branches of 2 sts each)
- Node 2: Sl st in each of the next 2 spine ch. Ch 4, sc in the 2nd ch from the hook, hdc in each of the next 2 ch, sl st in the same spine ch. Rep from * to * once more. (2 branches of 3 sts each)
- Node 3 (longest branches): Sl st in each of the next 2 spine ch. Ch 5, sc in the 2nd ch from the hook, hdc in the next ch, dc in each of the next 2 ch, sl st in the same spine ch. Rep from * to * once more. (2 branches of 4 sts each)
- Node 4: Sl st in each of the next 2 spine ch. Ch 4, sc in the 2nd ch from the hook, hdc in the next ch, dc in the next ch, sl st in the same spine ch. Rep from * to * once more. (2 branches of 3 sts each)
- Stem: Sl st in the last spine ch.
Spine check: 3 ch for the tip loop + 1 sl st ch + (4 nodes × 2 ch) + 1 stem ch = 13 ch.
One arm has 8 branches and 24 branch sts (2 × [2 + 3 + 4 + 3]), plus 1 ch-3 tip loop. The branches go short, medium, longest, medium from tip to base, so the arm is shaped like a leaf: narrow at the point, widest just below the middle, and tapering again toward the center.
Round 4: Ch 1, sc in the same sc as the join. Make arm. Sl st in the same sc of Round 3 (the arm base). Work 5 sc in the next ch-5 arch. Sc in the next sc, make arm, sl st in the same sc, 5 sc in the next ch-5 arch. Rep from * to * 4 more times. Join with sl st to the first sc. Fasten off and weave in the end.
Round 4 totals: 6 arms (48 branches, 6 ch-3 tip loops), 6 base sc, 30 valley sc (5 per arch).
The windows stay open because the 5 sc sit on top of each arch, and the 3 skipped sts are still free underneath.
Checkpoint: Pin out lightly. The snowflake should measure 4.5 in (11.4 cm) from point to opposite point, and each arm should extend about 1.375 in (3.5 cm) past the arches.
Border (Gold)
The border is one round of gold metallic thread. Every branch tip gets one picot group, chain links bridge between the tips, a three-picot cluster goes on each arm tip, and one picot goes in the middle of each valley.
Border gauge: One (sc, picot, sc) group measures about 0.2 in (0.5 cm) wide. The border adds 0.25 in (0.6 cm) beyond each tip.
Round 5: With the right side facing, join the gold with a standing sc in the center (3rd) sc of any valley. Picot, sc in the same st.
*Sc in each of the next 2 valley sc. Ch 2, skip the base sc.
Going up the first side of the arm: (sc, picot, sc) in the branch tip ch of the Node 4 branch, ch 2. (Sc, picot, sc) in the Node 3 branch tip ch, ch 2. (Sc, picot, sc) in the Node 2 branch tip ch, ch 2. (Sc, picot, sc) in the Node 1 branch tip ch, ch 2.
At the tip: (sc, picot, sc, picot, sc, picot, sc) in the ch-3 tip loop.
Going down the second side: ch 2, (sc, picot, sc) in the Node 1 branch tip ch. Ch 2, (sc, picot, sc) in the Node 2 branch tip ch. Ch 2, (sc, picot, sc) in the Node 3 branch tip ch. Ch 2, (sc, picot, sc) in the Node 4 branch tip ch.
Ch 2, sc in each of the first 2 sc of the next valley, (sc, picot, sc) in the center valley sc.* Rep from * to * 4 more times, ending the last rep after the 2 valley sc. Join with sl st to the first sc. Fasten off.
Counts per arm-and-valley repeat:
– Each side of the arm: 4 groups (8 sc, 4 picots) and 4 ch-2 links
– Tip: 4 sc, 3 picots
– Valley: (5 sc worked 1 per existing sc) + 1 extra sc in the center = 6 sc, plus 1 picot. The ch 2 at each end of the valley adds 2 more ch-2 links.
– Repeat total: 26 sc, 12 picots, 10 ch-2 links
Round 5 totals: 156 sc, 72 picots, 60 ch-2 links.
Why the math works: Branches along the spine are exactly 2 ch apart, and each ch-2 link spans the same distance. That way the edge doesn’t pull the branches inward or make them ruffle. Each valley has exactly the 5 sc made in Round 4, worked one each, plus one extra sc for the picot. That bit of extra ease keeps the inner corners flat. The ch-2 links on both sides of the base skip the base sc, so the valleys dip neatly between the arms.
Face
Using black sewing thread and a fine needle, sew the 2 beads on the joining line between Round 1 and Round 2, on the upper half of the disc. Space them 4 sts apart, about 0.4 in (1.0 cm). Thread a 12 in (30.5 cm) length of gold on the tapestry needle. Backstitch a curved smile in 3 short stitches across Round 1, just below the center ring. The smile should be about 0.3 in (0.8 cm) wide. Knot the ends on the back and hide them inside the stitches.
Hanging Loop
Join cream with a sl st into the ch-3 tip loop of one arm, working into the loop behind the gold stitches. Ch 50, about 4 in (10.2 cm). Sl st into the same tip loop. Fasten off, leaving a 6 in (15.2 cm) tail, and weave it back through the chain. The doubled loop hangs about 2 in (5.1 cm) above the tip.
Final Blocking
- Soak the snowflake in cool water for a few minutes, then roll it in a towel to remove excess water.
- Lay it right side up on the blocking board. Line up two opposite tips 5 in (12.7 cm) apart and pin them.
- Pin the other four tips. Each one should be 5 in (12.7 cm) from its opposite tip, and the tips should be evenly spaced around.
- Using the tip of a pin, open each pair of branches into a V. Angle each branch about 45 degrees toward its arm tip. Pin the longest Node 3 branches first.
- Pin the three-picot cluster at each tip so the picots fan out.
- Open each window under the arches with your fingertip.
- Spray starch evenly over the piece, then let it dry completely, at least 6 hours.
- Unpin and measure. It should be 5 in (12.7 cm) point to point, within 1/8 in (0.3 cm).
Final Quality-Control Checklist
- 6 arms, each with 8 branches arranged in 4 V pairs
- 6 open windows under the ch-5 arches
- 72 gold picots: 3 at each tip, 1 on each branch tip, 1 in each valley
- Both beads secure, level, and 0.4 in (1.0 cm) apart
- Smile centered under the eyes
- Hanging loop attached firmly to the top tip
- Snowflake lies flat with no cupping or ruffling
- Point to point measures 5 in (12.7 cm) on all three axes
- All tails woven in and trimmed
Troubleshooting
The center cups. Your Round 1 or Round 2 stitches are too tight. Redo Round 2 with a slightly looser tension, or switch up a hook size for these two rounds.
The arms are too short. The spine chain is too tight. Make your chains a little looser, or use a larger hook just for the ch 13.
The branches twist or overlap. Make sure each branch ends with a sl st into the same spine ch where it started. Then pin the branches into V shapes while the piece is still damp.
The border makes the arms curl. Work the ch-2 links more loosely, or change them to ch-3 links. Check that you didn’t add any extra sc between the groups.
The picots look flat. After the ch 3, pull the sl st snugly so each picot forms a small round bead.
The metallic thread splits. Use a hook with a smooth, rounded head and work slowly. Cut a shorter working length if needed.
Care
Hand wash in cool water with mild soap, then reshape and re-starch as needed. Store flat in tissue paper so the arms and picots stay crisp.

Final Notes
The measurement chain is simple: a 1.25 in (3.2 cm) center disc grows to 1.75 in (4.4 cm) with the arches. Six fern arms bring it to 4.5 in (11.4 cm) point to point, and the gold picot border adds 0.25 in (0.6 cm) at each end for a finished 5 in (12.7 cm) snowflake. If each checkpoint matches, the final size will too.
Make one, add its little face, and hang it somewhere it can catch the light. Happy crocheting!