

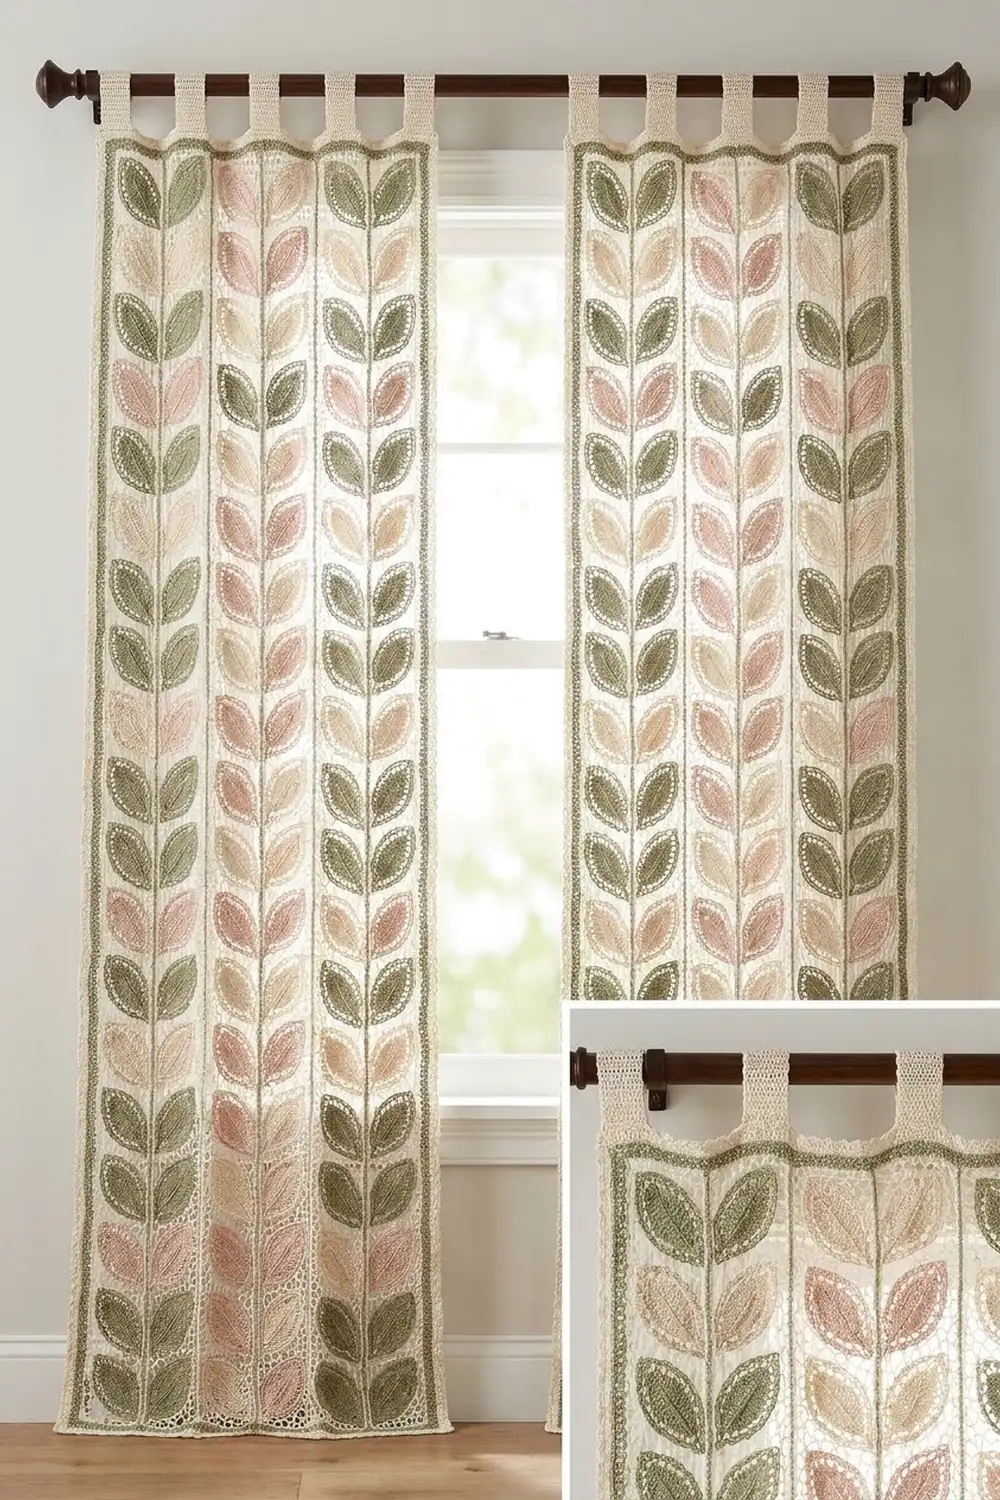
These lace curtain panels look like a climbing vine. Pointed leaves in sage green, blush pink, and cream lean left and right in tidy herringbone columns, and cream lace shows the light through between them.
Each panel is made from small square blocks. Every block holds one leaf on the diagonal. If you turn a block a quarter turn, the leaf leans the other way. When you set the blocks side by side in mirrored pairs, they form a V, and stacking the pairs makes a continuous vine. The seam between each pair reads as a cream stem.
The pattern uses US crochet terms. One finished panel measures 29 in (73.7 cm) wide by 78.5 in (199.4 cm) long, plus the hanging tabs. The instructions make one panel. Make two for the pair.
Construction is simple and repeats. First you crochet a leaf around a foundation chain. Next, two cream rounds turn it into a square. Then you join 102 blocks in a 6 × 17 grid, add a three-round border, and work six tabs along the top edge.
Finished Size and Construction
- Finished panel size: 29 in × 78.5 in (73.7 cm × 199.4 cm), tabs not included
- Skill level: Intermediate
- Terminology: US
- Yarn weight: DK (3) cotton or cotton blend
- Hook: 3.5 mm (E-4)
- Number of pieces: 102 blocks per panel (204 for the pair), plus 6 tabs per panel
- Layout: 6 blocks wide × 17 blocks tall
- Block size: 4.5 in × 4.5 in (11.4 cm × 11.4 cm)
- Size before border: 27 in × 76.5 in (68.6 cm × 194.3 cm)
- Border depth: 1 in (2.5 cm) on each side
Materials
Use a smooth, mercerized DK cotton. It shows the lace clearly, hangs straight, and handles sunlight better than acrylic. Choose a yarn with roughly 110 m per 50 g.
For the pair of panels:
- Cream (frames, cream leaves, border, tabs): 1,700 g, about 3,740 m
- Sage green (leaves): 250 g, about 550 m
- Blush pink (leaves): 250 g, about 550 m
For one panel, use half these amounts. The quantities include a margin of roughly 10 percent for gauge differences and swatching.
Tools:
- 3.5 mm (E-4) crochet hook
- Tapestry needle
- Stitch markers
- Scissors
- Blocking mats and rust-proof pins
- Spray bottle
- Measuring tape
Abbreviations (US Terms)
- ch: chain
- sl st: slip stitch
- sc: single crochet
- hdc: half double crochet
- dc: double crochet
- tr: treble crochet (yarn over twice)
- dtr: double treble crochet (yarn over three times, then work the loops off two at a time four times)
- sp(s): space(s)
- sk: skip
- RS / WS: right side / wrong side
Special technique: flat slip-stitch join. Lay two blocks right side up, edge to edge. Insert the hook through the back loop of the matching stitch on each block, yarn over, and pull through both loops and the loop on the hook. This makes a flat seam with a neat cream line on the front.
Gauge and Checkpoints
Make one complete block before you start production, and check it at each stage:
- Leaf after Round 2: 4.25 in (10.8 cm) long, 1.75 in (4.4 cm) wide
- Block after Round 4: about 4 in (10.2 cm) square. The edges may wave a little at this stage.
- Block after Round 5: 4.5 in × 4.5 in (11.4 cm × 11.4 cm), with 18 sc per side, or 4 sc per inch
If your block is bigger than 4.75 in (12.1 cm), go down half a hook size. If it is smaller than 4.25 in (10.8 cm), go up half a size. Change hooks for both the leaf and the frame so the leaf still fits on the diagonal.
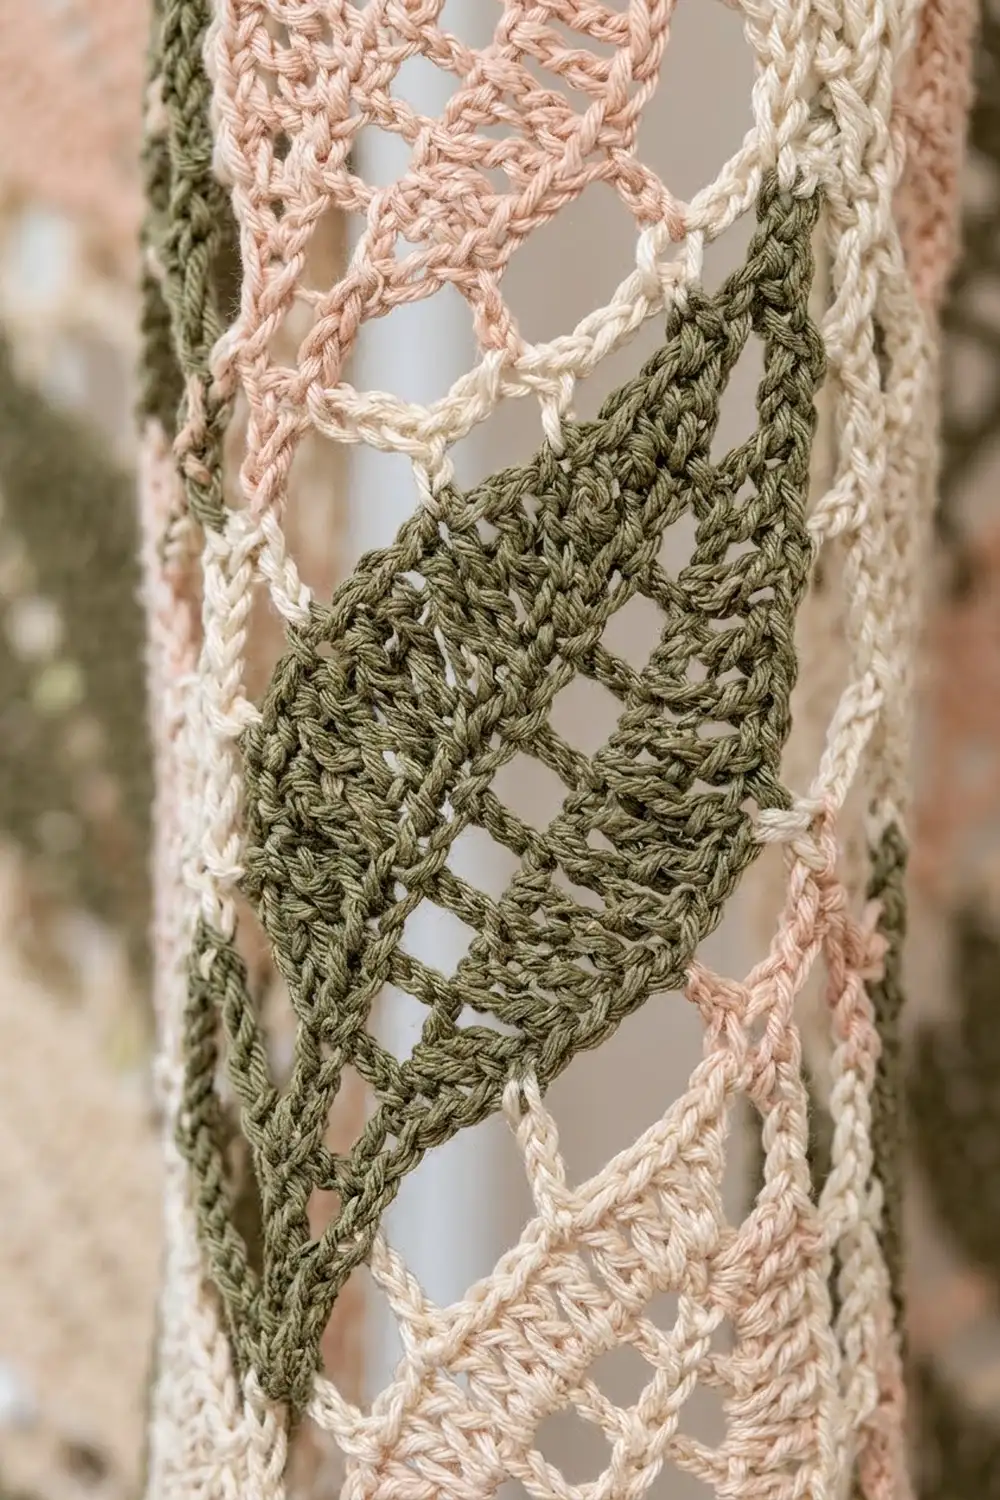
Leaf (Make 102 per Panel)
Work this with the leaf color. The leaf runs from a base end to a pointed tip.
Foundation: Ch 16.
Round 1: Sc in the 2nd ch from the hook (this is the base end). Hdc in the next ch, dc in each of the next 11 ch, hdc in the next ch. Work (sc, ch 2, sc) in the last ch to make the tip. Rotate and work along the underside of the foundation chain: hdc in the next ch, dc in each of the next 11 ch, hdc in the next ch, sc in the last ch. Ch 2 and sl st to the first sc.
Count: 30 stitches (15 per side, including each side’s end sc) and 2 ch-2 spaces.
The foundation chain stays visible down the middle as the center vein.
Round 2: Ch 1. Sc in the same st, hdc in the next hdc, [dc in the next dc, ch 1] 10 times, dc in the next dc, hdc in the next hdc, sc in the next sc. Work (sc, ch 3, sc) in the tip ch-2 sp. Then sc in the next sc, hdc in the next hdc, [dc in the next dc, ch 1] 10 times, dc in the next dc, hdc in the next hdc, sc in the next sc. Work (sc, ch 3, sc) in the base ch-2 sp and sl st to the first sc.
Count: 34 stitches (15 per side plus 2 sc at each end), 20 ch-1 spaces, and 2 ch-3 spaces.
The ch-1 gaps make the open side veins. The sc and hdc at each end taper the leaf into points. Fasten off and weave in the ends.
Square Frame (Cream)
Number the ch-1 spaces on each side of the leaf from 1 to 10, starting at the base.
Round 3: Join cream with a sc in the base ch-3 sp. Ch 3 and sc in the same sp (this is Corner A).
– Along the first side: ch 4, sc in ch-1 sp 2; ch 4, sc in sp 5; ch 7 (Corner B); sc in sp 6; ch 4, sc in sp 9; ch 4.
– At the tip: (sc, ch 3, sc) in the tip ch-3 sp (Corner C).
– Along the second side: ch 4, sc in sp 2; ch 4, sc in sp 5; ch 7 (Corner D); sc in sp 6; ch 4, sc in sp 9; ch 4.
– Sl st to the first sc.
Count: 12 sc, 8 ch-4 loops, 2 ch-3 corners, and 2 ch-7 corners.
Round 4: Sl st into the Corner A sp. Ch 3 (counts as dc), then work (dc, ch 2, 2 dc) in the same sp. Skip the sc between loops throughout this round.
– First side: 5 dc in the next ch-4 loop, 5 tr in the next ch-4 loop, then (4 dtr, ch 3, 4 dtr) in Corner B. Work 5 tr in the next loop and 5 dc in the next loop.
– Corner C: (2 dc, ch 2, 2 dc).
– Second side: 5 dc, 5 tr, (4 dtr, ch 3, 4 dtr) in Corner D, 5 tr, 5 dc.
– Sl st to the top of the ch-3.
Count: 64 stitches, which is 16 per square side between corner spaces (2 dc + 5 dc + 5 tr + 4 dtr), plus 4 corner spaces.
The stitches get taller toward Corners B and D. That fills the empty triangles beside the leaf so the leaf tips sit in Corners A and C.
Round 5: Ch 1. Sc in the same st and in the next dc, then (sc, ch 2, sc) in the Corner A sp. Sc in each of the next 16 sts, then (sc, ch 2, sc) in the next corner sp. Repeat from * 2 more times. Sc in each of the last 14 sts and sl st to the first sc.
Count: 72 sc, or 18 per side (16 + 1 corner sc at each end), plus 4 ch-2 corner spaces.
Fasten off and weave in the ends. Lightly steam or wet-block each block to 4.5 in (11.4 cm) square before you join it.
Make All Pieces
For one panel:
– 34 blocks with sage leaves
– 34 blocks with blush leaves
– 34 blocks with cream leaves
All frames are cream. Make the same set again for the second panel.
Layout grid: G = sage, P = blush, C = cream. L means the leaf leans up to the left (base at bottom right). R means it leans up to the right (base at bottom left). To get an R block, turn an L block a quarter turn.
Row  1: G-L  P-R | C-L  G-R | P-L  C-R
Row  2: P-L  C-R | G-L  P-R | C-L  G-R
Row  3: C-L  G-R | P-L  C-R | G-L  P-R
Rows 4–17: repeat Rows 1–3 in order, ending with a Row 2
Each bracketed pair is one V of the herringbone, so each panel has three vine columns. Every row has 2 blocks of each color, which gives 17 × 2 = 34 per color.
Joining
Use cream and the flat slip-stitch join.
- Join the rows. Join the 6 blocks of each row first. For each seam, sl st through both corner ch-2 spaces together, work 18 sl sts through the back loops of the matching sc (stitch for stitch, including the corner sc), and finish with a sl st through the next pair of corner spaces. There are 17 rows of 6 blocks.
- Size checkpoint. Each joined row should measure 27 in (68.6 cm) wide.
- Join the rows together. Join Row 1 to Row 2, and so on. Work 18 sl sts per block along each long seam, with a sl st through the corner spaces where blocks meet.
- Watch the orientation. Before each join, check that each V points upward.
Tension: Keep the slip stitches as loose as the sc they join. If seams pucker, go up one hook size for joining only.
Size checkpoint: The joined panel should measure 27 in × 76.5 in (68.6 cm × 194.3 cm), or 108 sc across and 306 sc down.
Border
Border gauge: 4 sc = 1 in (2.5 cm), the same as the blocks.
Round 1 (cream): Join in any sc and ch 1. Work 1 sc in each block sc. Where blocks meet, the joined corner spaces count as no stitch, so skip them. In each outer panel corner sp, work (sc, ch 2, sc). Sl st to the first sc.
– Short sides: 6 blocks × 18 = 108 existing sts + 2 corner sc = 110 sc per side
– Long sides: 17 blocks × 18 = 306 existing sts + 2 corner sc = 308 sc per side
– Total: 2 × 110 + 2 × 308 = 836 sc
Round 2: Ch 3 (counts as dc). Dc in each sc. In each corner sp, work (dc, ch 2, dc).
– Short sides: 110 + 2 corner dc = 112
– Long sides: 308 + 2 corner dc = 310
– Total: 844 dc
Round 3: Ch 1. Sc in each dc. In each corner sp, work (sc, ch 2, sc).
– Short sides: 112 + 2 = 114
– Long sides: 310 + 2 = 312
– Total: 852 sc
Why the math works: The border starts with exactly one stitch per block stitch: 108 sc at 4 sc per inch is 27 in. No stitches are added at the seams, and the only increases are at the four corners. The three rounds add 0.25 in, 0.5 in, and 0.25 in (0.6 cm, 1.3 cm, and 0.6 cm), for 1 in (2.5 cm) per side. That brings the panel to 29 in × 78.5 in (73.7 cm × 199.4 cm).
Tabs (make 6): Along the top short edge (114 sts), number the stitches 1 to 114 from the corner sc. The tabs sit on sts 1–9, 22–30, 43–51, 64–72, 85–93, and 106–114. Each tab is 9 sts wide, 2.25 in (5.7 cm), and the 5 gaps are 12 sts each, 3 in (7.6 cm). Check: 6 × 9 + 5 × 12 = 114.
- Row 1: Join cream in the first tab stitch. Ch 1 and sc in each of the 9 tab sts (9 sc).
- Rows 2–26: Ch 1, turn, and sc in each st (9 sc). The tab should measure 6 in (15.2 cm).
Fasten off, leaving a 12 in (30.5 cm) tail. Fold the tab to the WS and whipstitch the last row to the back of border Round 1. This leaves a loop that fits a rod up to 1.5 in (3.8 cm) across.
Final Blocking
- Weave in all remaining ends along the seams.
- Soak the panel in cool water and press out the water with towels. Don’t wring it.
- Lay it flat on mats and pin it out to 29 in × 78.5 in (73.7 cm × 199.4 cm).
- Pin straight down the edges every 2 in (5.1 cm), keeping the seam lines straight.
- Open each leaf’s side veins with your fingertips.
- Let it dry completely, then unpin. Repeat for the second panel.
Final Quality-Control Checklist
- [ ] Every block has 18 sc per side and 4 corner spaces.
- [ ] Every V points upward, giving three straight vine columns.
- [ ] The colors follow the grid, with no matching neighbors in a row.
- [ ] The border counts are 114 and 312 per side.
- [ ] The panel measures 29 in × 78.5 in (73.7 cm × 199.4 cm).
- [ ] The six tabs are evenly spaced and the same length.
- [ ] All ends are secure and hidden.
Troubleshooting
- The leaf is too long for the square: Your leaf gauge is loose. Use a smaller hook for the leaf rounds only.
- Corners B and D cup: Your dtr are too tight. Pull up each loop a little taller.
- Rows are different widths: Count 18 sl sts on every seam and re-block any block that is out of size.
- The border ruffles: You probably worked into the joined corner spaces. Rip back and skip them.
- The tabs twist: Whipstitch them evenly through both layers.
Care
Hand wash in cool water with a mild detergent and dry flat, re-pinning to size if needed. Don’t hang the panels wet, because the weight will stretch the lace.
Final Notes
The measurement chain links every stage. The leaf is 4.25 in (10.8 cm) long, which fits a 4.5 in (11.4 cm) block with 18 sc per side. Six blocks make 27 in (68.6 cm) and seventeen make 76.5 in (194.3 cm). A 1 in (2.5 cm) border brings the panel to 29 in × 78.5 in (73.7 cm × 199.4 cm). If you hit each checkpoint, the vines line up and the panels hang straight. Happy crocheting!