

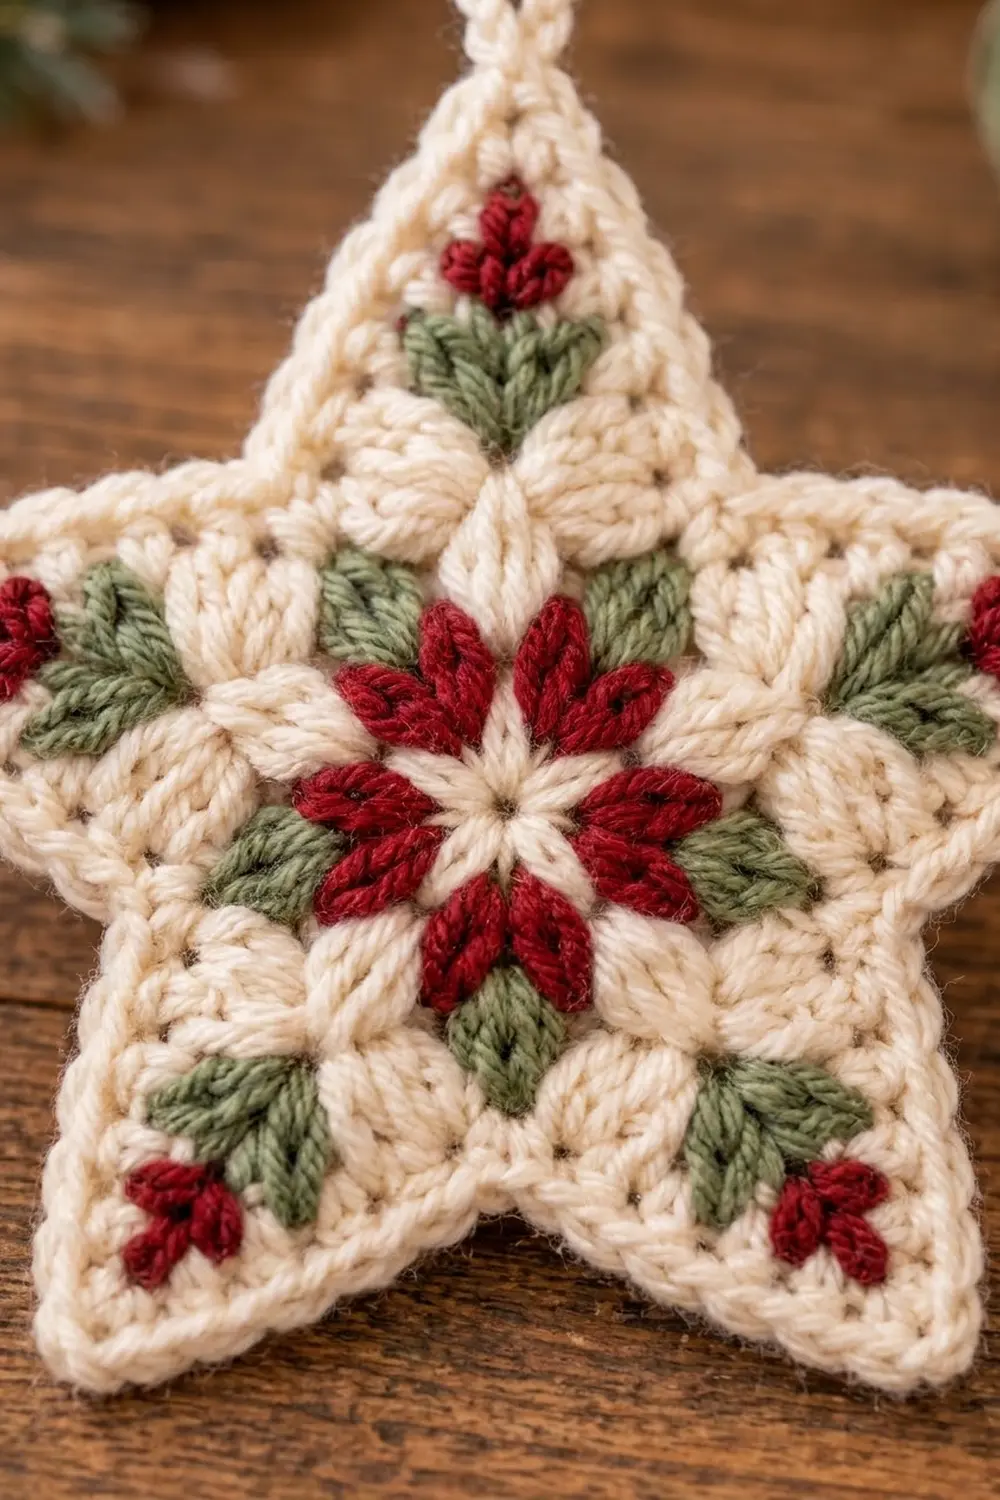
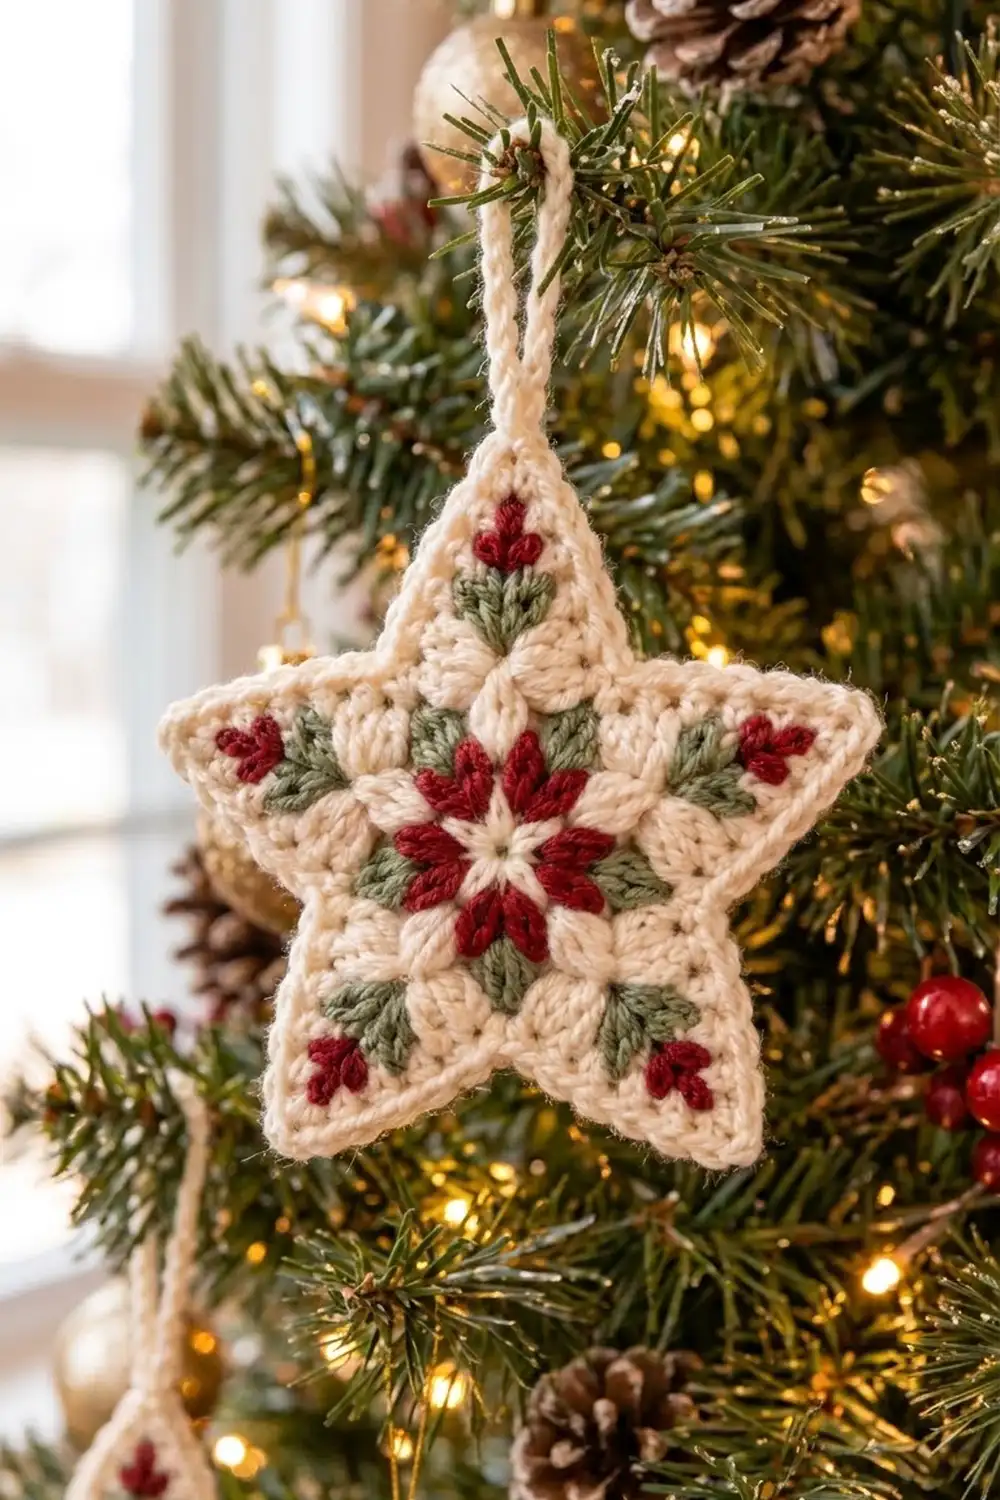
The Winter Berry Star is a five-pointed Christmas ornament with a classic cream, cranberry and sage palette. A ring of red cluster petals forms the center, framed by green cluster leaves. Each point carries a raised green sprig and a tiny red berry cluster made of bobbles.
The look is cozy and traditional, like Nordic embroidery worked in yarn. Cream keeps the background calm so the red and green motifs stand out on the tree.
This pattern uses US crochet terms. The finished star measures 6.25 in (15.9 cm) wide from tip to tip and 6 in (15.2 cm) tall, not counting the hanging loop.
Construction is simple. You crochet a round center medallion in five color rounds. Then you work each of the five points in rows straight off the medallion, adding bobbles on wrong-side rows. Two border rounds tidy the edge and add the hanging loop.
Finished Size and Construction
- Finished size: 6.25 in (15.9 cm) wide x 6 in (15.2 cm) tall
- Skill level: Intermediate
- Terminology: US crochet terms
- Yarn weight: Sport (#2)
- Hook: 3.0 mm (C/2–D/3)
- Number of pieces: 1 (single star)
- Layout: Center medallion with 5 points worked in rows
- Center medallion size: 3.25 in (8.3 cm) across
- Size before border: 5.75 in (14.6 cm) wide x 5.5 in (14.0 cm) tall
- Border depth: 0.25 in (0.6 cm) per edge, adding about 0.5 in (1.3 cm) overall
- Hanging loop: about 1.5 in (3.8 cm) long
Materials
Choose a smooth sport-weight cotton or cotton blend. Cotton holds sharp points and clear bobbles, and it doesn’t fuzz on the tree. Soft acrylic also works if you want a warmer look. Avoid fuzzy or very splitty yarns, because the bobbles lose their shape.
Yarn (sport weight, about 330 m per 100 g):
- Cream (main color): 12 g / 40 m
- Cranberry red: 4 g / 13 m
- Sage green: 4 g / 13 m
These quantities include a small safety margin for gauge differences and weaving in ends.
Tools:
- 3.0 mm crochet hook
- Tapestry needle
- 5 locking stitch markers
- Scissors
- Ruler or tape measure
- Blocking mat and rust-proof pins
- Spray bottle with water
Abbreviations (US Terms)
- ch: chain
- sl st: slip stitch
- sc: single crochet
- dc: double crochet
- sc2tog: single crochet 2 together
- sc3tog: single crochet 3 together
- st(s): stitch(es)
- sp: space
- rnd: round
- RS / WS: right side / wrong side
- MR: magic ring
- standing sc: start with a slip knot on your hook, then work a sc as usual
Special stitches:
- 2-dc cl (2-double crochet cluster): Yarn over, insert hook in st, pull up a loop, yarn over, pull through 2 loops twice, yarn over, pull through all 3 loops on hook.
- 3-dc cl (3-double crochet cluster): Same as above, worked 3 times, then pull through all 4 loops.
- Beg cl (beginning cluster): Ch 2, then work a 2-dc cl in the same st. This counts as a 3-dc cl in Rnd 2. In Rnd 4, work ch 2 and 1 dc in the same st; this counts as a 2-dc cl.
- bob (4-dc bobble): Yarn over, insert hook in st, pull up a loop, yarn over, pull through 2 loops 4 times, yarn over, pull through all 5 loops. Always work it on a WS row so it pops out on the RS.
Color changes for bobbles: Work the last yarn over of the stitch before the bobble in the new color. Work the bobble’s final yarn over in cream. Lay the inactive yarn along the top of the row and work over it, so it is carried inside the stitches.
Gauge and Checkpoints
Gauge: 24 sc x 26 rows = 4 in (10.2 cm) in sc worked in rows.
A star is small, so the center medallion works as your gauge test. Work Rnds 1–5 first and measure before you start the points.
Checkpoints (measured flat, edge to edge):
- After Rnd 1: 1 in (2.5 cm)
- After Rnd 2: 1.75 in (4.4 cm)
- After Rnd 3: 2.25 in (5.7 cm)
- After Rnd 4: 3 in (7.6 cm)
- After Rnd 5: 3.25 in (8.3 cm)
- Each point, from Rnd 5 edge to tip: 1.5 in (3.8 cm)
- Before border: 5.75 in (14.6 cm) wide
- After border: 6.25 in (15.9 cm) wide
If your medallion measures more than 3.5 in (8.9 cm), go down to a 2.75 mm hook. If it measures less than 3 in (7.6 cm), go up to a 3.25 mm hook. If the medallion ruffles, your clusters are too loose; tighten your tension on the cluster rounds before you change hooks. If it cups, you’re working the sc rounds too tightly.
Center Medallion
Rnd 1 (cream): Make a MR. Ch 3 (counts as dc), work 19 dc in ring. Pull the ring closed and join with a sl st to the top of ch-3. (20 dc) Fasten off.
Rnd 2 (red): Join red in any dc. Beg cl in the same st, ch 2, skip next dc, 3-dc cl in next dc, ch 2, skip next dc; repeat from * 8 more times. Join with sl st to top of beg cl. (10 clusters, 10 ch-2 sps) Fasten off.
These 10 clusters form the pointed red petals.
Rnd 3 (cream): Join cream with a standing sc in any ch-2 sp, work 2 more sc in the same sp, sc in top of next cl, 3 sc in next ch-2 sp, sc in top of next cl; repeat from * 8 more times. Join with sl st to first sc. (40 sc) Fasten off.
Each repeat is 4 sts: 3 sc over a space plus 1 sc over a cluster. 10 repeats x 4 = 40.
Rnd 4 (green): Join green in the center sc of any 3-sc group. Beg cl in the same st (ch 2, dc), ch 2, 2-dc cl in the same st (first leaf made), ch 2, skip next 3 sts, (2-dc cl, ch 2, 2-dc cl) in next st, ch 2, skip next 3 sts; repeat from * 8 more times. Join with sl st to top of beg cl. (10 leaves = 20 clusters, 10 tip ch-2 sps, 10 between ch-2 sps) Fasten off.
Each leaf sits in the center sc of a 3-sc group. After each leaf, the 3 skipped sts are the last sc of that group, the sc over the cluster, and the first sc of the next group.
Rnd 5 (cream): Join cream with a standing sc in the first cluster of any leaf. 3 sc in the leaf’s tip ch-2 sp, sc in next cluster, sc in next between ch-2 sp, sc in first cluster of next leaf; repeat from * 9 more times, omitting the final sc on the last repeat. Join with sl st to first sc. (60 sc) Fasten off.
Each leaf gives 6 sts: 1 + 3 + 1 sc over the leaf, plus 1 sc in the space between leaves. 10 x 6 = 60.
Marking the points: Find the middle sc of the 3 sc at any leaf tip and place a marker. Skip the next leaf, then mark the middle tip sc of the following leaf. Continue around until you’ve marked 5 alternate leaves. There are exactly 12 sts from one marker to the next.
The marked sts are the point centers. The middle tip sc of each unmarked leaf becomes a valley stitch.
Checkpoint: The medallion should be flat and measure 3.25 in (8.3 cm) across.
Star Points
You work each point in rows over 11 sts, centered on a marker. One valley stitch stays unworked between neighboring points: 5 x (11 + 1) = 60.
Setup: With the RS facing, count 5 sts to the right of a marked st. Join cream with a standing sc in that st.
Row 1 (RS, cream): Sc in the next 10 sts. This ends 5 sts past the marker. (11 sc) Turn.
Row 2 (WS): Ch 1 (does not count as a st here or in later rows). Sc in the next 3 sts, changing to green on the last one. Work 1 green bob in the next st, then sc in the next 3 sts in cream while carrying green. Work 1 green bob in the next st, then sc in the next 3 sts in cream. (9 sc, 2 bob = 11 sts) Turn.
Row 3 (RS, cream): Ch 1, sc2tog, sc in next 7 sts, sc2tog. (9 sts) Turn.
Row 4 (WS): Ch 1, sc in next 3 sts, green bob, sc in next st, green bob, sc in next 3 sts. (7 sc, 2 bob = 9 sts) Cut green, leaving a 4 in (10.2 cm) tail. Turn.
Row 5 (RS, cream): Ch 1, sc2tog, sc in next 5 sts, sc2tog. (7 sts) Turn.
Row 6 (WS): Ch 1, sc in next 2 sts, red bob, sc in next st, red bob, sc in next 2 sts. (5 sc, 2 bob = 7 sts) Turn.
Row 7 (RS, cream): Ch 1, sc2tog, sc in next 3 sts, sc2tog. (5 sts) Turn.
Row 8 (WS): Ch 1, sc in next 2 sts, red bob, sc in next 2 sts. (4 sc, 1 bob = 5 sts) Cut red. Turn.
Row 9 (RS, cream): Ch 1, sc2tog, sc in next st, sc2tog. (3 sts) Turn.
Row 10 (WS, cream): Ch 1, sc3tog. (1 st) Fasten off.
How the motif lines up: Row 2 bobbles sit 2 sts out from center on each side. Row 4 bobbles step 1 st inward, which forms the green V-sprig. The red bobbles in Row 6 sit directly above the Row 4 bobbles, and the single Row 8 bobble caps them at center. Together they make the three-bobble berry cluster.
Remaining points: Find the next marker. Count 5 sts to its right and join cream there. This leaves exactly 1 unworked valley st between points. Repeat Rows 1–10. Make 5 points in total.
Checkpoint: Each point measures 1.5 in (3.8 cm) from the medallion edge to the tip. The star measures 5.75 in (14.6 cm) wide and 5.5 in (14.0 cm) tall.
Weave in all color tails before the border, hiding each tail in stitches of its own color.
Border
Border gauge: Along the sloped edges of the points, aim for about 6 sc per 1 in (2.5 cm). That works out to 11 sc per point side.
Border Rnd 1 (cream): Choose the point that will be the top. Join cream with a standing sc in its Row 10 st, ch 2, sc in the same st. Work down the left side of this point with 1 sc in each row-end of Rows 9 through 2, but work 2 sc in the row-ends of Rows 7, 5 and 3. (11 sc on this side)
Next, sc3tog over the Row 1 row-end, the valley st and the Row 1 row-end of the next point. Work up the next point’s side the same way, from Row 2 to Row 9, for 11 sc. Then work (sc, ch 2, sc) in its Row 10 st.
Continue around until you’ve worked all 5 points. Join with sl st to the first sc.
Count per point: 2 tip sc + 11 + 1 sc3tog + 11 = 25 sts. Total: 5 x 25 = 125 sts, plus 5 ch-2 tip sps.
Border Rnd 2 (cream, with hanging loop): Sl st into the top ch-2 sp. Ch 1, then work (sc, ch 20, sc) in the same sp to make the hanging loop.
Then work these steps for each point:
- Sc in the next tip sc and in the next 10 side sts.
- Sc3tog over the last side st, the sc3tog and the first side st of the next point.
- Sc in the next 10 side sts and in the next tip sc.
- Work (sc, ch 2, sc) in the next tip ch-2 sp.
Repeat around. On the final side, end with sc in the last tip sc, the first sc of Rnd 1. Join with sl st to the first sc. Fasten off.
Count per point: 2 tip sc + 1 + 10 + 1 sc3tog + 10 + 1 = 25 sts. Total: 125 sts, plus 4 ch-2 tip sps and 1 ch-20 loop.
Why the math works: Each tip adds 2 sc around its corner space, and each valley sc3tog removes 2 sts. These cancel out, so the count stays at 25 per point in both rounds. The straight sides lie flat, the tips stay sharp and the valleys stay crisp without puckering. The extra sc on Rows 3, 5 and 7 cover the sloped decrease edges, which are longer than a straight stack of rows.
Checkpoint: 6.25 in (15.9 cm) wide and 6 in (15.2 cm) tall. The loop hangs about 1.5 in (3.8 cm) above the top tip.
Final Blocking
- Lightly mist the star with water until it is damp, not soaked.
- Lay it RS up on the blocking mat.
- Pin the center of the medallion, then pin each tip outward until the star measures 6.25 in (15.9 cm) across.
- Pin each valley gently toward the center so all five valleys look the same.
- Check that the points look evenly spaced. All five tips should sit the same distance from the center.
- Pinch each bobble from behind so it sits up on the RS.
- Lay the hanging loop straight above the top tip.
- Let it dry completely, usually 4–6 hours.
- For extra stiffness, mist with a light fabric stiffener, then pin it again and let it dry.
Final Quality-Control Checklist
- Medallion is flat and 3.25 in (8.3 cm) across
- 10 red petals and 10 green leaves are evenly spaced
- Each point has 2 green bobble V-pairs and 3 red bobbles
- All bobbles pop out on the RS
- Exactly 1 valley st between each pair of points
- 125 sts in each border round
- Tips are sharp and valleys don’t pucker
- Width is 6.25 in (15.9 cm) and height is 6 in (15.2 cm)
- All ends are woven in invisibly
- The loop is secure and centered on the top tip
Troubleshooting
Medallion ruffles: Your clusters are too loose or your hook is too big. Rework Rnd 4 with tighter tension.
Medallion cups: Your Rnd 3 or Rnd 5 sc stitches are too tight. Loosen up, or go up a hook size for those rounds only.
Bobbles appear on the back: You worked them on a RS row. Bobbles go on even-numbered WS rows only.
Cream shows through the bobbles: Carry the inactive yarn on top of the row and keep it snug, not tight.
Points are uneven: Recount the 5 sts before each join. Each point needs 11 sts, with 1 valley st between points.
Border waves: You’ve added too many side sc. Keep to exactly 11 per side.
Border pulls the tips in: Loosen the (sc, ch 2, sc) at the tips.
Valleys gape: Make sure the sc3tog is centered over the valley st.
Care
Hand wash in cool water, press out the water in a towel and lay flat to dry. Reshape and pin the points if needed. Store the star flat with tissue between ornaments.
Final Notes
The measurement chain is short and easy to check:
- Medallion: 60 sts, 3.25 in (8.3 cm) across
- Points: five 11-st points, each 1.5 in (3.8 cm) long, for a 5.75 in (14.6 cm) star before the border
- Border: two rounds of 125 sts, bringing the star to 6.25 in (15.9 cm) x 6 in (15.2 cm)
Check the medallion first and everything else follows. Make one for your tree, a gift tag or a holiday card topper.
Happy crocheting!