

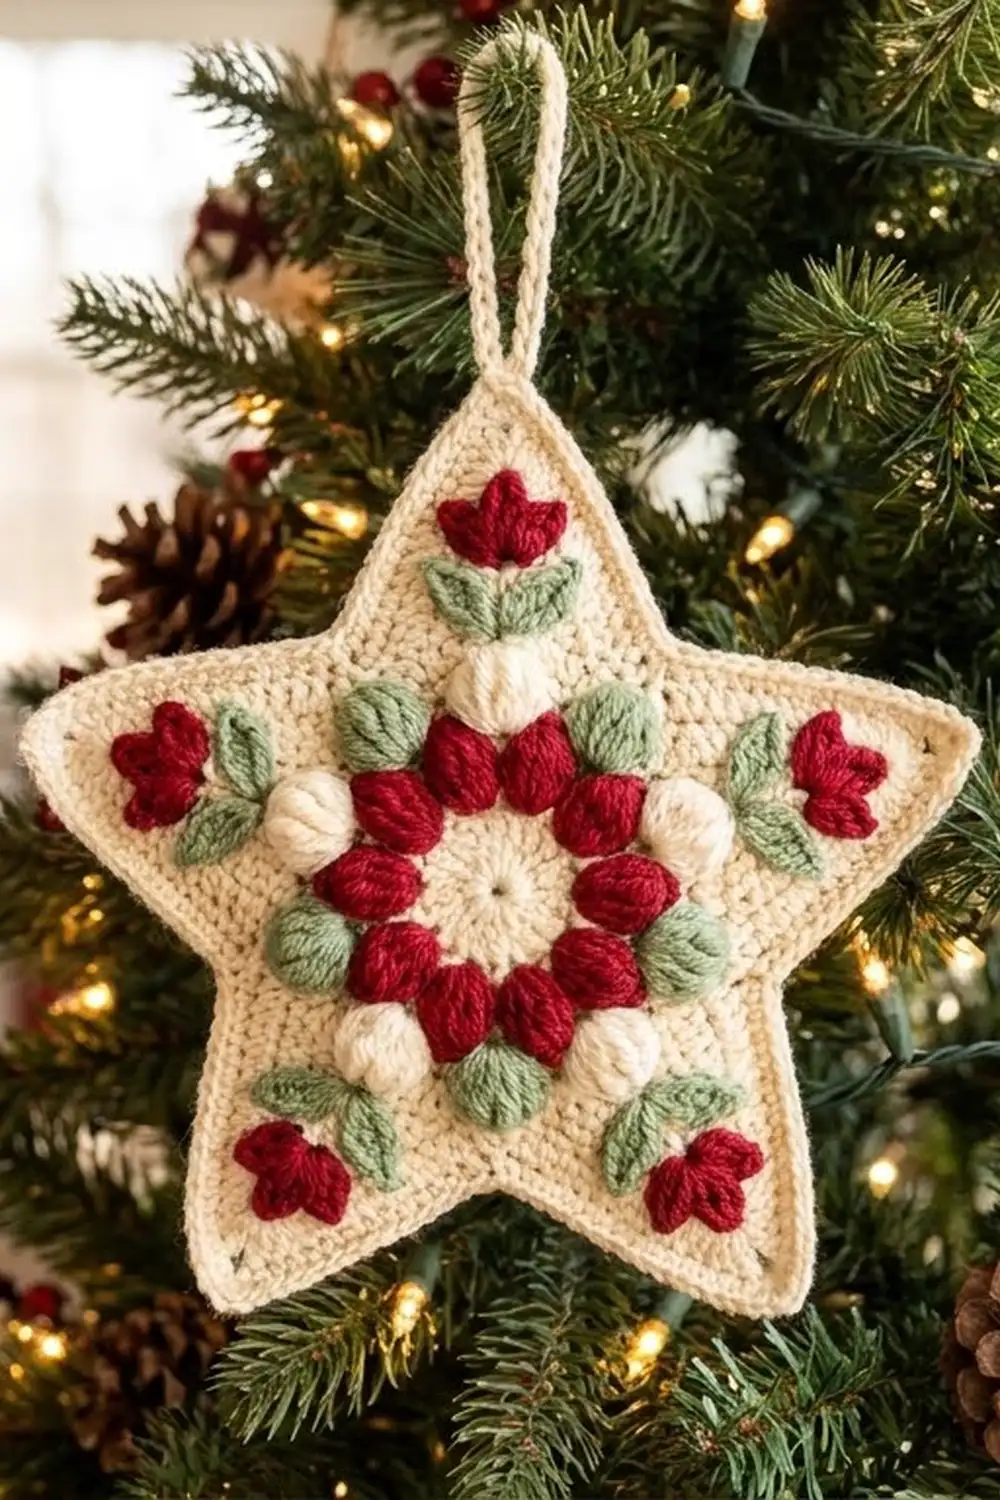
The Winter Berry Star is a flat, five-pointed ornament with a lot of texture. A cranberry puff flower sits at the center. Around it are a ring of sage-green puffs and a ring of soft cream puffs. Each point has its own tiny sprig: two green leaves and a red bud.
The colors are classic and cozy: warm cream, deep cranberry and muted sage. It looks handmade and Nordic-inspired, so it suits a natural, rustic tree, a gift topper or a window hook.
This pattern uses US crochet terms. The finished star measures about 5 in (12.7 cm) from point to point and 4.75 in (12.1 cm) tall, not counting the 1.5 in (3.8 cm) hanging loop.
Construction overview: You work the center in joined rounds and finish it with a 40-stitch single-crochet round. Each of the five points is worked in short turned rows directly off that round. The leaves and buds are embroidered onto the points. Last, one round of cream border goes around the whole star, and you add a crocheted-over hanging loop at the top tip.
Finished Size and Construction
- Finished size: 5 in (12.7 cm) wide × 4.75 in (12.1 cm) tall, excluding loop
- Skill level: Easy-intermediate (puff stitches, decreases, simple embroidery)
- Terminology: US crochet terms
- Yarn weight: DK (light worsted, #3)
- Hook: 3.5 mm (E/4)
- Number of pieces: 1 (single star, no joining)
- Layout: One center medallion with 5 points worked directly onto it
- Center medallion size (after Rnd 5): 2.5 in (6.4 cm) diameter
- Size before border: 4.75 in (12.1 cm) wide × 4.5 in (11.4 cm) tall
- Border depth: about 0.125 in (0.3 cm), one round
Materials
Choose a smooth cotton or cotton blend in DK weight so the puffs and embroidery stay crisp. A soft acrylic DK also works, but it can make the puffs look fuzzier.
- Cream (main color): 12 g / 28 m
- Cranberry red: 4 g / 9 m
- Sage green: 4 g / 9 m
These amounts include a margin for the gauge swatch, embroidery and weaving in ends. One standard ball of each color makes many stars.
Tools:
– 3.5 mm (E/4) crochet hook
– Tapestry needle with a blunt tip
– Scissors
– Stitch marker
– Rust-proof pins and a blocking mat or folded towel
– Spray bottle with water
Abbreviations (US Terms)
- ch – chain
- sl st – slip stitch
- sc – single crochet
- sc2tog – single crochet 2 together
- st(s) – stitch(es)
- sp – space
- Rnd – round
- RS / WS – right side / wrong side
Special stitches:
- Puff stitch (puff): (Yarn over, insert hook in the stitch or space, yarn over and pull up a loop to the height of the round) 3 times. You now have 7 loops on the hook. Yarn over and pull through all 7 loops. One puff counts as 1 stitch.
- Lazy daisy (embroidery): Bring the needle up at A. Insert it back down at A and bring it up at B (the leaf tip) with the yarn under the needle. Pull through to form a loop, then make a tiny stitch over the loop at B to anchor it.
Gauge and Checkpoints
Gauge: 20 sc and 22 rows = 4 in (10.2 cm) in sc worked in rows with a 3.5 mm hook. That works out to 5 sts and 5.5 rows per 1 in (2.5 cm).
Make one test star before planning a batch. Measure after each stage:
- After Rnd 1: 0.5 in (1.3 cm) across
- After Rnd 2: 1.25 in (3.2 cm) across
- After Rnd 3: 1.75 in (4.4 cm) across
- After Rnd 4: 2.25 in (5.7 cm) across
- After Rnd 5: 2.5 in (6.4 cm) across, lying flat
- Each point: 1.25 in (3.2 cm) long from the Rnd 5 edge to the tip, and 1.6 in (4.1 cm) wide at the base
- Before border: 4.75 in (12.1 cm) wide
- After border: 5 in (12.7 cm) wide
If your center is too big (over 2.75 in / 7 cm after Rnd 5), switch to a 3.25 mm hook and pull your puffs up a little shorter. If it is too small or cupping (under 2.25 in / 5.7 cm), switch to a 3.75 mm hook. If the medallion ruffles, your puffs are too tall. If it cups, your chain spaces are too tight.
Pattern
Center Medallion
Rnd 1 (cream): Make a magic ring. Ch 1, then work 10 sc into the ring. Pull the ring closed and sl st to the first sc. (10 sc) Fasten off cream.
Rnd 2 (red): Join red in any sc. Ch 2 (does not count as a st) and work 1 puff in the same st, ch 2. (Puff in next sc, ch 2) 9 times. Sl st to the top of the first puff. (10 puffs, 10 ch-2 sps) Fasten off red.
These 10 puffs form the cranberry petals. Push each one gently outward with your fingertip so the petals point away from the center.
Rnd 3 (green): Join green in any ch-2 sp. Ch 2 and work 1 puff in the same sp, ch 3. (Puff in next ch-2 sp, ch 3) 9 times. Sl st to the top of the first puff. (10 puffs, 10 ch-3 sps) Fasten off green.
Each green puff sits between two red petals, so the green peeks out as little leaves around the flower.
Rnd 4 (cream): Join cream in any ch-3 sp. Ch 2, then (puff, ch 1, puff, ch 1) in the same sp. (Puff, ch 1, puff, ch 1) in each of the next 9 ch-3 sps. Sl st to the top of the first puff. (20 puffs, 20 ch-1 sps)
This round makes the raised ring of cream puffs. Do not fasten off.
Rnd 5 (cream, conversion round): Ch 1. Work 1 sc in the top of the first puff and 1 sc in the next ch-1 sp. Continue around with 1 sc in each puff and 1 sc in each ch-1 sp. Sl st to the first sc.
Count: 20 sc worked into the puffs + 20 sc worked into the ch-1 sps = 40 sc.
Place a marker in the first sc. Do not fasten off.
Checkpoint: The medallion should measure 2.5 in (6.4 cm) across and lie flat. The 40 sts divide evenly into 5 groups of 8, so each group is one point base.
Points (make 5 directly on Rnd 5)
Each point is worked in turned rows over 8 sts of Rnd 5. Point 1 uses Rnd 5 sts 1–8, Point 2 uses sts 9–16, and so on. No stitches are skipped between points, so the points meet cleanly at the valleys.
Row 1 (RS): Ch 1, then sc in each of the next 8 sts. Turn. (8 sc)
Row 2 (WS): Ch 1, sc2tog, sc in the next 4 sts, sc2tog. Turn. (6 sc)
Row 3: Ch 1, sc in each st across. Turn. (6 sc)
Row 4: Ch 1, sc2tog, sc in the next 2 sts, sc2tog. Turn. (4 sc)
Row 5: Ch 1, sc in each st across. Turn. (4 sc)
Row 6: Ch 1, sc2tog twice. Turn. (2 sc)
Row 7 (RS): Ch 1, sc2tog. (1 sc, the tip)
Fasten off with a 4 in (10.2 cm) tail.
For Points 2–5, join cream with a sl st in the next unworked st of Rnd 5. Then repeat Rows 1–7 over the next 8 sts.
Checkpoint: Each point is 7 rows tall. At 5.5 rows per inch, that is about 1.25 in (3.2 cm). The star should now measure 4.75 in (12.1 cm) wide and 4.5 in (11.4 cm) tall. Weave in the point tails along the point edges.
Point Sprigs (embroidery)
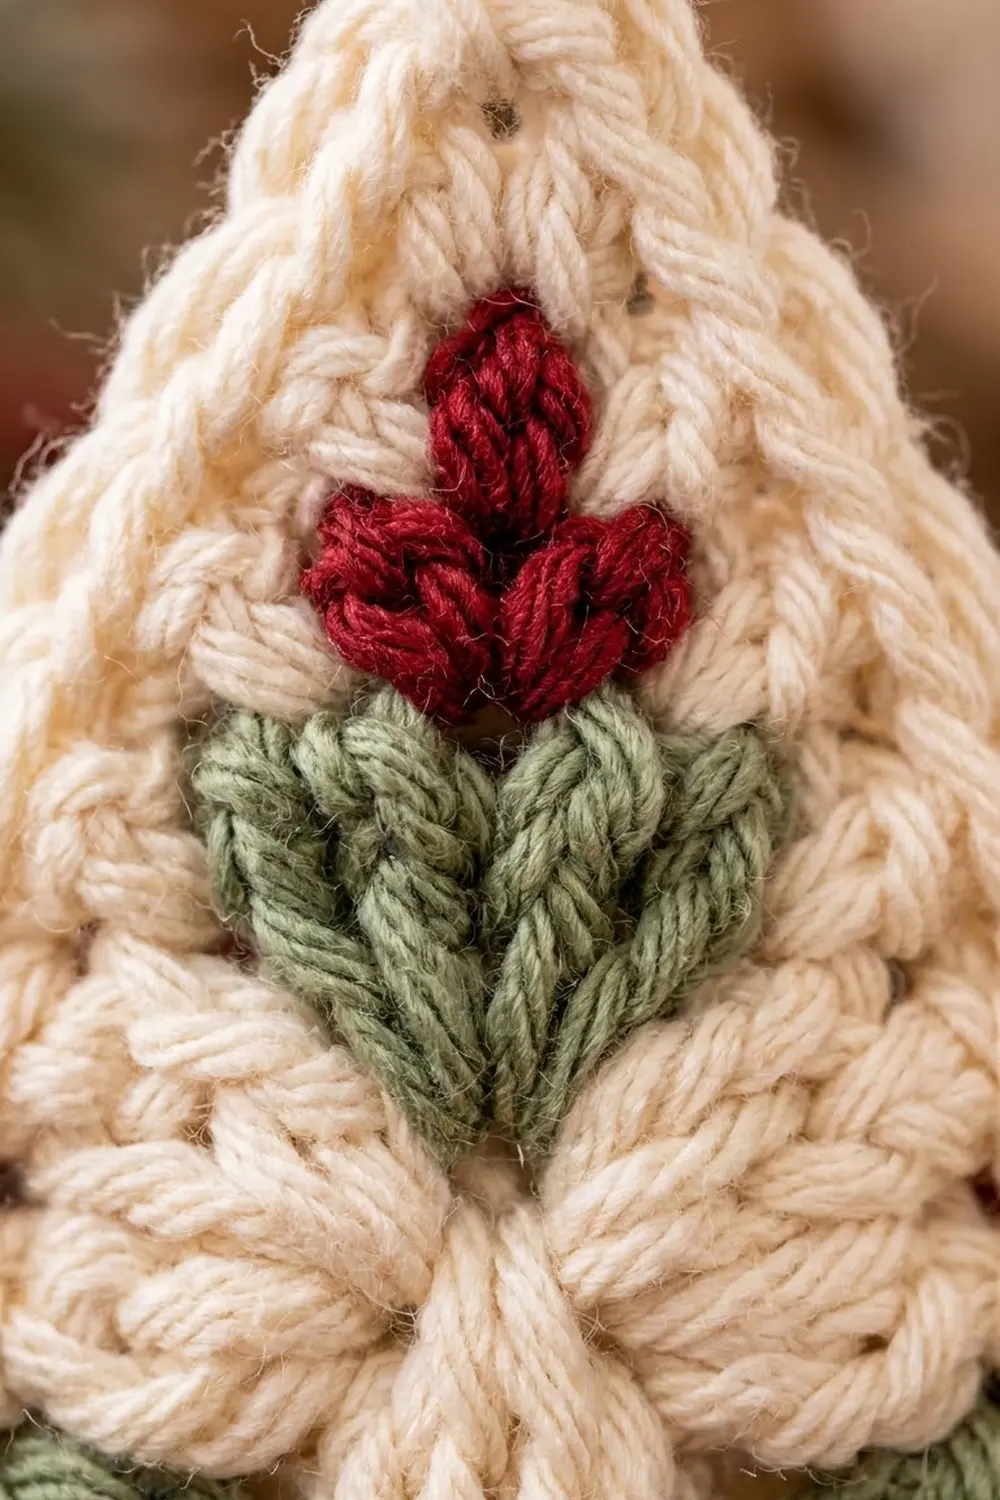
Thread about 16 in (40.6 cm) of green yarn, doubled, onto the tapestry needle. Doubled yarn gives the plump, raised look of the leaves in the photo.
- Leaves: On each point, center the work on the middle 2 sts of Row 2. Make one lazy daisy angled up-left and one angled up-right from that center point. Each leaf ends on Row 4, about 0.3 in (0.8 cm) long. Together they form a V.
- Bud: With doubled red yarn, make 3 short lazy daisies on Rows 5–6 above the V. Fan them out from one shared base point: one pointing straight up toward the tip and one angled to each side.
- Keep every stitch on the RS only. Carry yarn between points on the WS, under the stitches, and do not pull it tight.
Repeat on all 5 points and weave in the ends on the WS.
Border
Border gauge: One sc per row end, so the border matches the 5.5 rows-per-inch point edge.
Border Rnd (cream): With the RS facing, join cream in the Row 2 row end on the right side of the top point. Ch 1. Then, for each point:
- First side: sc in the row ends of Rows 2–6. (5 sc)
- Tip: (sc, ch 2, sc) in the Row 7 tip st. (2 sc + 1 ch-2 sp)
- Second side: sc in the row ends of Rows 6–2. (5 sc)
- Valley: sc2tog worked across the Row 1 row end of this point and the Row 1 row end of the next point. (1 st)
Repeat around all 5 points. Sl st to the first sc. Do not fasten off.
Per-point count: 5 + 2 + 5 + 1 = 13 sts, plus 1 ch-2 sp. Total: 13 × 5 = 65 sts and 5 ch-2 sps.
Why the math works: Each point side has 7 row ends. Rows 2–6 get 5 sc. The Row 7 end is the tip itself, which gets the (sc, ch 2, sc). The two Row 1 ends at each valley share one sc2tog. That sc2tog pulls the valley in neatly instead of rounding it. Every row end is covered exactly once, so the edge neither ruffles nor pulls.
Hanging Loop
Sl st along the border to the top point’s ch-2 sp. Then:
- Ch 16 and sl st into the same ch-2 sp to form a loop.
- Work 24 sc into the loop, then sl st into the ch-2 sp.
Fasten off and weave in the end. The covered loop stands about 1.5 in (3.8 cm) tall.
Final Blocking
- Lightly mist the star until it is damp, not wet.
- Lay it RS up on the mat.
- Pin the 5 tips so they sit evenly on a 5 in (12.7 cm) circle. Keep the top tip centered.
- Pin each valley to sit about 1.5 in (3.8 cm) from the center.
- Fluff each puff with your fingertip so it stands slightly raised.
- Pin the hanging loop straight up.
- Let it dry completely, at least 6 hours, before unpinning.
Final Quality-Control Checklist
- Center flower has 10 red petals and 10 green puffs.
- Rnd 4 has 20 cream puffs, and Rnd 5 has 40 sc.
- All 5 points have 7 rows and end in a single st.
- The star measures 5 in (12.7 cm) wide and 4.75 in (12.1 cm) tall.
- Every point has a matching green V and a three-petal red bud.
- The border has 65 sts plus 5 tip ch-2 sps.
- The valleys are crisp, and none of the edges ruffle.
- The loop is secure and centered on the top tip.
- All ends are woven in on the WS.
Troubleshooting
- Center cups: Your chain spaces are too short. Loosen the ch-3s in Rnd 3, or go up one hook size for Rnds 2–4.
- Center ruffles: Your puffs are too tall. Pull up shorter loops, or work the puffs with 2 yarn overs instead of 3.
- Points lean sideways: Check that you turn after every row and that every decrease is at an edge.
- Points different lengths: Recount the rows on each point. All should have exactly 7.
- Wavy border: You likely added extra sc. Use one sc per row end.
- Rounded valleys: Make sure you work the sc2tog across both Row 1 ends.
- Embroidery puckers: Loosen the carried yarn on the WS and re-block.
Care
Hand wash in cool water with mild soap and press out the water in a towel. Reshape the star and let it dry flat, pinning it again if needed.
Final Notes
The measurement chain is simple:
- The 40-sc medallion measures 2.5 in (6.4 cm).
- Five 7-row points bring the star to 4.75 in (12.1 cm) wide.
- One 65-stitch border finishes it at 5 in (12.7 cm) wide and 4.75 in (12.1 cm) tall, plus a 1.5 in (3.8 cm) loop.
Check each stage against those numbers, and every star in your batch will match.
Happy crocheting!