

The Winter Frost Star Bedspread is a lacy, heirloom-style coverlet made from six-pointed snowflake stars in one soft cream shade. Each star has a solid little ring at the center and a ring of open loops, and its points are filled with leaf-like clusters. Because the stars are joined only at their tips, the open shapes between them make a second lacy pattern across the whole bed.
This pattern uses US crochet terms throughout. One motif measures 7 in (17.8 cm) from tip to opposite tip. The finished bedspread measures about 84.75 × 91.65 in (215.3 × 232.8 cm) after the border, which suits a queen bed with some drop at the sides.
Here’s how it’s built: you work 173 star motifs in the round, 7 rounds each, and join them on the last round as you go. They are joined in 15 offset rows that alternate 12 and 11 motifs. A two-round border then follows the zigzag outer edge, so the star points stay sharp.
The design uses one color and one repeated motif, so it’s a calm project to carry around. The stitch math is the same every time.
Finished Size and Construction
- Finished size: about 84.75 × 91.65 in (215.3 × 232.8 cm)
- Skill level: Intermediate
- Terminology: US crochet terms
- Yarn weight: DK (#3), cotton or cotton blend
- Hook: 3.5 mm (E-4)
- Number of pieces: 173 star motifs
- Layout: 15 offset rows: 8 rows of 12 motifs and 7 rows of 11 motifs
- Piece size: 7 in (17.8 cm) tip to opposite tip; 6.06 in (15.4 cm) from the top pair of tips to the bottom pair
- Size before border: 84 × 90.9 in (213.4 × 230.9 cm)
- Border depth: about 0.375 in (1.0 cm)
Materials
Yarn: Choose a smooth, mercerized or combed cotton DK so the clusters show up clearly and the tips block sharply. Avoid fuzzy yarn, because it blurs the lace.
- Cream (single color): 1,800 g, about 3,960 m. Each motif uses about 9 g (20 m), and the border uses about 60 g.
These quantities include a margin of about 10% for gauge swatches and differences in tension.
Tools:
– 3.5 mm (E-4) crochet hook
– Tapestry needle
– Stitch markers
– Measuring tape
– Blocking mats and rustproof pins
– Spray bottle
Abbreviations (US Terms)
- ch – chain
- sl st – slip stitch
- sc – single crochet
- dc – double crochet
- sk – skip
- sp – space
- st(s) – stitch(es)
- sc2tog – single crochet 2 together
Special stitch – 3-dc cluster (cl): Yarn over, insert hook in the stitch or space, yarn over, pull up a loop, yarn over, draw through 2 loops. Repeat from * to * 2 more times in the same place (4 loops on hook), then yarn over and draw through all 4 loops.
Beginning cluster (beg cl): Ch 2, then work a 2-dc cluster in the same place. This counts as 1 cl.
Gauge and Checkpoints
Make one complete motif before you buy all the yarn. Block it lightly and measure it.
Gauge: Rounds 1–2 = 2.75 in (7.0 cm) across. One finished motif = 7 in (17.8 cm) tip to opposite tip.
Checkpoints (diameter, measured flat):
– After Round 1: 1.5 in (3.8 cm)
– After Round 2: 2.75 in (7.0 cm)
– After Round 3: 3.5 in (8.9 cm)
– After Round 4: 4.5 in (11.4 cm) tip to tip
– After Round 5: 5.5 in (14.0 cm) tip to tip
– After Round 6: 6.5 in (16.5 cm) tip to tip
– After Round 7: 7 in (17.8 cm) tip to tip
If your motif is too big, go down a hook size to 3.25 mm (D-3). If it’s too small, go up to 3.75 mm (F-5). A difference of only 0.25 in (0.6 cm) per motif adds up to 3 in (7.6 cm) across a 12-motif row, so don’t skip this check.
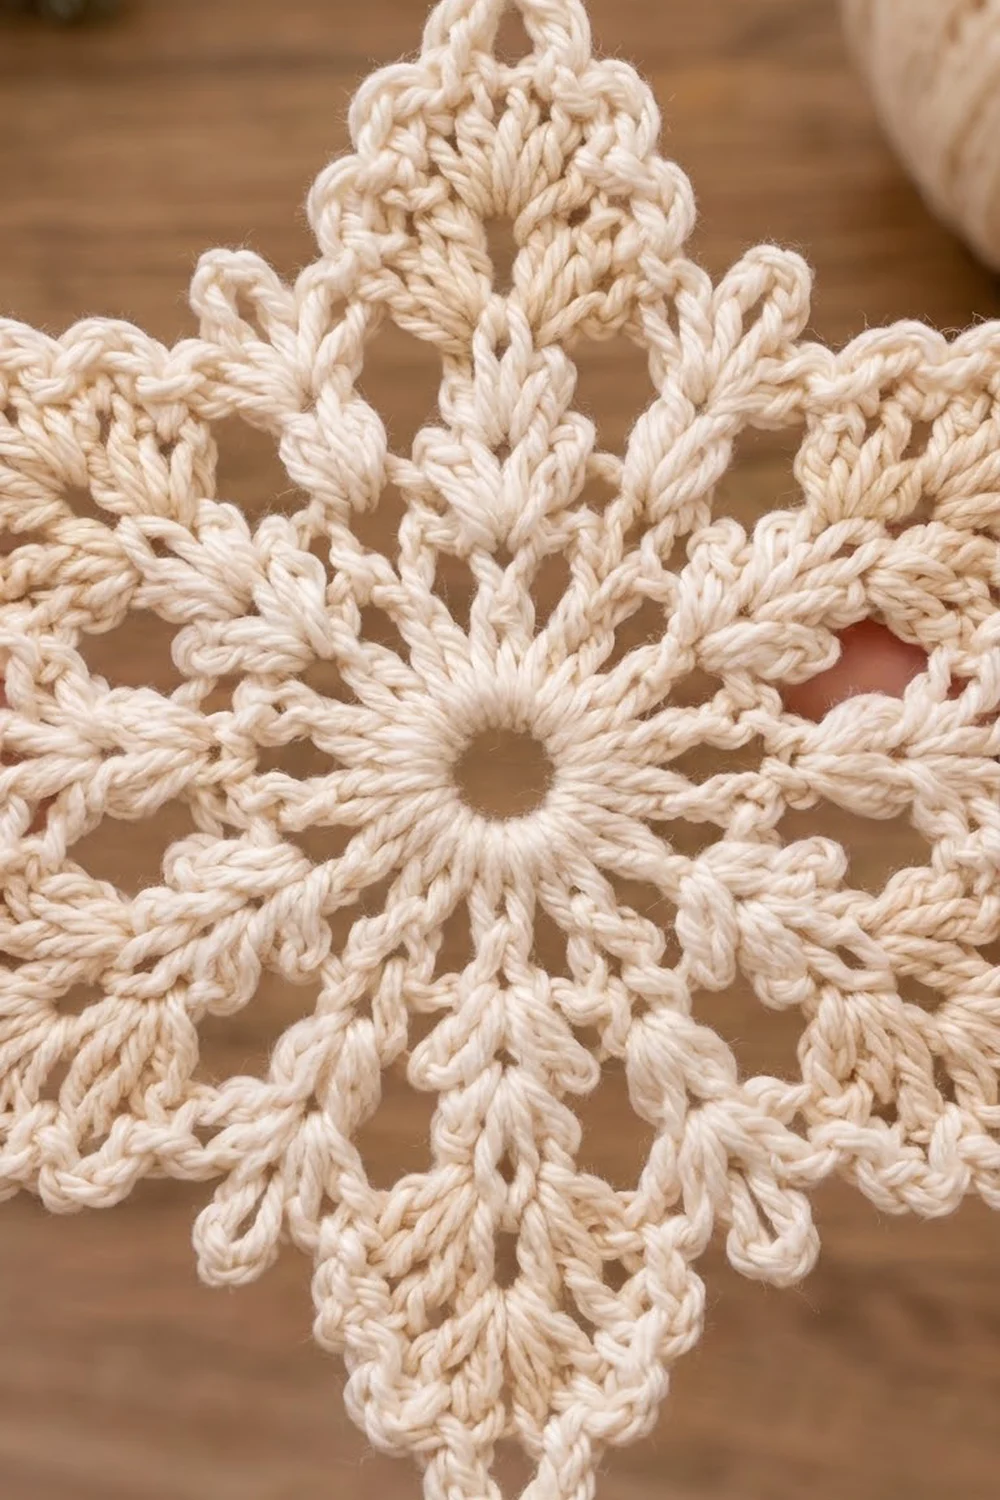
Star Motif
Round 1: Make a magic ring. Ch 3 (counts as dc), work 23 dc in the ring, and sl st to the top of the beginning ch-3. Pull the ring snug but leave a small open hole. (24 dc)
Round 2: Ch 1, sc in the same st, ch 5, sk next st. Sc in next st, ch 5, sk next st; repeat from * 10 more times. Sl st to the first sc. (12 sc, 12 ch-5 loops)
Round 3: Sl st into the first ch-5 loop. Ch 3 (counts as dc), then (dc, ch 2, 2 dc) in the same loop to make the first shell. Ch 2, sc in the next loop, ch 2. (2 dc, ch 2, 2 dc) in next loop, ch 2, sc in next loop, ch 2; repeat from * 4 more times. Sl st to the top of the beginning ch-3. (30 sts: 24 dc + 6 sc; 6 shell ch-2 sps, 12 ch-2 sps)
Round 4: Sl st in the next dc and in the shell ch-2 sp. Ch 3 (counts as dc), then (2 dc, ch 3, 3 dc) in the same sp. Ch 2, dc in the next sc, ch 2. (3 dc, ch 3, 3 dc) in next shell sp, ch 2, dc in next sc, ch 2; repeat from * 4 more times. Sl st to the top of the beginning ch-3. (42 dc; 6 ch-3 tip sps, 12 ch-2 sps)
This round sets up the six points.
Round 5 (leaf clusters): Sl st in the next 2 dc and into the ch-3 tip sp. Work (beg cl, ch 3, cl, ch 3, cl) in the same sp. Ch 3, sk 3 dc, sc in the ch-2 sp, sc in the dc, sc in the next ch-2 sp, ch 3, sk 3 dc.
(Cl, ch 3, cl, ch 3, cl) in next tip sp, ch 3, sk 3 dc, sc in ch-2 sp, sc in dc, sc in next ch-2 sp, ch 3, sk 3 dc; repeat from * 4 more times. Sl st to the top of the beg cl. (36 sts: 18 cl + 18 sc; 12 tip ch-3 sps, 12 side ch-3 sps)
The three clusters fan out into the V-shaped “leaves” inside each point.
Round 6 (points): Sl st into the next ch-3 sp, between the first and center cluster. Ch 3 (counts as dc), then 2 dc in the same sp. Then work the rest of the first point:
- (2 dc, ch 3, 2 dc) in the center cl
- 3 dc in the next ch-3 sp
- dc in the next cl
- 3 sc in the side ch-3 sp
- sk 1 sc, sc in the middle sc, sk 1 sc
- 3 sc in the next side ch-3 sp
- dc in the next cl
Repeat this for each remaining point: 3 dc in next ch-3 sp, then work the list above; repeat from * 4 more times. Sl st to the top of the beginning ch-3. (114 sts: 72 dc + 42 sc; 6 ch-3 tips)
Each repeat has 19 sts, and 19 × 6 = 114. Skipping the sc on either side of the middle sc pulls the valleys in, which makes the long, tapered points.
Round 7 (edge): Ch 1, sc in the same st and in the next 4 sts. (Sc, ch 3, sc) in the ch-3 tip sp, sc in the next 19 sts; repeat from * 4 more times. (Sc, ch 3, sc) in the last tip sp, sc in the last 14 sts, and sl st to the first sc. Fasten off and weave in the ends. (126 sc; 6 ch-3 tips)
Each tip-to-tip edge now has exactly 21 sc: 1 tip sc + 19 sts + 1 tip sc. The middle (11th) sc sits in the valley. Six edges × 21 = 126.
Make All Pieces
Make 1 complete motif following Rounds 1–7. For the other 172 motifs, work Rounds 1–6, then work Round 7 using the join-as-you-go method below.
- Cream: 173 motifs total (8 rows × 12 = 96, plus 7 rows × 11 = 77)
Turn each motif so one tip points left and one points right. That puts two tips on top and two on the bottom.
Row 1:   * * * * * * * * * * * *     (12)
Row 2:    * * * * * * * * * * *      (11)
Row 3:   * * * * * * * * * * * *     (12)
Row 4:    * * * * * * * * * * *      (11)
 ... continue alternating ...
Row 14:   * * * * * * * * * * *      (11)
Row 15:  * * * * * * * * * * * *     (12)
Each row of 11 sits in the notches between motifs of the row above it.
Joining
Method: Join as you go on Round 7. When you reach a tip that must connect to a motif you’ve already made, replace the “ch 3” with: ch 1, sl st into the neighbor’s ch-3 tip sp, ch 1. Then finish the tip with sc as usual. Only tips are joined; the edges stay free.
Which tips to join:
– Row 1, motif k (k = 2–12): Join the left (W) tip to motif k−1’s right (E) tip.
– Even rows, motif j:
– Join the upper-left (NW) tip to motif j’s lower-right (SE) tip in the row above.
– Join the upper-right (NE) tip to motif j+1’s lower-left (SW) tip in the row above.
– Join the W tip to motif j−1’s E tip (for j ≥ 2).
– Odd rows 3–15, motif j:
– Join the NW tip to motif j−1’s SE tip in the row above (j ≥ 2).
– Join the NE tip to motif j’s SW tip in the row above (j ≤ 11).
– Join the W tip to motif j−1’s E tip (j ≥ 2).
Stitch logic: The join chains replace the 3 tip chains, so every motif still has exactly 126 sc. No stitches are added or lost at any seam.
Tension: Keep the ch-1 on either side of the join sl st at your normal chain size. If they’re too tight, the tips pucker. If they’re too loose, the lace sags.
Size checkpoints (laid flat, not stretched):
– After Row 1: 84 in (213.4 cm) wide
– After Row 2: 12.12 in (30.8 cm) tall. Row 2 spans 77 in (195.6 cm) between its own outer tips.
– After Row 5: 30.3 in (77.0 cm) tall
– After Row 15: 90.9 in (230.9 cm) tall
Each row adds 6.06 in (15.4 cm), which is the height of one motif.
Border
Border gauge: You work the border into the Round 7 sc, so it follows motif gauge: about 5 sc per 1 in (2.5 cm) along the edges.
Define the sides. The four corners are the outer tips of the end motifs in Rows 1 and 15. Those corner tips belong to no side.
Round 1 (sc): Join with a standing sc in the first sc after any corner tip. Work around the whole outer edge:
- sc in each Round 7 sc
- (sc, ch 3, sc) in each free tip sp, including the corners
- at each perimeter join: sc in the last sc of one motif, ch 1, sc in the first sc of the next motif. The joined tips themselves are skipped.
Sl st to the first sc.
Per-side counts, Round 1:
– Top and bottom (each): The 12 motifs each show 3 edges, so 12 × (3 × 21) = 756 sc. Add 24 free tips × 2 sc = 48 sc, for 804 sc, plus 24 ch-3 sps and 11 ch-1 sps.
– Left and right (each): There are 42 exposed edges × 21 = 882 sc:
– The 2 end motifs show 2 edges each.
– The 6 inner motifs from odd rows show 4 edges each.
– The 7 motifs from even rows show 2 edges each.
Add 27 free tips × 2 sc = 54 sc, for 936 sc, plus 27 ch-3 sps and 14 ch-1 sps.
– Corners: 4 × (sc, ch 3, sc) = 8 sc + 4 ch-3 sps.
– Total: 804 + 804 + 936 + 936 + 8 = 3,488 sc
Round 2 (sl st edge): Sl st in each sc, 1 sl st in each ch-1 sp, and (sl st, ch 3, sl st) in each ch-3 sp. Sl st to the first st and fasten off.
- Top and bottom (each): 804 + 11 + 48 = 863 sl st, counted as 1 per existing sc + 1 per ch-1 + 2 per tip.
- Left and right (each): 936 + 14 + 54 = 1,004 sl st
- Corners: 4 × 4 = 16 sl st
Why the math works: Every exposed edge carries exactly 21 sc from Round 7, and the border only works 1 stitch into each one. The extra stitches are explicit: 2 per free tip and 1 ch per join. Because nothing is added at random, the edge neither ruffles nor cups. The two rounds add about 0.375 in (1.0 cm) all around.
Final Blocking
- Weave in any remaining ends along the dc ring or sc edges.
- Lay the bedspread on mats over a clean floor, working in sections if needed.
- Mist it evenly until damp, not soaked.
- Pin the row 1 tips along a straight line 84 in (213.4 cm) long.
- Pin each motif’s tips outward so the points look sharp and the clusters fan open.
- Check that each row adds 6.06 in (15.4 cm).
- Pin all the border picot tips.
- Let it dry completely before unpinning.
Final Quality-Control Checklist
- [ ] Every motif measures 7 in (17.8 cm) tip to tip.
- [ ] Every motif has 126 sc and 6 tips in Round 7.
- [ ] All 466 internal joins are secure, with no tip left unjoined.
- [ ] Rows alternate 12 and 11 motifs, 15 rows total.
- [ ] Border Round 1 has 3,488 sc.
- [ ] The bedspread measures about 84.75 × 91.65 in (215.3 × 232.8 cm).
- [ ] All ends are woven in and invisible from the front.
Troubleshooting
- The center hole is too big: Pull the magic ring tighter before the Round 1 sl st.
- Points are blunt: Make sure you skip the sc on either side of the middle sc in Round 6.
- The motif cups: Your Round 5 chains are too tight. Loosen them or go up 0.25 mm.
- The motif ruffles: Check the Round 6 count of 114 sts, then try a smaller hook.
- A row is drifting wider: One motif is oversized. Re-measure each one against the 7 in (17.8 cm) gauge.
- The border waves: Recount each side against the per-side totals.
Care
Hand wash in cool water with mild soap, press out the water without wringing, and dry flat, reshaping the points. Avoid hanging the bedspread, which stretches the lace.
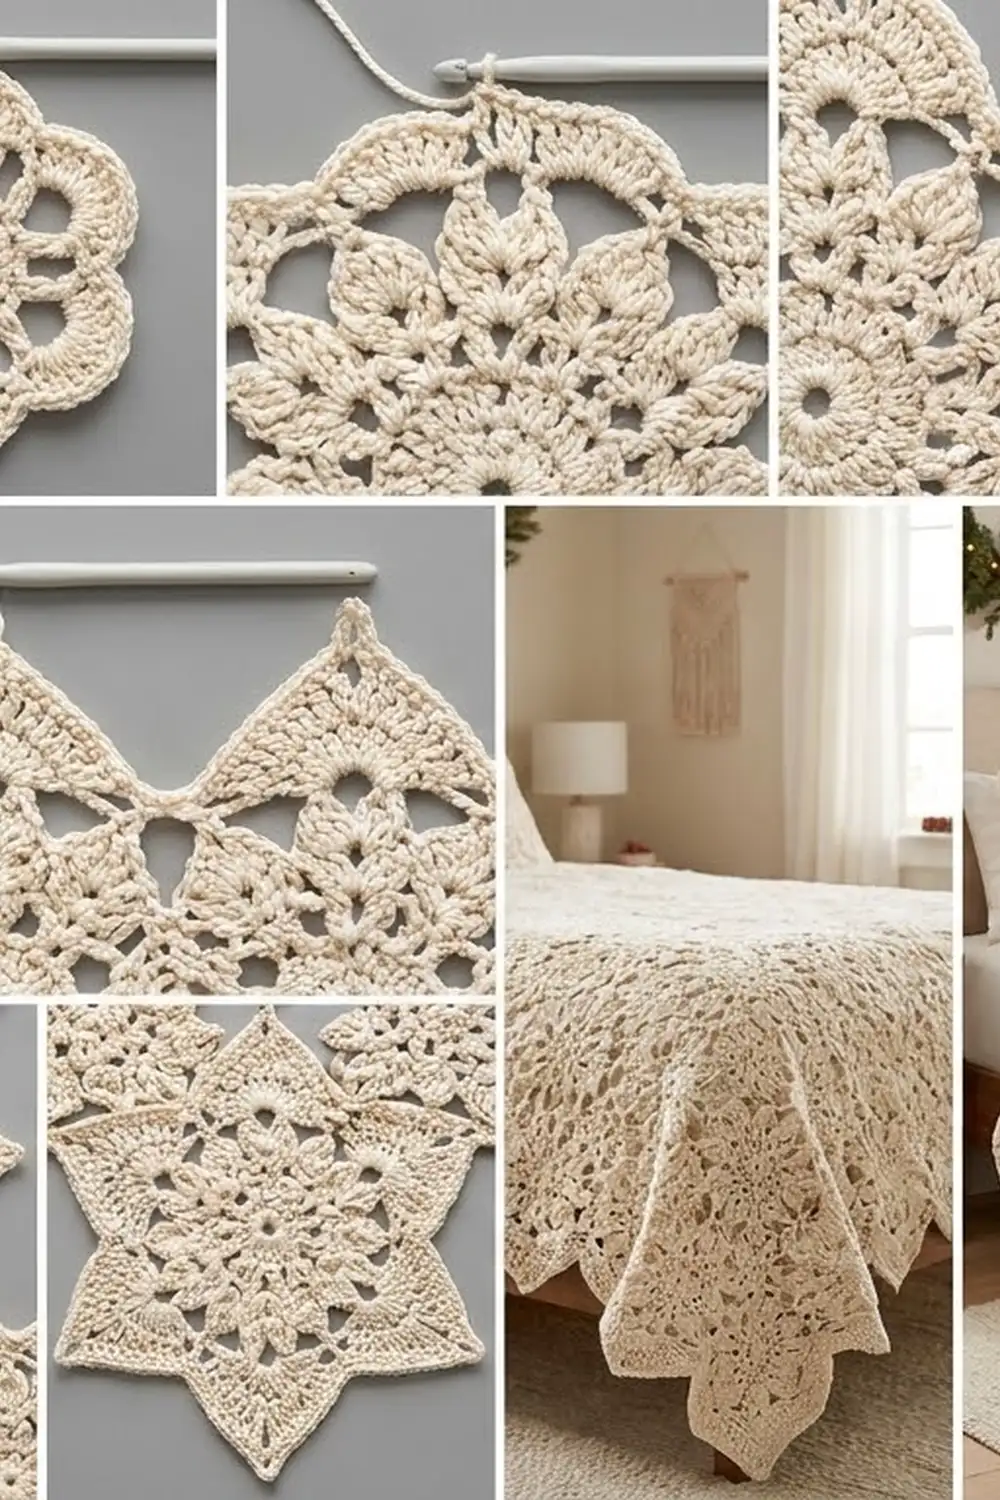
Final Notes
The measurement chain is simple. A 7 in (17.8 cm) motif with 21 sc per edge gives 84 in (213.4 cm) across 12 motifs. Each row adds 6.06 in (15.4 cm), so 15 rows reach 90.9 in (230.9 cm). A 0.375 in (1.0 cm) border on each side brings the bedspread to 84.75 × 91.65 in (215.3 × 232.8 cm). If the first motif matches, everything after it will too.
Happy crocheting!