

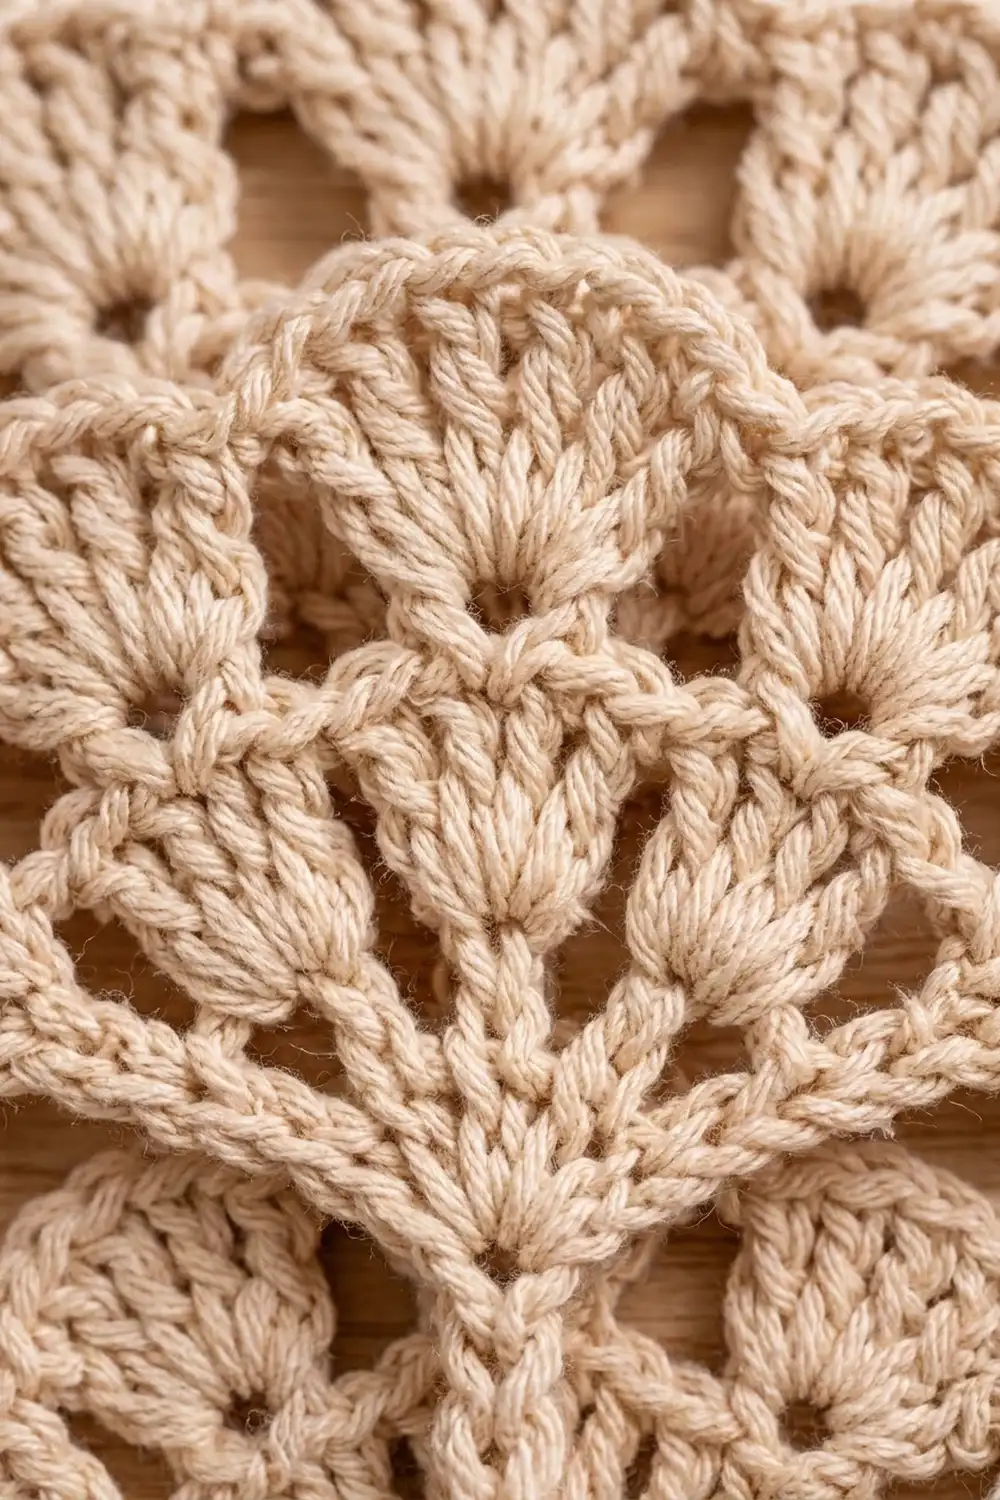
The Winter Ginkgo Fan is a lacy, leaf-shaped motif that looks like an open hand fan on a slim stem. Three tiers of shells spread out from a small ring. Five soft scallops form the top edge, and a single crochet outline gives the shape clean, defined edges.
This sample uses one color, a warm cream or ecru cotton, which keeps the stitch texture front and center. It suits Scandinavian and rustic holiday decor and looks just as natural in spring as it does next to pine and red berries. The pattern uses US crochet terms throughout.
The finished motif is 5.5 in (14.0 cm) wide and 6 in (15.2 cm) tall including the stem. The fan body alone is 3.75 in (9.5 cm) tall, and the stem is 2.25 in (5.7 cm) long.
You work it in one piece. Start with a chain ring, then work three turned rows that fan outward. A single crochet border goes all the way around the fan, and a slip-stitch cord stem is worked down from the base. No sewing or joining is needed.
Finished Size and Construction
- Finished size: 5.5 in (14.0 cm) wide x 6 in (15.2 cm) tall, including stem
- Skill level: Easy-intermediate
- Terminology: US crochet terms
- Yarn weight: Worsted (#4), cotton or cotton blend
- Hook: 4.5 mm (US 7)
- Number of pieces: 1
- Layout: Single fan motif with stem; worked flat in rows from the base outward
- Piece size (fan body): 5.5 in (14.0 cm) wide x 3.75 in (9.5 cm) tall
- Size before border: 5 in (12.7 cm) wide x 3.5 in (8.9 cm) tall
- Border depth: 0.25 in (0.6 cm), one round of single crochet
- Stem length: 2.25 in (5.7 cm)
Materials
Yarn: Choose a smooth, tightly plied worsted-weight cotton. Cotton keeps shells crisp and holds its shape after blocking. Acrylic also works, but the scallops will be softer and need firmer blocking. Avoid fuzzy or brushed yarns, because they hide the lacy openings.
- Cream / ecru: 10 g, about 17 m (approx. 18.6 yd), based on a 50 g / 85 m ball
The quantity includes a margin of about 30% for the gauge swatch, a test ring, and weaving in ends. One motif alone uses about 7 g.
Tools:
- 4.5 mm (US 7) crochet hook
- Tapestry needle
- Scissors
- Stitch marker (optional, for the center dc of each shell)
- Blocking mat and rust-proof pins
- Spray bottle with water
- Ruler or tape measure
Abbreviations (US Terms)
- ch – chain
- sl st – slip stitch
- sc – single crochet
- dc – double crochet
- sp – space
- st(s) – stitch(es)
- RS / WS – right side / wrong side
Special stitches:
- 7-dc shell: Work 7 dc into the same stitch or space. The center stitch is the 4th dc.
- 9-dc shell: Work 9 dc into the same stitch. The center stitch is the 5th dc.
- Half-shell: Work 5 dc into the same stitch (at the row ends only). Where it starts a row, the beginning ch 3 counts as the first dc.
Gauge and Checkpoints
Gauge: 16 dc and 8 dc rows = 4 in (10.2 cm) in plain dc rows; 4 ch = 1 in (2.5 cm).
Gauge is not critical for a decorative motif, but it controls the final size and how much yarn you use. Make one full motif first and measure it before you make any more.
Checkpoints (lay the piece flat without stretching):
- After Row 1: about 2 in (5.1 cm) wide x 1 in (2.5 cm) tall
- After Row 2: about 3.5 in (8.9 cm) wide x 2 in (5.1 cm) tall
- After Row 3: 5 in (12.7 cm) wide x 3.5 in (8.9 cm) tall
- After border: 5.5 in (14.0 cm) wide x 3.75 in (9.5 cm) tall
- With stem: 6 in (15.2 cm) total height
If your motif is too big: go down to a 4.0 mm (US G-6) hook. Do not cut stitches from the shells, because every count below sets the fan’s curve.
If your motif is too small: go up to a 5.0 mm (US H-8) hook.
If it is the right width but too tall: you are probably pulling your dc loops up too high. Keep the first yarn-over loop level with your hook.
Pattern
Ring
Ch 5, sl st in the first ch to form a ring.
Row 1 (RS) – Spokes
Ch 4 (counts as dc + ch 1), [dc, ch 1] 6 times in ring, dc in ring. Turn.
Count: 8 dc and 7 ch-1 sps.
The dc spokes fill the ring and open into a half circle. Push the stitches together around the ring so they don’t overlap.
Row 2 (WS) – Middle Tier
Ch 1, sc in first dc, 7-dc shell in next ch-1 sp, sc in next ch-1 sp, 7-dc shell in next ch-1 sp, sc in next ch-1 sp, 7-dc shell in next ch-1 sp, sc in next ch-1 sp, 7-dc shell in last ch-1 sp, sc in 3rd ch of beginning ch-4. Turn.
Count: 4 shells (28 dc) + 5 sc = 33 sts.
The shells sit in spaces 1, 3, 5, and 7, and the sc anchors sit in spaces 2, 4, and 6 plus the two ends. That gives you the four middle fans. The ch-1 spaces you skip are bridged by the shells and leave the small lacy openings you see between the tiers.
Row 3 (RS) – Top Scallops
Ch 3 (counts as dc), 4 dc in first sc (half-shell made), sc in 4th dc of next shell, 9-dc shell in next sc, sc in 4th dc of next shell, 9-dc shell in next sc, sc in 4th dc of next shell, 9-dc shell in next sc, sc in 4th dc of last shell, 5 dc in last sc (half-shell made). Do not turn.
Count: 2 half-shells (10 dc) + 3 full shells (27 dc) + 4 sc = 41 sts.
This row makes the five top scallops. The three full shells sit across the top of the fan, and the two half-shells droop at each side. Each sc lands in the center of a middle-tier shell, so it pulls the fan into its rounded ginkgo shape.
Checkpoint: 5 in (12.7 cm) wide x 3.5 in (8.9 cm) tall.
Border
Border gauge: One round of sc adds 0.25 in (0.6 cm) of depth all around: 0.25 in (0.6 cm) at each side and 0.25 in (0.6 cm) at the top. Use the same 4.5 mm hook and keep your sc firm but not tight.
Border Round (RS)
Keep the RS facing. You are at the end of Row 3, at the top of the left side edge.
- Left side (5 sc): Ch 1. Working down the row ends, work 2 sc around the post of the last dc of Row 3, 1 sc in the end of Row 2, and 2 sc around the post of the end dc of Row 1.
- Base: sl st in the ring. Do not count this as a border stitch, because the stem will be attached here.
- Right side (5 sc): Working up the opposite row ends, work 2 sc around the post of the end dc of Row 1, 1 sc in the end of Row 2, and 2 sc around the beginning ch-3 of Row 3.
- Top arc (47 sc): Working across the top of Row 3, sc in each of the 5 sts of the first half-shell. Sc in the next sc, sc in each of the next 4 dc, 3 sc in the center (5th) dc, sc in each of the next 4 dc. Repeat from * to * 2 more times. Sc in the next sc, then sc in each of the 5 sts of the last half-shell.
- Join with sl st to the first sc of the round.
Count: 5 (left side) + 5 (right side) + 47 (top) = 57 sc, plus 1 sl st at the base.
Why the math works: The top arc has 41 Row 3 sts. You work 1 sc into each of them, and the only extra stitches are 2 added at each of the three full-shell peaks (3 sc into 1 st). That gives 41 + 6 = 47, written as 41 worked 1-to-1 plus 6 added. The extra stitches open the peaks enough to keep the scallops round instead of cupping. The half-shells don’t get increases because they lie flatter at the sides. Each side edge has two dc row ends at 2 sc each and one sc row end at 1 sc, for 5 sc per side. That matches the roughly 1.25 in (3.2 cm) edge length at 4 sc per inch.
Checkpoint: 5.5 in (14.0 cm) wide x 3.75 in (9.5 cm) tall. The 5 in (12.7 cm) fan plus 0.25 in (0.6 cm) of border on each side gives 5.5 in (14.0 cm). The 3.5 in (8.9 cm) fan plus 0.25 in (0.6 cm) at the top gives 3.75 in (9.5 cm).
Stem
Sl st across to the base sl st in the ring, or fasten off and rejoin there with the RS facing.
Ch 10, sl st in 2nd ch from hook and in each of the next 8 ch, then sl st in the ring at the base of the fan.
Count: 9 sl sts. At 4 ch per inch, this gives a 2.25 in (5.7 cm) stem.
Fasten off. Weave the end up through the stem to make it firmer, then weave in all other ends on the WS through the solid dc of the shells.
Checkpoint: total height of 6 in (15.2 cm), made up of 3.75 in (9.5 cm) of fan and 2.25 in (5.7 cm) of stem.
Final Blocking
- Weave in all ends before blocking. Leave about 0.5 in (1.3 cm) tails to trim after the piece dries.
- Mist the motif with water until it is evenly damp but not dripping. For acrylic, use light steam held above the piece instead of water.
- Lay it flat with the RS up on the blocking mat.
- Pin the stem straight first: one pin at the ring and one at the stem tip, 2.25 in (5.7 cm) apart.
- Pin the side half-shells out until the fan is 5.5 in (14.0 cm) wide.
- Pin the peak of each of the three top scallops so the top of the fan is 3.75 in (9.5 cm) above the ring.
- Gently open each lacy opening with your fingertip and smooth the shells so the dc spokes fan out evenly.
- Let the piece dry completely, usually 6–12 hours, then unpin and trim the tails.
Final Quality-Control Checklist
- [ ] Row 1 has 8 dc and 7 ch-1 sps
- [ ] Row 2 has 4 shells of 7 dc and 5 sc (33 sts)
- [ ] Row 3 has 2 half-shells, 3 full shells, and 4 sc (41 sts)
- [ ] The border has 57 sc: 5 + 5 on the sides and 47 across the top
- [ ] Each full top shell has a 3-sc peak
- [ ] The stem has 9 sl sts and is straight, not twisted
- [ ] The fan measures 5.5 in (14.0 cm) x 3.75 in (9.5 cm)
- [ ] The total height is 6 in (15.2 cm)
- [ ] All ends are woven in and invisible from the RS
Troubleshooting
Row 1 overlaps or buckles at the ring: The ring is too small for your tension. Remake it with ch 6. Keep the stitch counts the same.
The middle-tier shells ruffle: Your shells are too loose compared with your sc anchors. Work the 7-dc shells a little more firmly, or go down 0.5 mm only for Row 2.
The fan cups upward instead of lying flat: Check that the Row 3 sc anchors land in the 4th (center) dc of each Row 2 shell. If an anchor is off-center, that shell tilts.
The scallops look pointed: You probably worked the 3-sc peaks too tightly. Loosen up at the peaks, or block each scallop over a fingertip so it rounds out.
The stem curls or spirals: The slip stitches are too tight. Work them more loosely, then block the stem pinned straight while it is damp.
The border edge waves along the sides: You have more than 5 sc per side. Pull them out and work exactly 2 + 1 + 2.
Care
Hand wash in cool water with mild soap, press out the water in a towel, and dry flat, reshaping it to the blocked size. Cotton motifs can be pressed lightly with a warm iron through a cloth.

Final Notes
The size of the Winter Ginkgo Fan depends on a short chain of measurements. Gauge of 16 dc to 4 in (10.2 cm) sets the rows. Row 3 brings the fan to 5 in (12.7 cm) wide x 3.5 in (8.9 cm) tall. The single crochet border adds 0.25 in (0.6 cm) for a 5.5 in (14.0 cm) x 3.75 in (9.5 cm) fan. The 2.25 in (5.7 cm) stem brings the motif to 6 in (15.2 cm) in total.
If your motif matches each checkpoint, every copy you make will match too. That lets you use one fan as an ornament, gift tag, or appliqué, or repeat it for your own projects.
Happy crocheting!