

The Winter Ginkgo Leaf is a single lace motif shaped like the fan of a ginkgo leaf. Seventeen open rays spread out from a tiny half-ring. A light mesh band softens the outer edge, and four rounded lobes finish the top. A fine picot outline runs around the whole leaf, and a short looped stem completes the shape.
You need only one color, a warm cream or ivory cotton thread. The look is quiet and airy. Use it for window decorations, appliqués, table scatter or gift toppers, or frame a single leaf. It also makes a good sample before you plan larger lace projects.
This pattern uses US crochet terms. The finished leaf measures 7.5 in (19.1 cm) wide and 3.75 in (9.5 cm) tall, or 5.25 in (13.3 cm) tall including the stem.
Construction is simple:
– Work the fan back and forth in 10 rows into a small ring.
– Add one picot border around the sides and lobes.
– Chain and work the stem directly from the base.
There is no sewing and only a few ends to weave in.
Finished Size and Construction
- Finished size: 7.5 in (19.1 cm) wide x 5.25 in (13.3 cm) tall with stem
- Leaf height without stem: 3.75 in (9.5 cm)
- Skill level: Intermediate (thread lace, tall stitches, picots)
- Terminology: US crochet terms
- Yarn weight: Size 3 cotton crochet thread (lace weight, category 0)
- Hook: 2.25 mm (US B-1)
- Number of pieces: 1
- Layout: single fan-shaped motif with stem
- Piece size before border: 7 in (17.8 cm) wide x 3.5 in (8.9 cm) tall
- Border depth: 0.25 in (0.6 cm) on each side edge and along the lobes
Materials
Choose a mercerized cotton thread in size 3. Mercerized cotton keeps each stitch crisp, blocks well, and holds the rays straight. Softer, unmercerized cotton will work, but the lace will look fuzzier and may need starch.
- Cream / ivory, size 3 cotton thread: about 12 g, approximately 33 m (36 yd)
Tools:
- 2.25 mm (US B-1) crochet hook
- Tapestry needle with an eye large enough for the thread
- Small scissors
- Rustproof pins and a blocking board or foam mat
- Spray bottle with water; optional light spray starch
- Ruler or tape measure
The quantities include a margin of about 20 percent for your gauge test, differences in tension, and weaving in ends.
Abbreviations (US Terms)
- ch – chain
- sl st – slip stitch
- sc – single crochet
- hdc – half double crochet
- dc – double crochet
- tr – treble crochet
- st(s) – stitch(es)
- sp(s) – space(s)
- RS / WS – right side / wrong side
Special stitch – Picot: Ch 3, sl st in the 3rd ch from hook (the first chain made). The picot sits on top of the stitch just worked and does not count as a stitch.
Gauge and Checkpoints
Gauge matters less here than in a garment, but it controls the final size and how flat the fan lies. Work Rows 1–4 as a test before committing to the full leaf.
- After Row 4: the half-circle measures 1.4 in (3.6 cm) from the center of the ring to the top edge.
- After Row 7: height 2.75 in (7.0 cm) from ring center; width across the straight bottom edge 5.5 in (14.0 cm).
- After Row 10: height 3.5 in (8.9 cm); width 7 in (17.8 cm).
- After the border: 7.5 in (19.1 cm) wide x 3.75 in (9.5 cm) tall.
If your piece is too big, go down to a 2.0 mm hook or work your chains slightly tighter. If it is too small, go up to a 2.5 mm hook.
If the fan cups (curls up like a bowl), your chain spaces are too short; loosen them. If it ripples, your chains are too loose; snug them up.
Measure gently on a flat surface without stretching the lace.
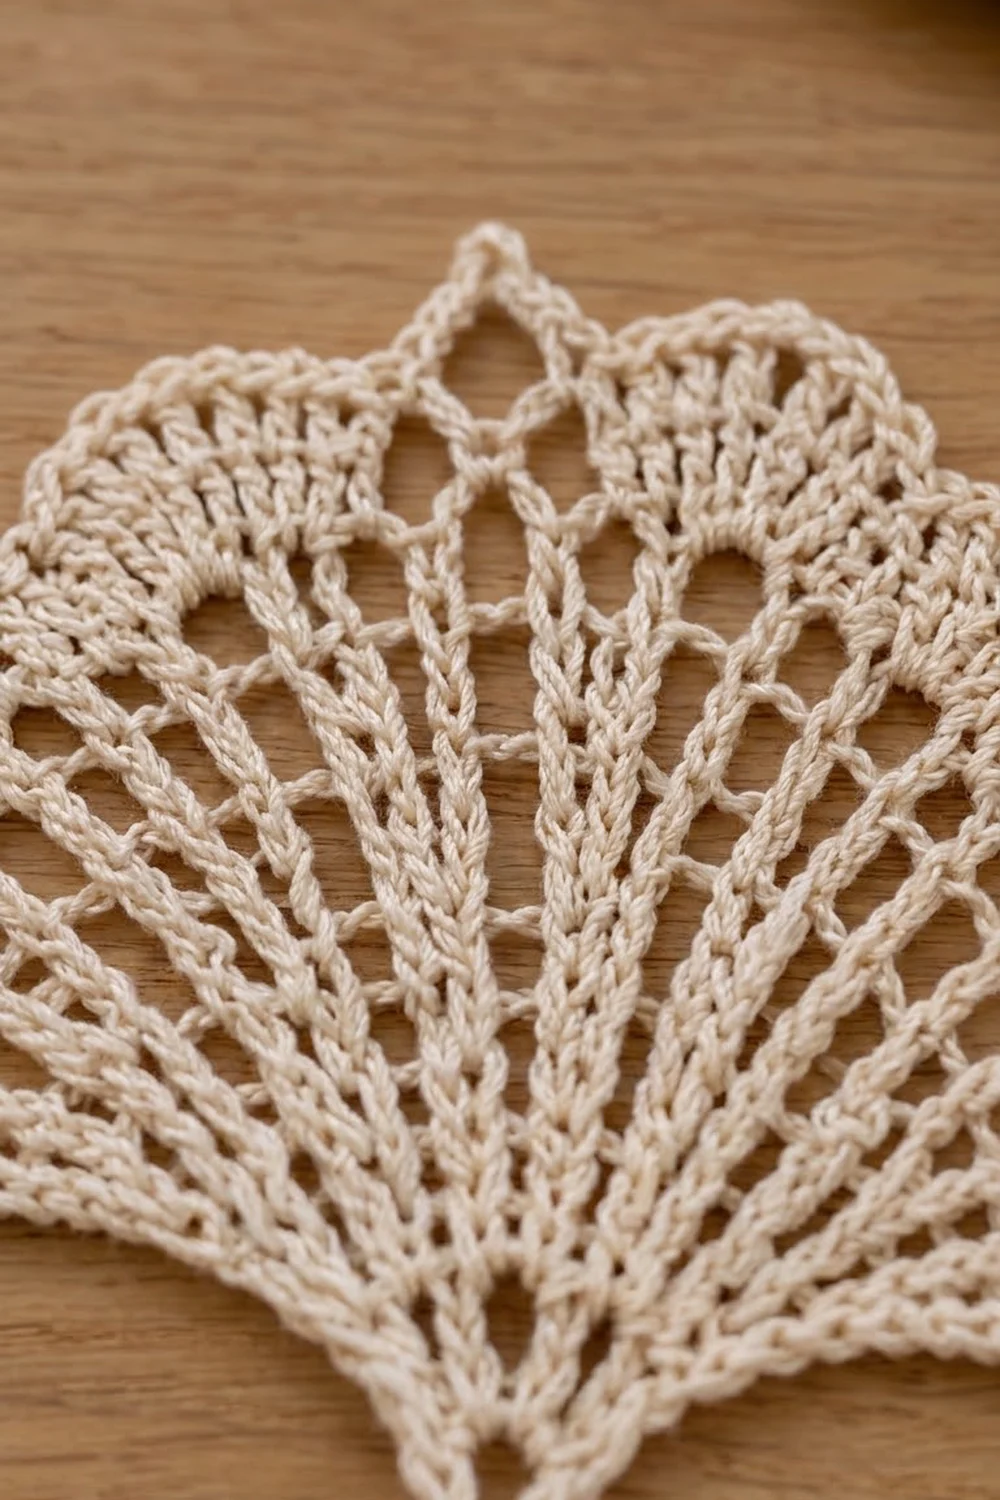
Leaf Pattern
Work the fan in rows, turning at the end of each row. Turning chains count as stitches where stated. Check each measurement checkpoint before moving on.
Base Ring
Ch 5, sl st in first ch to form a ring. Leave a 4 in (10.2 cm) tail.
Rows 1–2: Solid Base
Row 1 (RS): Ch 3 (counts as dc), work 8 dc in ring, so the stitches fill only half of the ring. Turn. (9 dc)
Row 2: Ch 3 (counts as dc), dc in first dc, 2 dc in each of next 7 dc, dc in top of turning ch. Turn. (17 dc)
Row 2 sets up the 17 rays. From here on, every ray sits directly above one of these 17 stitches.
Rows 3–7: Open Rays
Row 3: Ch 4 (counts as dc + ch 1), dc in next dc, ch 1; rep from * 14 more times, dc in top of turning ch. Turn. (17 dc, 16 ch-1 sps)*
Row 4: Ch 5 (counts as dc + ch 2), dc in next dc, ch 2; rep from * 14 more times, dc in 3rd ch of turning ch. Turn. (17 dc, 16 ch-2 sps)*
Checkpoint: 1.4 in (3.6 cm) from ring center.
Row 5: Ch 6 (counts as tr + ch 2), tr in next dc, ch 2; rep from * 14 more times, tr in 3rd ch of turning ch. Turn. (17 tr, 16 ch-2 sps)*
Row 6: Ch 7 (counts as tr + ch 3), tr in next tr, ch 3; rep from * 14 more times, tr in 4th ch of turning ch. Turn. (17 tr, 16 ch-3 sps)*
Row 7: Ch 7 (counts as tr + ch 3), tr in next tr, ch 3; rep from * 14 more times, tr in 4th ch of turning ch. Turn. (17 tr, 16 ch-3 sps)*
Checkpoint: 2.75 in (7.0 cm) tall and 5.5 in (14.0 cm) wide. The rays should run straight from the base like the ribs of a folding fan.
Rows 8–9: Mesh Band
Row 8: Ch 1, sc in first tr, ch 5, sc in next tr; rep from * 15 more times, working the last sc in the 4th ch of the turning ch. Turn. (17 sc, 16 ch-5 loops)*
Row 9: Ch 1, sc in first sc, ch 3, sc in next ch-5 loop, ch 3, sc in next sc; rep from * 15 more times. Turn. (33 sc, 32 ch-3 loops)*
Row 9 doubles the number of loops so the lobes have enough base to curve. For reference, number the sc of Row 9 from 0 to 32. Sc 8, 16, and 24 will become the notches between the lobes.
Row 10: Four Lobes
Each lobe is worked across 8 ch-3 loops. Inside a lobe, skip the sc between loops and work only into the loops.
Lobe: sc in next loop, 2 hdc in next loop, 3 dc in next loop, 4 dc in next loop, 4 dc in next loop, 3 dc in next loop, 2 hdc in next loop, sc in next loop. (20 sts)
Row 10: Ch 1, sl st in first sc (sc 0). Work Lobe, sl st in next sc; rep from * 3 more times. The final sl st lands in sc 32. Fasten off. (4 lobes of 20 sts = 80 sts, plus 5 sl sts)*
The sl sts in sc 8, 16, and 24 pull the edge down slightly to form the three notches. The center notch (sc 16) will hold the pointed peak in the border.
Checkpoint: 3.5 in (8.9 cm) tall and 7 in (17.8 cm) wide.
Border
The border is one continuous picot round. It goes up one straight side, across all four lobes, and down the other side. You then work the stem from the base without cutting the thread.
Border gauge: each sc on the sides covers about 0.18 in (0.5 cm) of row ends. The 19 sc on each side should lie flat along the 3.5 in (8.9 cm) edge without ruffling or pulling.
Side A (19 sc, 6 picots)
With RS facing, join thread with sl st at the base ring at the start of Row 1. Working up the row ends, sc as follows:
- 2 sc in each dc row end of Rows 1–4 (8 sc)
- 3 sc in each tr row end of Rows 5–7 (9 sc)
- 1 sc in each sc row end of Rows 8–9 (2 sc)
(19 sc)
As you go, add a picot after every 3rd sc: after sc 3, 6, 9, 12, 15, and 18. (6 picots)
Top Edge (4 lobes)
Continue straight into the first lobe with no extra corner stitch. The last sc of Side A and the first sc of the lobe sit side by side.
Each lobe: sc in each of the 20 sts of the lobe, working a picot after sc 2, 4, 6, 8, 10, 12, 14, 16, and 18. (20 sc, 9 picots)
Notches between lobes 1–2 and 3–4: sl st in the notch sl st.
Center notch between lobes 2–3: (sl st, ch 5, sl st) in the notch sl st. This forms the small pointed loop at the top center.
Top edge total: 80 sc, 36 picots, and 3 notch stitches (one with the ch-5 peak).
Side B (19 sc, 6 picots)
Work down the row ends in reverse order:
- 1 sc in each row end of Rows 9–8 (2 sc)
- 3 sc in each row end of Rows 7–5 (9 sc)
- 2 sc in each row end of Rows 4–1 (8 sc)
(19 sc)
Add a picot after sc 1, 4, 7, 10, 13, and 16 so the spacing mirrors Side A. (6 picots)
Sl st in the base ring next to the joining sl st.
Stem
Ch 16, sl st in 6th ch from hook to form a small loop. Work 8 sc in the loop, then sc in each of the remaining 10 ch back toward the leaf. Sl st in the base ring. Fasten off. (18 sc total; stem about 1.5 in / 3.8 cm long)
Why the Math Works
Both sides have the same 19 sc, matched to the row heights. A dc row is about two sc tall, a tr row about three, and an sc row one. This keeps both sides flat and identical.
Each lobe has exactly 20 sc, one for each stitch of Row 10, so the picots space evenly and the lobes match. Picots add texture but no width.
The border therefore adds only 0.25 in (0.6 cm) per edge:
– Width: 7 in + 0.25 in + 0.25 in = 7.5 in (19.1 cm)
– Height: 3.5 in + 0.25 in = 3.75 in (9.5 cm)
– With the 1.5 in (3.8 cm) stem: 5.25 in (13.3 cm) overall
Final Blocking
Thread lace always looks better after blocking. The rays straighten and the picots open up.
- Weave in all ends along the solid base rows and the stem, not through the open rays.
- Soak the motif in cool water for 10 minutes, then press it gently in a towel. Do not wring.
- Lay the leaf RS up on your blocking mat.
- Pin the base ring first. Then pin the two straight sides into the fan shape, so the bottom edge measures 7.5 in (19.1 cm) from outer corner to outer corner.
- Pin the center peak so the leaf is 3.75 in (9.5 cm) tall.
- Pin each ray straight from the base toward the mesh band.
- Pin each lobe into a round curve, then pin out every picot with a single pin.
- Straighten the stem and pin the tip loop open.
- Mist with light spray starch if you want a crisp, stiff finish.
- Let it dry completely, at least 6–8 hours, before removing the pins.
Final Quality-Control Checklist
- 17 rays, all running straight from the base
- 16 open spaces between rays, widening toward the edge
- Mesh band of 32 small loops visible above the rays
- Four matching lobes with two shallow notches and one center peak loop
- 6 picots on each side and 9 picots on each lobe (48 picots total)
- Stem about 1.5 in (3.8 cm) long, ending in a closed loop
- Finished size 7.5 in (19.1 cm) x 5.25 in (13.3 cm)
- All ends woven into solid areas and trimmed close
Troubleshooting
The fan cups upward. The chain spaces in Rows 4–7 are too tight. Loosen your chains. Add 1 extra ch per space only if you crochet very tightly.
The fan ruffles. Your chains are too loose or your tr are too tall. Use a smaller hook for the ray rows only.
Rays lean to one side. Make sure each dc or tr goes into the top of the stitch directly below, not into the chain space.
Lobes are uneven. Recount Row 9. You need exactly 32 loops so each lobe gets 8.
Sides ripple in the border. On that side, work 2 sc instead of 3 into one tr row end, and check that the other side matches.
Stem twists. Steam it lightly and pin it straight while it dries.
Center peak flops. Starch the peak, or work it as ch 4 instead of ch 5.
Care
Hand wash in cool water with mild soap, press the water out in a towel, and dry flat, pinning again if needed. Starch again after washing if you want the crisp finish back.

Final Notes
The measurement chain is short and easy to follow:
– After Row 4: 1.4 in (3.6 cm) tall
– After Row 7: 2.75 in (7.0 cm) tall and 5.5 in (14.0 cm) wide
– After Row 10: 3.5 in (8.9 cm) tall and 7 in (17.8 cm) wide
– After the border: 7.5 in (19.1 cm) wide and 3.75 in (9.5 cm) tall
– With the 1.5 in (3.8 cm) stem: 5.25 in (13.3 cm) tall
Keep your counts at 17 rays, 32 mesh loops, and 20 stitches per lobe, and the leaf will block into a crisp, even fan every time.
Happy crocheting!