

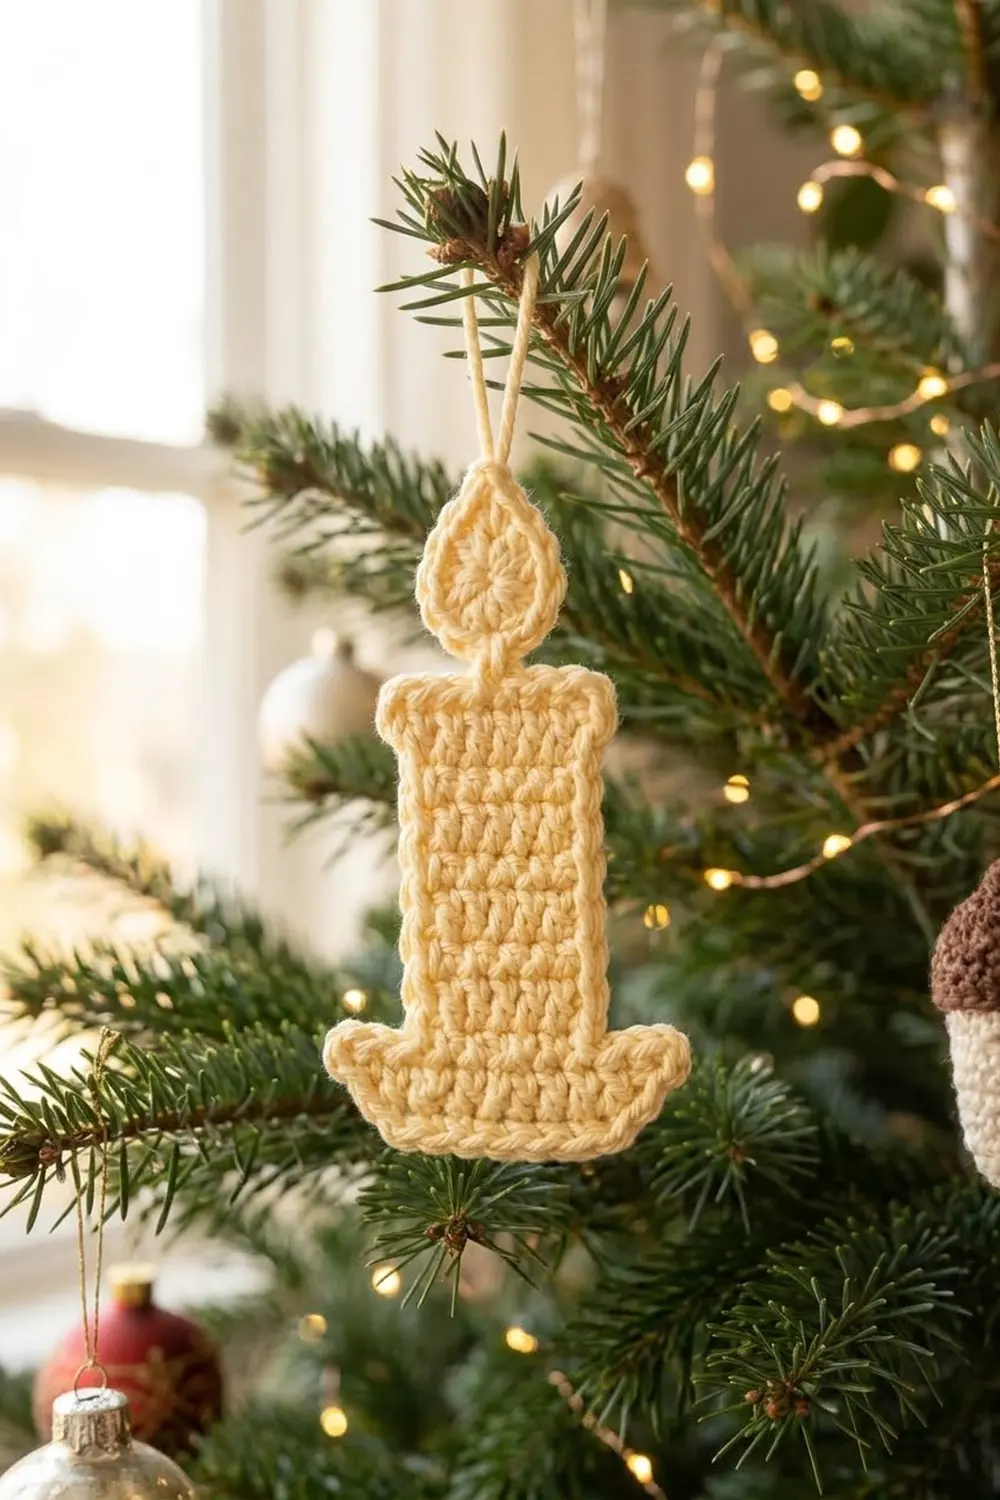
This little candle ornament is a classic holiday shape. It has a teardrop flame with a hanging loop, a tall rectangular candle body, and a wider base with a scalloped drip trim along the bottom. It is worked entirely in one soft cream (pale yellow) yarn, so the texture of the stitches does all the decorating.
The style is flat appliqué crochet. The candle body is worked in dense single crochet rows, which gives the horizontal ridges you see in the photo. A single crochet outline frames the body and base, and a row of small hdc shells along the base edge creates the “drip” detail.
This pattern uses US crochet terms throughout. The finished ornament measures about 4 in (10.2 cm) tall without the hanging loop and 3.0 in (7.6 cm) wide at the base.
Construction is simple. You make three pieces: the flame, the body, and the base. You seam the body to the base, then work the outline border and the shell drip trim. Last, you sew the flame to the top and add the hanging cord.
Finished Size and Construction
- Finished size: about 4.0 in (10.2 cm) tall x 3.0 in (7.6 cm) wide at the base, loop not included
- Skill level: Easy / advanced beginner
- Terminology: US crochet terms
- Yarn weight: DK / light worsted (#3), cotton
- Hook: 3.5 mm (E-4)
- Number of pieces: 3 (flame, body, base), joined into one ornament
- Layout: stacked vertically: flame on top, body in the middle, base at the bottom
- Piece sizes: flame 1.0 in (2.5 cm) wide x 1.2 in (3.0 cm) tall; body 1.4 in (3.6 cm) wide x 1.8 in (4.6 cm) tall; base 2.6 in (6.6 cm) wide x 0.6 in (1.5 cm) tall
- Size before border (body + base joined): 2.6 in (6.6 cm) wide x 2.4 in (6.1 cm) tall
- Border depth: 0.2 in (0.5 cm) sc outline all around, plus 0.3 in (0.8 cm) shell drip trim on the bottom edge
Materials
Yarn: Choose a smooth, mercerized cotton in DK or light worsted weight. Cotton holds crisp stitch definition and keeps the flat shape after blocking. Avoid fuzzy or very stretchy yarns, which blur the ridges and the scallops.
- Cream / pale yellow: 8 g, about 20 m (22 yd)
Tools:
- 3.5 mm (E-4) crochet hook
- Tapestry needle
- Scissors
- 2 stitch markers
- Rust-proof pins and a small blocking mat or folded towel
- Spray bottle or steamer
Yarn quantities include a margin for the gauge swatch, the sewing tails, and the hanging cord.
Abbreviations (US Terms)
- ch – chain
- sl st – slip stitch
- sc – single crochet
- hdc – half double crochet
- dc – double crochet
- sc2tog – single crochet 2 together
- MR – magic ring
- st(s) – stitch(es)
- sp – space
- sk – skip
- RS – right side
Special stitch – Shell: Work 5 hdc in the same stitch.
Gauge and Checkpoints
Gauge: 10 sc x 10 rows = 2.0 in (5.1 cm) square, worked in sc rows with a 3.5 mm hook. That equals 5 sc and 5 rows per inch.
Crochet a small swatch first, or simply make the body piece and measure it before you continue. The body is small, so it works well as a test piece.
Checkpoints:
- Body after Row 9: 1.4 in (3.6 cm) wide x 1.8 in (4.6 cm) tall
- Base after Row 3: 2.6 in (6.6 cm) wide x 0.6 in (1.5 cm) tall
- Flame after Round 2: about 0.8 in (2.0 cm) across
- Flame after Round 3: 1.0 in (2.5 cm) wide x 1.2 in (3.0 cm) tall, point included
- After Border Round 1: 3.0 in (7.6 cm) wide at the base, 2.8 in (7.1 cm) tall
- After the shell trim: 3.1 in (7.9 cm) tall
If your pieces are too big, go down a hook size to 3.25 mm (D-3). If they are too small, go up to 3.75 mm (F-5). Keep the stitch counts the same. The counts control the shape, and the hook controls the size.
Pattern
Piece 1: Candle Body
The body is worked flat in rows of sc. The turned rows create the horizontal texture ridges.
Foundation: Ch 8.
Row 1 (RS): Sc in 2nd ch from hook and in each ch across, turn. (7 sc)
Rows 2–9: Ch 1 (does not count as a st), sc in each st across, turn. (7 sc)
Fasten off, leaving a 12 in (30.5 cm) tail for seaming.
Checkpoint: 1.4 in (3.6 cm) wide x 1.8 in (4.6 cm) tall. Keep the edges straight. Count 7 sc at the end of every row.
Piece 2: Candle Base
Foundation: Ch 14.
Row 1 (RS): Sc in 2nd ch from hook and in each ch across, turn. (13 sc)
Rows 2–3: Ch 1, sc in each st across, turn. (13 sc)
Fasten off and weave in the ends.
Checkpoint: 2.6 in (6.6 cm) wide x 0.6 in (1.5 cm) tall.
Place a marker in the 4th st and in the 10th st of Row 3. These mark the middle 7 sts, where the body will sit. That leaves 3 free sts at each end to form the shoulders.
Piece 3: Flame
The flame is worked in joined rounds. The point is shaped in the final round.
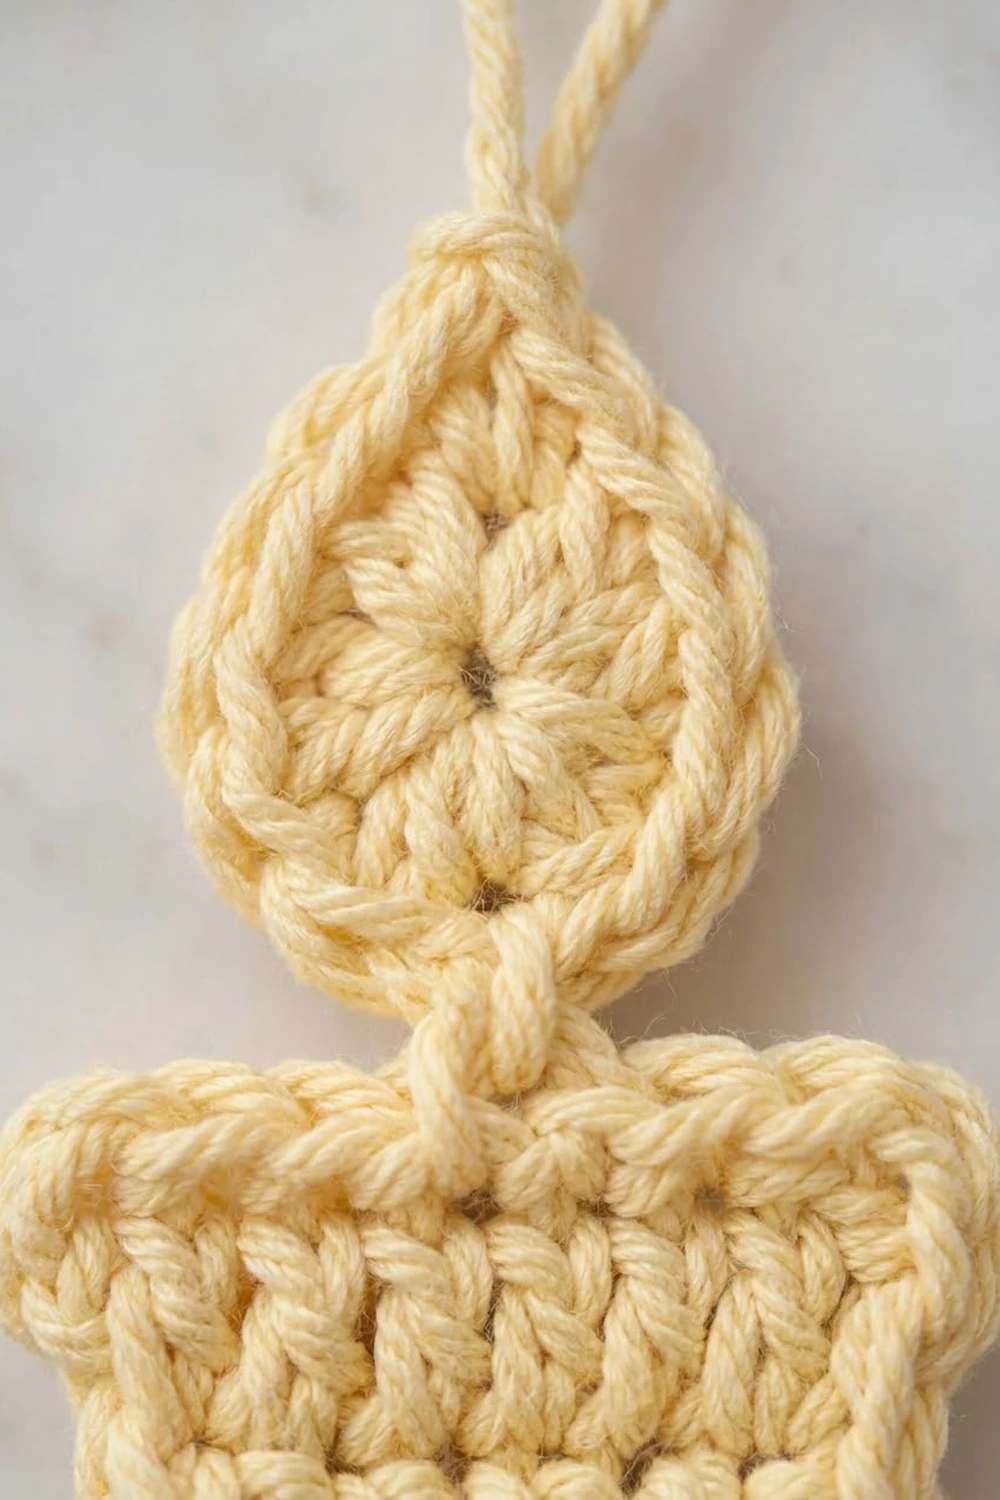
Round 1: Make a MR, ch 1, work 6 sc in ring, sl st to first sc. Pull the ring closed. (6 sc)
Round 2: Ch 1, 2 sc in each st around, sl st to first sc. (12 sc)
Round 3 (point): Ch 1, sc in next 4 sts, hdc in next st, (dc, ch 2, dc) in next st, hdc in next st, sc in next 5 sts, sl st to first sc. (4 sc + 1 hdc + 2 dc + 1 hdc + 5 sc = 13 sts, plus 1 ch-2 point sp)
All 12 sts of Round 2 are used: 4 + 1 + 1 + 1 + 5 = 12. The last sc of the round sits directly opposite the point, at the bottom of the teardrop.
Fasten off, leaving a 12 in (30.5 cm) tail for sewing. The tail sits at the bottom of the flame, where you need it.
Hanging cord: Join the yarn with a sl st in the ch-2 point sp. Ch 20, then sl st in the same ch-2 sp. Fasten off and weave in the ends. The loop hangs about 1.5 in (3.8 cm) long.
Checkpoint: 1.0 in (2.5 cm) wide x 1.2 in (3.0 cm) tall.
Make All Pieces
All three pieces use the same cream yarn.
- Cream: 1 flame, 1 body, 1 base
Layout (top to bottom):
ROW 1: FLAME
ROW 2: BODY
ROW 3: BASE
Lay all three pieces RS up in this order before joining. Check that the body’s foundation edge faces down toward the base.
Joining
Body to Base (before the border)
Place the body’s foundation edge against Row 3 of the base, between the two markers. Use the body’s long tail to whipstitch from the wrong side.
Stitch-to-stitch logic: The body has 7 foundation sts. The base has 7 marked center sts (the 4th through 10th). Sew one body st to one base st, 7 to 7. That leaves exactly 3 free sts on each side of the base for the shoulders.
Tension: Pull each stitch snug but not tight. The seam should lie flat with no puckering. If the base cups upward, your seam is too tight. Loosen it and re-sew.
Checkpoint: The joined shape measures 2.6 in (6.6 cm) wide x 2.4 in (6.1 cm) tall. Remove the markers.
Flame to Top (after Border Round 1)
Attach the flame only after Border Round 1 is finished. Then sew the 3 bottom sts of the flame to the center 3 sc of the top border edge. The flame’s bottom sts are the last sc of Round 3 plus one st on each side of it. The top border’s center sc are the 5th, 6th, and 7th of its 11 sc.
The flame overlaps the top border by about 0.3 in (0.8 cm). Sew from the back so the stitches stay hidden.
Checkpoint: The total height is 3.1 in + 1.2 in − 0.3 in = 4.0 in (10.2 cm).
Border
Border gauge: The border uses the same hook and the same gauge as the pieces: 5 sc per inch. The sc outline adds 0.2 in (0.5 cm) on every outer edge.
Border Round 1 (sc outline)
With RS facing, join the yarn in the first foundation st at the bottom-left corner of the base.
- Base bottom: Ch 1, 3 sc in corner st, sc in next 11 sts, 3 sc in last st. (17 sc)
- Base right side: Sc in each of 3 row ends. (3 sc)
- Right shoulder: 3 sc in the outer st of Row 3, sc in next st, sc2tog over the last shoulder st and the first body row end. (5 sc)
- Body right side: Sc in each of the remaining 8 row ends. (8 sc)
- Body top: 3 sc in first st, sc in next 5 sts, 3 sc in last st. (11 sc)
- Body left side: Sc in each of the next 8 row ends. (8 sc)
- Left shoulder: Sc2tog over the last body row end and the first shoulder st, sc in next st, 3 sc in the outer st. (5 sc)
- Base left side: Sc in each of 3 row ends, sl st to first sc. (3 sc)
Round total: 60 sc.
Why the math works: This is a conversion round, not a growth round. Work 1 sc into each existing stitch or row end: 13 (base bottom) + 3 + 3 (right shoulder) + 9 (body side) + 7 (body top) + 9 + 3 + 3 = 50. Next, add the corner extras. Each of the 6 outer corners gets 2 extra sc: +12. Then subtract the inner corners. Each of the 2 inner corners is a sc2tog: −2. That gives 50 + 12 − 2 = 60.
The sc2tog at each inner corner keeps the shoulders from rippling. The 3-sc groups at the outer corners keep those corners sharp and flat.
Do not fasten off yet if you want to go straight into the trim. Otherwise, fasten off and rejoin for Round 2.
Border Round 2 (shell drip trim, bottom edge only)
This round is worked across the 17 sc of the base bottom only.
With RS facing, sl st in the first sc of the bottom-left 3-sc corner group. [Sk 1, shell in next st, sk 1, sl st in next st] 4 times. The final sl st lands in the last sc of the bottom-right corner group.
Fasten off and weave in the ends.
Count: 4 shells (20 hdc) + 5 sl sts.
Why the math works: Each repeat uses 4 sts, plus 1 st for the starting sl st. That gives 4 x 4 + 1 = 17, which matches the bottom edge exactly. The shells sit on the 3rd, 7th, 11th, and 15th sts, so they are spaced evenly.
Checkpoint: The candle measures 3.1 in (7.9 cm) tall from the shell tips to the top border. It measures 3.0 in (7.6 cm) wide at the base, flaring to about 3.2 in (8.1 cm) at the shells.
Now sew the flame on, as described in Joining.
Final Blocking
- Weave in all remaining ends along the back, through the stitches of matching pieces.
- Lay the ornament RS up on a blocking mat or folded towel.
- Mist it lightly with water, or hover a steamer about 1 in (2.5 cm) above it. Do not press the iron down.
- Pin the base to 3.0 in (7.6 cm) wide and the body to 1.8 in (4.6 cm) wide.
- Pin the full height to 4.0 in (10.2 cm), flame included.
- Pin each shell into a rounded scallop. Pin the flame point upward.
- Let it dry completely before you unpin it.
Final Quality-Control Checklist
- Body has 7 sc per row and 9 rows
- Base has 13 sc per row and 3 rows
- Flame Round 3 has 13 sts plus the ch-2 point
- Body is centered, with 3 free base sts on each side
- Border Round 1 totals 60 sc
- Bottom edge has 4 even shells
- Flame is centered on the top 3 sc
- Hanging loop is secure at the flame point
- Finished size is 4.0 in (10.2 cm) x 3.0 in (7.6 cm)
- All ends are hidden on the back
Troubleshooting
Body edges slant inward: You are skipping the last stitch of the row. Count 7 sc on every row.
Shoulders ripple: You skipped the sc2tog at the inner corners. Rework those corners.
Outer corners curl: Check that each outer corner has 3 sc in one stitch.
Shells crowd together or come out uneven: You started on the wrong stitch. Start in the first sc of the corner group and recount the 17 bottom sts.
Flame looks round instead of teardrop: The point stitch needs (dc, ch 2, dc) in one stitch, with an hdc on each side.
Ornament won’t lie flat: Your gauge is too loose. Go down a hook size, or block it more firmly.
Care
Hand wash in cool water and lay flat to dry, reshaping the shells and flame point. Store it flat between seasons so the hanging loop stays straight.
Final Notes
The measurement chain is simple. The 1.4 in (3.6 cm) body sits on the 2.6 in (6.6 cm) base, and together they measure 2.4 in (6.1 cm) tall. The 60-sc outline brings the base to 3.0 in (7.6 cm) wide. The shell trim adds a drip edge that brings the candle to 3.1 in (7.9 cm) tall. The 1.2 in (3.0 cm) flame finishes the ornament at 4.0 in (10.2 cm).
Optional: make several candles to hang on a tree or tie onto gift packages.
Happy crocheting!