

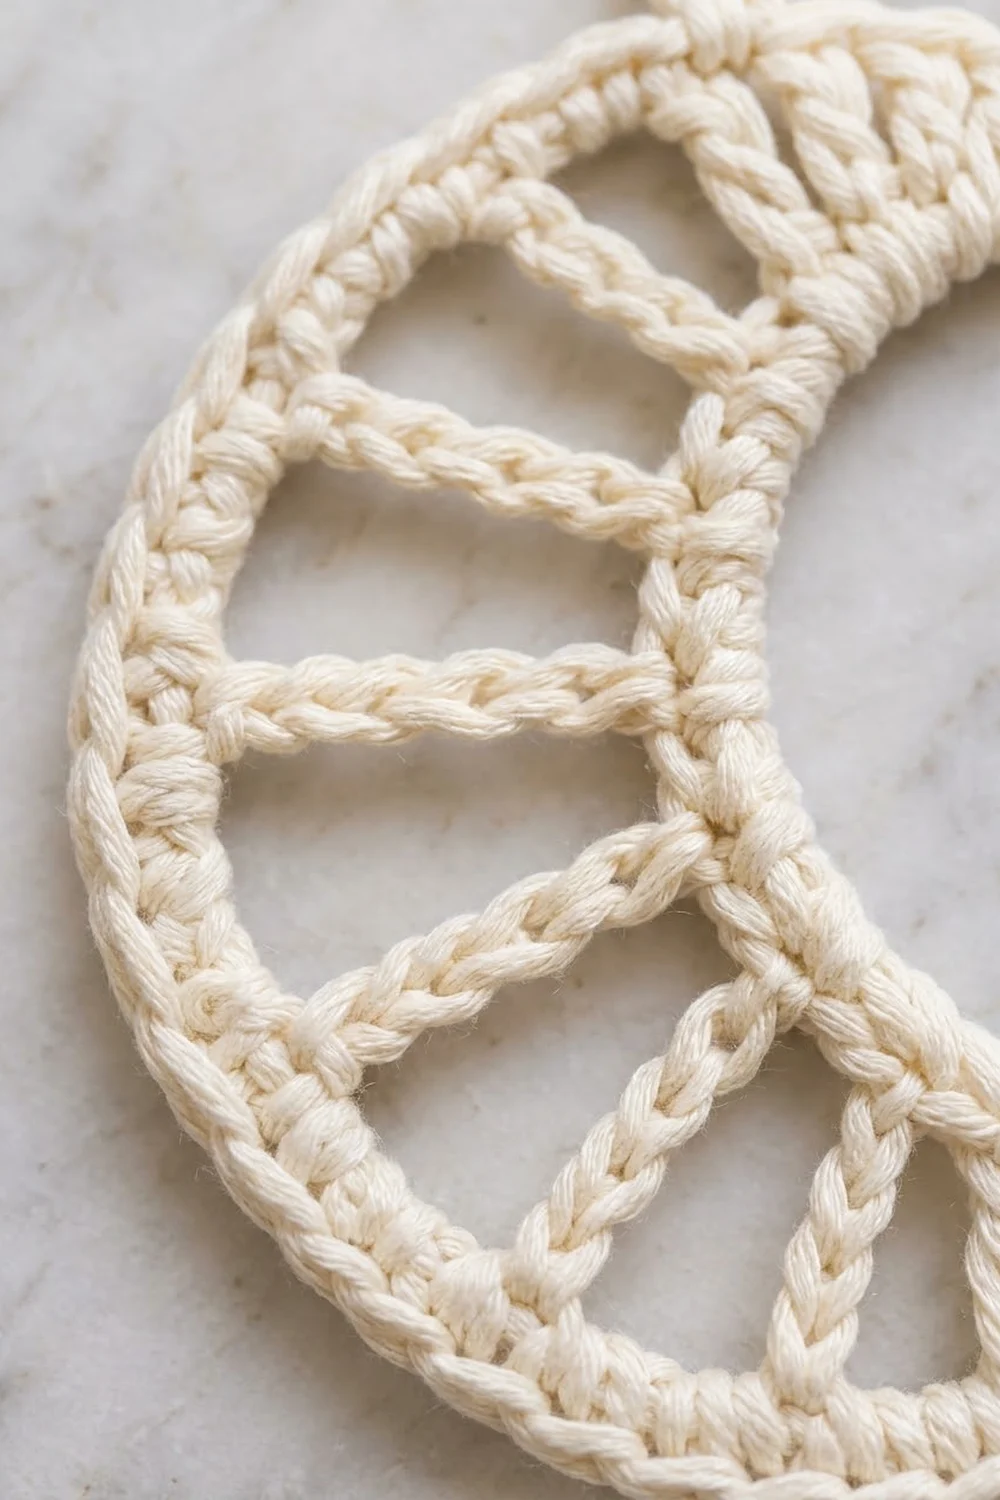
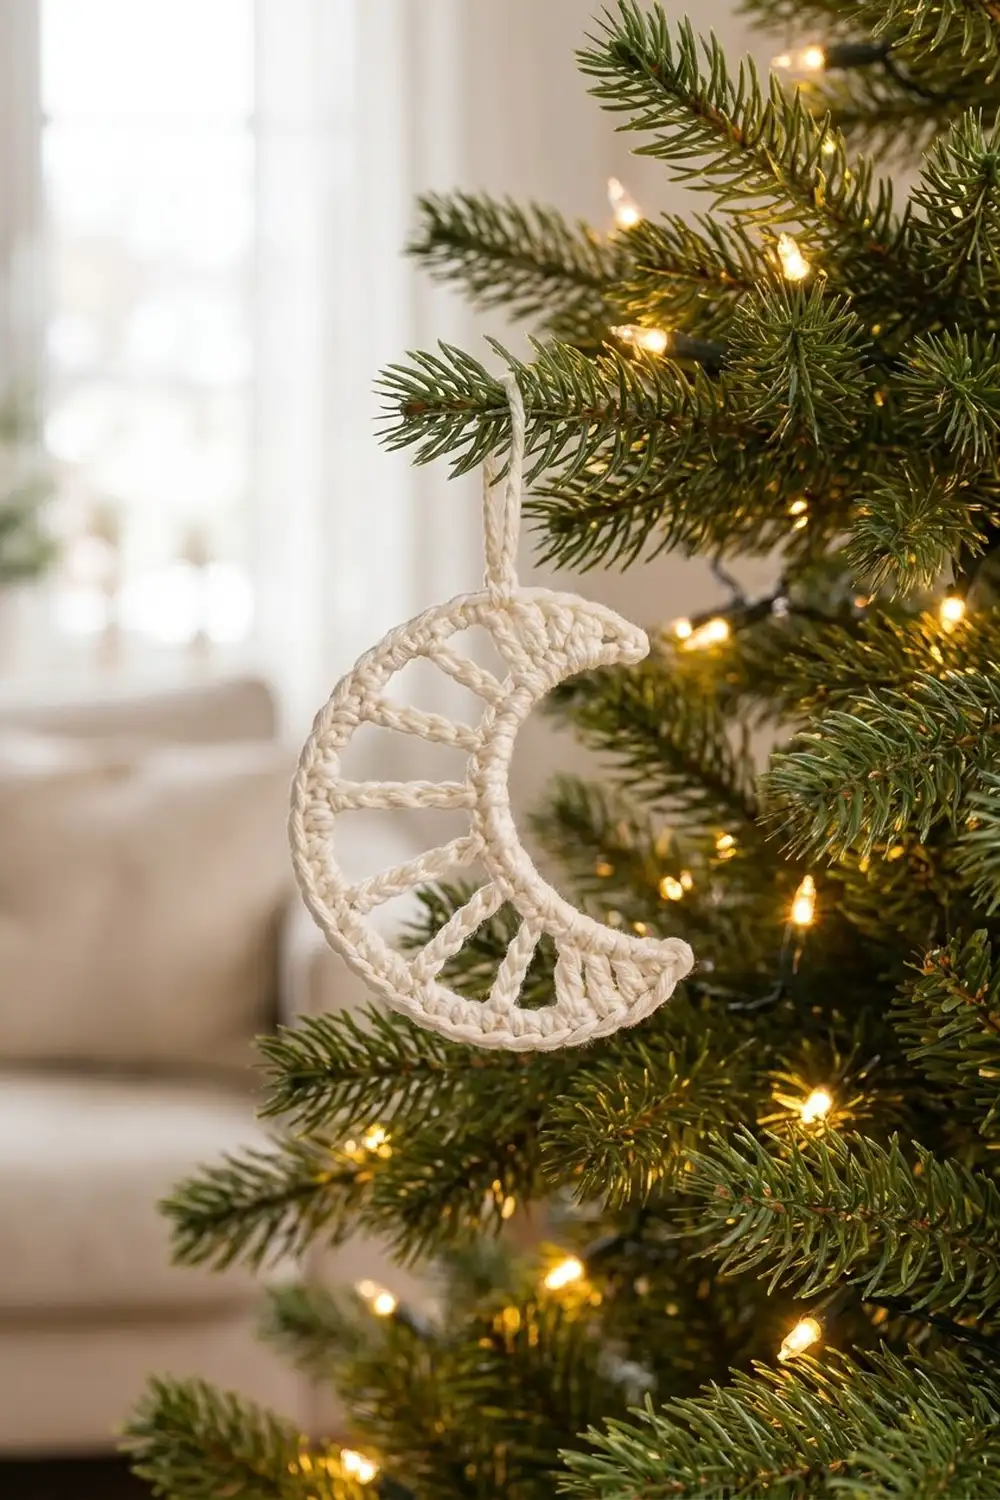
This crescent moon ornament has a quiet, airy look: a solid outer arc, a slim inner arc, and a row of slender spokes that leave open “windows” between them. Each tip is filled in solid, so the moon looks finished from every angle on the tree.
The sample is a single color, a soft cream cotton. Against green branches and warm lights it reads as snow or moonlight, and the texture shows up well in one neutral shade. The style is Scandinavian and minimal, and it suits natural-themed trees, gift toppers, and window hangings.
The pattern uses US crochet terms. The finished moon measures about 5.5 in (14.0 cm) tall and 3 in (7.6 cm) wide at its widest point. The hanging loop adds about 1 in (2.5 cm) on top of that.
Construction is quick. You crochet one row of single crochet for the inner arc. Next comes a spoke row of graduated tall stitches joined by chains, then a row of single crochet that builds the solid outer arc. One round of single crochet runs around the whole piece, and a chain loop finishes it. You end up with one flat piece and no sewing.
Finished Size and Construction
- Finished size: about 5.5 in (14.0 cm) tall x 3 in (7.6 cm) wide, not counting the loop
- Skill level: Easy / Advanced Beginner (needs taller stitches: tr, dtr, trtr)
- Terminology: US crochet terms
- Yarn weight: Sport weight (#2) cotton
- Hook: 3.0 mm (US C/2 or D/3)
- Number of pieces: 1 (a single crescent motif)
- Layout: single standalone ornament, so no joining
- Piece size before border: about 5.25 in (13.3 cm) x 2.75 in (7.0 cm)
- Border depth: one round of sc, about 0.15 in (0.4 cm) on each edge
- Hanging loop: chain loop about 1 in (2.5 cm) long
Materials
Yarn: Use a smooth, tightly plied sport weight cotton or cotton blend. Cotton gives crisp stitch definition and holds the curve after blocking. Fuzzy or very soft acrylic will blur the spokes and make the open windows look less clean.
- Cream: about 8 g / approx. 25 m (27 yd) per ornament
This quantity includes a margin for your gauge swatch, the hanging loop, and weaving in ends. A 50 g ball will make several moons.
Tools:
- 3.0 mm crochet hook
- Tapestry needle
- Scissors
- Stitch marker (optional, for marking the center spoke)
- Blocking mat or folded towel
- Rust-proof pins
- Spray bottle with water
- Optional: diluted fabric stiffener for a firmer ornament
Abbreviations (US Terms)
- ch – chain
- sl st – slip stitch
- sc – single crochet
- hdc – half double crochet
- dc – double crochet
- tr – treble crochet (yarn over 2 times)
- dtr – double treble crochet (yarn over 3 times)
- trtr – triple treble crochet (see below)
- sp – space
- st(s) – stitch(es)
- RS – right side
Special stitch – Triple treble crochet (trtr): Yarn over 4 times. Insert the hook in the indicated stitch, yarn over and pull up a loop (6 loops on hook). Then (yarn over, pull through 2 loops) 5 times. With this yarn and hook, one trtr stands about 1 in (2.5 cm) tall.
Dtr reminder: Yarn over 3 times, insert, pull up a loop (5 loops on hook), then (yarn over, pull through 2 loops) 4 times. Each dtr stands about 0.8 in (2.0 cm) tall.
Gauge and Checkpoints
Gauge: 6 sc and 6 sc rows = 1 in (2.5 cm). Exact gauge is not critical for an ornament, but the shape depends on proportion. The outer arc needs to come out about twice the length of the inner arc.
Test one piece first. Your first moon doubles as the gauge swatch. Stop at each checkpoint below and measure the work lying flat without stretching it.
- After Row 1: the inner arc strip measures about 4.25 in (10.8 cm) long.
- After Row 2: the center trtr spokes stand about 1 in (2.5 cm) tall, and the work starts to fan into a curve.
- After Row 3: the outer arc measures about 8.25 in (21.0 cm) along its edge, and the center of the crescent is about 1.25 in (3.2 cm) wide.
- After the border: the moon is about 5.5 in (14.0 cm) tall, and the widest part of the band is about 1.5 in (3.8 cm).
Too big? Go down 0.25 mm in hook size, or check that you aren’t making extra-loose loops on the tall stitches.
Too small, or are the spokes too short to open the windows? Go up 0.25 mm in hook size. Pull up the first loop of each tall stitch to the height of the stitches beside it.
Curling into a full circle? Your outer chains are too tight. Loosen your tension on the chain-4 spaces only.
Pattern
Row 1 – Inner Arc
Ch 26.
Row 1: Sc in 2nd ch from hook and in each ch across. (25 sc)
The strip will be straight for now. It curves once Row 2 is added. Checkpoint: about 4.25 in (10.8 cm) long.
Keep the foundation chain fairly relaxed. You’ll work into its free loops again during the border, so a tight chain makes the inner arc pucker.
Row 2 – Tips and Spokes
This row builds both solid tips and the eight spokes. The stitches get taller toward the center, and that is what tapers the crescent at each end.
To keep track, number the Row 1 stitches 1 to 25 in the order you work them.
Row 2: Ch 1, turn.
- Tip A: Sc in st 1, hdc in st 2, dc in st 3, tr in st 4. (4 sts)
- Ch 3, skip st 5, dtr in st 6. (first spoke)
- [Ch 4, skip next st, trtr in next st] 6 times. Your trtr spokes sit in sts 8, 10, 12, 14, 16 and 18.
- Ch 4, skip st 19, dtr in st 20. (last spoke)
- Ch 3, skip st 21.
- Tip B: Tr in st 22, dc in st 23, hdc in st 24, sc in st 25. (4 sts)
Stitch count for Row 2: 16 sts (4 tip sts + 2 dtr + 6 trtr + 4 tip sts) and 9 chain spaces (2 ch-3 sps + 7 ch-4 sps).
Check the spaces: tr to dtr at each end is a ch-3. The 7 gaps between the 8 spokes are all ch-4.
Working tall stitches neatly: Hold the wraps loosely on the hook shaft, not the throat, so they slide off evenly. Pull each pair of loops through with the same smooth motion. That keeps the spokes straight and gives them the slightly twisted, cord-like look of the sample.
The work now forms a loose fan, with the tall spokes standing on the short inner arc. Optional: put a marker in the 4th trtr. It sits at the center of the moon.
Row 3 – Outer Arc
Each chain space gets as many sc as it has chains, plus 1 sc on top of each stitch. That gives the outer arc twice as many stitches as the inner arc, and the strip pulls into a crescent.
Row 3: Ch 1, turn.
- Sc in each of first 4 sts (sc, hdc, dc, tr of Tip B). (4 sc)
- 3 sc in ch-3 sp, sc in dtr. (4 sc)
- [4 sc in next ch-4 sp, sc in next trtr] 6 times. (30 sc)
- 4 sc in next ch-4 sp, sc in dtr. (5 sc)
- 3 sc in ch-3 sp. (3 sc)
- Sc in each of last 4 sts (tr, dc, hdc, sc of Tip A). (4 sc)
Stitch count for Row 3: 50 sc. Check: 4 + 4 + 30 + 5 + 3 + 4 = 50.
Work the sc into each space by inserting the hook under the whole chain, not into individual chains. That way the sc pack together into a smooth, solid outer arc.
Checkpoint: the outer edge measures about 8.25 in (21.0 cm). The band is about 1.25 in (3.2 cm) wide at the center and narrows to a point at each tip. The piece should measure about 5.25 in (13.3 cm) x 2.75 in (7.0 cm).
Lay the piece flat. If it won’t lie flat yet, that’s normal. The border and blocking will fix it.
Border
Border gauge: the same as the body, 6 sc = 1 in (2.5 cm). The border is a single round of sc. It adds about 0.15 in (0.4 cm) on every edge and turns the edges into neat, cord-like outlines.
Rnd 4 (Border): Ch 1, turn.
- Outer arc: 3 sc in first sc, sc in each of next 48 sc, 3 sc in last sc. (54 sc)
- Tip end: Rotate the work. Sc in the side of the Row 2 sc at this tip. (1 sc)
- Inner arc: Working in the free loops on the underside of the foundation chain, sc in each of 25 ch. (25 sc)
- Other tip end: Sc in the side of the Row 2 sc at the remaining tip. (1 sc)
- Join with sl st to first sc.
Stitch count for Rnd 4: 81 sc. Check: 54 + 1 + 25 + 1 = 81.
Why the math works: The outer arc keeps all 50 sc from Row 3. Each tip gets 2 extra sc (3 sc worked into 1 st), which gives 50 + 4 = 54. The inner arc follows the 25 foundation chains one-for-one, so the inner curve keeps its length and doesn’t ruffle. One sc at each tip end covers the short row ends of Row 2. The 2:1 ratio between the outer and inner arc (50 and 25) holds, so the crescent shape stays the same and the border just thickens the outline.
Hanging Loop
You’re now at the tip where you joined. Ch 16, then sl st into the same st as the join to form a loop. Fasten off, leaving a 6 in (15.2 cm) tail.
Weave the tail back through the base of the loop twice to secure it. Then hide it inside the border sc. Weave in the starting tail along the inner arc.
The loop hangs about 1 in (2.5 cm) above the tip. For a sturdier loop, work 20 sc around the ch-16 before fastening off.
Final Blocking
- Dampen. Mist the moon until it is evenly damp but not dripping. Cotton can also be soaked and gently pressed in a towel.
- Shape the outer arc. Lay the piece on the mat with the RS up. Pin the center of the outer arc first, then ease the curve out evenly toward each tip.
- Pin the tips. Pin each tip to a sharp point, about 5.5 in (14.0 cm) apart from top to bottom. Check that both tips curve inward by the same amount.
- Open the windows. Gently pull each spoke straight so it points from the inner arc out to the outer arc, like a wheel spoke. Pin the inner arc into a smooth curve as you go.
- Check the width. The center of the band should measure about 1.5 in (3.8 cm).
- Optional stiffening. For a crisp tree ornament, brush on diluted fabric stiffener now.
- Dry completely. Leave the moon pinned until fully dry, usually 6 to 12 hours. Then unpin it.
Final Quality-Control Checklist
- The moon is 5.5 in (14.0 cm) tall and 3 in (7.6 cm) wide, give or take 0.25 in (0.6 cm).
- There are 8 spokes: 1 dtr, 6 trtr, 1 dtr.
- All 7 windows between the spokes are about equal in size.
- Both tips are solid and taper evenly (sc, hdc, dc, tr).
- The outer arc has a smooth row of sc with no gaps where it meets the chain spaces.
- The border has 81 sc and lies flat with no ruffling.
- The hanging loop is secure and sits at the tip.
- All ends are woven in and none show on the RS.
Troubleshooting
Moon is lopsided. Count Row 2 again. The spokes must sit in sts 6, 8, 10, 12, 14, 16, 18 and 20 for both tips to match.
Windows look pinched. Your tall stitches are short. Pull the first loop up higher, or go up a hook size.
Outer edge ruffles. You may have worked 5 sc into a ch-4 sp. Go back to exactly 4 sc per ch-4 sp and 3 sc per ch-3 sp.
Inner arc puckers. The border was worked too tightly on the foundation chain. Loosen up, and make sure you work exactly 25 sc there.
Tips are blunt. Pin them to a point during blocking. Also check that each tip has 3 sc in the corner stitch.
Spokes twist or lean. Pin each spoke straight while damp and let it dry fully before unpinning.
The loop pulls the tip sideways. Work the loop’s sl st into the exact center stitch of the tip, or add the optional 20 sc around the loop so it sits upright.
Ran short of yarn. One moon needs well under 8 g. If you ran short, your tension is loose. Go down a hook size for the next one.
Care
Hand wash in cool water with mild soap, press out water in a towel, and reshape flat to dry. If you used fabric stiffener, spot clean only.
Final Notes
The measurement chain for this moon is short. The inner arc is 25 sc, about 4.25 in (10.8 cm). The spoke row adds about 1 in (2.5 cm) of height at the center. The outer arc has 50 sc, about 8.25 in (21.0 cm), which brings the piece to about 5.25 in (13.3 cm) x 2.75 in (7.0 cm). The 81-sc border brings it to 5.5 in (14.0 cm) x 3 in (7.6 cm).
If your numbers match at each checkpoint, your moon will match too. Once you have one you like, make a few more for the tree, a gift tag, or a winter window.
Happy crocheting!