

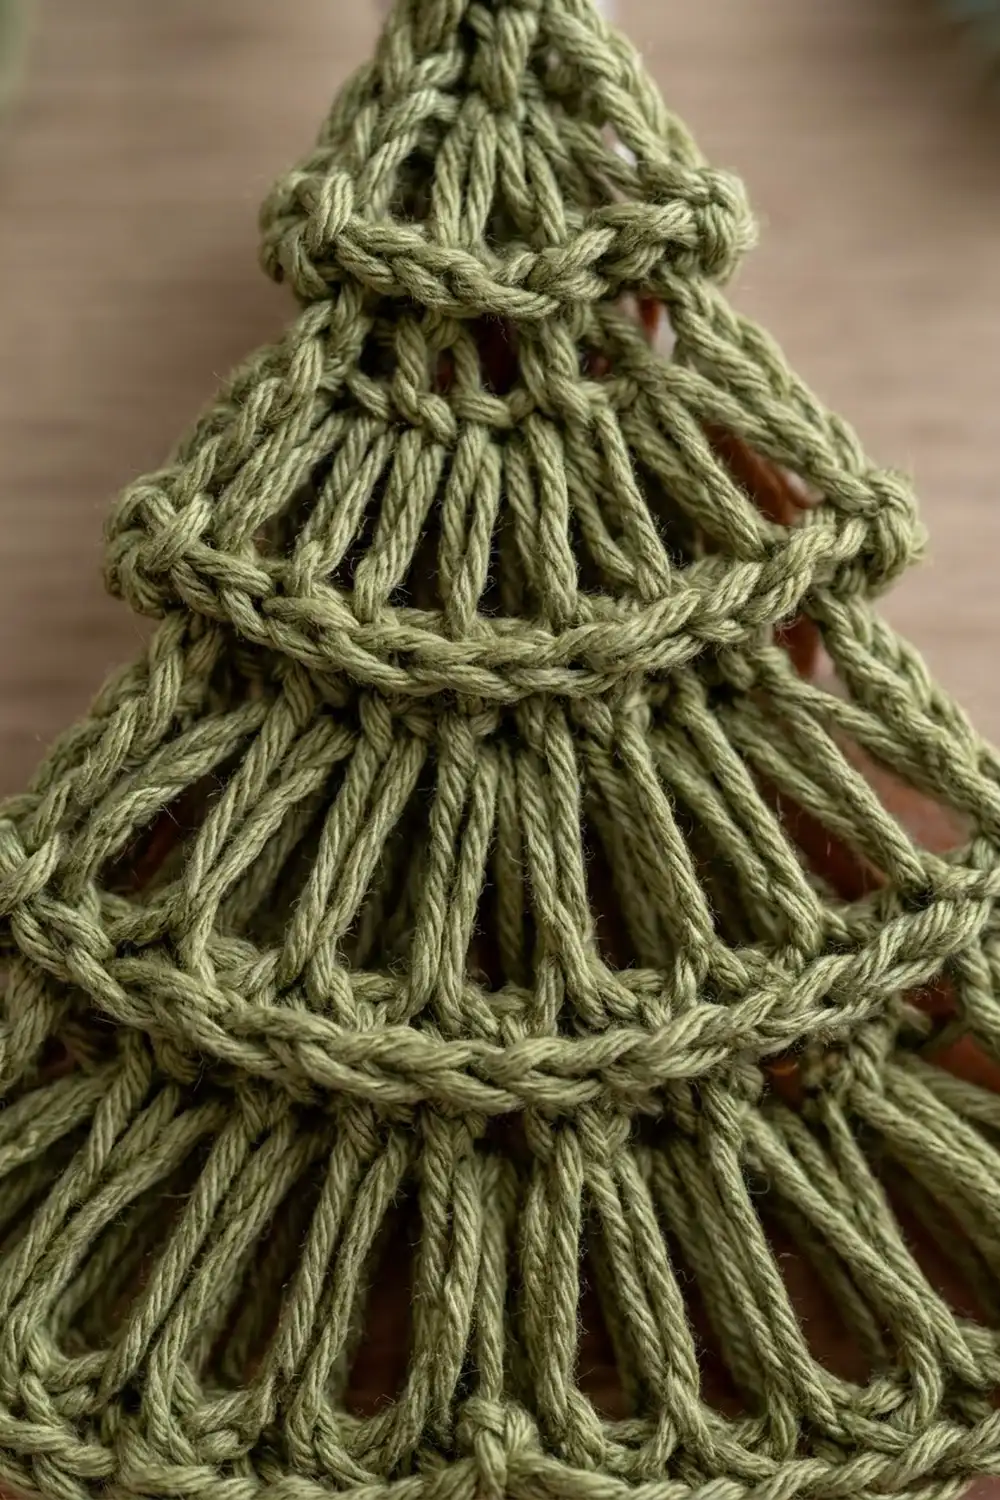
This little tree ornament is made of open, airy tiers of tall stitches stacked into a neat triangle. Raised ridges separate the tiers, and a small cream trunk sits at the bottom. The light passes through the long stitches, so the ornament looks delicate on a branch, in a window, or tied onto a gift.
The palette is quiet and natural: sage green for the tree, with soft cream for the trunk and the hanging loop. It fits rustic, Scandinavian, and farmhouse holiday decor, and works on its own or as a set of matching ornaments.
This pattern uses US crochet terms. The finished tree is 4.6″ (11.7 cm) wide and 4.2″ (10.7 cm) tall. With the trunk, the total height is 5.0″ (12.7 cm). The hanging loop adds another 1.5″ (3.8 cm).
The tree is worked flat in rows from the tip down. Each tier is a right-side row of tall stitches that increases at both ends. It is followed by a wrong-side single crochet ridge row worked in front loops only, which leaves a chain-like ridge on the right side. A single border round tidies the edges. The trunk is a separate small square that you sew on, and the loop is a simple chain.
Finished Size and Construction
- Finished size: 4.6″ (11.7 cm) wide × 4.2″ (10.7 cm) tall; 5.0″ (12.7 cm) tall with the trunk
- Skill level: Easy–Intermediate
- Terminology: US crochet terms
- Yarn weight: DK (light worsted, #3), cotton or cotton blend
- Hook: 3.5 mm (E/4)
- Number of pieces: 1 tree, plus 1 small trunk sewn on and 1 chain loop
- Layout: single motif (nothing to join)
- Tree size before border: 4.2″ (10.7 cm) wide × 4.0″ (10.2 cm) tall
- Border depth: 1 round of sc, about 0.2″ (0.5 cm)
Materials
Choose a smooth, mercerized or matte cotton DK. Cotton gives crisp ridges and holds the tall stitches open after blocking. Acrylic also works, but it gives a softer, less defined tier shape.
- Sage green (tree): 12 g, about 24 m
- Cream (trunk and loop): 3 g, about 6 m
These quantities are for one ornament and include a safety margin of roughly 30%.
Tools:
– 3.5 mm (E/4) crochet hook
– Tapestry needle
– Scissors
– 4 locking stitch markers
– Ruler or tape measure
– Blocking mat, rust-proof pins, and a spray bottle
Abbreviations (US Terms)
- ch – chain
- sc – single crochet
- dc – double crochet
- tr – treble crochet (yarn over twice)
- dtr – double treble crochet (yarn over 3 times, then work off 2 loops at a time 4 times)
- FLO – front loop only
- st(s) – stitch(es)
- RS / WS – right side / wrong side
- sl st – slip stitch
Special technique: Ridge Row. This is worked on WS rows. Single crochet into the front loop only of each stitch, meaning the loop closest to you as you hold the WS. The unworked back loops face the RS and form the raised, braid-like band between tiers.
Turning chains: In this pattern, turning chains never count as stitches. Always work the first stitch of the row into the first stitch.
Gauge and Checkpoints
Gauge: 10 sc × 10 rows = 2″ (5.1 cm) in rows of sc.
Make one full tree before you buy yarn for a set. Measure the stitches lying flat and unstretched. Width checkpoints are taken across the ridge rows. Height is measured straight down from the tip.
| After Row | Stitches | Width | Height |
|---|---|---|---|
| 2 | 5 | 1.0″ (2.5 cm) | 0.4″ (1.0 cm) |
| 4 | 9 | 1.8″ (4.6 cm) | 1.1″ (2.8 cm) |
| 6 | 13 | 2.6″ (6.6 cm) | 2.0″ (5.1 cm) |
| 8 | 17 | 3.4″ (8.6 cm) | 2.9″ (7.4 cm) |
| 10 | 21 | 4.2″ (10.7 cm) | 4.0″ (10.2 cm) |
If your tree is too big: go down to a 3.25 mm hook, or tighten your yarn-overs on the tall stitches. Loose tall stitches add height quickly.
If your tree is too small: go up to a 3.75 mm hook. Pull up the first loop of each tall stitch to the full height of the row.
If the width is correct but the height is off, the tall stitches are the cause. Adjust your stitch height rather than your hook.
Tree Pattern
Use sage green.
Row 1 (RS): Ch 2, 3 sc in the 2nd ch from the hook. Turn. (3 sc)
Place a marker on the RS so you can always find it.
Row 2 (WS, Ridge): Ch 1, 2 sc FLO in the first st, sc FLO in the next st, 2 sc FLO in the last st. Turn. (5 sc)
This is the small tip ridge. The width is now 1.0″ (2.5 cm).
Tier 1 – Double Crochet
Row 3 (RS): Ch 2, 2 dc in each of the first 2 sts, dc in the next st, 2 dc in each of the last 2 sts. Turn. (9 dc)
The paired stitches at each end fan outward and create the flared corner of the tier.
Row 4 (WS, Ridge): Ch 1, sc FLO in each st across. Turn. (9 sc)
Checkpoint: 1.8″ (4.6 cm) wide, 1.1″ (2.8 cm) tall.
Tier 2 – Treble Crochet
Row 5 (RS): Ch 3, 2 tr in each of the first 2 sts, tr in each of the next 5 sts, 2 tr in each of the last 2 sts. Turn. (13 tr)
Row 6 (WS, Ridge): Ch 1, sc FLO in each st across. Turn. (13 sc)
Checkpoint: 2.6″ (6.6 cm) wide, 2.0″ (5.1 cm) tall.
Tier 3 – Treble Crochet
Row 7 (RS): Ch 3, 2 tr in each of the first 2 sts, tr in each of the next 9 sts, 2 tr in each of the last 2 sts. Turn. (17 tr)
Row 8 (WS, Ridge): Ch 1, sc FLO in each st across. Turn. (17 sc)
Checkpoint: 3.4″ (8.6 cm) wide, 2.9″ (7.4 cm) tall.
Tier 4 – Double Treble Crochet
Row 9 (RS): Ch 4, 2 dtr in each of the first 2 sts, dtr in each of the next 13 sts, 2 dtr in each of the last 2 sts. Turn. (21 dtr)
This is the tallest and most open tier, which makes the bottom of the tree look heavier.
Row 10 (WS, Ridge): Ch 1, sc FLO in each st across. Do not fasten off. (21 sc)
Checkpoint: 4.2″ (10.7 cm) wide, 4.0″ (10.2 cm) tall.
Count logic: Each tall-stitch row adds 4 stitches: 2 at each end, made by working 2 stitches into each of the 2 end stitches. Ridge rows add nothing. That gives 5 → 9 → 13 → 17 → 21. The ridge rows hold the width steady, so the edge steps outward once per tier.
Border
Continue with sage green. Turn so the RS faces you; you are now at the bottom-right corner of the tree.
Border gauge: Along the bottom edge, work 1 sc per stitch, which is 5 sc per inch (2.5 cm). On the slanted sides, work into row ends at these rates:
- 1 sc per sc row end
- 2 sc per dc row end
- 3 sc per tr row end
- 4 sc per dtr row end
On the sides this works out to about 4 sc per inch (2.5 cm). The row ends of tall stitches are loose, so this slightly lower rate keeps the sides flat instead of ruffled.
Border Round 1 (RS): Ch 1. Work 3 sc in the first st of Row 10 (corner). Sc in each of the next 19 sts. Work 3 sc in the last st (corner).
Now work up the first slanted side, into the row ends:
- Row 10: 1 sc
- Row 9: 4 sc
- Row 8: 1 sc
- Row 7: 3 sc
- Row 6: 1 sc
- Row 5: 3 sc
- Row 4: 1 sc
- Row 3: 2 sc
- Row 2: 1 sc
- Row 1: 1 sc
That is 18 sc. Next, work 3 sc in the tip, into the foundation ch of Row 1 (tip corner). Work down the second slanted side in the same way, in reverse order: 1, 1, 2, 1, 3, 1, 3, 1, 4, 1. That is another 18 sc. Join with a sl st to the first sc. Fasten off and weave in the ends. (64 sc total)
Per-side counts: Each corner is a 3-sc group: one side sc, one center sc, and one side sc. Counting each side from corner center to corner center, including both centers:
- Bottom: 1 + 1 + 19 + 1 + 1 = 23 sc
- Each slanted side: 1 + 1 + 18 + 1 + 1 = 22 sc
Why the math works: The bottom edge has 21 stitches. The first and last stitches each hold a 3-sc corner group, which leaves 19 stitches between them. The sides add 18 + 18 = 36 sc. The three corners add 3 × 3 = 9 sc. So 19 + 36 + 9 = 64. The per-side totals add up to 23 + 22 + 22 = 67. That is 3 more than 64 only because each of the 3 corner centers is counted on two sides.
The border adds 0.2″ (0.5 cm) to each edge. The tree becomes 4.6″ (11.7 cm) wide and 4.2″ (10.7 cm) tall.
Trunk
Use cream.
Row 1: Ch 6, sc in the 2nd ch from the hook and in each ch across. Turn. (5 sc)
Rows 2–4: Ch 1, sc in each st across. Turn. (5 sc)
Fasten off, leaving a 10″ (25.4 cm) tail. The trunk measures 1.0″ (2.5 cm) wide × 0.8″ (2.0 cm) tall.
Attaching: Count the 21 sts on the bottom border between the two corner center stitches. Skip 8, mark the next 5, and leave 8. Lay the trunk RS up with its top edge butted against the 5 marked border stitches. Whipstitch one trunk stitch to one border stitch through the back loops, so the seam disappears on the front. The total height is now 5.0″ (12.7 cm).
Hanging Loop
Use cream. Ch 18, which is about 3.0″ (7.6 cm), and fasten off, leaving 4″ (10.2 cm) tails at both ends. Thread both tails through the center sc at the tip from front to back. Tie a firm square knot on the WS and weave in the tails. The folded loop stands about 1.5″ (3.8 cm) above the tip.
Final Blocking
- Weave in all the ends before blocking, except the hanging loop tails if you have not tied them yet.
- Lightly mist the ornament with water until it is damp, not dripping.
- Lay it RS up on the blocking mat.
- Pin the three corners first: the tip and the two bottom corners. Set the bottom width to 4.6″ (11.7 cm) and the border height to 4.2″ (10.7 cm).
- Gently pull each tier’s flared end outward and pin it, so the stepped silhouette shows clearly.
- Gently stretch each tall-stitch row downward so the gaps between stitches open into an even ladder.
- Pin the trunk square at 1.0″ (2.5 cm) × 0.8″ (2.0 cm).
- Let it dry completely, usually 6–12 hours. Unpin it only when it is fully dry.
Final Quality-Control Checklist
- Row 10 has exactly 21 sts, and Border Round 1 has 64 sc.
- There are four tiers, increasing in height from dc to tr to tr to dtr.
- All four ridges show raised chains on the RS.
- Both slanted sides look like mirror images, with matching steps.
- The tree is 4.6″ (11.7 cm) wide and 4.2″ (10.7 cm) tall after the border.
- The trunk is centered, with 8 border stitches on each side of it.
- The trunk seam is invisible from the front.
- The hanging loop is centered at the tip and securely knotted.
- No yarn tails show on the RS.
Troubleshooting
The ridges show on the wrong side. You worked a ridge row on the RS, or worked into the back loops. Ridge rows are always WS rows worked in the FLO.
The tree is lopsided. Check that the increases are mirrored on every tall row: 2 stitches in each of the first 2 sts and in each of the last 2 sts.
The sides ruffle. You worked too many row-end stitches. Follow the 1/2/3/4 rate exactly.
The sides pull inward. You worked too few row-end stitches, or your border tension is tight. Loosen up, or go up half a hook size for the border only.
The tall stitches look crowded rather than open. Pull up the first loop of each stitch to full height, and stretch the rows downward when you block.
The stitch count is off by 1 on a ridge row. You probably worked into the turning chain. Turning chains never count in this pattern.
The trunk droops. Pin it out while blocking, and whipstitch both corners of the trunk twice.
Care
Hand wash in cool water with mild soap, press out the water in a towel, and dry flat, re-pinning the shape if needed. Store the ornament flat or hanging, not crushed.

Final Notes
The measurement chain is simple: gauge of 5 sc per inch (2.5 cm). The ridge-row widths go 5, 9, 13, 17, and 21 sts, which is 1.0″ (2.5 cm), 1.8″ (4.6 cm), 2.6″ (6.6 cm), 3.4″ (8.6 cm), and 4.2″ (10.7 cm). The unbordered tree is 4.0″ (10.2 cm) tall. One round of 64 sc brings it to 4.6″ × 4.2″ (11.7 × 10.7 cm), and the trunk brings the total height to 5.0″ (12.7 cm). If you hit each checkpoint, the finished tree will be the right size.
Happy crocheting!