

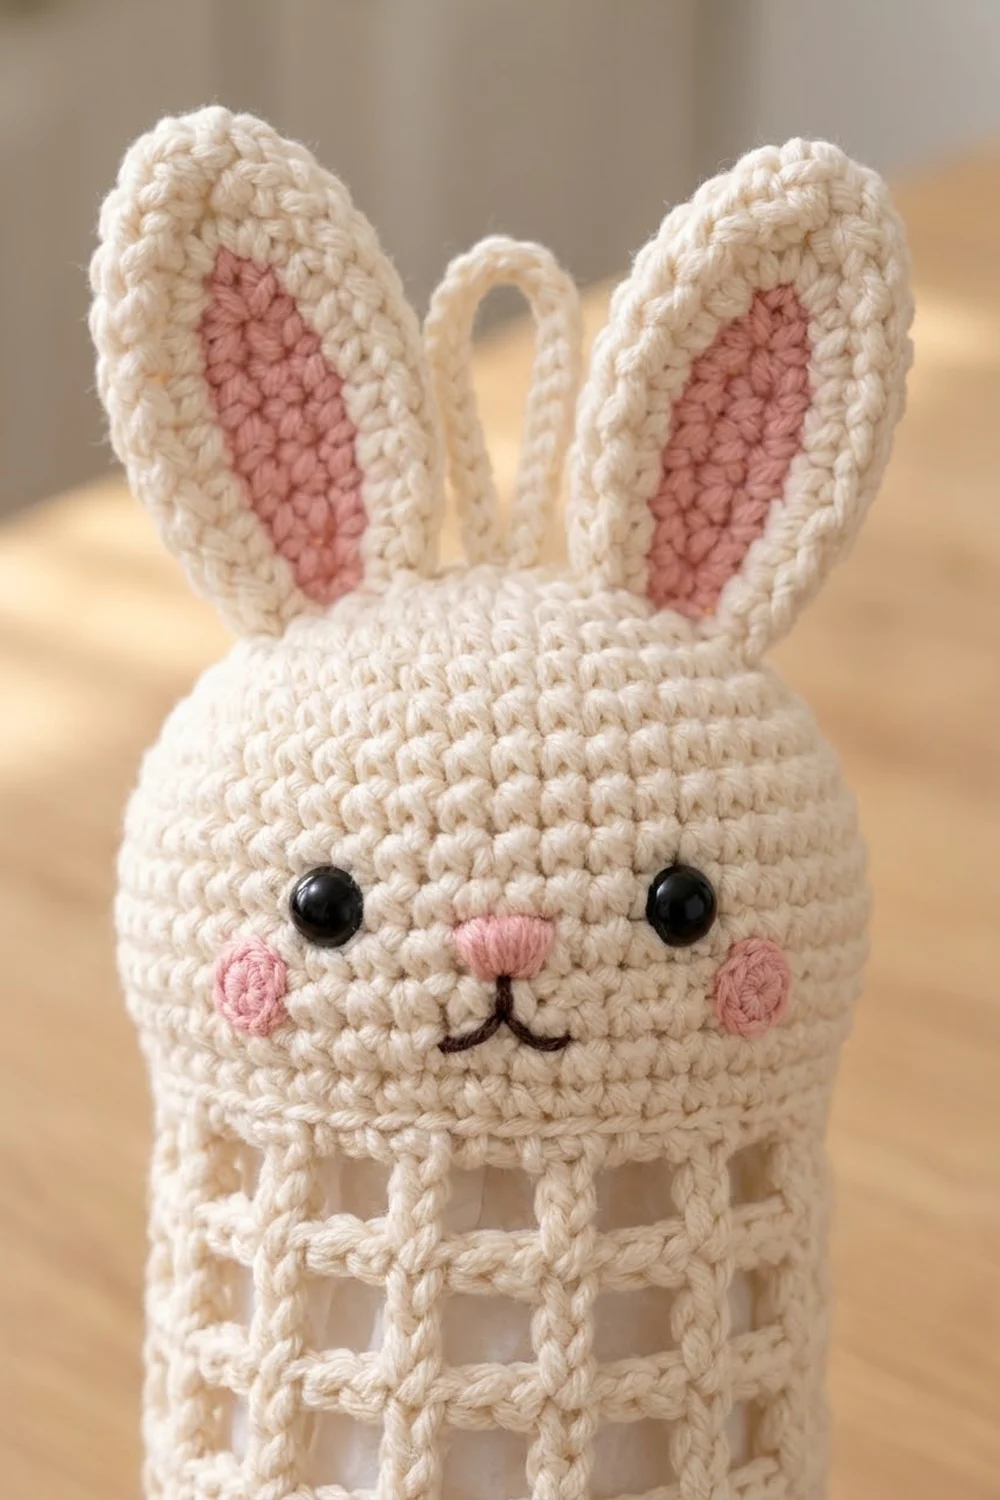
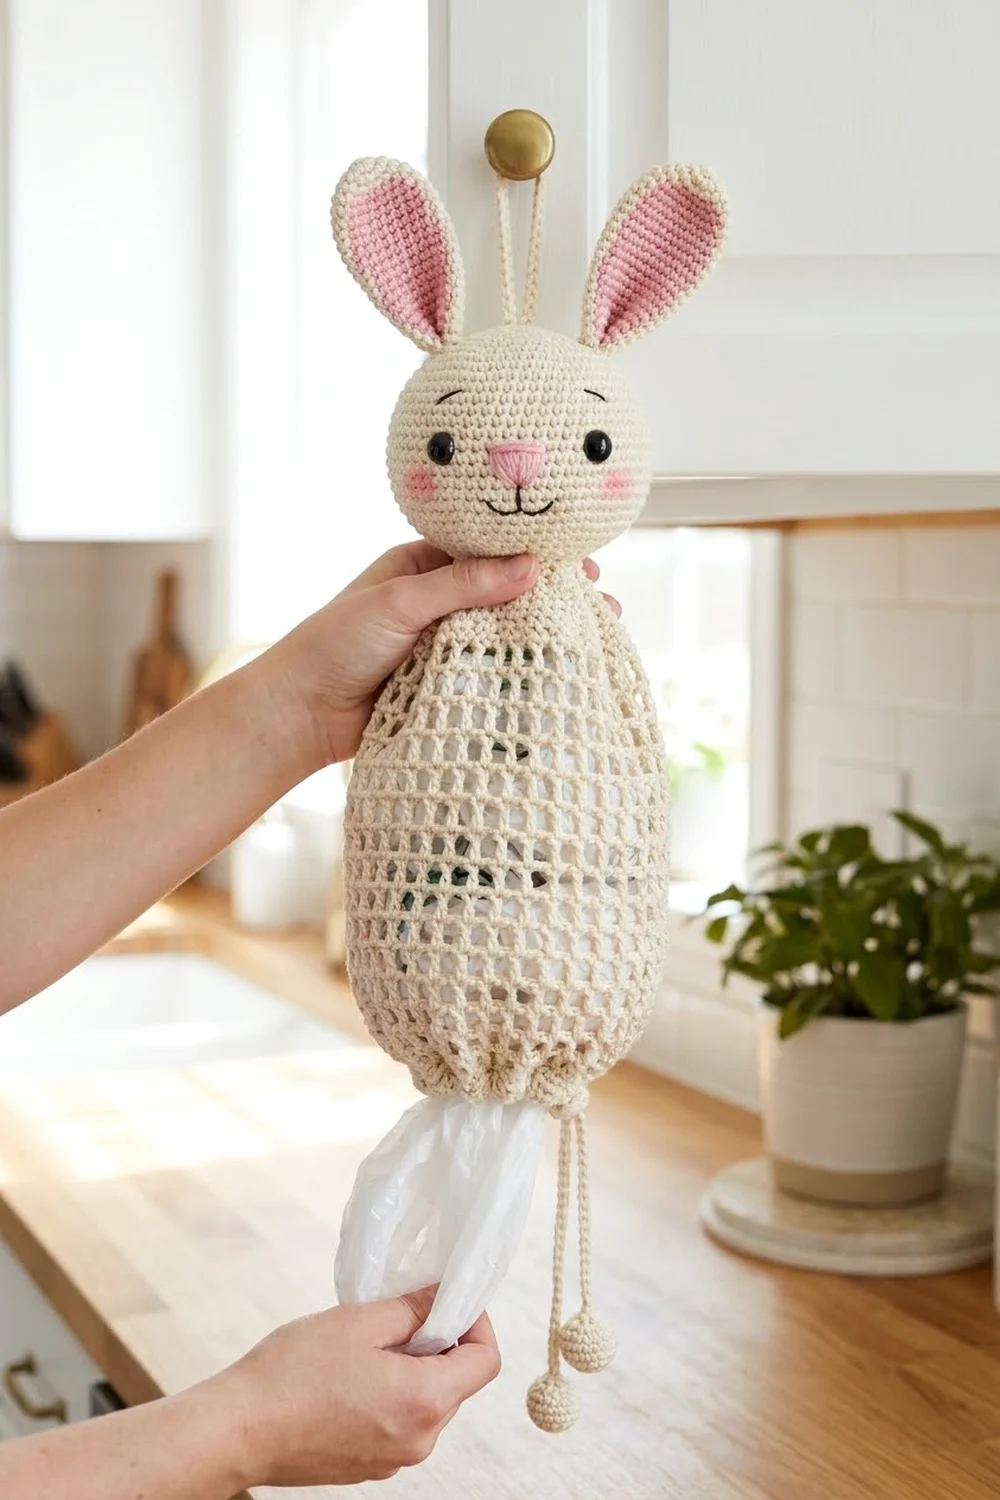
This bunny bag holder turns your pile of plastic grocery bags into something nice to look at. The body is an open, square mesh tube, so you can see the bags inside. A soft stuffed bunny head sits on top, with pink-lined ears and a hanging loop.
The palette is simple. Cream cotton makes up almost the whole piece. Soft pink fills the inner ears, the cheeks and the nose, and a little dark brown makes the mouth. Black safety eyes finish the face.
The pattern uses US crochet terms. The finished holder is about 18.75 in (47.6 cm) from ear tips to gathered bottom, not counting the hanging loop and drawstring tails. The mesh body is 5.25 in (13.3 cm) wide when flattened.
Here is how it goes together. You work the mesh body top-down in joined rounds, then add solid single-crochet bands at the top and bottom edges. The head is a stuffed dome closed with a flat base. You sew only the back half of the head to the body’s top band, which leaves a front slot for putting bags in. Bags come out through the drawstring opening at the bottom.
Finished Size and Construction
- Finished size: about 18.75 in (47.6 cm) tall; body 5.25 in (13.3 cm) wide when flattened
- Skill level: Easy–Intermediate
- Terminology: US crochet terms
- Yarn weight: worsted (#4) cotton
- Hook: 4.5 mm (US 7)
- Number of pieces: 1 finished holder (mesh body, head dome, head base, 2 ears, 2 cheeks, hanging loop, drawstring, 2 cord balls)
- Layout: head stacked on top of the body, ears and loop on top of the head
- Body circumference: 42 sts = 10.5 in (26.7 cm)
- Body length before border: 12 in (30.5 cm)
- Border depth: top 0.75 in (1.9 cm), bottom 0.5 in (1.3 cm)
- Body length after border: 13.25 in (33.7 cm)
Materials
Use a smooth worsted-weight cotton or cotton blend. It shows the mesh squares clearly, holds its shape under the weight of the bags, and survives washing. Avoid fuzzy or very stretchy yarn, because the mesh will sag.
- Cream (main color): 120 g / about 204 m
- Soft pink: 10 g / about 17 m
- Dark brown: about 2 m of yarn or embroidery floss, for the mouth
Tools:
– 4.5 mm (US 7) crochet hook
– 2 black safety eyes, 10 mm
– About 15 g polyester fiberfill
– Yarn needle
– Stitch markers
– Scissors
– Pins and a spray bottle for blocking
All yarn amounts include a margin of about 15% for swatching and joining.
Abbreviations (US Terms)
- ch – chain
- sl st – slip stitch
- sc – single crochet
- hdc – half double crochet
- dc – double crochet
- MR – magic ring
- inc – 2 sc in the same stitch
- sp – space
- st(s) – stitch(es)
- beg – beginning
- RS / WS – right side / wrong side
Special stitches
- Mesh square: dc, ch 2, skip 2 sts (or work over the ch-2 sp below). Each square uses 3 sts of width.
- Back-bump sl st cord: slip stitch into the back bump of each chain. This makes a firm, round-looking cord that won’t stretch.
Gauge and Checkpoints
- Single crochet: 16 sc and 16 rounds = 4 in (10.2 cm)
- Mesh: 4 squares wide and 4 rounds tall = 3 in x 3 in (7.6 cm x 7.6 cm)
Test one piece first. Make the head base (Rounds 1–7 of the head) before anything else. It should measure 3.5 in (8.9 cm) across. If it does, your sc gauge is right.
Checkpoints:
1. Head base after Round 7: 3.5 in (8.9 cm) across.
2. Body after mesh Round 4: 3 in (7.6 cm) tall and 5.25 in (13.3 cm) wide when flattened.
3. Body after mesh Round 16: 12 in (30.5 cm) tall.
4. Body after both borders: 13.25 in (33.7 cm) tall.
5. Finished head: 3.5 in (8.9 cm) across and about 3.25 in (8.3 cm) tall.
If your work is too big, go down 0.5 mm in hook size. If it is too small, go up 0.5 mm. Don’t add or remove stitches. The head and body both rely on the same 42-stitch count to line up.
Mesh Body
Use cream. You work the body from the top down, joining each round and never turning, so the RS always faces you. The join stays in one column, and that column becomes the center back.
Foundation: Ch 42 and join with a sl st to the first ch to form a ring. Make sure the chain is not twisted.
Round 1: Ch 5 (counts as dc + ch 2), skip next 2 ch. Dc in next ch, ch 2, skip next 2 ch. Repeat from * 12 more times. Sl st in 3rd ch of beg ch-5.
(14 dc + 28 ch = 42 sts; 14 mesh squares)
Rounds 2–16: Ch 5 (counts as dc + ch 2). Dc in next dc, ch 2. Repeat from * 12 more times. Sl st in 3rd ch of beg ch-5.
(42 sts and 14 squares each round)
Every dc sits directly on top of the dc below it. This stacking is what makes the clean square grid. After Round 16 you have 16 mesh rounds, and the body should measure 12 in (30.5 cm). Fasten off.
Place a marker on the join column. This is the center back.
Head
Head Dome
Use cream. Work in continuous spiral rounds and mark the first stitch of each round.
- Round 1: 6 sc in MR. (6)
- Round 2: Inc in each st. (12)
- Round 3: Sc 1, inc 6 times. (18)
- Round 4: Sc 2, inc 6 times. (24)
- Round 5: Sc 3, inc 6 times. (30)
- Round 6: Sc 4, inc 6 times. (36)
- Round 7: Sc 5, inc 6 times. (42)
- Rounds 8–14: Sc in each st. (42 each round)
Sl st in the next st and fasten off, leaving a short tail.
Head Base
Use cream. Work Rounds 1–7 exactly as for the dome. You end with 42 sts and a circle 3.5 in (8.9 cm) across. Sl st in the next st and fasten off.
Cheeks (make 2)
Use pink.
Round 1: 8 sc in MR, then sl st to the first sc. (8)
Pull the ring closed, leaving a small center hole. Each cheek is about 0.6 in (1.5 cm) across. Fasten off, leaving a tail for sewing.
Face
Finish the face before you close the head.
- Eyes: Insert the safety eyes between Rounds 10 and 11 of the dome, with 7 sts between them. Lock the washers in place.
- Nose: Using pink, embroider a small inverted triangle in satin stitch. Center it between the eyes and work it over 2 sts across Rounds 11–12.
- Mouth: Using dark brown, stitch a small “w” shape just under the nose.
- Cheeks: Sew one cheek on Round 12, just below and outside each eye.
Closing the Head
- Hold the base against the open edge of the dome with WS together and the dome facing you.
- Join cream through both layers. Ch 1, then sc through both layers in each st around. Stop when about 10 sts remain.
- Stuff the dome firmly. Keep the bottom flat.
- Finish the round. You have 42 sc.
- Sl st to the first sc and fasten off, leaving a 20 in (50.8 cm) tail for attaching the head to the body.
Ears (make 2)
Pink Center
Use pink. Ch 10.
Round 1: Work into the chain as follows:
- Starting in the 2nd ch from hook: sc in each of the next 2 ch, hdc in each of the next 2 ch, dc in each of the next 4 ch.
- Work 6 dc in the last ch. This makes the rounded base.
- Rotate and work along the opposite side of the chain: dc in each of the next 4 ch, hdc in each of the next 2 ch, sc in the next ch.
- Work 2 sc in the first ch. This gives that ch 3 sc in total and forms the tip.
- Sl st to the first sc.
(8 + 6 + 7 + 2 = 23 sts)
Fasten off the pink.
Cream Outline
Round 2: Join cream in any st. Ch 1, then sc in each st around with these changes:
- Work 2 sc in each of the 6 base dc.
- Work 3 sc in the center sc of the tip.
Sl st to the first sc. (23 sts worked 1-per-stitch + 8 extra = 31)
Each ear measures about 3 in (7.6 cm) long and 1.75 in (4.4 cm) wide. Fasten off, leaving a tail for sewing.
Hanging Loop and Drawstring
Hanging loop: Using cream, ch 26. Sl st in the back bump of the 2nd ch from hook and in each ch across. (25 sl st; about 6 in / 15.2 cm long)
Drawstring: Using cream, ch 70. Sl st in the back bump of the 2nd ch from hook and in each ch across. (69 sl st; about 16 in / 40.6 cm long)
Cord balls (make 2): Using cream, work 6 sc in MR, then sc in each st for 1 more round. (6 each round)
Stuff each ball with its own yarn tail and cinch it closed. Each ball is about 0.5 in (1.3 cm) across.
Border: Top Band and Bottom Edge
The border uses the same 16-sc gauge as the head. Since the body is a tube, there are no corners. When you flatten the body with the marker at center back, each “side” is one flattened half of 21 sts: 7 mesh squares x 3 sts.
Top Band
Turn the body so the foundation chain is on top. Join cream at the center-back marker.
- Round 1: Ch 1, then sc in each of the 42 free loops of the foundation chain. Sl st to the first sc. (42: 21 front + 21 back)
- Rounds 2–3: Ch 1, sc in each st around, sl st to the first sc. (42 each round)
Fasten off. The top band adds 0.75 in (1.9 cm).
Bottom Edge
Join cream at the center back, working into Round 16 of the mesh.
- Round 1 (conversion): Ch 1. Sc in each dc and work 2 sc in each ch-2 sp. Sl st to the first sc. (14 sc in dc + 28 sc in spaces = 42; 21 per side)
- Round 2: Ch 1, sc in each st around, sl st to the first sc. (42)
Fasten off. The bottom edge adds 0.5 in (1.3 cm).
Why the Math Works
- Each mesh round holds 14 dc + 28 ch = 42 sts. That equals the foundation count, so the top band picks up exactly 42 sts.
- At the bottom, the conversion round gives each dc 1 sc and each ch-2 sp 2 sc, so the count stays at 42.
- The head’s closing round is also 42 sts, so the back 21 sts of the head line up stitch-for-stitch with the back 21 sts of the top band.
- Total body length: 12 + 0.75 + 0.5 = 13.25 in (33.7 cm).
Assembly
- Attach the head. Flatten the body with the marker at center back. Set the head on top so the face points to the front. Using the long tail, whipstitch the back 21 sts of the head’s closing round to the back 21 sts of the top band, one stitch to one stitch. Reinforce the two side points with 2 extra stitches each. The front 21 sts stay unsewn, which leaves a slot about 5 in (12.7 cm) wide for putting bags in.
- Attach the ears. Pinch the bottom corners of each ear slightly together. Sew the ears to Rounds 4–7 of the dome, about 1.5 in (3.8 cm) apart, facing forward. About 2.25 in (5.7 cm) of each ear should stand above the head.
- Attach the hanging loop. Fold the loop in half and sew both ends to the top center of the head, between the ears. The loop should stand about 2.5 in (6.4 cm) tall.
- Thread the drawstring. Starting at center front, weave the drawstring in and out through the 14 ch-2 spaces of mesh Round 16. Both ends come out through neighboring spaces at the front.
- Finish the cord ends. Knot each end of the drawstring and sew a ball over each knot.
- Gather the bottom. Pull the drawstring until the bottom opening is about 1 in (2.5 cm) across, then tie a firm knot.
Final Blocking
- Lightly mist the body with water until it is damp.
- Slide a 3.25 in (8.3 cm) wide cylinder inside the body, such as a rolled towel or a tall container.
- Line up the dc posts vertically. Straighten each square with your fingers.
- Check that the body measures 13.25 in (33.7 cm) from the top of the band to the bottom edge.
- Pin the ears flat on a towel and mist them so the cream outline lies smooth.
- Let everything dry completely before you load bags.
Final Quality-Control Checklist
- [ ] Every mesh round has 14 dc and 14 open squares
- [ ] The join column runs straight up the center back
- [ ] Top band and bottom edge are 42 sts each
- [ ] Head is 3.5 in (8.9 cm) across and firmly stuffed with a flat base
- [ ] Only the back 21 head sts are sewn, and the front slot opens easily
- [ ] Eyes are locked and level; nose and mouth are centered
- [ ] Ears are 31 sts each, symmetrical, and stand evenly
- [ ] Loop is secure enough to hold a full holder
- [ ] Drawstring gathers to about 1 in (2.5 cm) and both balls are sewn tight
Troubleshooting
- Mesh spirals or leans: Make sure you dc into the dc below, not into the ch-sp. Don’t turn your work between rounds.
- Squares are taller than they are wide: Pull up your dc loops a little shorter, or go down a hook size.
- Body is narrower than the head: You probably lost a square. Count 14 dc per round.
- Top band ruffles: Your foundation chain was tight. Work the band with a hook one size larger.
- Head looks pointed: Space out the increases evenly and stuff the head more firmly at the sides.
- Ears curl: Block them flat. Also check that the tip got exactly 3 sc in Round 2.
- Drawstring slips loose: Tie a double knot, then hide a short tail inside the bottom edge.
Care
Hand wash in cool water with mild soap. Gently reshape the holder over a cylinder and lay it flat or stand it up to dry.
Final Notes
Every part of this holder hangs on one measurement chain:
- 16 sc = 4 in (10.2 cm), and a mesh square is 0.75 in (1.9 cm)
- 42 sts around gives a body 5.25 in (13.3 cm) wide when flattened
- 16 mesh rounds = 12 in (30.5 cm), and the borders bring the body to 13.25 in (33.7 cm)
- A 42-st head joins stitch-for-stitch across the back half, for about 18.75 in (47.6 cm) overall
If you check gauge first and keep the counts at 42, the head, body and borders will line up.
Happy crocheting!