

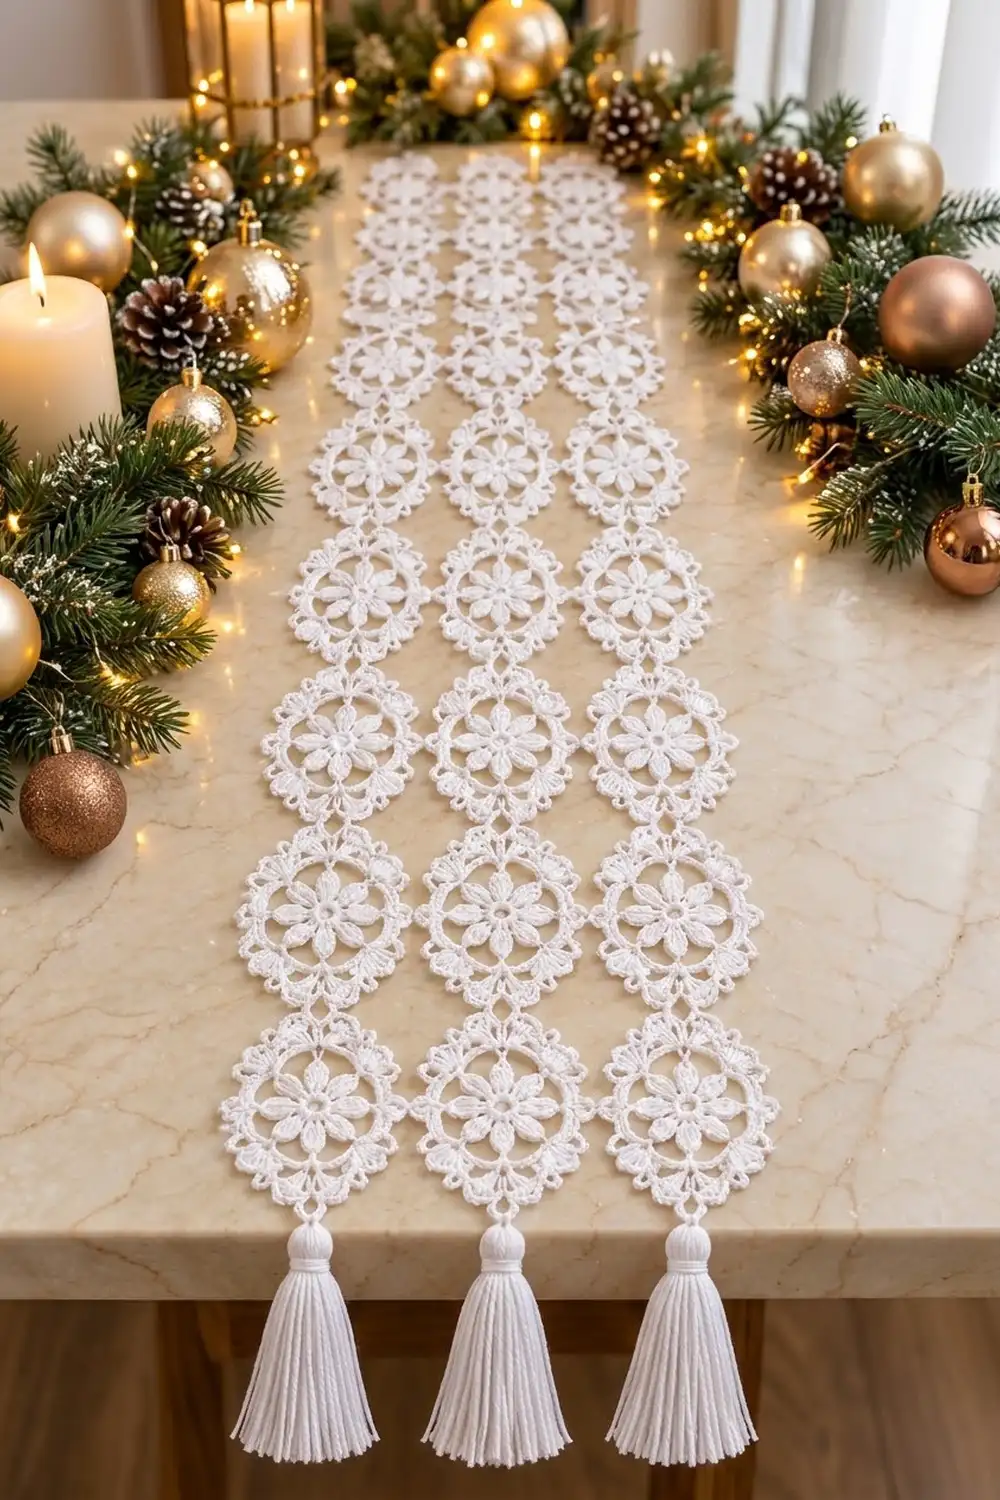
This lace table runner is made from 24 white oval medallions joined into three long columns. Each medallion has an open centre ring, a soft 8-petal flower, a crisp circular frame, and pointed tips trimmed with fans and loops. A plump tassel finishes the end of each column.
The look is clean and elegant: bright white cotton, lots of open space, and a slightly vintage doily style. The runner suits a holiday table but works all year on a sideboard or dresser.
The pattern uses US crochet terms. Including the tassels, the finished runner measures 10.5 in (26.7 cm) wide by 36 in (91.4 cm) long, or 44 in (111.8 cm) long with tassels at both ends.
To build it, you crochet each medallion in the round from the centre out. From the second motif on, you join it to its neighbours in the last round. You don’t add a separate border, because the picot edge of each motif is the finished edge. Then you make the tassels, attach them, and block the runner.
Finished Size and Construction
- Finished size: 10.5 in x 36 in (26.7 cm x 91.4 cm), plus 4 in (10.2 cm) tassels at each end
- Skill level: Intermediate
- Terminology: US
- Yarn weight: Fingering-weight / size 3 mercerized cotton
- Hook: 2.5 mm
- Number of pieces: 24 motifs + 6 tassels
- Layout: 3 columns x 8 motifs
- Motif size (blocked): 3.5 in wide x 4.5 in tall (8.9 cm x 11.4 cm), measured loop to loop
- Size before border: 10.5 in x 36 in (26.7 cm x 91.4 cm)
- Border depth: 0 in (0 cm). No separate border; Round 8 is the finished edge
Materials
Yarn: Use a mercerized cotton in size 3 crochet thread or a fingering weight, about 150 m per 50 g (164 yd per 50 g). Mercerized cotton gives the crisp stitch definition and slight sheen in the photo, and it blocks well. Avoid fuzzy or very stretchy fibres, because the lace will lose its shape.
- White: 250 g / 750 m (820 yd) total
- Motifs: about 150 g / 450 m (492 yd)
- Tassels: about 50 g / 150 m (164 yd)
Quantities include a margin of about 25% for gauge differences, swatching, and tassel trimming.
Tools:
– 2.5 mm crochet hook
– Tapestry needle
– 4 stitch markers
– Scissors
– Stiff card, 4.5 in (11.4 cm) tall, for tassels
– Blocking mats, rustproof pins, and a spray bottle
– Measuring tape
Abbreviations (US Terms)
- ch – chain
- sl st – slip stitch
- sc – single crochet
- hdc – half double crochet
- dc – double crochet
- tr – treble crochet
- sk – skip
- sp – space
- st(s) – stitch(es)
- picot – ch 3, sl st in the last sc made
Special stitch – joining loop (JL): Where the pattern calls for a ch-5 loop that must connect to a finished motif, work ch 2, sl st into the matching ch-5 loop of the finished motif, then ch 2. This replaces the ch 5.
Gauge and Checkpoints
Gauge isn’t critical for a runner, but it controls the final size and how much yarn you use. Make one complete motif first, block it, and measure it before you start the rest.
Checkpoints (unblocked, lightly flattened):
– After Round 3 (flower): 1.75 in (4.4 cm) across
– After Round 5 (circle): 2.5 in (6.4 cm) across
– After Round 7: 3.25 in wide x 4.25 in tall (8.3 cm x 10.8 cm)
– After Round 8, blocked: 3.5 in wide x 4.5 in tall (8.9 cm x 11.4 cm)
A difference of ±0.25 in (0.6 cm) on the finished motif is fine.
If your motif is too big: go down to a 2.25 mm hook. Every 0.25 in (0.6 cm) of extra height per motif adds 2 in (5.1 cm) to the runner’s length.
If your motif is too small: go up to a 2.75 mm hook, or check that you aren’t pulling the chain loops in Rounds 4 and 6 too tight.
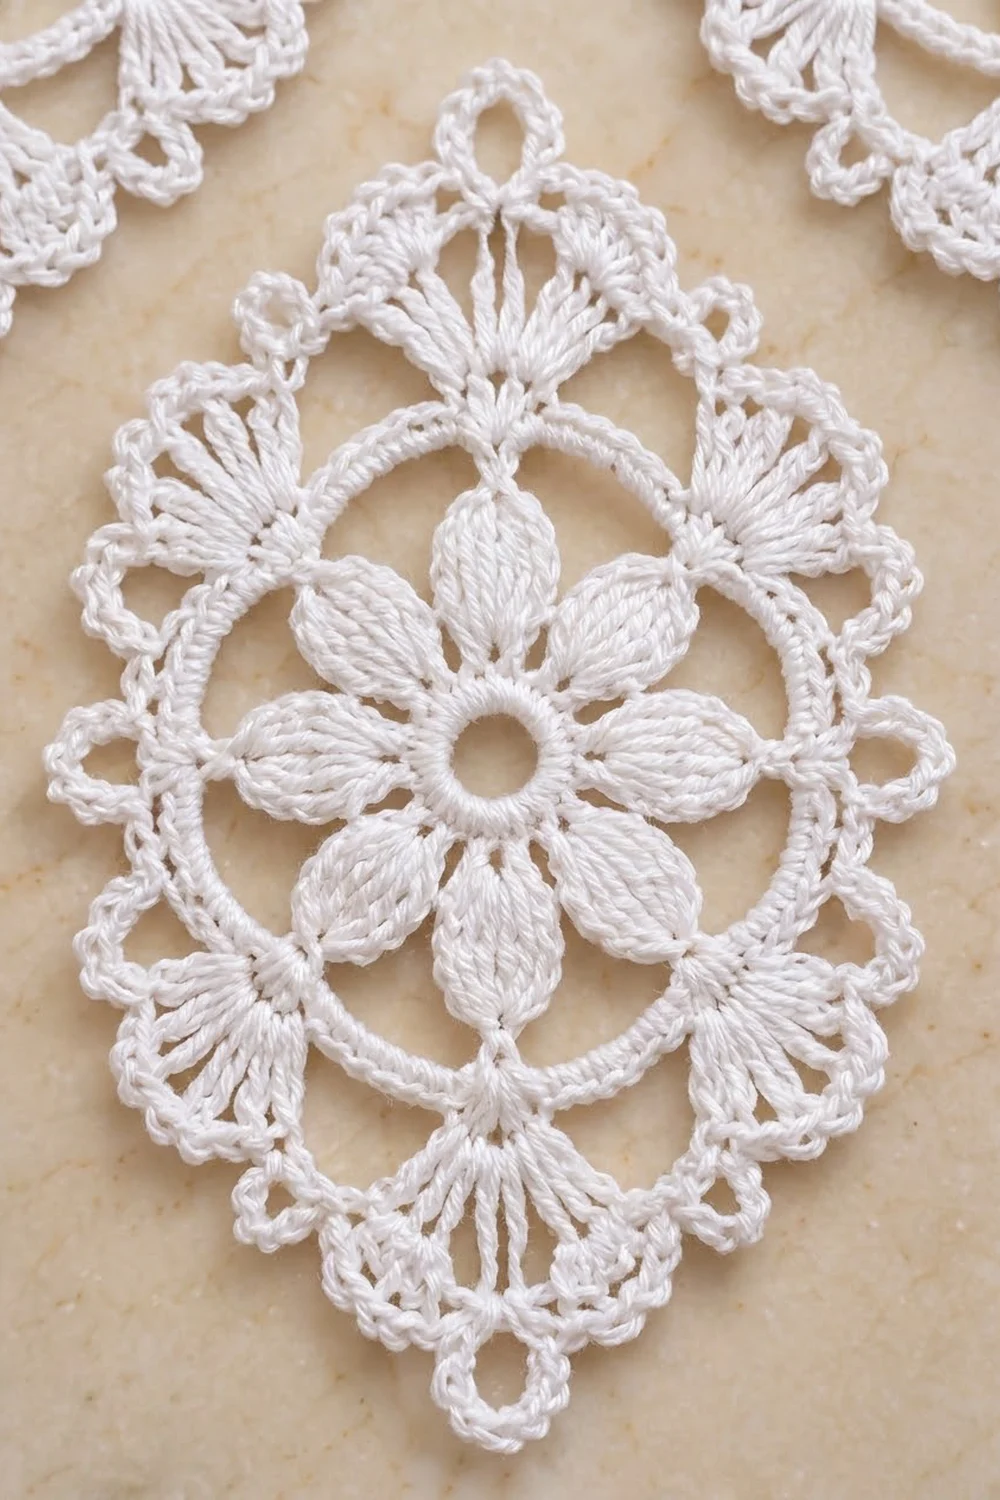
Motif Pattern (Make 24)
Ch 6, sl st in the first ch to form a ring.
Round 1: Ch 3 (counts as dc), 15 dc in ring, sl st in top of ch-3. (16 dc)
Round 2: Ch 1, sc in same st, ch 4, sk 1, sc in next st, ch 4, sk 1; repeat from * 6 more times, sl st in first sc. (8 sc, 8 ch-4 sps)
Round 3 (petals): Sl st in first ch-4 sp. Work (sc, hdc, 2 dc, tr, 2 dc, hdc, sc) in each ch-4 sp around, sl st in first sc. (8 petals of 9 sts each = 72 sts)
Each petal is wide at the middle and narrow at both ends, which gives the leaf shape. The tr is the petal tip.
Round 4: Sl st in each of the next 4 sts to reach the first petal’s tr. Ch 1, sc in the same tr, ch 7, sc in the tr of the next petal, ch 7; repeat from * 6 more times, sl st in first sc. (8 sc, 8 ch-7 sps)
The ch-7 loops arch behind and between the petal tips.
Round 5 (circle): Ch 1, sc in sc, 7 sc in next ch-7 sp; repeat from * around, sl st in first sc. (64 sc)
This is the solid circular frame around the flower. Check the 2.5 in (6.4 cm) checkpoint now.
Round 6: Ch 1, sc in same st, ch 5, sk 3, sc in next st, ch 5, sk 3; repeat from * 14 more times, sl st in first sc. (16 sc, 16 ch-5 loops)
Number the loops 1 to 16, starting with the loop just made after the joining sc. Loop 1 is the top tip and loop 9 is the bottom tip. Loops 5 and 13 are the side loops, and loops 3, 7, 11, and 15 are the fan loops. The rest (2, 4, 6, 8, 10, 12, 14, 16) are plain loops. Place markers in loops 1, 5, 9, and 13.
Round 7 (shaping): Sl st in loop 1. For each loop in order, work the loop’s contents, then 1 sc in the next sc of Round 6 (a “separator”):
– Tip loops (1 and 9): (3 tr, ch 5, 3 tr)
– Fan loops (3, 7, 11, 15): 9 dc
– Side loops (5 and 13): (3 sc, ch 3, 3 sc)
– Plain loops (2, 4, 6, 8, 10, 12, 14, 16): 5 sc
Begin the first tip with ch 4 (counts as the first tr) and end with sl st in that top ch.
Count for Round 7: 12 tr + 36 dc + 12 side sc + 40 plain sc + 16 separator sc = 116 sts, plus 2 tip ch-5 sps and 2 side ch-3 sps.
The tall tr at the tips and short sc at the sides are what pull the circle into a pointed oval.
Round 8 (edge): Work this round as a conversion: 1 sc in every Round 7 st, plus extra sc in the 4 chain spaces. Begin at the top tip ch-5 sp:
– Each tip ch-5 sp: (3 sc, ch 5, 3 sc), which makes the tip loop
– Each tr: 1 sc
– Each separator: 1 sc
– Each plain segment: sc in next 2 sts, sc in next st, picot, sc in next 2 sts (5 sc + 1 picot)
– Each fan: sc in first dc, ch 3, sc in next dc; repeat from * 7 more times (9 sc + 8 ch-3 loops)
– Each side segment: sc in each of 3 sc, (2 sc, ch 5, 2 sc) in ch-3 sp, sc in each of 3 sc (10 sc + 1 ch-5 side loop)
Sl st in the first sc and fasten off.
Count for Round 8: 116 sc (1 per Round 7 st) + 12 sc (in the tip sps) + 8 sc (in the side sps) = 136 sc. You also have 32 ch-3 fan loops, 8 picots, 2 tip ch-5 loops, and 2 side ch-5 loops.
Per-side check: From tip loop to tip loop, each long side holds 68 sc, 16 ch-3 loops, 4 picots, and 1 side loop. 68 x 2 = 136. ✓
Make All Pieces
Make all 24 motifs in white.
- Motif 1: Work Rounds 1–8 in full.
- All other motifs: Work Rounds 1–7 in full, then join in Round 8 (see Joining).
Layout (columns A, B, C; rows 1–8):
Row 1:  A1 – B1 – C1
         |    |    |
Row 2:  A2 – B2 – C2
         |    |    |
Row 3:  A3 – B3 – C3
 ...
Row 8:  A8 – B8 – C8
“–” = side loop join. “|” = tip loop join.
Joining
Use join-as-you-go in Round 8. You replace a ch-5 loop with a joining loop (JL), so each join links two loops at their tips. The joins add no stitches and no extra length.
Order: Make A1. Then work row by row, left to right: B1, C1, A2, B2, C2, and so on.
Stitch-to-stitch logic:
– Joining to the motif above: On the new motif’s top tip, work (3 sc, JL, 3 sc), with the JL linked to the bottom tip loop of the motif above.
– Joining to the motif on the left: On the new motif’s left side loop (loop 13), work (2 sc, JL, 2 sc), with the JL linked to the right side loop of the motif to the left.
Make sure loop 1 of every motif points up, so the fans line up across the rows.
Joins per motif:
– A1: none
– Other row 1 motifs: 1 side join
– A2–A8: 1 tip join
– All other motifs: 1 tip join + 1 side join
Totals: 21 tip joins (7 per column) and 16 side joins (2 per row).
Tension: Keep the JL chains the same tension as your normal ch-5 loops. Joins that are too tight pucker the medallions; loose ones let the columns sag apart.
Size checkpoint after Row 2: Lay it flat. The block should measure about 10.5 in x 9 in (26.7 cm x 22.9 cm) after a light pressing with your hands.
Border
No separate border is added. The Round 8 edge of each motif is the finished edge, as in the photo, so the border depth is 0 in (0 cm).
Edge gauge: Each motif’s long side carries 68 sc over 4.5 in (11.4 cm), about 15 sc per inch (6 sc per cm) along its curved edge.
Edge counts:
– Each long outer edge of the runner: 8 motifs x 68 sc = 544 sc. Each motif also adds 16 ch-3 loops and 4 picots, and its 1 side loop stays free.
– Each short end: 3 motifs, each with a free tip loop for a tassel.
Why the math works: Each motif already has its finished per-side count, and no stitches are added at the joins. So the edge counts are simply the motif count multiplied by the per-motif count. Because every motif has the same edge, the runner lies straight with no ruffling.
Tassels (make 6):
1. Wrap white 40 times around the 4.5 in (11.4 cm) card.
2. Slide a 10 in (25.4 cm) tie strand under the wraps at the top and knot it tightly.
3. Cut the wraps at the bottom.
4. Wrap a separate strand 8 times around the bundle, 0.75 in (1.9 cm) below the top, to form the neck. Knot it and hide the ends inside.
5. Trim to 4 in (10.2 cm).
6. Use the tie strand to attach one tassel through the free tip loop at each end of each column.
Final Blocking
- Weave in all ends along the Round 5 or Round 8 sc, not through the open chains.
- Soak the runner in cool water for 10 minutes and gently squeeze it out. Don’t wring it.
- Roll it in a towel to remove the extra water.
- Lay it on blocking mats and pin the outer corners of the layout to 10.5 in x 36 in (26.7 cm x 91.4 cm).
- Pin every tip loop and side loop, then pin the centre of each fan.
- Spray lightly and let it dry completely, usually 12–24 hours.
- Unpin, comb the tassels straight, and trim them even if needed.
Final Quality-Control Checklist
- [ ] 24 motifs, each with 136 sc in Round 8
- [ ] Every motif has its top tip pointing the same direction
- [ ] 21 tip joins and 16 side joins, none twisted
- [ ] Runner measures 10.5 in x 36 in (26.7 cm x 91.4 cm), ±0.5 in (1.3 cm)
- [ ] All fans lie open, with no curled ch-3 loops
- [ ] 6 tassels, each 4 in (10.2 cm), firmly attached
- [ ] All ends woven in and invisible from both sides
Troubleshooting
Motif cups like a bowl: The Round 4 or Round 6 chains are too tight. Loosen your chains or use a hook 0.25 mm larger just for the chain rounds.
Motif ruffles: Your dc fans or petals are too loose. Tighten your tension, or check that you didn’t work extra stitches.
Motif looks round instead of oval: Check that you used tr at the tips and sc at the sides in Round 7. Swapping them flattens the shape.
Fans don’t line up between rows: A motif was joined with loop 1 not at the top. Undo Round 8 and rejoin it the right way.
Columns sag apart: The side joins are loose. Redo them with ch 1 instead of ch 2 on each side of the sl st.
Tassel splays open: Wrap the neck more firmly, and steam it lightly.
Care
Hand wash in cool water with a mild detergent and dry flat, pinning it back into shape if needed. Press with a warm iron through a cloth, without flattening the petals.
Final Notes
The measurement chain is simple:
– The flower measures 1.75 in (4.4 cm) after Round 3.
– The circle measures 2.5 in (6.4 cm) after Round 5.
– The blocked motif measures 3.5 in x 4.5 in (8.9 cm x 11.4 cm).
– Three motifs across give 10.5 in (26.7 cm) of width.
– Eight motifs down give 36 in (91.4 cm) of length.
– The 4 in (10.2 cm) tassels at each end bring the total length to 44 in (111.8 cm).
If you get the first motif right, the rest of the runner will come out the right size.
Happy crocheting!