

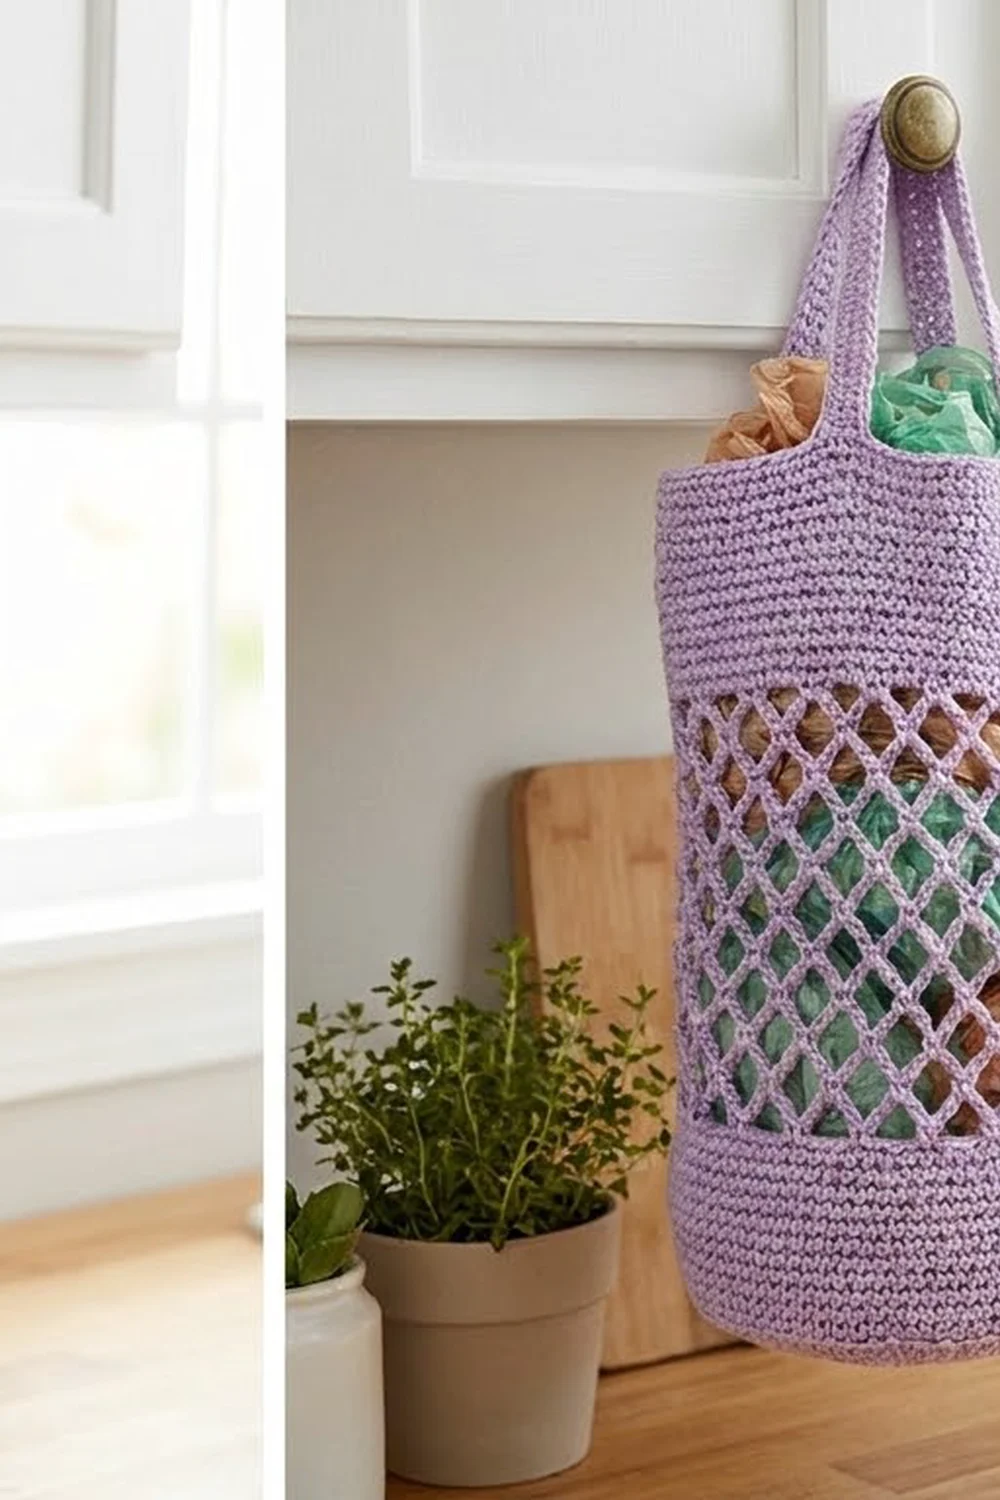
Plastic grocery bags tend to pile up in a drawer or under the sink. This holder gives them a tidy home on a cabinet knob and looks good while it does it. You stuff bags in through the open top and pull them out one at a time through the narrowed bottom.
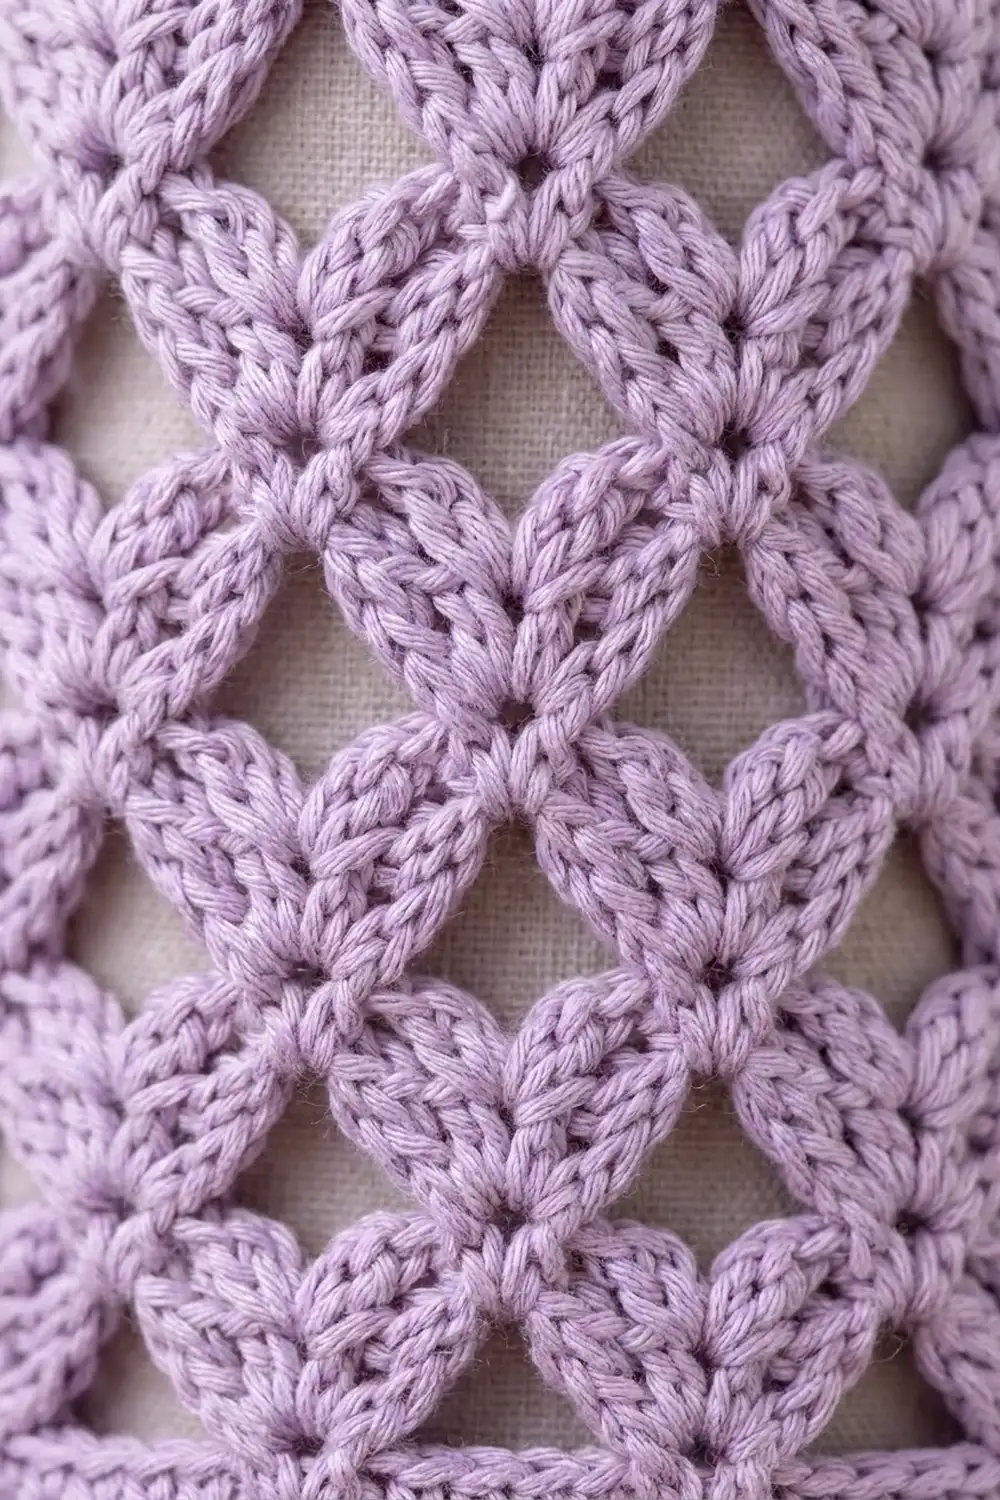
The Lavender Lattice holder is worked in a soft lavender cotton. It has a solid single crochet band at the top and bottom, and a lace middle made of offset fans that form a lattice of X-shaped petals. The open lace lets you see the colorful bags inside, while the solid bands keep the holder sturdy. A light gray version looks just as good if lavender doesn’t suit your kitchen.
This pattern uses US crochet terms. The finished holder is about 6 in (15.2 cm) wide when flat, 12 in (30.5 cm) around, and 17 in (43.2 cm) tall, not counting the hanging strap.
You make it as one flat rectangle: a sc band, the fan lace, and a second sc band. Then you seam it into a tube, work decrease rounds at the bottom, work a firm rim at the top, and add a cord strap.
Finished Size and Construction
- Finished size: 6 in (15.2 cm) flat width × 17 in (43.2 cm) tall; 12 in (30.5 cm) circumference
- Strap: rises about 3 in (7.6 cm) above the rim
- Skill level: Easy-Intermediate
- Terminology: US
- Yarn weight: Worsted (#4), cotton or cotton blend
- Hook: 5.0 mm (H-8)
- Number of pieces: 1 (plus the strap, which is worked straight onto the rim)
- Layout: one rectangle, seamed vertically into a tube
- Flat panel size before seaming: 12.25 in (31.1 cm) wide × 16 in (40.6 cm) tall
- Size before edging: 16 in (40.6 cm) tall tube
- Edging depth: bottom 0.6 in (1.5 cm), top 0.4 in (1.0 cm)
Materials
Yarn: Use a smooth worsted-weight cotton or cotton blend. Cotton holds its shape, doesn’t stretch much under the weight of the bags, and makes the fan stitches stand out clearly. Avoid fuzzy or very stretchy acrylics, because they blur the lattice and let the tube sag.
- Lavender (main color): 175 g, about 300 m (328 yd)
- Optional gray colorway: use the same 175 g, about 300 m (328 yd), in place of the lavender
These quantities include a margin of roughly 20% for your gauge swatch and small tension differences.
Tools:
– 5.0 mm (H-8) crochet hook
– Tapestry needle
– 2 locking stitch markers
– Measuring tape
– Scissors
– Blocking pins and a spray bottle
Abbreviations (US Terms)
- ch – chain
- sl st – slip stitch
- sc – single crochet
- hdc – half double crochet
- dc – double crochet
- sc2tog – single crochet 2 together
- st(s) – stitch(es)
- sp – space
- RS / WS – right side / wrong side
Special stitch – Fan: (2 dc, ch 1, 2 dc) all worked into the same stitch. A fan counts as 5 stitches: 4 dc plus the ch-1 space. Its “center” is the ch-1 space.
Half fan: 3 dc in one stitch. At the start of a row, the ch-3 counts as the first of these 3 dc.
Gauge and Checkpoints
Single crochet gauge: 16 sc and 20 rows = 4 in (10.2 cm).
Lace gauge: 2 fan repeats (12 sts) = 3 in (7.6 cm) wide; 4 lace rows = 2.5 in (6.4 cm) tall.
Both gauges give 4 sts per inch, so the bands and the lace come out the same width. That is why the panel’s edges stay straight.
Test first: Ch 26 and work 10 rows of sc on 25 sts. Then work 4 lace rows on the same 25 sts (2 fan repeats + 1). The sc part should measure 6.25 in (15.9 cm) wide.
Checkpoints:
– After Row 15 (bottom band): 12.25 in (31.1 cm) wide, 3 in (7.6 cm) tall
– After Row 31 (end of lace): 13 in (33.0 cm) tall from the foundation
– After Row 46 (finished panel): 16 in (40.6 cm) tall
– After the edging rounds: tube 17 in (43.2 cm) tall, 6 in (15.2 cm) flat
If your work is too big, go down 0.5 mm in hook size. If it is too small, go up 0.5 mm. Don’t add or remove stitches, because the lace only works on a multiple of 6 + 1.
The Panel
The panel is worked flat in turned rows. Every row has 49 sts, which is 8 fan repeats (6 sts each) plus 1.
Bottom Band
Foundation: Ch 50.
Row 1 (RS): Sc in 2nd ch from hook and in each ch across, turn. (49 sts)
Rows 2–15: Ch 1 (does not count as a st), sc in each st across, turn. (49 sts)
The band should measure 3 in (7.6 cm). Place a marker on the RS.
Lattice Lace
Row 16 (Lace Row A): Ch 1, sc in first st, skip 2 sts, Fan in next st, skip 2 sts, sc in next st; repeat from * 7 more times, turn. (49 sts: 8 Fans of 5 + 9 sc)
Row 17 (Lace Row B): Ch 3 (counts as dc), 2 dc in first sc (half fan made). Sc in ch-1 sp of next Fan, Fan in next sc; repeat from * 6 more times. Sc in ch-1 sp of last Fan, 3 dc in last sc, turn. (49 sts: 3 + 42 + 1 + 3)
This row puts the new fans upside-down relative to the fans below and offset by half a repeat. Each new fan grows out of the sc dip between two old fans. That stacking is what forms the X-shaped petal diamonds.
Row 18 (Lace Row C): Ch 1, sc in first dc. Fan in next sc, sc in ch-1 sp of next Fan; repeat from * 6 more times. Fan in last sc, sc in top of turning ch-3, turn. (49 sts: 1 + 42 + 6)
Row C lines up with Row A, giving you 8 full fans again.
Rows 19–30: Repeat Rows 17–18 six more times.
Row 31: Repeat Row 17 once more. (49 sts)
That makes 16 lace rows in total (Rows 16–31), measuring 10 in (25.4 cm). The panel is now 13 in (33.0 cm) tall.
Top Band
Row 32 (Leveling Row): Ch 1. Work 1 st into each st across: sc in each dc and in each ch-1 sp, and dc in each sc dip. Sc in the top of the turning ch-3, turn. (49 sts: 49 worked 1-per-stitch + 0 added)
The dc in each dip brings the low points up level with the fan tops, so the top band starts straight.
Rows 33–46: Ch 1, sc in each st across, turn. (49 sts)
The top band (Rows 32–46) is 15 rows, or 3 in (7.6 cm). The full panel measures 12.25 in (31.1 cm) × 16 in (40.6 cm). Don’t fasten off. You will use the working yarn to seam.
Seam
Fold the panel RS together so the two side edges meet. Sl st through the row ends of both edges from top to bottom, working 1 sl st per sc row and 2 sl sts per lace row. Keep the sl sts loose so the seam stretches as much as the fabric does. Fasten off and turn the tube RS out.
The seam takes up about 0.25 in (0.6 cm), so the tube measures 12 in (30.5 cm) around and lies 6 in (15.2 cm) flat. Keep the seam at the center back.
Border (Top and Bottom Edging)
The edging is worked in joined rounds. It uses the same gauge as the bands: 4 sc per inch.
Bottom Edging
Join the yarn at the seam into the free loops of the foundation chain. This edge has 49 loops, and the first and last loops sit side by side at the seam.
Rnd 1: Ch 1, sc2tog over the 2 loops at the seam, then sc in each of the remaining 47 loops. Sl st to the first st. (48 sts: 47 worked 1-per-stitch + 1 sc2tog)
Rnd 2: Ch 1, sc in next 4 sts, sc2tog; repeat around, sl st to join. (40 sts)
Rnd 3: Ch 1, sc in next 3 sts, sc2tog; repeat around, sl st to join. (32 sts)
Rnd 4: Sl st in each st around. (32 sts) Fasten off.
Why the math works: Each decrease round takes out 8 sts (one per fan repeat), evenly spaced. The opening shrinks from 12 in (30.5 cm) to 8 in (20.3 cm) around. That is loose enough to pull a bag out, but tight enough to hold the rest in. The 4 rounds add 0.6 in (1.5 cm) of height.
Top Edging
Join the yarn at the seam in the last row of the panel (Row 46, 49 sts).
Rnd 1: Ch 1, sc2tog over the 2 sts at the seam, sc in each of the remaining 47 sts, sl st to join. (48 sts: 47 + 1 sc2tog)
Rnd 2: Ch 1, sc in each st around, sl st to join. (48 sts)
Rnd 3: Sl st in each st around. (48 sts) Don’t fasten off.
These rounds add 0.4 in (1.0 cm). The finished tube now measures 17 in (43.2 cm) tall.
Hanging Strap
Lay the tube flat with the seam at the center back. Count the Rnd 2 stitches of the top edging, with the first st right after the seam as st 1. The side folds fall at st 12 and st 36, which are 24 sts apart, or exactly half of 48.
Row 1: With the working yarn, sl st across to st 12. Ch 40, then sl st into st 36 and into st 37, and turn.
Row 2: Sc in each of the 40 ch. Sl st into st 13 and fasten off. (40 sc)
The strap is 10 in (25.4 cm) long. Its ends sit 6 in (15.2 cm) apart, so it arcs about 3 in (7.6 cm) above the rim and makes a sturdy loop for a knob or hook.
Final Blocking
- Weave in all ends along the seam and through the solid bands, never through the lace.
- Slip a rolled towel inside the tube so it lies flat at 6 in (15.2 cm) wide.
- Mist it evenly with water until it’s damp, not soaked.
- Gently stretch the lace section lengthwise and pin it to 10 in (25.4 cm) tall, so each fan opens into a clear petal.
- Check that the total height is 17 in (43.2 cm) and both bands lie straight.
- Let it dry completely, then remove the towel and pins.
Final Quality-Control Checklist
- Every panel row has 49 sts.
- The lace has 16 rows, with 8 full fans in each Row A/C row.
- The petal X-shapes line up in straight vertical columns.
- The seam is flat and centered at the back.
- Bottom edging ends at 32 sts, and top edging at 48 sts.
- The strap is centered, with its ends at the two side folds.
- The tube measures 6 in (15.2 cm) × 17 in (43.2 cm).
Troubleshooting
The lace is wider than the bands. Your fans are too loose. Use a hook 0.5 mm smaller for the lace rows only.
The stitch count drifts in the lace. Count by fans. Rows A and C should each have 8 full fans. Row B should have 7 full fans plus a half fan at each end.
The top band starts out wavy. You probably worked sc instead of dc in the dips on Row 32. Rip back and redo the Leveling Row.
Bags fall out of the bottom. Work one more round, (sc in next 2 sts, sc2tog) around, to reach 24 sts.
The strap stretches. Work a row of sl sts along the sc of the strap to stiffen it.
The seam puckers. Your sl sts are too tight. Redo it using 2 sl sts per lace row.
Care
Hand wash or machine wash on a gentle cycle in cool water, then lay the holder flat to dry and reshape it. Cotton can be pressed lightly with a warm iron through a cloth.
Final Notes
Here is the full measurement chain. A gauge of 4 sts per inch turns 49 sts into a 12.25 in (31.1 cm) panel. Three inches (7.6 cm) of sc, 10 in (25.4 cm) of lace and another 3 in (7.6 cm) of sc give a 16 in (40.6 cm) panel. Seaming makes a tube 12 in (30.5 cm) around, and the edging brings it to 17 in (43.2 cm) tall. If you check each stage as you go, the lattice comes out straight and the dispenser hangs neatly. Make one in lavender, another in gray, and give the plastic bags a better home.
Happy crocheting!