

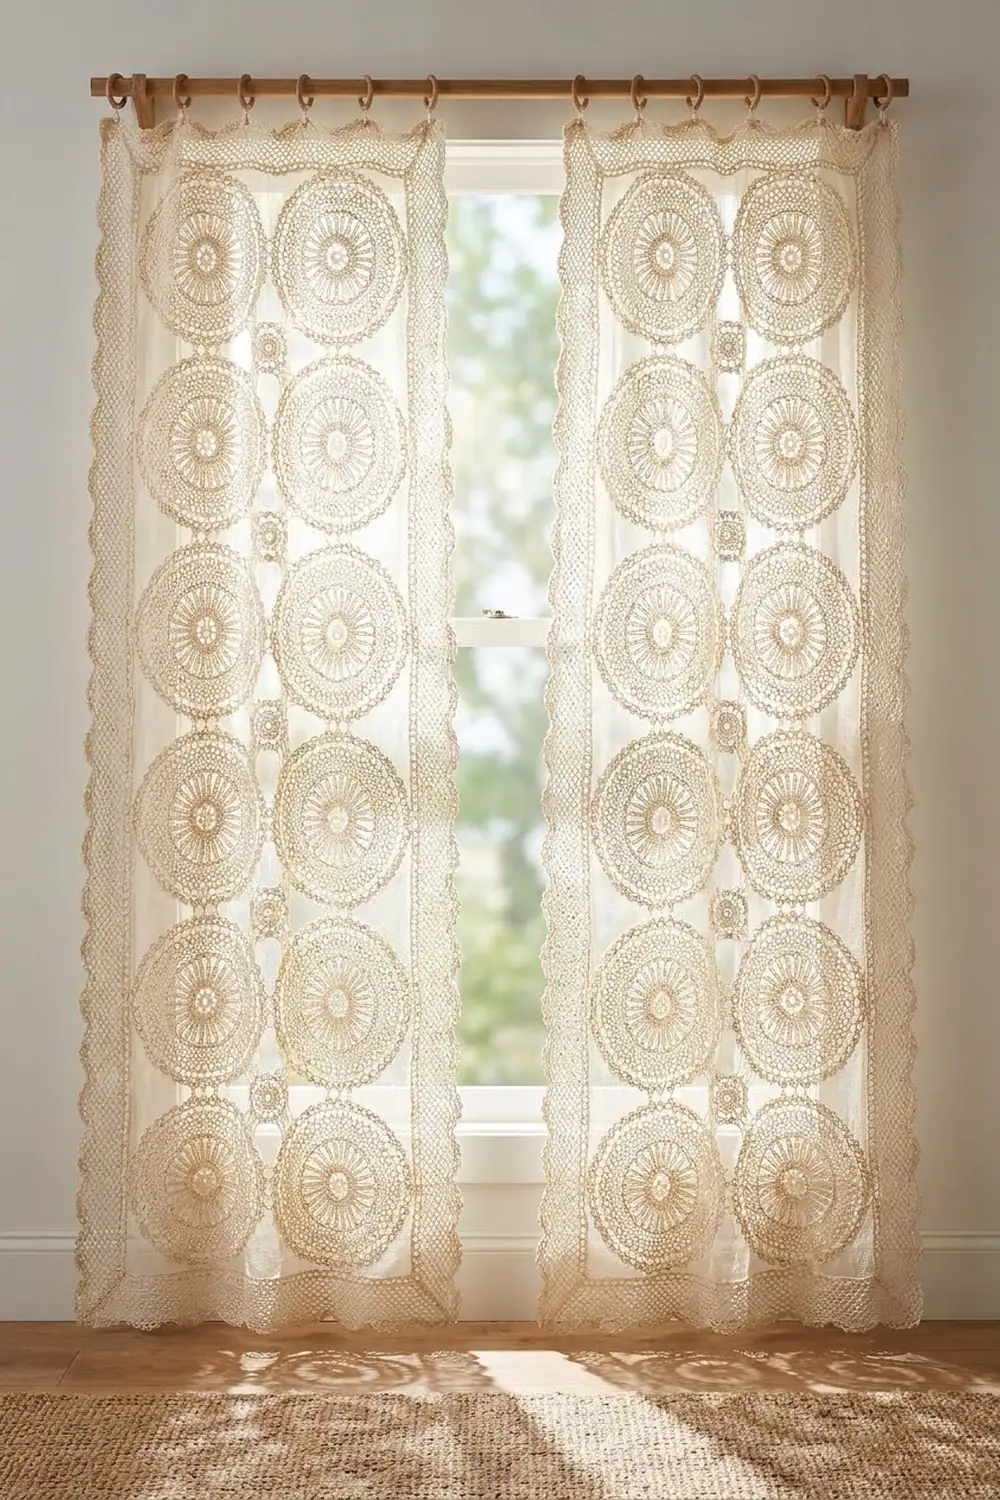
These lace curtain panels are made of stacked mandala medallions. Light comes through the open spokes and chain loops, so the window shows through while the room still gets soft, filtered light. Each panel is a single column of round medallions squared off with chain mesh, and a scalloped border runs all the way around.
The design uses one color only: a warm cream or ivory cotton. This keeps the look calm and bohemian, and the stitch pattern stays the focus. A natural or off-white cotton gives the softest glow in sunlight.
This pattern uses US crochet terms. Each finished panel measures 13 in (33.0 cm) wide by 73 in (185.4 cm) long. The pattern makes two matching panels.
Construction is simple. You crochet 14 medallion blocks in rounds. Each block starts as a circle and is squared off in its last two rounds. You join 7 blocks into a vertical strip for each panel, add a three-round border, and block.
Finished Size and Construction
- Finished panel size: 13 in x 73 in (33.0 cm x 185.4 cm)
- Skill level: Intermediate
- Terminology: US crochet terms
- Yarn weight: DK (light #3) cotton
- Hook: 4.0 mm (US G-6)
- Number of pieces: 14 blocks (7 per panel, 2 panels)
- Layout: 1 block wide x 7 blocks tall per panel
- Block size: 10 in x 10 in (25.4 cm x 25.4 cm)
- Panel size before border: 10 in x 70 in (25.4 cm x 177.8 cm)
- Border depth: 1.5 in (3.8 cm) on every side
Materials
Yarn: Use a smooth mercerized or combed DK cotton. Cotton keeps its shape when it hangs, shows stitch detail clearly, and survives washing. Avoid fuzzy blends, because they blur the lace.
- Cream/ivory: 500 g (about 1,150 m)
This total is for both panels. Each block uses about 25 g (58 m), and each panel’s border uses about 40 g (92 m). The quantity includes a margin of roughly 15 percent for your gauge swatch and any small differences in tension.
Tools:
– 4.0 mm (US G-6) crochet hook
– Tapestry needle
– Stitch markers
– Scissors
– Measuring tape
– Blocking mats and rust-proof pins
– Spray bottle
– 14 curtain clip rings (7 per panel)
Abbreviations (US Terms)
- ch – chain
- sl st – slip stitch
- sc – single crochet
- hdc – half double crochet
- dc – double crochet
- tr – treble crochet
- sk – skip
- sp(s) – space(s)
- st(s) – stitch(es)
- RS / WS – right side / wrong side
Special stitches:
– Scallop: (sc, hdc, 5 dc, hdc, sc) in the same chain loop. The center of the scallop is the 3rd of its 5 dc.
– Shell: 5 dc in the same space.
– Corner shell: 7 dc in the same space.
Gauge and Checkpoints
Gauge: 23 dc = 5 in (12.7 cm) in rows. The tension of your rounds matters more than a flat swatch, so make one complete block first and measure it before you make the rest.
Checkpoints for one block (measure flat, not stretched):
– After Round 1: about 1.5 in (3.8 cm) across
– After Round 3: about 3.5 in (8.9 cm) across
– After Round 4: about 5 in (12.7 cm) across
– After Round 6: about 7.25 in (18.4 cm) across
– After Round 7: about 8.5 in (21.6 cm) across, measured from scallop tip to scallop tip
– After Round 8: about 9.5 in (24.1 cm) square
– After Round 9: 10 in (25.4 cm) square
If your block is too big (more than 10.25 in / 26.0 cm), go down to a 3.75 mm hook. If it is too small (under 9.75 in / 24.8 cm), go up to a 4.5 mm hook. Light blocking can adjust a block by about 0.25 in (0.6 cm), but not more. If a block cups, your loops are too short. If it ruffles, your loops are too long.
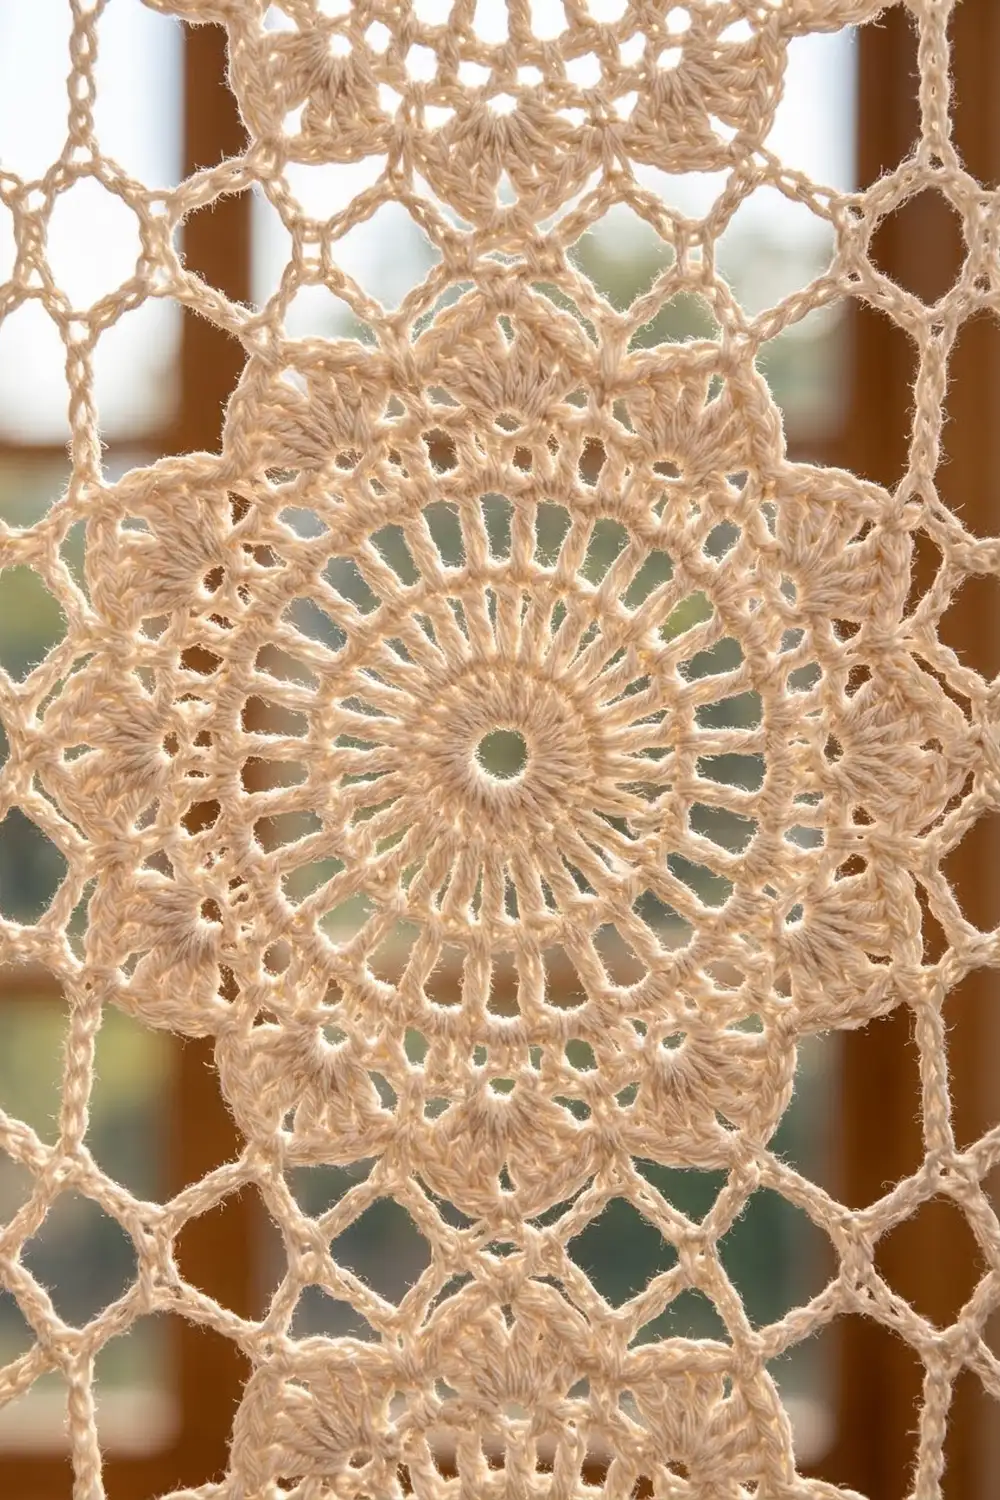
Medallion Block (make 14)
Round 1: Make a magic ring. Ch 3 (counts as dc), then work 23 dc into the ring. Join with a sl st to the top of the ch-3. Pull the ring snug but leave a small open center. (24 dc)
Round 2: Ch 4 (counts as dc + ch 1). Dc in the next dc, ch 1. Repeat from * around. Join with a sl st to the 3rd ch of the ch-4. (24 dc, 24 ch-1 sps)
Round 3: Ch 5 (counts as dc + ch 2). Dc in the next dc, ch 2. Repeat from * around. Join with a sl st to the 3rd ch of the ch-5. This round makes the radiating spokes. (24 dc, 24 ch-2 sps)
Round 4: Sl st into the first ch-2 sp. Ch 3 (counts as dc), then dc in the same sp. Dc in the next dc, 2 dc in the next ch-2 sp. Repeat from * around, ending with dc in the last dc. Join to the top of the ch-3. This makes the solid band. (72 dc: 24 dc worked into the spokes + 48 dc worked into the spaces)
Round 5: Ch 1, sc in the same st. Ch 5, sk 2 dc, sc in the next dc. Repeat from * around, ending with ch 5, sk 2 dc. Join to the first sc. (24 sc, 24 ch-5 loops)
Round 6: Sl st into the first 3 ch of the first loop. Ch 1, sc in the same loop. Ch 5, sc in the next ch-5 loop. Repeat from * around, ending with ch 5. Join to the first sc. (24 ch-5 loops)
Round 7: Sl st into the first loop. Work 1 Scallop in each ch-5 loop around. Join to the first sc. (24 scallops; 216 sts)
Round 8 (squaring round): Sl st across the sc, hdc, and first 2 dc of the first scallop, so you are at its center dc.
– Ch 4 (counts as tr), ch 7, tr in the same st. This is the first corner.
– Ch 7, dc in the center dc of the next scallop.
– Ch 7, sc in the center of the next scallop.
– [Ch 7, sc in the center of the next scallop] twice.
– Ch 7, dc in the center of the next scallop.
– Ch 7, then (tr, ch 7, tr) in the center of the next scallop for the corner.
– Repeat from * to * twice more.
– Ch 7, dc in the next scallop, ch 7, [sc in the next scallop, ch 7] 3 times, dc in the next scallop, ch 7. Join to the top of the ch-4.
The stitches get taller toward each corner (sc, then dc, then tr), which pulls the circle out into a square.
Count: 6 scallops are used per side (1 corner scallop + 5 side scallops), for 24 in total. Each side has 6 ch-7 loops, plus 1 ch-7 corner sp at each corner. (28 loops total)
Round 9: Sl st into the corner ch-7 sp. Ch 3 (counts as dc), then (dc, ch 2, 2 dc) in the same sp. Work 7 dc in each of the next 6 side loops, then (2 dc, ch 2, 2 dc) in the corner sp. Repeat from * twice more. Work 7 dc in each of the last 6 loops and join to the top of the ch-3. Fasten off and weave in the ends.
Count per side: 2 corner dc + 42 dc + 2 corner dc = 46 dc between the corner ch-2 sps.
Total: 4 sides x 46 = 184 dc, plus 4 ch-2 corner sps.
Make All Pieces
Make 14 blocks in cream/ivory: 7 for each panel.
Layout per panel (1 wide x 7 tall):
[ 1 ]  top
[ 2 ]
[ 3 ]
[ 4 ]
[ 5 ]
[ 6 ]
[ 7 ]  bottom
Before you join, lightly mist each block and pin it to a 10 in (25.4 cm) square so all the blocks match.
Joining
Method: Slip stitch join through back loops only.
- Hold Block 1 and Block 2 with WS together and RS facing you. Line up the edges so the corner ch-2 sps match.
- Insert the hook through both corner ch-2 sps and work 1 sl st.
- Work 1 sl st through the back loop of each pair of matching dc. That is 46 sl st, one for each of the 46 dc on each block’s side.
- Finish with 1 sl st through the next pair of corner ch-2 sps. Fasten off.
This joins stitch to stitch, so the seam adds no length and the corners stay aligned.
Repeat this to join Block 3 to Block 2, and so on down to Block 7. Each panel has 6 seams.
Tension: Keep your sl sts as tall as a loose chain. If the seam is tighter than the blocks, the panel will pucker when it hangs. If yours run tight, go up one hook size for joining.
Checkpoint: Each joined strip should measure 10 in x 70 in (25.4 cm x 177.8 cm). If it is shorter, the seams are too tight.
Border
Border gauge: The border adds 1.5 in (3.8 cm) per side: about 0.25 in (0.6 cm) for Round 1, 0.5 in (1.3 cm) for Round 2, and 0.75 in (1.9 cm) for Round 3.
Starting counts:
– Short sides (top and bottom): 1 block x 46 dc = 46 dc
– Long sides: 7 blocks x 46 dc = 322 dc
Along the long sides, you will reach the corner ch-2 sps of the blocks at each seam. Skip them and do not work into them. Work only into the dc, so no stitches are added at the seams.
Round 1: With RS facing, join the yarn in any outer corner ch-2 sp. Ch 1, then (sc, ch 2, sc) in the same sp. Sc in each dc along the side. Work (sc, ch 2, sc) in each of the other outer corners. Join to the first sc.
– Short sides: 46 + 2 corner sc = 48 sc
– Long sides: 322 + 2 corner sc = 324 sc
– Total: 744 sc, plus 4 corner ch-2 sps
Round 2 (mesh): Sl st into the corner ch-2 sp. Ch 6 (counts as dc + ch 3), then dc in the same sp.
– Along each side: ch 1, sk 1 sc, dc in the next sc. Repeat from * across.
– End each side with ch 1, sk the last sc, then work (dc, ch 3, dc) in the corner sp.
– At the last corner, finish the corner by working dc in the starting sp, then join to the 3rd ch of the ch-6.
The counts work out like this:
– Short sides: 24 dc between corners + 2 corner dc = 26 dc, with 25 ch-1 sps
– Long sides: 162 dc between corners + 2 corner dc = 164 dc, with 163 ch-1 sps
Round 3 (scallop edge): Sl st into the corner ch-3 sp. Ch 3 (counts as dc), then 6 dc in the same sp, for the first Corner Shell. Along each side: sc in the next ch-1 sp, Shell in the next ch-1 sp. Repeat from * until 1 ch-1 sp remains, then sc in that last sp. Work a Corner Shell in each corner sp. Join to the top of the ch-3. Fasten off and weave in the ends.
– Short sides: 13 sc + 12 Shells
– Long sides: 82 sc + 81 Shells
– Corners: 4 Corner Shells
Why the math works: Each block side has an even count (46). Adding 2 corner sc in Round 1 keeps it even (48 and 324). Working dc into every other sc then gives an odd number of ch-1 sps per side (25 and 163). An odd count lets Round 3 alternate sc and Shell so that every side begins and ends with an sc. That means each Corner Shell sits between two sc, and the scallops stay symmetrical on all four sides.
Final Blocking
- Weave in all the remaining ends along the dc rows, not through the open loops.
- Soak each panel in cool water for 15 minutes. Gently press the water out. Do not wring.
- Roll the panel in a towel to remove the extra moisture.
- Lay it flat on blocking mats and shape it to 13 in x 73 in (33.0 cm x 185.4 cm).
- Pin each block’s corners first, then the center of each scallop on Round 7 so the medallions are round.
- Pin each border Shell into a smooth curve.
- Let it dry completely, which takes 24–48 hours. Unpin it.
- Clip 7 curtain rings through the top border mesh. Space them evenly, about 2 in (5.1 cm) apart, starting at the corners.
Final Quality-Control Checklist
- All 14 blocks measure 10 in (25.4 cm) square within 0.25 in (0.6 cm).
- Every block has 46 dc per side and 184 dc in total.
- Each panel has 6 seams with 46 sl st each, plus the corner sl sts.
- Seams lie flat and do not pucker when the panel hangs.
- Border Round 1 has 48 sc on each short side and 324 sc on each long side.
- The scallop edge starts and ends with an sc on every side.
- Both panels measure 13 in x 73 in (33.0 cm x 185.4 cm).
- All the medallion centers line up vertically.
Troubleshooting
- The center hole is too big: Pull the magic ring tighter before you join Round 1, then secure the tail firmly.
- The block cups after Round 5 or 6: Your chains are tight. Chain more loosely, or work the ch-5 loops as ch-6.
- The block ruffles after Round 7: Your loops are too long. Make the chains tighter or use a smaller hook.
- The corners are rounded instead of square: Check that you used tr at the corners and dc next to them in Round 8.
- The panel is shorter than 70 in (177.8 cm) before the border: The joining sl sts are tight. Rejoin with a larger hook.
- The border waves: Check that you skipped the seam corner sps and did not work extra sc into them.
- The shells are uneven at the corners: Count the ch-1 sps on each side. It must be an odd number.
Care
Hand wash in cool water with a mild detergent, then lay flat to dry and reshape. Avoid direct heat, because it can shrink cotton and distort the lace.
Final Notes
The measurement chain is easy to follow. One block is 10 in (25.4 cm) with 46 dc per side. Seven blocks make a 10 in x 70 in (25.4 cm x 177.8 cm) strip. The 1.5 in (3.8 cm) border brings each panel to 13 in x 73 in (33.0 cm x 185.4 cm). If your first block hits the 10 in mark, every other number will follow. Take your time with the squaring round, keep your joins relaxed, and enjoy watching the light come through.
Happy crocheting!