

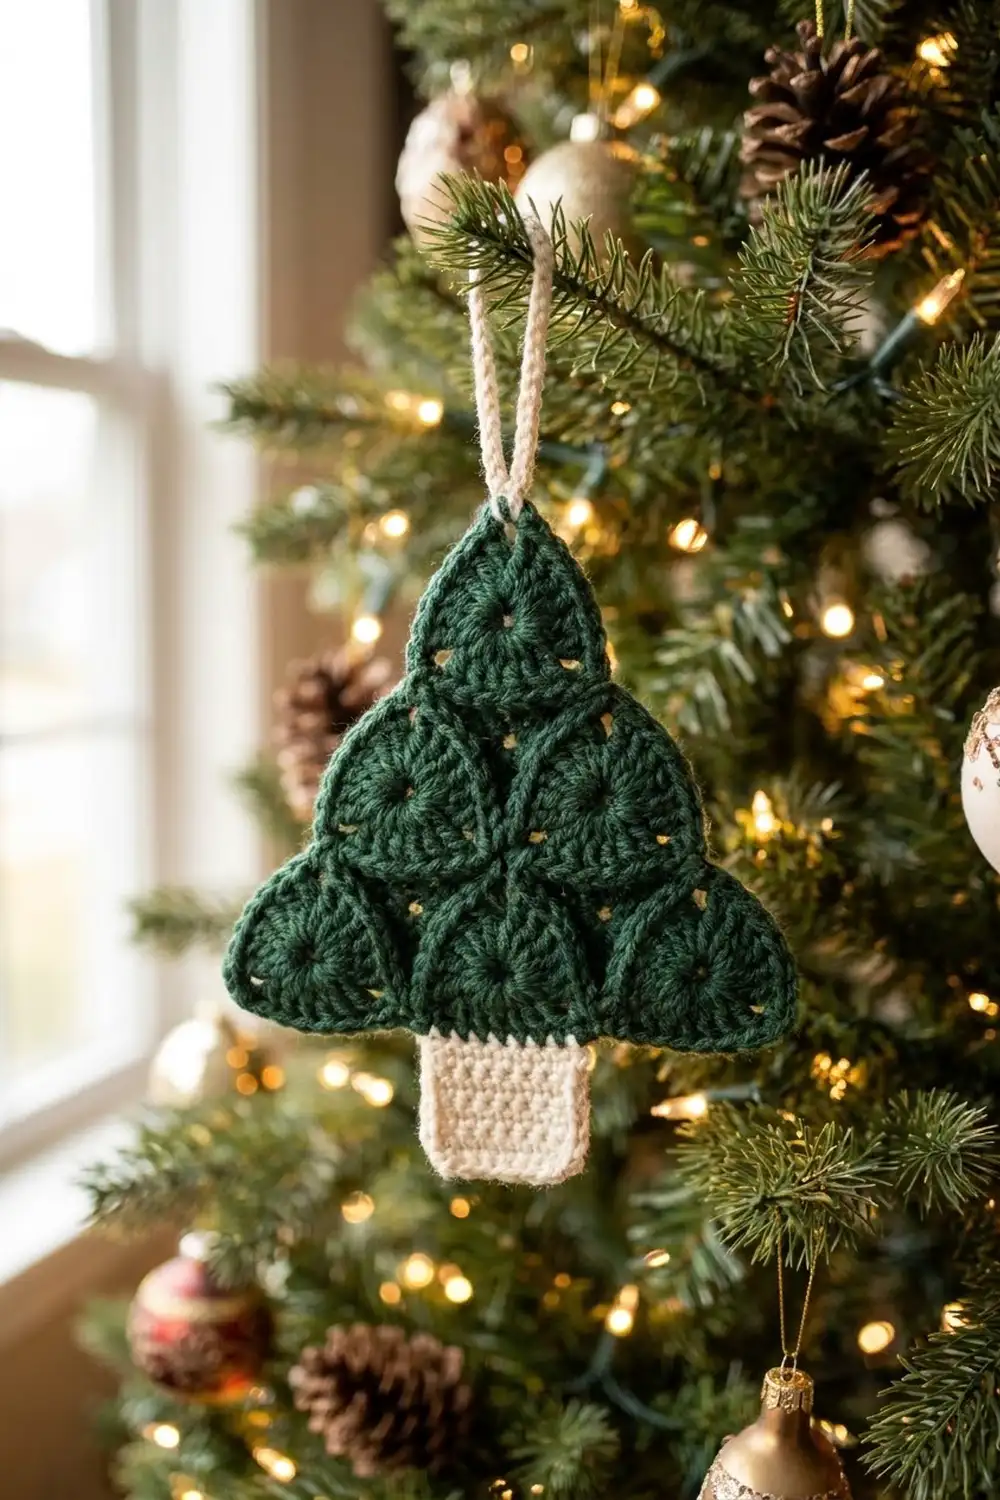
This little tree ornament is made from six fan-filled triangles in deep forest green, stacked one, two, three into a neat pyramid. Each triangle holds a spray of long stitches that open upward like a leaf, and a crisp single crochet frame sharpens every edge. A cream trunk and a cream corded hanger finish it in classic holiday colors.
The style is simple and graphic. The small open gaps between the triangles let tree lights shine through, so it looks lovely hanging on a real branch.
This pattern uses US crochet terms. The finished tree is about 4.25 in (10.8 cm) wide at the base and 3.75 in (9.5 cm) tall. With the trunk, the ornament measures about 4.85 in (12.3 cm) from tip to trunk bottom, not counting the hanger.
Construction is join-as-you-go. You make the first triangle, then join each new triangle to its neighbors at the corners as you finish its last round. One green border round outlines the tree, the trunk is worked straight down from the border, and the hanger is attached last.
Finished Size and Construction
- Finished size: 4.25 in (10.8 cm) base width x 3.75 in (9.5 cm) tree height; 4.85 in (12.3 cm) total height including trunk
- Skill level: Easy–Intermediate
- Terminology: US
- Yarn weight: DK (#3)
- Hook: 3.5 mm (E-4)
- Number of pieces: 6 triangle motifs, plus a trunk and hanger worked on
- Layout: 1-2-3 pyramid of point-up triangles
- Piece size: each motif side 1.25 in (3.2 cm), height about 1.1 in (2.8 cm)
- Size before border: each tree side 3.75 in (9.5 cm), height about 3.25 in (8.3 cm)
- Border depth: 1 round of sc, about 0.2 in (0.5 cm)
Materials
Choose a smooth DK yarn with good stitch definition, about 230 m per 100 g. Cotton or a cotton blend gives the sharpest fans. Soft acrylic works too but will look slightly puffier.
- Forest green (main color): 12 g, about 28 m
- Cream (trunk and hanger): 4 g, about 9 m
Both quantities include a margin for your gauge swatch and weaving in ends.
Tools:
– 3.5 mm (E-4) crochet hook
– Tapestry needle
– Scissors
– Stitch markers
– Rust-proof pins and a blocking mat or foam board
– Spray bottle with water
Abbreviations (US Terms)
- ch – chain
- sl st – slip stitch
- sc – single crochet
- hdc – half double crochet
- dc – double crochet
- tr – treble crochet
- sp – space
- st(s) – stitch(es)
- RS – right side
- BL / BR – bottom-left / bottom-right corner
Special technique – Joined corner: When the pattern says to join a corner, work the first corner stitch, ch 1, sl st into the named ch-2 sp of the finished neighbor motif, ch 1, then work the second corner stitch. This replaces the ch 2 of that corner and does not change the stitch count.
Standing sc: With a slip knot on the hook, insert the hook into the stitch or space, yarn over, pull up a loop, yarn over and pull through both loops.
Gauge and Checkpoints
Gauge: 22 sc and 26 rows = 4 in (10.2 cm) in sc rows with a 3.5 mm hook.
Make one full motif and measure it before you make more. A single motif tells you more than a swatch because it uses the tall fan stitches.
Checkpoints:
– After Round 1, the fan measures about 1.1 in (2.8 cm) straight across the flat base.
– After Round 2, each motif side measures 1.25 in (3.2 cm) from corner tip to corner tip.
– After joining, each tree side measures 3.75 in (9.5 cm).
– After the border, the base measures 4.25 in (10.8 cm).
If your motif is too big: go down to a 3.25 mm hook, or tighten the tr stitches by not pulling up extra-long loops.
If your motif is too small: go up to a 3.75 mm hook.
A difference of 0.125 in (0.3 cm) per motif side grows to about 0.4 in (1 cm) across the tree, so adjust now.

Triangle Motif (make 6)
Use forest green. The fan is worked into a magic ring as a half circle. The framing round then turns the half circle into a triangle: the curved edge becomes the two slanted sides, and the flat edge becomes the base.
Round 1 (fan): Make a magic ring. Ch 4 (counts as first tr), 8 tr in ring. Do not join. Pull the ring tight. (9 tr)
The 9 tr form a half circle. The beginning ch-4 and the last tr lie flat along the base, and the 5th tr points straight up. Number the stitches tr 1 (the ch-4) through tr 9 (the last tr).
Round 2 (frame): Do not turn. You now work along the flat base first, then up and around the fan.
- Ch 1, sc in top of tr 9. (BL corner stitch, base side)
- Base: 2 sc around the post of tr 9, 1 sc in the ring center, 2 sc around the post of the beginning ch-4. (5 sc)
- BR corner: (sc, ch 2, sc) in top of tr 1.
- Right side: 2 sc in tr 2, hdc in tr 3, 2 dc in tr 4. (5 sts)
- Apex: (tr, ch 2, tr) in tr 5.
- Left side: 2 dc in tr 6, hdc in tr 7, 2 sc in tr 8. (5 sts)
- BL corner: sc in tr 9 (the same st as the first sc), ch 2, sl st to first sc.
Count after Round 2: 21 sts and 3 ch-2 corner sps.
Each side has exactly 7 sts, including its 2 corner sts:
– Base: corner sc + 5 sc + corner sc = 7
– Right side: corner sc + 2 sc + hdc + 2 dc + corner tr = 7
– Left side: corner tr + 2 dc + hdc + 2 sc + corner sc = 7
The stitches step up from sc to tr, so each slanted side climbs evenly to a sharp tip. Fasten off the first motif and weave in the ends. For the other five motifs, work Round 2 with joined corners as shown below.
Make All Pieces
- Forest green: 6 triangle motifs
- Cream: none as separate pieces. The trunk and hanger are worked or attached after the border.
Layout grid (all motifs point up):
        [A]
      [B] [C]
    [D] [E] [F]
Motif A is the tip. B and C form the middle row. D, E, and F form the base row.
Joining
Use join-as-you-go at the corners only. The motifs never share a side, which leaves the three small inverted-triangle gaps that are part of the design.
Make A in full. For each later motif, work Rounds 1 and 2 as written, but replace the ch 2 at the listed corners with a joined corner:
- B: apex joins A’s BL ch-2 sp.
- C: apex joins A’s BR ch-2 sp; BL corner (the closing corner) joins B’s BR ch-2 sp.
- D: apex joins B’s BL ch-2 sp.
- E: apex joins B’s BR ch-2 sp (the same sp that C is already joined to); BL corner joins D’s BR ch-2 sp.
- F: apex joins C’s BR ch-2 sp; BL corner joins E’s BR ch-2 sp.
Stitch-to-stitch logic: Each joined corner adds no stitches. Each motif still has 7 sts per side. The joins are only chains and sl sts, so the border can count each motif’s sides cleanly.
Tension: Keep the ch 1 on either side of each joining sl st relaxed. If the joining chains are too tight, the tree cups. If they are too loose, the gaps stretch open.
Size checkpoint: Lay the joined tree flat. Each side should measure 3.75 in (9.5 cm) = 3 motifs x 1.25 in (3.2 cm). The height should be about 3.25 in (8.3 cm).
Border
Use forest green, RS facing. The border is worked counterclockwise around the outer edge only. Do not work into the inner gaps.
Border gauge: 1 sc into each motif stitch, the same 7 sts per motif side as Round 2.
Border Round: Join with a standing sc in F’s BR ch-2 sp, ch 2, sc in the same sp. (Tree BR corner.)
- Right side: sc in each of the 7 sts of F’s right side; skip the joined corner chains; sc in each of the 7 sts of C’s right side; skip the join; sc in each of the 7 sts of A’s right side. (21 sc)
- Tip corner: (sc, ch 2, sc) in A’s apex ch-2 sp.
- Left side: sc in each of the 7 sts of A’s left side, B’s left side, and D’s left side, skipping the joins. (21 sc)
- BL corner: (sc, ch 2, sc) in D’s BL ch-2 sp.
- Base: sc in each of the 7 sts of D’s base, E’s base, and F’s base, skipping the joins. (21 sc)
- Sl st to the first sc.
Counts per side:
– Starting count for each side: 3 motifs x 7 sts = 21 sts, worked 1 sc per existing st
– Each side with its corners: 21 sc + 2 corner sc = 23 sc
– Round total: 63 sc worked 1 per st + 6 corner sc added = 69 sc, plus 3 ch-2 corner sps
Why the math works: Each tree side is made of exactly three motif sides of 7 sts. Joins add only chains, which are skipped, so nothing extra builds up at the seams. The only added stitches are the 2 sc at each of the 3 tree corners, so every side ends with the same count and the triangle stays even. Fasten off.
Trunk
Use cream. On the base side, count from either tree corner, with the corner sc as st 1. Sts 2–8 sit on D, 9–15 on E, and 16–22 on F. The trunk uses sts 10–14, the 5 center stitches of E. Because 23 is odd, sts 10–14 are centered from either end.
Row 1: With RS facing and the tree upside down, join cream with a standing sc in st 10, sc in each of the next 4 sts. (5 sc)
Rows 2–7: Ch 1, turn, sc in each st across. (5 sc)
Fasten off. The trunk measures about 0.9 in (2.3 cm) wide x 1.1 in (2.8 cm) tall.
Hanger
Use cream. Ch 31. Sl st in the back bump of the 2nd ch from hook and in each ch across. (30 sl st)
The sl st cord measures about 5 in (12.7 cm). Fold it in half and sew both ends securely to the back of the tip corner. This makes a 2.5 in (6.4 cm) loop.
Final Blocking
- Weave in all ends along the back of the frames, not through the fans.
- Mist the ornament lightly until it is damp but not wet.
- Draw a triangle with a 4.25 in (10.8 cm) base and 3.75 in (9.5 cm) height on paper, and place it under the ornament.
- Pin the three tree corners first, then pin each side straight between them.
- Gently open each inner gap into a small, even triangle.
- Pin the trunk square to 0.9 x 1.1 in (2.3 x 2.8 cm).
- Let it dry completely before you unpin it.
Final Quality-Control Checklist
- Each motif has 21 sts and 3 corners, with 7 sts per side.
- All seven corner joins are secure, and the three inner gaps are even.
- The border has 69 sc, with 23 sc per side including corners.
- The trunk is centered on sts 10–14 of the base.
- The base is 4.25 in (10.8 cm) wide, and the tree is 3.75 in (9.5 cm) tall.
- The hanger loop is 2.5 in (6.4 cm) and firmly attached.
- No ends show on the front.
Troubleshooting
The fan ruffles: Your tr are too loose. Go down a hook size, or work Round 1 with 7 tr and repeat the check. If you do this, rework the side increases so each side still has 7 sts.
The tip is rounded: Make sure the apex is (tr, ch 2, tr) and that the tr are worked fully.
The tree cups: The joining chains are too tight. Loosen the ch 1 on each side of the joins.
The border waves: You worked into the joined chains. Skip them.
The trunk is off-center: Recount the base from the corner sc.
Care
Hand wash in cool water, press out the water in a towel, and dry flat, reshaping as you go. Store the ornament flat so the tip stays crisp.
Final Notes
The measurement chain is short and reliable:
– Fan base: 1.1 in (2.8 cm)
– Motif side: 1.25 in (3.2 cm)
– Joined tree side: 3.75 in (9.5 cm)
– Bordered base: 4.25 in (10.8 cm)
– Total height with trunk: 4.85 in (12.3 cm)
Check each link as you go, and every tree will match. Make a whole set for your branches or tie one onto a gift.
Happy crocheting!