

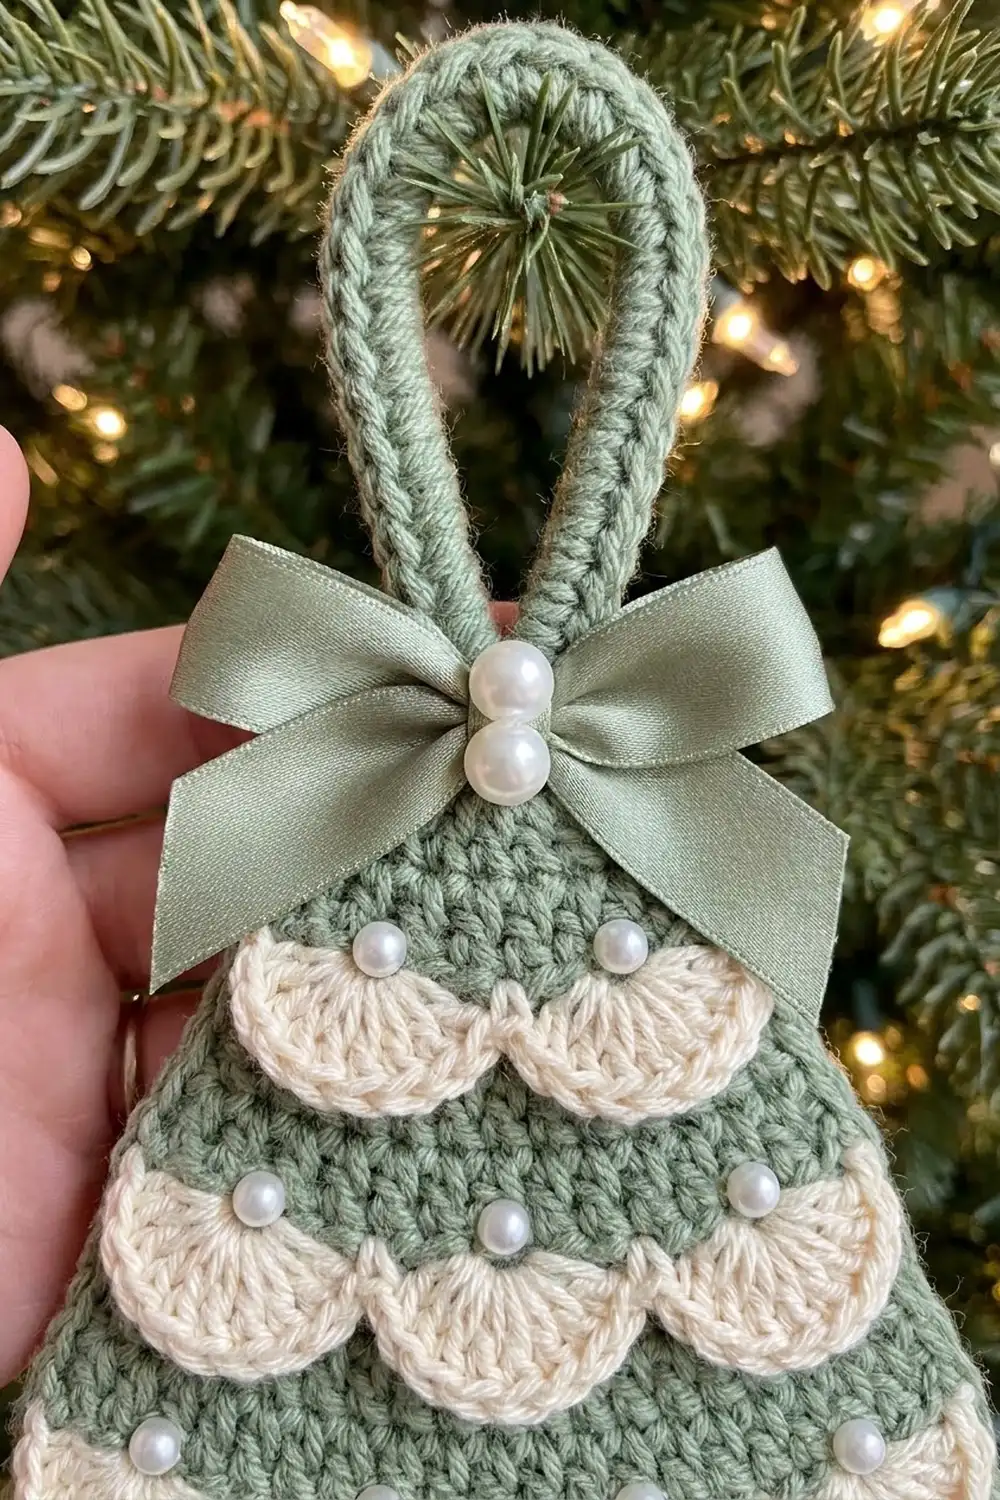
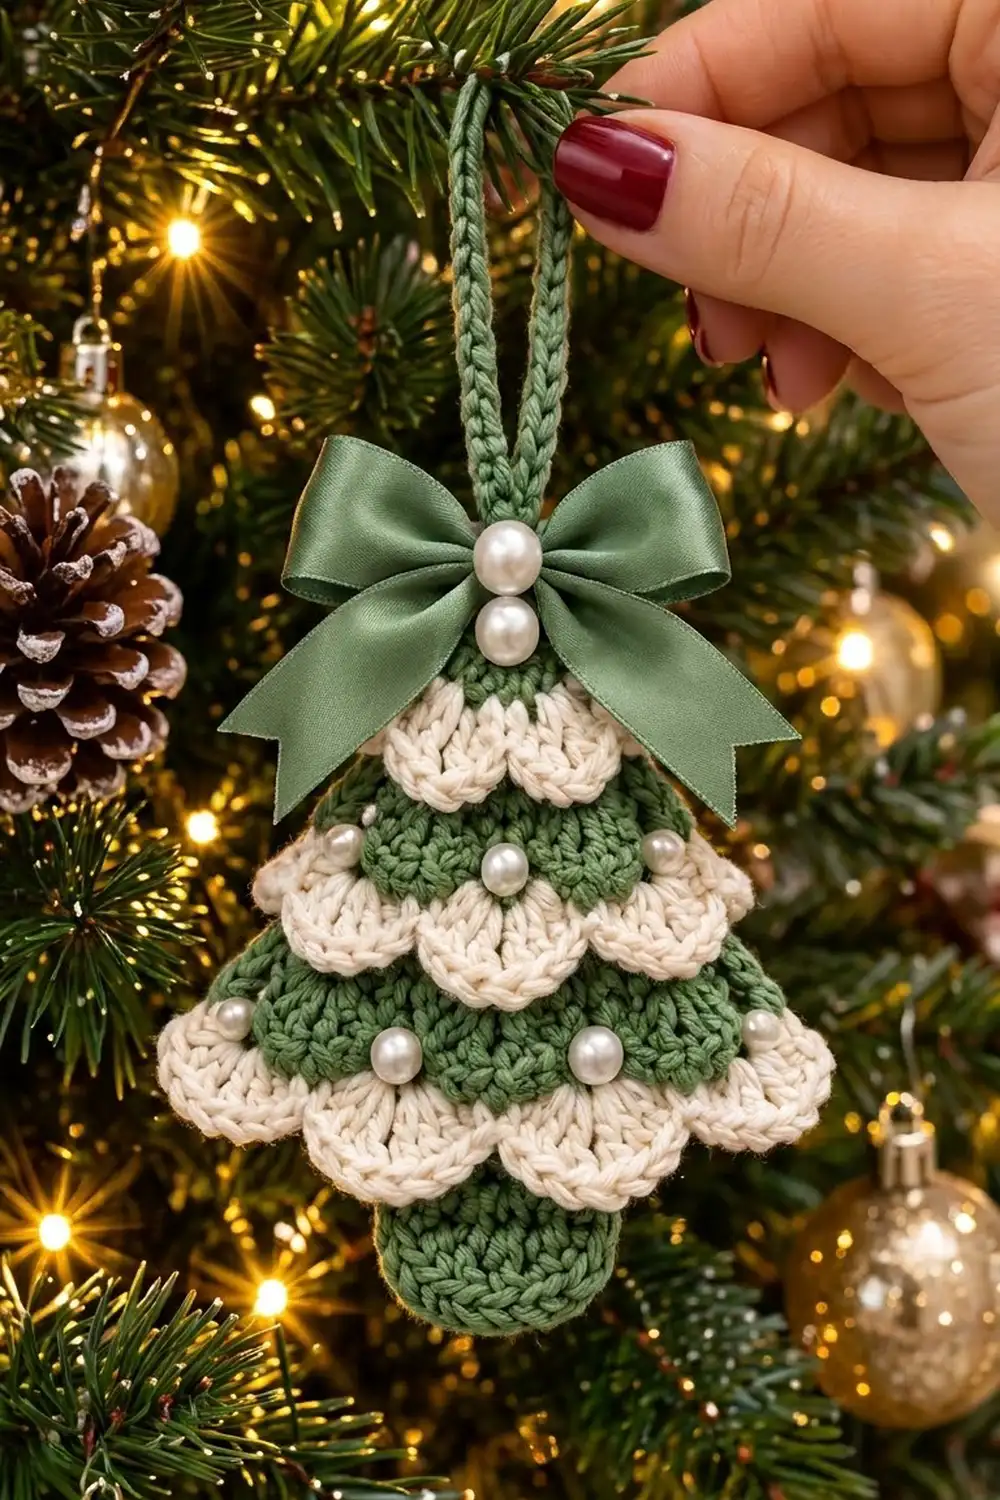
This little tree ornament has soft sage green tiers edged with creamy shell scallops. Small pearl beads and a satin bow finish it off. It looks elegant but uses only basic stitches.
The palette is calm and vintage-inspired: sage green for the tree and trunk, cream for the scallops, white pearls, and a sage satin ribbon bow. It fits well on a neutral or natural-themed tree, and it also works as a gift topper.
The pattern uses US crochet terms. The finished ornament measures about 4.5 in (11.4 cm) wide at the widest scallop tier and 5.6 in (14.2 cm) tall from tip to trunk, not counting the hanging loop. The loop adds about 2 in (5.1 cm).
You crochet the tree as one flat piece from the tip down. At the end of each tier, you work a cream scallop row into the front loops of the last green row. The next green tier then continues in the back loops of that same row, so the scallops hang in front like layered branches. A short trunk, a single green edging round, and a covered hanging loop finish the piece.
Finished Size and Construction
- Finished size: 4.5 in (11.4 cm) wide × 5.6 in (14.2 cm) tall, excluding the loop
- Skill level: Easy–intermediate (front/back loop work, dropping and picking up a loop)
- Terminology: US
- Yarn weight: DK (light, #3)
- Hook: 3.5 mm (E-4)
- Number of pieces: 1 (single ornament, worked in one piece)
- Layout: 4 stacked tiers + trunk
- Piece size before border: 4.2 in (10.7 cm) wide × 5.5 in (14.0 cm) tall
- Border depth: 1 round of sc, about 0.1 in (0.3 cm)
Materials
Choose a smooth DK cotton or cotton blend. Cotton shows the scallops clearly and keeps the tiers crisp. Acrylic DK also works, but the scallops will be a little softer.
- Sage green (Color A): 12 g, about 30 m
- Cream (Color B): 5 g, about 12 m
- 3.5 mm (E-4) crochet hook
- 8 white pearl beads, 6 mm (2 for the bow, 6 for the tiers)
- Sage green satin ribbon, 5/8 in (1.6 cm) wide, 14 in (35.6 cm) long
- Sewing needle and white or green thread
- Tapestry needle
- 1 locking stitch marker
- Scissors, pins, and a blocking mat
All quantities include a margin of roughly 20% for your swatch and weaving in ends.
Abbreviations (US Terms)
- ch – chain
- sc – single crochet
- dc – double crochet
- sl st – slip stitch
- sc2tog – single crochet 2 together
- inc – 2 sc in the same stitch
- FLO – front loop only
- BLO – back loop only
- st(s) – stitch(es)
- RS / WS – right side / wrong side
Special stitch – Scallop: 5 dc in the same stitch.
Gauge and Checkpoints
Gauge: 20 sc × 22 rows = 4 in (10.2 cm) in sc worked flat. That is 5 sts and 5.5 rows per inch.
Before you make the full tree, work Rows 1–4 and measure them. The whole ornament is small, so this first tier is your test piece.
Checkpoints:
- After Row 4: 9 sts, about 1.8 in (4.6 cm) wide and 0.7 in (1.8 cm) tall
- After Row 10: 13 sts, about 2.6 in (6.6 cm) wide and 1.8 in (4.6 cm) tall
- After Row 16: 17 sts, about 3.4 in (8.6 cm) wide and 2.9 in (7.4 cm) tall
- After Row 22: 21 sts, about 4.2 in (10.7 cm) wide and 4.0 in (10.2 cm) tall
- Trunk: about 1.4 in (3.6 cm) wide and 1.5 in (3.8 cm) tall
If your tree is too big, go down a hook size (3.25 mm). If it is too small, go up to 3.75 mm (F-5). Change the hook rather than the stitch counts, because the scallop repeats depend on each tier’s exact count.
Pattern
Row setup: Odd rows are RS rows and even rows are WS rows. Every tier ends on a WS row. Even rows finish at the right-hand edge when you look at the RS, so the dropped green loop is always waiting where the next RS row begins.
Ch 1 at the start of each row does not count as a stitch.
Tier 1 (Tree Tip) – Color A
Row 1 (RS): Ch 2, 3 sc in 2nd ch from hook. Turn. (3 sts)
Row 2 (WS): Ch 1, inc in first st, sc 1, inc in last st. Turn. (5 sts)
Row 3 (RS): Ch 1, inc in first st, sc 3, inc in last st. Turn. (7 sts)
Row 4 (WS): Ch 1, inc in first st, sc 5, inc in last st. (9 sts) Do not turn. Pull up a long loop and place the stitch marker in it to hold it.
Scallop Row 1 – Color B
With RS facing, join Color B in the FLO of the first st at the right edge (the last st you made).
Ch 1, sc in FLO of same st, skip next st, Scallop in FLO of next st, skip next st, sc in FLO of next st; repeat from * across. (2 scallops + 3 sc = 13 sts) Fasten off and weave in the end.
The 9-stitch row fits this repeat exactly: sc, skip, scallop, skip, sc, skip, scallop, skip, sc.
Tier 2 – Color A
Put the dropped green loop back on your hook. Fold the scallops forward.
Row 5 (RS): Ch 1, sc in BLO of each st of Row 4 across. Turn. (9 sts)
Row 6 (WS): Ch 1, sc across. Turn. (9 sts)
Row 7 (RS): Ch 1, inc in first st, sc 7, inc in last st. Turn. (11 sts)
Row 8 (WS): Ch 1, sc across. Turn. (11 sts)
Row 9 (RS): Ch 1, sc across. Turn. (11 sts)
Row 10 (WS): Ch 1, inc in first st, sc 9, inc in last st. (13 sts) Drop the loop onto the marker.
Scallop Row 2 – Color B
With RS facing, join Color B in the FLO of the first st at the right edge. Work as for Scallop Row 1. (3 scallops + 4 sc = 19 sts) Fasten off.
Tier 3 – Color A
Row 11 (RS): Pick up the loop, ch 1, sc in BLO of each st of Row 10 across. Turn. (13 sts)
Row 12 (WS): Ch 1, sc across. Turn. (13 sts)
Row 13 (RS): Ch 1, inc, sc 11, inc. Turn. (15 sts)
Rows 14–15: Ch 1, sc across. Turn. (15 sts)
Row 16 (WS): Ch 1, inc, sc 13, inc. (17 sts) Drop the loop.
Scallop Row 3 – Color B
Work as before in the FLO of Row 16. (4 scallops + 5 sc = 25 sts) Fasten off.
Tier 4 – Color A
Row 17 (RS): Pick up the loop, ch 1, sc in BLO of each st of Row 16 across. Turn. (17 sts)
Row 18 (WS): Ch 1, sc across. Turn. (17 sts)
Row 19 (RS): Ch 1, inc, sc 15, inc. Turn. (19 sts)
Rows 20–21: Ch 1, sc across. Turn. (19 sts)
Row 22 (WS): Ch 1, inc, sc 17, inc. (21 sts) Drop the loop.
Scallop Row 4 – Color B
Work as before in the FLO of Row 22. (5 scallops + 6 sc = 31 sts) Fasten off.
Now go back to the dropped green loop. Cut the yarn, pull it through, and weave in the end. Row 22 now has 21 free back loops.
Trunk – Color A
With RS facing, lift the bottom scallops out of the way. Skip the first 7 free back loops from the right edge. Join Color A in the BLO of the 8th st.
Row T1 (RS): Ch 1, sc in BLO of same st and next 6 sts. Turn. (7 sts; 7 free back loops remain on each side)
Rows T2–T7: Ch 1, sc across. Turn. (7 sts)
Row T8 (WS): Ch 1, sc2tog, sc 3, sc2tog. (5 sts) Fasten off.
The decrease row rounds the trunk’s lower corners. The trunk is about 1.4 in (3.6 cm) wide and 1.5 in (3.8 cm) tall, which brings the piece to 4.2 × 5.5 in (10.7 × 14.0 cm) before the border.
Border
Border gauge: 5 sc per inch, with 1 sc per row end along the sides. Fold all the scallops upward while you work so they don’t get caught.
Round 1 – Color A
With RS facing, join Color A in the free loop of the foundation ch at the tree tip. Work counterclockwise:
- Tip: 1 sc in the foundation ch
- Left side of tree: 1 sc in each row end of Rows 1–22 (22 sc)
- Left bottom of tree: 1 sc in each of the 7 free BLO (7 sc)
- Left side of trunk: 1 sc in each row end of T1–T8 (8 sc)
- Trunk bottom: 2 sc in first st, sc 3, 2 sc in last st (7 sc)
- Right side of trunk: 1 sc in each row end of T8–T1 (8 sc)
- Right bottom of tree: 1 sc in each of the 7 free BLO (7 sc)
- Right side of tree: 1 sc in each row end of Rows 22–1 (22 sc)
Sl st to the first sc. (82 sts: 1 + 22 + 7 + 8 + 7 + 8 + 7 + 22)
Round 2 – Hanging Loop
Ch 22. Sl st into the tip sc to form a ring. Work 28 sc over the ch-22 loop, then sl st into the tip sc. Fasten off, leaving a 6 in (15.2 cm) tail.
The ch 22 forms a loop about 2 in (5.1 cm) tall. The 28 sc pack tightly over it and make the thick, corded look.
Why the Math Works
Each slanted side of the tree rises 4.0 in (10.2 cm) while moving out 1.8 in (4.6 cm), so it is about 4.4 in (11.2 cm) long. Twenty-two sc at 5 per inch also make 4.4 in (11.2 cm), so the edge lies flat without ruffling or pulling in.
The 7 free loops on each side of the trunk match the 7 sts used for the trunk (7 + 7 + 7 = 21). The two extra stitches at the trunk bottom (5 + 2 = 7) turn the rounded corners smoothly.
Final Blocking
- Weave in all ends except the loop tail, hiding them behind the green bands.
- Lightly mist the ornament with water until it is damp but not soaked.
- Pin it RS up on a blocking mat to 4.2 in (10.7 cm) across Row 22 and 5.5 in (14.0 cm) from tip to trunk bottom, measured along the green body.
- Use your fingers to fan each scallop open, then pin the center of each one so it hangs straight down.
- Pin the trunk so its sides are straight and the bottom is evenly rounded.
- Let it dry completely, about 4–6 hours.
- Unpin it and check the finished size: about 4.5 in (11.4 cm) wide across the bottom scallops and 5.6 in (14.2 cm) tall.
Finishing Touches
- Pearls: Sew 1 pearl centered on the Tier 2 green band, 2 pearls evenly spaced on Tier 3, and 3 pearls on Tier 4. Place each one about halfway between the scallop tips above and the scallop row below.
- Bow: Tie the ribbon into a bow about 3 in (7.6 cm) wide and trim the ends at an angle. Sew it over the base of the hanging loop, then stack 2 pearls vertically on the knot.
- Use the loop tail to secure the base of the loop behind the bow, then weave it in.
Final Quality-Control Checklist
- Tier counts are 9, 13, 17, and 21 sts.
- Scallop tiers have 2, 3, 4, and 5 scallops, and all of them face forward.
- No back loops were skipped where green continues behind a scallop row.
- The trunk is centered, with exactly 7 free loops on each side.
- The border round has 82 sts, and the side edges lie flat.
- The hanging loop is firm and secured at the tip.
- 6 pearls are on the tiers and 2 on the bow, all sewn tightly.
- The finished ornament is about 4.5 × 5.6 in (11.4 × 14.2 cm).
Troubleshooting
The scallops ruffle or overlap their neighbors. Your dc tension is loose. Go down a hook size for the cream rows only.
The scallops don’t fit evenly across the row. The green row count is off. Every tier must end on 4n + 1 sts (9, 13, 17, 21). Recount before you join the cream.
A gap shows behind a scallop row. You worked the next green row through both loops instead of the BLO. Rip back that row and redo it in the BLO.
The trunk is off-center. Count the free back loops again. There must be 7 on each side of the trunk.
The side edges wave. You worked more than 1 sc per row end. Rework the border with exactly 22 sc per side.
The tree curls. Block it again and pin it firmly, especially the bottom edge.
Care
Spot clean with cool water and mild soap, then press flat and let it air dry. Keep it away from heat so the satin ribbon and pearls stay intact.
Final Notes
The measurement chain is easy to follow:
- Tier 1 ends at 9 sts and 1.8 in (4.6 cm) wide.
- Each later tier adds 4 sts and 0.8 in (2.0 cm), ending at 21 sts and 4.2 in (10.7 cm).
- The 7-stitch trunk adds 1.5 in (3.8 cm), for 4.2 × 5.5 in (10.7 × 14.0 cm) before the border.
- One 82-stitch border round brings the finished ornament to 4.5 × 5.6 in (11.4 × 14.2 cm).
Check each count as you go and the tree will come out the right size.
Happy crocheting!