

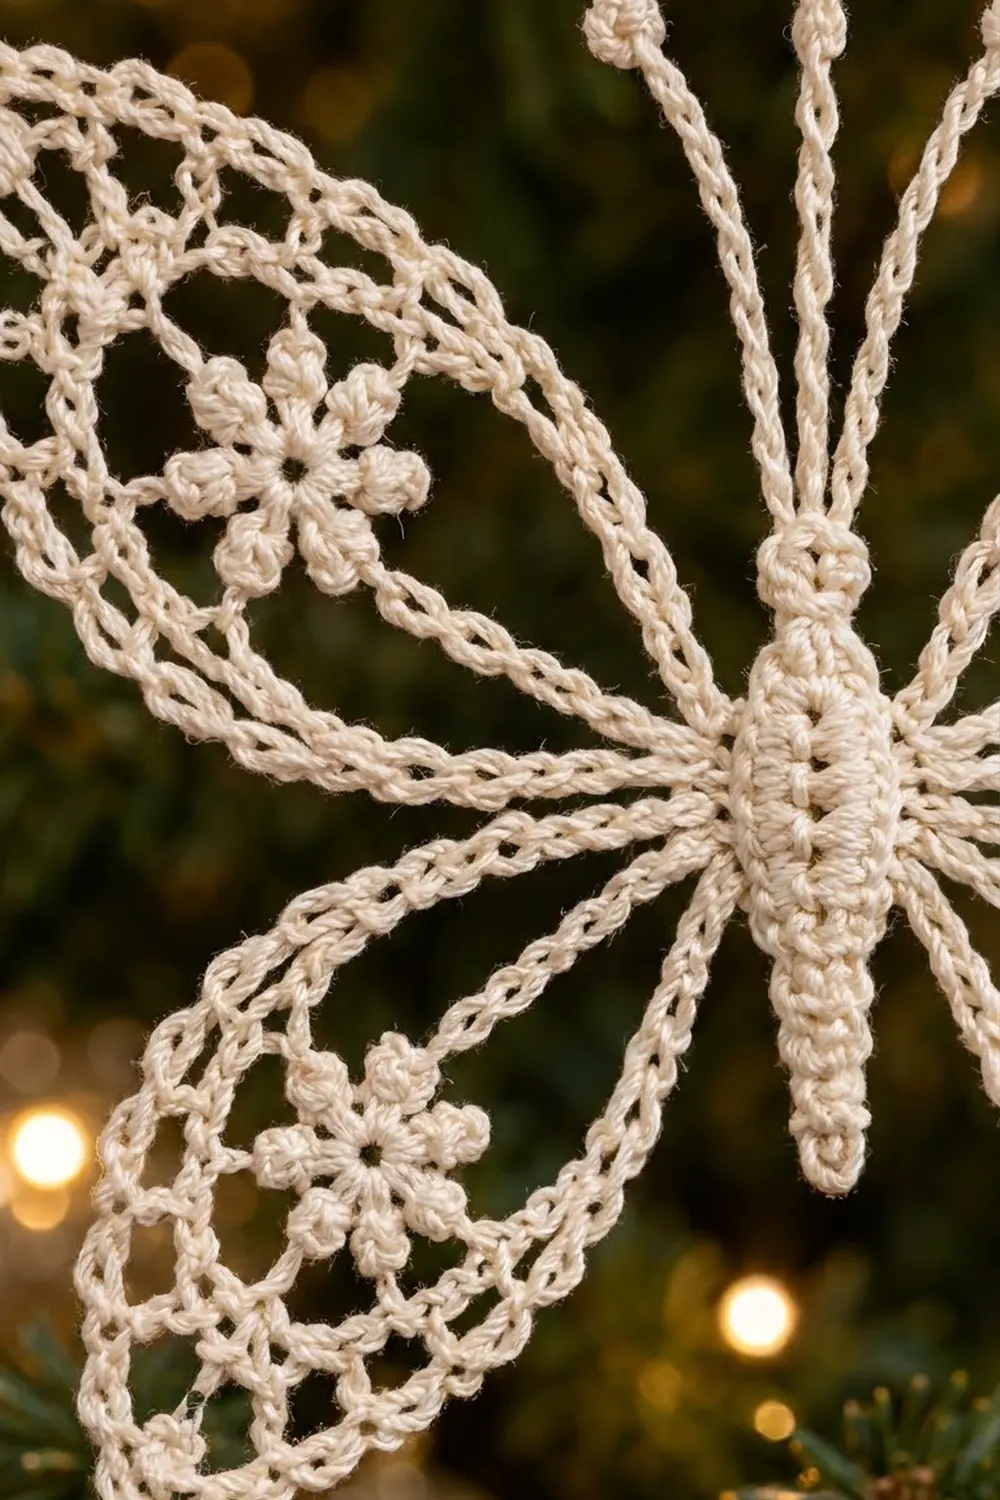
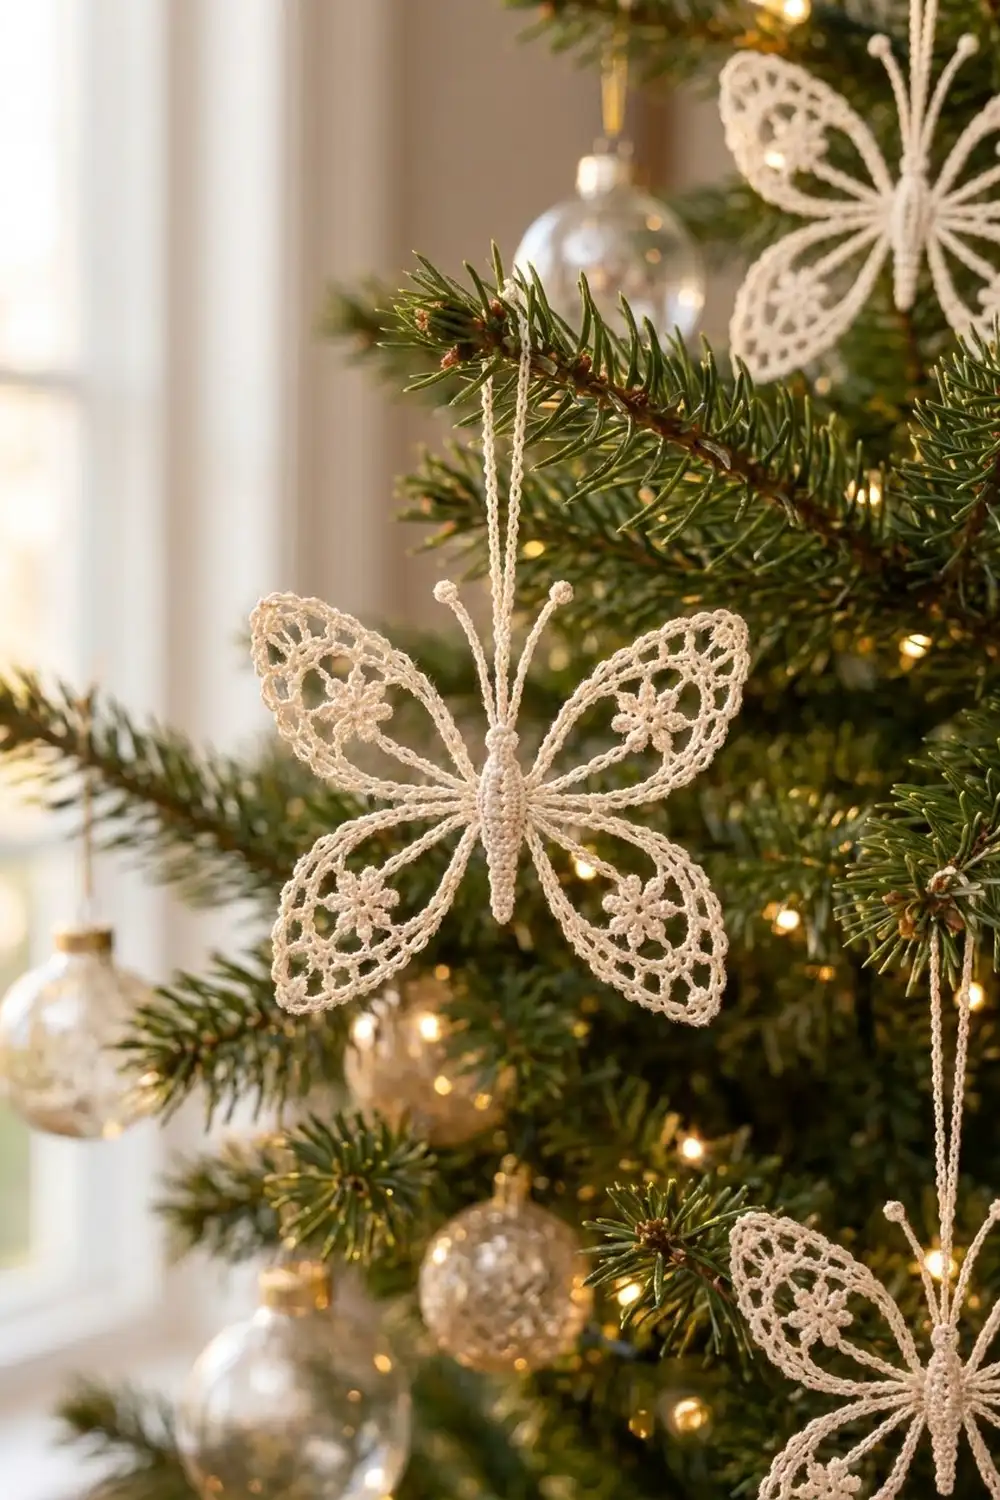
The Snowflower Lace Butterfly is a light, airy ornament worked in fine ivory cotton thread. Each wing has a small puffed six-petal flower in the middle, surrounded by open chain loops and outlined with a smooth single-crochet edge. The overall look is soft, vintage and wintry, and it’s lovely on a tree, in a window or tied onto a gift.
The ornament is worked in one color, ivory or cream, so the lace texture does all the work. The style is classic thread crochet: neat, symmetrical and stiffened after blocking so it holds its shape.
This pattern uses US crochet terms. The finished butterfly measures about 5 in (12.7 cm) wide by 4.5 in (11.4 cm) tall, not counting the antennae and hanging loop.
Construction is simple. You crochet a small oval body first, then add the antennae and hanging loop. Each of the four wings starts as a flower worked in the round, grows into a teardrop of chain loops, and is joined to the body as you work its final edging round. There is nothing to sew. Everything is joined as you go.
Finished Size and Construction
- Finished size: 5 in (12.7 cm) wide x 4.5 in (11.4 cm) tall
- Skill level: Intermediate (thread crochet, puff stitches, join-as-you-go)
- Terminology: US crochet terms
- Yarn weight: Lace (0), size 10 crochet cotton thread
- Hook: 1.5 mm (US steel 7 or 8)
- Number of pieces: 1 finished ornament (body plus 4 wings joined as you go)
- Layout: body in the center, 2 upper wings angled up and out, 2 lower wings angled down and out
- Body size: 1.75 in (4.4 cm) long x 0.5 in (1.3 cm) wide
- Upper wing before edging: 2.4 in (6.1 cm) x 1.4 in (3.6 cm)
- Upper wing after edging and blocking: 2.75 in (7.0 cm) x 1.75 in (4.4 cm)
- Lower wing before edging: 2 in (5.1 cm) x 1.25 in (3.2 cm)
- Lower wing after edging and blocking: 2.25 in (5.7 cm) x 1.5 in (3.8 cm)
- Edging depth: about 0.125 in (0.3 cm)
- Antennae: 1 in (2.5 cm) each
- Hanging loop: 3 in (7.6 cm) of chain, folded into a loop
Materials
Use a mercerized size 10 cotton thread. Mercerized cotton has a slight sheen, shows stitch definition clearly and takes starch well. Choose ivory, cream or natural white for the snowy look shown. Avoid acrylic or fuzzy blends, because they won’t hold a crisp shape after stiffening.
Thread:
– Ivory size 10 cotton: 6 g (about 28 m) per ornament
Tools:
– 1.5 mm (US steel 7 or 8) crochet hook
– Fine tapestry needle for weaving in ends
– Small sharp scissors
– 4 stitch markers
– Blocking foam board and rust-proof pins
– Spray starch or liquid fabric stiffener
– Plastic wrap to protect the foam
These thread quantities include a margin of about 20% for your gauge swatch and weaving in ends.
Abbreviations (US Terms)
- ch – chain
- sl st – slip stitch
- sc – single crochet
- hdc – half double crochet
- dc – double crochet
- BLO – back loop only
- sp – space
- st(s) – stitch(es)
- rnd – round
Special stitches:
- Puff: (Yarn over, insert hook in st, yarn over and pull up a loop) 3 times, then yarn over and pull through all 7 loops on hook.
- 3-dc cluster: (Yarn over, insert hook in st, yarn over and pull up a loop, yarn over and pull through 2 loops) 3 times in the same st, then yarn over and pull through all 4 loops on hook.
- Joining sc (jsc): Insert hook into the chain loop, then also through the designated body st. Yarn over and pull up a loop through both, then yarn over and pull through 2 loops. A jsc counts as 1 sc.
Gauge and Checkpoints
Gauge: 10 sc = 1 in (2.5 cm), worked firmly in size 10 thread with a 1.5 mm hook. Chain gauge is 12 ch = 1 in (2.5 cm).
Before making the whole ornament, crochet one upper wing through Rnd 5 as your test piece. It takes about 10 minutes and tells you everything you need.
Checkpoints:
– Wing flower after Rnd 2: 0.75 in (1.9 cm) across
– Wing after Rnd 3: 1.25 in (3.2 cm) across
– Wing after Rnd 4: 1.5 in (3.8 cm) across
– Upper wing after Rnd 5: 2.4 in (6.1 cm) x 1.4 in (3.6 cm), relaxed
– Body after Rnd 2: 1.75 in (4.4 cm) x 0.5 in (1.3 cm)
If your piece is too big: go down to a 1.25 mm hook or tighten your chains. Loose chains are the most common cause.
If your piece is too small: go up to a 1.75 mm hook. Don’t add extra chains to the loops, because that changes the edging math.
Part 1: Body
The body is a small oval worked around a foundation chain. Hdc on one half makes the wider thorax, and sc on the other half makes the tapering tail.
Ch 16.
Rnd 1: Sc in 2nd ch from hook and in next 6 ch (7 sc), hdc in next 7 ch (7 hdc), 3 hdc in last ch (head end). Rotate and work along the opposite side of the foundation: hdc in next 7 ch, sc in next 6 ch, 2 sc in same ch as first sc (tail end). Join with sl st to first sc. (32 sts)
Count check: 13 sts along each long side, 3 sts at the head end and 3 sts at the tail end. That’s 13 + 13 + 3 + 3 = 32.
Rnd 2 (BLO): Ch 1. Working in BLO, sc in each st around, except work 2 sc in each of the 3 head-end hdc. Join with sl st to first sc. (35 sc)
Count check: 13 side sts on each long side, 6 sts at the head end and 3 sts at the tail end. That’s 13 + 13 + 6 + 3 = 35. Working in BLO leaves the front loops showing as a fine ridge, which gives the body its texture.
Fasten off and weave in the ends.
Checkpoint: 1.75 in (4.4 cm) long x 0.5 in (1.3 cm) wide.
Mark the wing positions: On each long side, count the 13 side sts starting from the head end as st 1 through st 13. Place a marker in side st 1 and another in side st 8 on each side. Side sts 1–6 will hold an upper wing, side st 7 stays free as a small gap, and side sts 8–13 will hold a lower wing.
Part 2: Antennae and Hanging Loop
Number the 6 head-end sts from 1 to 6, going across the head.
First antenna: Join thread with a sl st in head st 2. Ch 15, then work a 3-dc cluster in the 4th ch from hook to make the knob. Sl st in each of the next 11 ch back toward the body, then sl st in head st 2. The sl sts lie alongside the chain, so the antenna looks doubled and firm. (1 knob, 12-ch stem, 11 sl sts)
Hanging loop: Sl st in head sts 3 and 4. Ch 36, then sl st in head st 4 again to close the loop. (36-ch loop)
Second antenna: Sl st in head st 5. Repeat the first antenna. Fasten off and weave in the ends.
Checkpoint: each antenna stem is about 1 in (2.5 cm) long, and the hanging loop is 3 in (7.6 cm) of chain.
Part 3: Upper Wings (make 2)
Rnd 1: Ch 4 and join with sl st to form a ring. Ch 1, 12 sc in ring. Join with sl st to first sc. (12 sc)
Rnd 2: Ch 2 (doesn’t count as a st). Puff in first sc, ch 2, skip next sc. Puff in next sc, ch 2, skip next sc. Repeat from * 4 more times. Join with sl st to top of first puff. (6 puffs, 6 ch-2 sps)
Checkpoint: the flower measures 0.75 in (1.9 cm).
Rnd 3: Sl st in first ch-2 sp. Ch 1. Sc in ch-2 sp, ch 5. Repeat from * 5 more times. Join with sl st to first sc. (6 sc, 6 ch-5 loops)
Checkpoint: 1.25 in (3.2 cm).
Rnd 4: Sl st in first ch-5 loop. Ch 1. (Sc, ch 5, sc) in ch-5 loop, ch 5. Repeat from * 5 more times. Join with sl st to first sc. (12 sc, 12 ch-5 loops)
Number these 12 loops from 1 to 12, starting with the first loop worked (the one inside the first Rnd-3 loop). Loop 1 becomes the wing tip, and loop 7 is directly opposite it, at the base of the wing.
Checkpoint: 1.5 in (3.8 cm).
Rnd 5 (shaping): Sl st in next 2 ch to reach the center of loop 1. Ch 1. (Sc, ch 9, sc) in loop 1 for the tip. Ch 7, sc in next loop. Repeat from * 10 more times (loops 2 through 12). Ch 7 and join with sl st to first sc. (13 sc, 1 ch-9 tip loop, 12 ch-7 loops)
Name the ch-7 loops A1 through A12 in working order. A1 runs from the tip to loop 2, and A12 runs from loop 12 back to the start. The sc worked in loop 7 is the base point, with A6 on one side and A7 on the other.
The longer tip chain and the longer side chains stretch the round into a teardrop, with the point at loop 1 and the narrow base at loop 7.
Checkpoint: 2.4 in (6.1 cm) x 1.4 in (3.6 cm).
Do not fasten off. Go to the Border section to edge the wing and join it to the body.
Part 4: Lower Wings (make 2)
Work Rnds 1–4 exactly as for the Upper Wing. (After Rnd 4: 12 sc, 12 ch-5 loops)
Rnd 5 (shaping): Sl st in next 2 ch. Ch 1. (Sc, ch 8, sc) in loop 1 for the tip. Ch 6, sc in next loop. Repeat from * 10 more times. Ch 6 and join with sl st to first sc. (13 sc, 1 ch-8 tip loop, 12 ch-6 loops)
Name the ch-6 loops B1 through B12, the same way as A1–A12. The base point is the sc in loop 7, between B6 and B7.
Checkpoint: 2 in (5.1 cm) x 1.25 in (3.2 cm).
Do not fasten off.
Border: Wing Edging and Join-As-You-Go
Each wing has one edging round. It turns the chain loops into a smooth, dense outline, adds a tiny point at the tip and attaches the wing base to the body at the same time.
Border gauge: 9 sc fills each ch-7 loop and 8 sc fills each ch-6 loop, which is 2 more sts than the chains in each loop. The finished edge should lie flat with no ruffling or cupping.
Upper Wing Edging (Rnd 6)
Hold the body with the head pointing up. Position the wing so its tip (loop 1) points up and away from the body, and its base (the sc in loop 7) sits against the marked side sts 1–6.
Ch 1. In the ch-9 tip loop work (5 sc, ch 3, 5 sc).
- Side 1: 9 sc in each of A1–A5 (45 sc). In A6, work 6 sc and then 3 jsc into body side sts 1, 2 and 3. Side 1 total: 54 sts.
- Side 2: In A7, work 3 jsc into body side sts 4, 5 and 6, then 6 sc. Work 9 sc in each of A8–A12 (45 sc). Side 2 total: 54 sts.
Join with sl st to first sc. Fasten off and weave in the ends.
Round total: 10 tip sc + 54 + 54 = 118 sts plus 1 ch-3 tip point. Of these, 6 are jsc joined to 6 body sts.
On the second upper wing, work the jsc into side sts 1–6 on the other side of the body. Go from the head toward the tail, or from the tail toward the head, whichever direction your round is traveling. What matters is that the wing tip points up and outward, mirroring the first wing.
Lower Wing Edging (Rnd 6)
Position the lower wing so its tip points down and away from the body, with its base against side sts 8–13.
Ch 1. In the ch-8 tip loop work (4 sc, ch 3, 4 sc).
- Side 1: 8 sc in each of B1–B5 (40 sc). In B6, work 5 sc and then 3 jsc into body side sts 8, 9 and 10. Side 1 total: 48 sts.
- Side 2: In B7, work 3 jsc into body side sts 11, 12 and 13, then 5 sc. Work 8 sc in each of B8–B12 (40 sc). Side 2 total: 48 sts.
Join with sl st, fasten off and weave in the ends.
Round total: 8 tip sc + 48 + 48 = 104 sts plus 1 ch-3 tip point. Repeat on the other side of the body.
Why the Math Works
Each chain loop curves outward, so its outer edge is a little longer than its chain count. Adding 2 sc per loop (7 ch gets 9 sc, 6 ch gets 8 sc) matches that extra length without ruffling.
The jsc replace ordinary sc one-for-one, so the per-side counts don’t change. Each wing uses exactly 6 body sts. Upper (6) + gap (1) + lower (6) = 13, which equals the 13 side sts on each long edge of the body. That leaves the 6 head sts free for the antennae and loop, and the 3 tail sts free for the tapered tail.
Final Blocking
- Weave in any remaining ends and trim them close.
- Cover your foam board with plastic wrap.
- Lay the butterfly face up. Pin the body straight down the center.
- Angle the upper wings up and out so their tips sit about 5 in (12.7 cm) apart. Pin each tip point.
- Angle the lower wings down and out. Check that the total height from upper wing tips to lower wing tips is about 4.5 in (11.4 cm).
- Pin the outer edge of each wing at every 2–3 loops, easing the teardrops open until upper wings measure 2.75 in (7.0 cm) x 1.75 in (4.4 cm) and lower wings measure 2.25 in (5.7 cm) x 1.5 in (3.8 cm).
- Pull each puff flower round and centered. Straighten the antennae and give them a slight outward curve.
- Spray generously with starch, or brush on diluted fabric stiffener.
- Let it dry completely, about 24 hours, before unpinning.
Final Quality-Control Checklist
- Body has 35 sc, with a visible ridge from the BLO round.
- Both antennae are the same length, with round, matching knobs.
- Hanging loop is centered on the head.
- Each upper wing edging has 118 sts plus the tip point, and each lower wing has 104 sts plus the tip point.
- Each wing is joined through exactly 6 body sts, with side st 7 free on both sides.
- All four flowers have 6 even puffs.
- Wings are mirrored left to right.
- The ornament measures 5 in (12.7 cm) x 4.5 in (11.4 cm) and hangs level.
Troubleshooting
Wing edge ruffles: you’re working too many sc per loop, or your chains are tight. Check for 9 or 8 sc per loop, and loosen your chains slightly.
Wing edge cups or curls: your chains are too loose. Go down a hook size for Rnd 5 only.
Wing tip is rounded, not pointed: you skipped the longer tip chain. Use ch 9 for the upper wing and ch 8 for the lower wing in loop 1, and pin the ch-3 point firmly when blocking.
Puffs look flat: pull up taller loops before closing each puff.
Wings are uneven: recount the body side sts. Each wing must use 6 consecutive sts, with st 7 free.
Butterfly hangs crooked: the hanging loop isn’t centered. Redo it between head sts 3 and 4.
Care
Spot clean only with cool water and a mild soap, then re-starch and reshape as needed. Store flat in a box between layers of tissue paper so the wings don’t crush.
Final Notes
The measurement chain is simple. A 0.75 in (1.9 cm) flower grows to 1.5 in (3.8 cm) after Rnd 4. Rnd 5 brings the upper wing to 2.4 in (6.1 cm) and the lower wing to 2 in (5.1 cm). After edging and blocking, the wings measure 2.75 in (7.0 cm) and 2.25 in (5.7 cm). Joined to the 1.75 in (4.4 cm) body, they make a 5 in (12.7 cm) x 4.5 in (11.4 cm) butterfly. Check each step and the finished ornament will come out right.
Happy crocheting!