

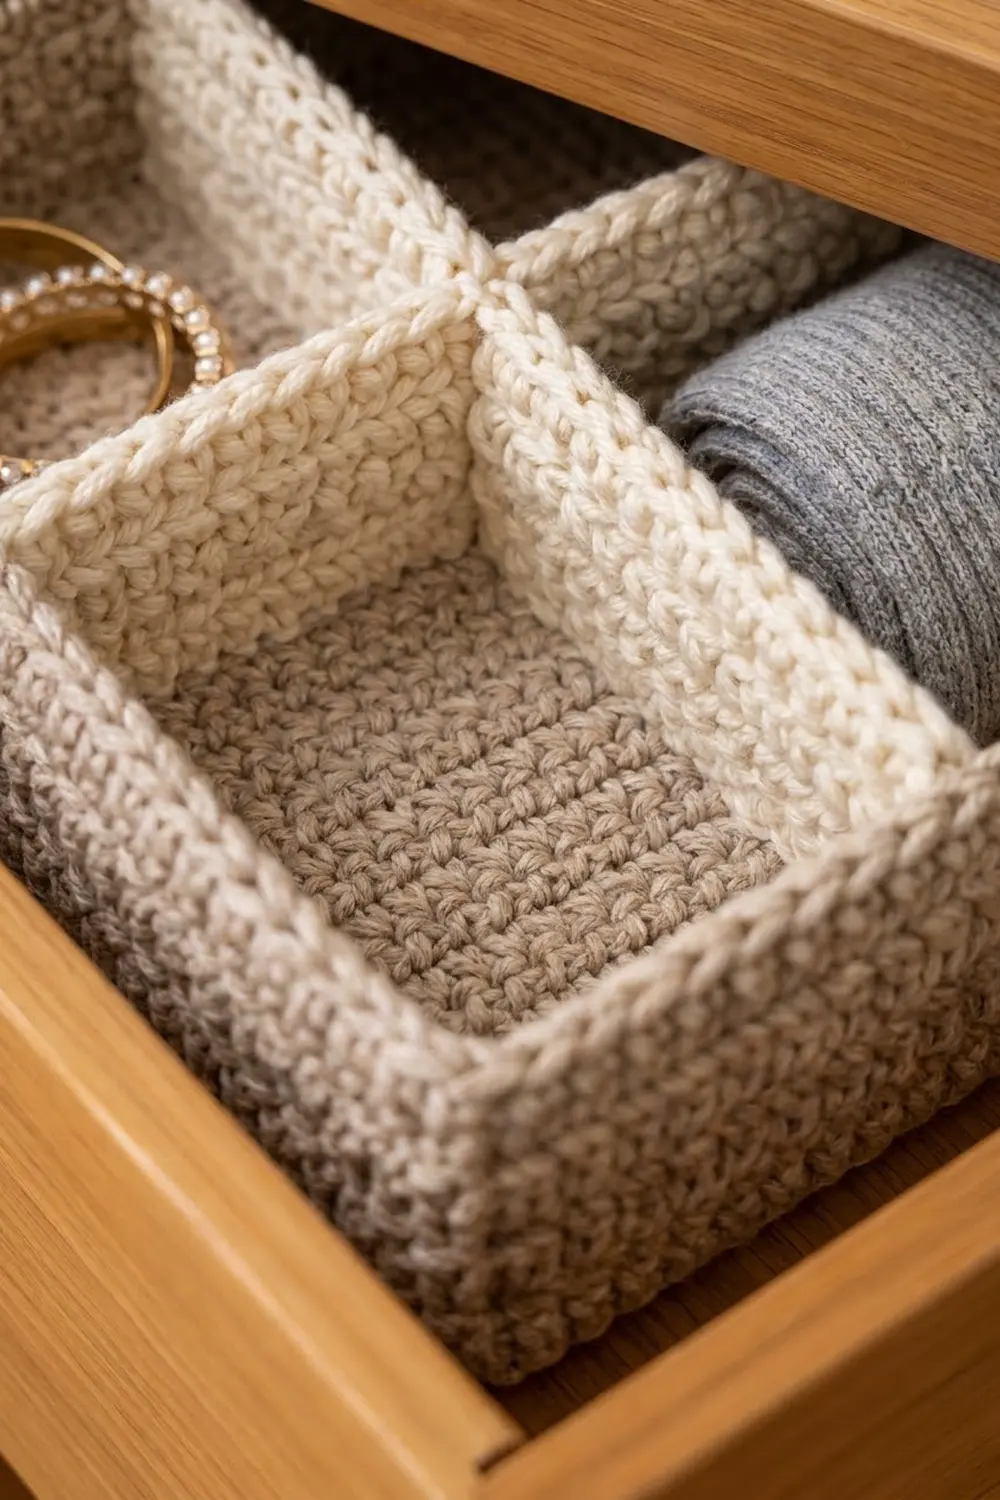
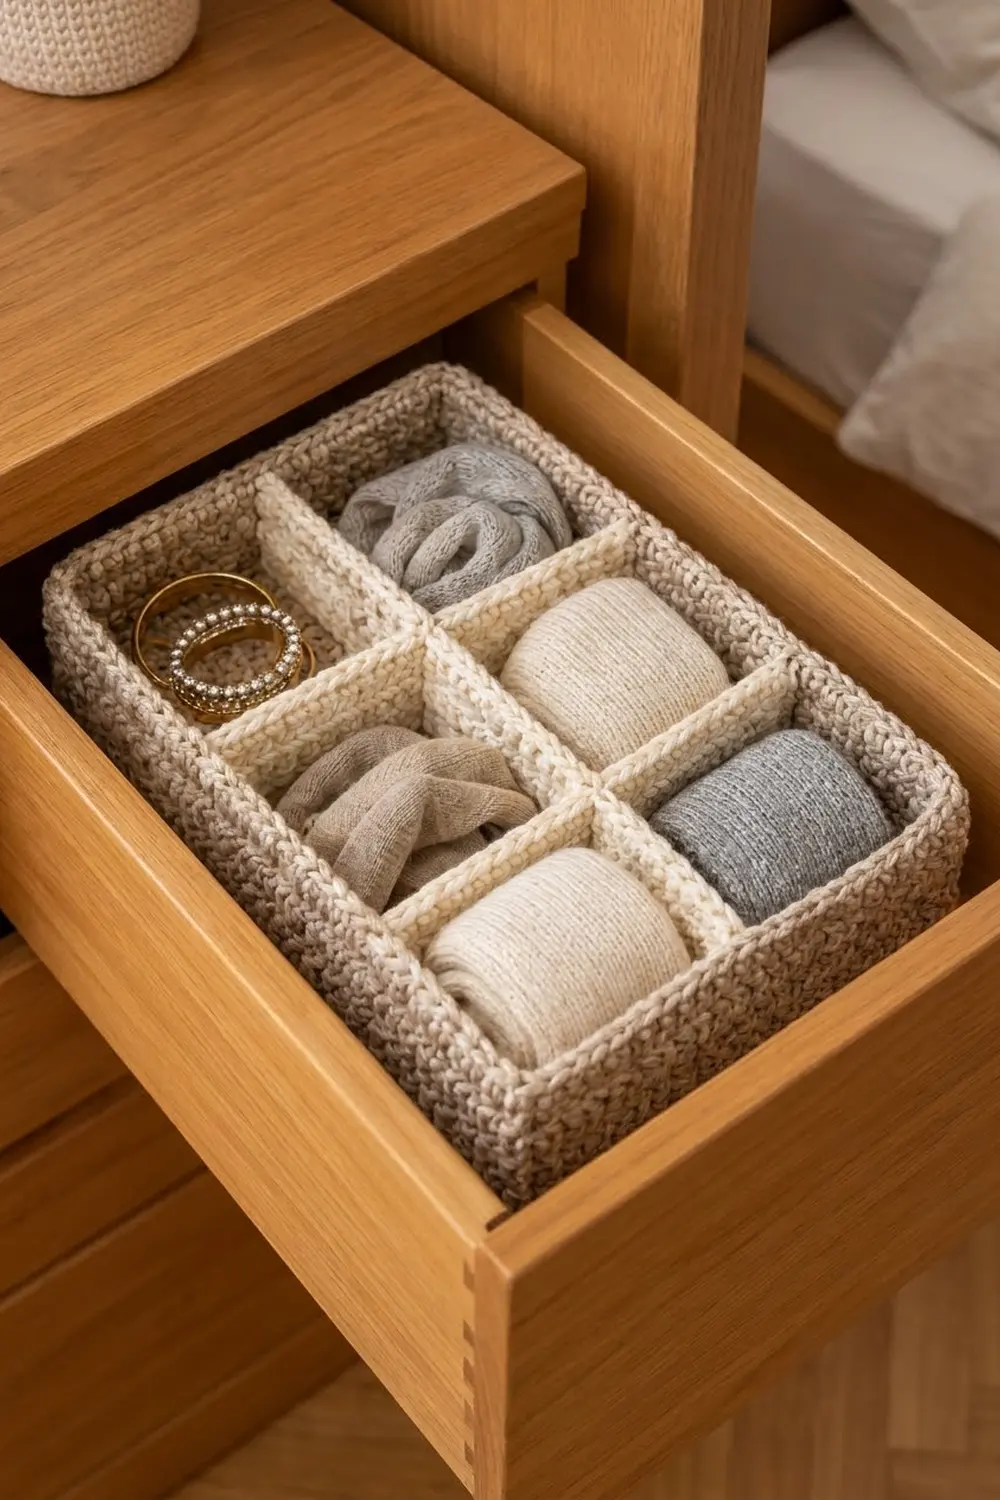
This drawer organizer is a low, rectangular crochet basket in warm oatmeal taupe. Inside, cream divider panels split it into six square pockets. It is made to tidy socks, scarves, jewelry, and other small things that tend to pile up in a drawer.
The walls are worked in waistcoat stitch, which looks like dense knit stockinette. The dividers are plain single crochet, folded double so they stand up on their own. A slip-stitch rim gives the top edge a neat braided line. The overall style is calm and minimal: two neutral colors, firm fabric, and clean corners.
This pattern uses US crochet terms. The finished organizer measures 8 in (20.3 cm) wide, 12 in (30.5 cm) long, and about 3.25 in (8.3 cm) tall. Each of the six pockets is about 3.5 x 3.5 in (8.9 x 8.9 cm).
You will crochet a flat single crochet base, turn up the walls in the round, and finish with a two-round rim. Then you will make one long divider and four short half-dividers, fold each one double, and sew them into a 2 x 3 grid.
Finished Size and Construction
- Finished size: 8 x 12 in (20.3 x 30.5 cm), about 3.25 in (8.3 cm) tall
- Skill level: Easy-intermediate
- Terminology: US crochet terms
- Yarn weight: Worsted (#4) cotton or cotton blend
- Hook: 5 mm (H-8)
- Number of pieces: 6 (1 basket, 1 long divider, 4 short half-dividers)
- Layout: 2 pockets across x 3 pockets long
- Pocket size: about 3.5 x 3.5 in (8.9 x 8.9 cm)
- Base size before edging: 7.5 x 11.5 in (19.1 x 29.2 cm)
- Rim depth: 2 rounds, about 0.25 in (0.6 cm)
Materials
Choose a firm cotton or cotton-blend worsted yarn with a smooth twist. Cotton holds its shape better than acrylic, and the organizer should stand up without help. Avoid fuzzy or very stretchy yarns.
- Color A – oatmeal taupe (basket): 150 g / 285 m
- Color B – cream (dividers): 80 g / 152 m
Quantities assume yarn of about 190 m per 100 g and include a margin of roughly 15 percent for your gauge swatch and tails.
Tools:
- 5 mm (H-8) crochet hook
- 4 locking stitch markers
- Tapestry needle
- Scissors
- Measuring tape
- Pins or blocking clips
- Optional: plastic canvas strips cut to divider size, for extra stiffness
Abbreviations (US Terms)
- ch – chain
- sc – single crochet
- sl st – slip stitch
- st(s) – stitch(es)
- blo – back loop only
- rnd – round
- wst – waistcoat stitch
Waistcoat stitch (wst): Look at the sc stitch below from the front. You will see a V shape with two vertical legs. Insert the hook between those two legs, in the center of the V, and push it through to the back. Yarn over, pull up a loop, yarn over, and pull through both loops. It is worked exactly like sc, only placed in a different spot. The result is a thick, knit-look fabric.
Gauge and Checkpoints
Gauge: 16 sts and 18 rows/rnds = 4 in (10.2 cm) in sc, and the same in waistcoat stitch worked in the round. That works out to 4 sts and 4.5 rows per inch (2.5 cm).
Work a 20-st swatch of 20 rows in sc before you start. If you are planning a test piece, make one short half-divider first. It is small and quick, and it gives you a reliable reading of your tension.
Checkpoints:
- Short half-divider before folding: 3.5 in (8.9 cm) long
- Base after Row 52: 7.5 x 11.5 in (19.1 x 29.2 cm)
- Base after edging: 8 x 12 in (20.3 x 30.5 cm)
- Walls after Rnd 13: about 2.9 in (7.4 cm) tall from the base ridge
- Finished organizer: about 3.25 in (8.3 cm) tall
If your work is too big, go down to a 4.5 mm hook. If it is too small, go up to a 5.5 mm hook. Do not change stitch counts, because the divider placement relies on them. Waistcoat stitch can tighten as you go, so keep the loops on your hook relaxed.
Basket
Base
With Color A, ch 31.
Row 1: Sc in 2nd ch from hook and in each ch across, turn. (30 sts)
Rows 2–52: Ch 1, sc in each st across, turn. (30 sts)
Checkpoint: 7.5 x 11.5 in (19.1 x 29.2 cm).
Base Edging Round
This round squares the base off and sets the stitch count for the walls. In this pattern, the corner stitch is counted separately from the side counts.
Edging Rnd: Ch 1. Do not turn. Work along the top of Row 52: 3 sc in first st, sc in next 28 sts, 3 sc in last st. Rotate and work down the long edge: sc in each row end, skipping the row ends of Rows 48, 40, 32, 24, 16, and 8 (46 sc). Along the foundation chain: 3 sc in first ch, sc in next 28 ch, 3 sc in last ch. Up the second long edge: sc in each row end, again skipping 6 row ends evenly as before (46 sc). Join with sl st to first sc.
Each 3-sc group gives 1 side stitch, 1 corner stitch, and 1 side stitch. So each short side has 30 sts between the corners, and each long side has 46.
Count: 30 + 46 + 30 + 46 = 152 side sts, plus 4 corner sts = 156 sts.
Place a marker in each of the 4 corner stitches. Move the markers up as you work.
Checkpoint: 8 x 12 in (20.3 x 30.5 cm). A long side of 46 sts plus 2 corners is 48 sts, which equals 12 in at 4 sts per inch. A short side of 30 plus 2 corners is 32 sts, which equals 8 in.
Walls
Rnd 1 (turning ridge): Ch 1, sc blo in each st around, join. (156 sts)
The unworked front loops make a crisp fold line, so the walls rise straight up from the base.
Rnds 2–13: Ch 1, wst in each st around, join with sl st to first st. (156 sts)
Do not increase at the corners. The marked corner stitches simply stack up and form a sharp vertical crease. If a corner starts to round, pinch it as you work.
Checkpoint: the walls measure about 2.9 in (7.4 cm) from the ridge. Do not fasten off. Go straight on to the two rim rounds in the Border section, then come back to make the dividers.
Dividers
All dividers are made with Color B and worked flat in sc rows. Each one is worked twice as tall as needed and then folded in half lengthwise. The fold becomes a smooth, rounded top edge, and the double layer keeps the divider stiff.
Long Divider (make 1)
Ch 47.
Row 1: Sc in 2nd ch from hook and in each ch across, turn. (46 sts)
Rows 2–24: Ch 1, sc in each st across, turn. (46 sts)
Fold and close: Fold the piece lengthwise so Row 24 lies on top of the foundation chain. Ch 1, then sl st through each st of Row 24 and the matching ch of the foundation, working through both layers. (46 sl sts) Next, sl st through both layers along each short end, working 1 sl st per row-end pair (12 per end). Fasten off, leaving a 24 in (61.0 cm) tail for sewing.
Size: 11.5 in (29.2 cm) long and about 2.7 in (6.9 cm) tall (12 rows per layer).
Short Half-Divider (make 4)
Ch 15.
Row 1: Sc in 2nd ch from hook and in each ch across, turn. (14 sts)
Rows 2–24: Ch 1, sc in each st across, turn. (14 sts)
Fold and close exactly as for the long divider: 14 sl sts along the bottom, and 12 sl sts along each end. Fasten off, leaving a 20 in (50.8 cm) tail.
Size: 3.5 in (8.9 cm) long and about 2.7 in (6.9 cm) tall.
If you want firmer dividers, slip a strip of plastic canvas between the layers before you close them. Cut it to 3.25 x 2.5 in (8.3 x 6.4 cm) for a short half-divider, or 11.25 x 2.5 in (28.6 x 6.4 cm) for the long divider.
Make All Pieces
- Color A: 1 basket (base, walls, rim)
- Color B: 1 long divider (46 sts) and 4 short half-dividers (14 sts each)
Layout grid (seen from above, with the long sides running top to bottom):
+--------+--------+
| Pocket | Pocket |
+--S1----+----S2--+
| Pocket L Pocket |
+--S3----+----S4--+
| Pocket | Pocket |
+--------+--------+
L = long divider, running down the center the full 12 in (30.5 cm) length.
S1 to S4 = short half-dividers, running from the long divider out to each long wall.
Joining
Sew the dividers in with the Color B tails, using a tapestry needle and a firm whipstitch.
Long divider: The base is 30 sts wide, so its center line falls between sts 15 and 16 of each short side. Center the long divider’s closed bottom edge on that line, running from one short wall to the other. Its 46 bottom sts match the 46 between-corner sts of the long sides one-for-one, so it fits the interior exactly. Whipstitch each end to a short wall from the base ridge up to the divider’s fold. Then tack the bottom edge to the base every second stitch.
Short half-dividers: Count along a long wall’s 46 between-corner sts: 14 sts (pocket), 2 sts (divider), 14 sts (pocket), 2 sts (divider), 14 sts (pocket). 14 + 2 + 14 + 2 + 14 = 46. Center one half-divider on wall sts 15–16 and another on wall sts 31–32. Line up the inner end of each with long divider sts 15–16 or 31–32. Whipstitch the outer end to the wall, the inner end to the long divider, and tack the bottom to the base. Repeat on the other side.
Across the width, 14 sts (half-divider) + 2 sts (long divider thickness) + 14 sts (half-divider) = 30 sts. That matches the 30 between-corner sts of each short side.
Tension: Pull each whipstitch snug but not tight. Overtight sewing will pull the walls inward and make the pockets uneven.
Checkpoint: Each pocket should measure about 3.5 x 3.5 in (8.9 x 8.9 cm), and the outer size should still be 8 x 12 in (20.3 x 30.5 cm).
Border (Rim)
The rim is worked in Color A directly onto the last wall round, before the dividers are sewn in. It is described here so all the edge work stays in one section.
Border gauge: Same as the walls, 4 sts per inch (2.5 cm).
Border Rnd 1: Ch 1, sc in both loops of each st around, join. Per side: 30 sts on each short side and 46 on each long side, between corners, plus 4 corner sts. (156 sts)
Border Rnd 2: Ch 1, sl st loosely in each st around. Per side: 30 short, 46 long, plus 4 corners. (156 sl sts) Join to the first sl st and fasten off. Weave in the end.
The slip stitches lie on top of the rim like a braided chain and lock the edge so it does not flare.
Why the math works: The rim has no increases, because the walls rise straight up. Every round from the base edging to the final slip stitch holds 156 sts: 2 x 30 + 2 x 46 + 4 = 156. At 4 sts per inch, the short sides span 32 sts including corners, which is 8 in (20.3 cm), and the long sides span 48, which is 12 in (30.5 cm). The rim adds about 0.25 in (0.6 cm), bringing the 2.9 in (7.4 cm) walls up to about 3.1 in (7.9 cm). The slip stitch top and the base thickness bring the total to about 3.25 in (8.3 cm).
Final Blocking
- Weave in all ends securely, and run each tail back over itself once.
- Lightly spray the whole organizer with water until it is damp, not soaked.
- Stuff the pockets with folded washcloths or small boxes so the walls stand straight.
- Pinch each corner into a sharp vertical crease.
- Straighten the dividers so they stand upright and square to the base.
- Measure: 8 x 12 in (20.3 x 30.5 cm) outside, with pockets of about 3.5 in (8.9 cm).
- Let it dry completely, at least 24 hours, before taking out the fillers.
Final Quality-Control Checklist
- Base edging and all wall rounds count 156 sts
- 4 crisp corners, with no rounding or extra stitches
- The turning ridge is even all the way around
- Walls are about 2.9 in (7.4 cm) before the rim
- The rim slip stitches lie flat without puckering
- Long divider is 46 sts and centered between sts 15 and 16
- Half-dividers sit at wall sts 15–16 and 31–32
- All six pockets are about 3.5 x 3.5 in (8.9 x 8.9 cm)
- No sewing stitches show on the outside of the walls
Troubleshooting
- Walls lean outward: Your tension is too loose for waistcoat stitch. Re-work with a smaller hook, or make sure Rnd 1 is worked in the back loops only.
- Walls pull inward: Your waistcoat stitches are too tight. Loosen your yarn-over loops or go up 0.5 mm.
- Corners are rounded: Check that you are not adding stitches at the markers, and block with the corners pinched.
- Long divider is too long: Your gauge is loose. Remake it with a smaller hook so the 46 sts measure 11.5 in (29.2 cm).
- Dividers flop: Add plastic canvas inserts, or sew the bottom edge to the base at every stitch instead of every second one.
- Rim ruffles: Your slip stitches are too loose. Redo Border Rnd 2 with a hook 0.5 mm smaller.
Care
Hand wash in cool water with mild soap, press out the water in a towel, and dry it flat with the pockets stuffed so it keeps its shape. Remove plastic canvas inserts before washing if you can.
Final Notes
The measurement chain is simple. The base is 30 sts x 52 rows, or 7.5 x 11.5 in (19.1 x 29.2 cm). The edging brings the base to 156 sts and 8 x 12 in (20.3 x 30.5 cm). The walls hold 156 sts for 13 rounds to about 2.9 in (7.4 cm). The rim brings the height to about 3.25 in (8.3 cm). Inside, a 46-st long divider and four 14-st half-dividers form six pockets of 3.5 in (8.9 cm). If each checkpoint matches, the dividers will fit right where they belong.
Happy crocheting!