

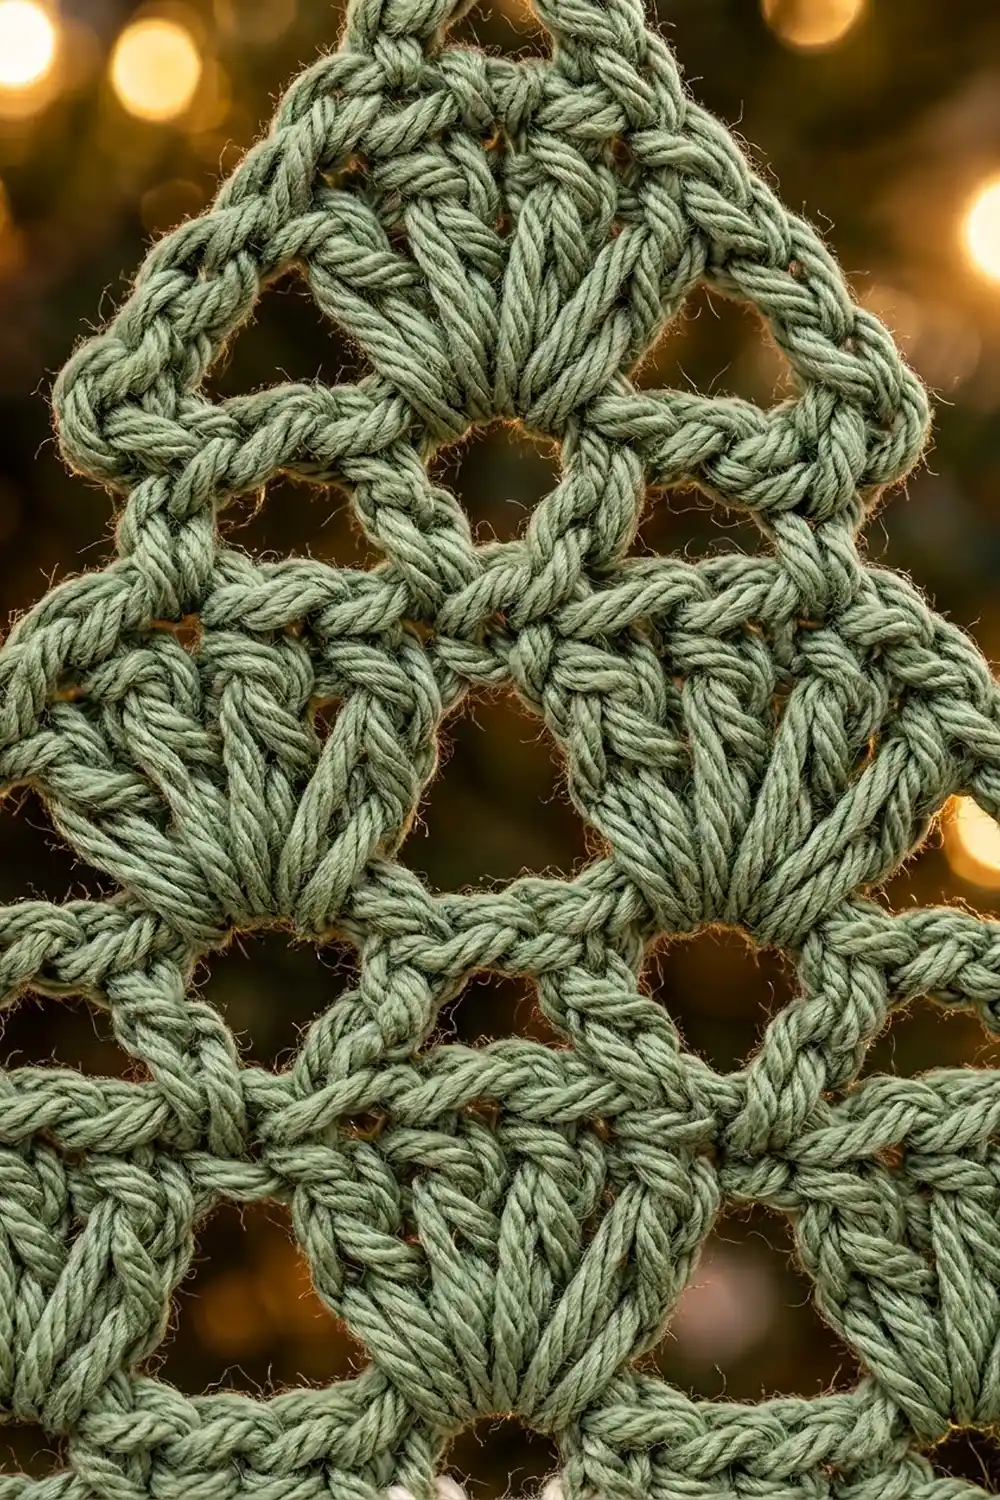
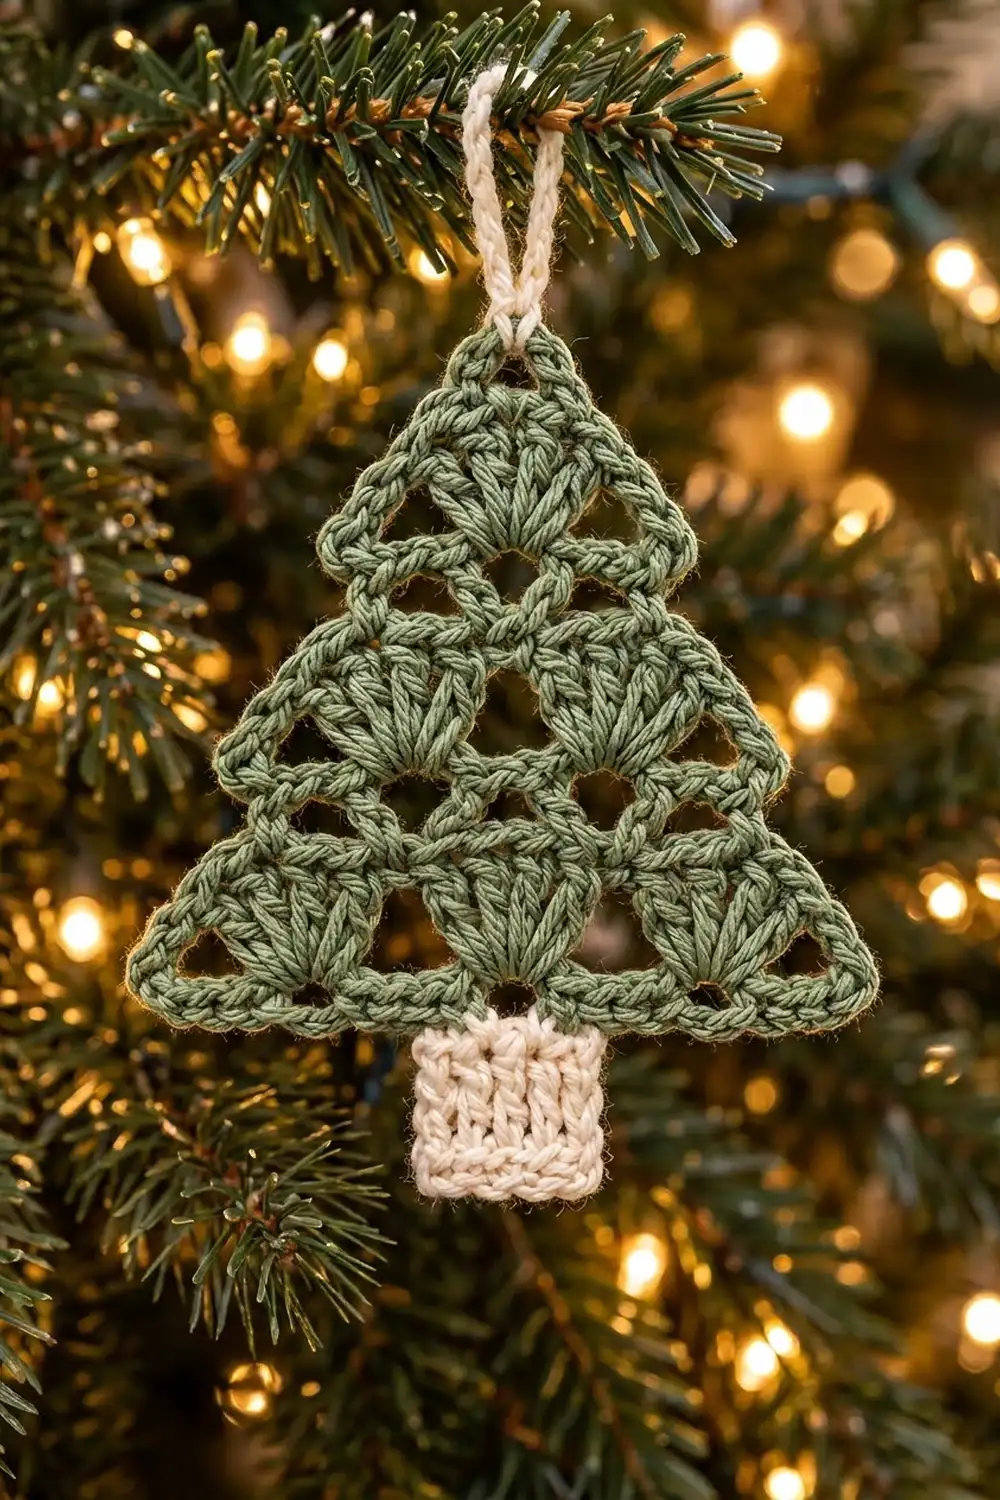
This little tree is a single flat ornament. It’s built from lacy shell fans stacked in three tiers: three fans along the bottom, two in the middle, and one at the top. Small triangular openings sit between the fans, so the tree looks light against the lights of a real tree.
The body is worked in soft sage green. A small cream trunk hangs from the center of the base, and a cream loop at the tip makes it ready to hang. It has a calm, Scandinavian-style look that suits natural and neutral holiday decor.
This pattern uses US crochet terms. The finished ornament measures about 4.7 in (11.9 cm) across the base and about 5 in (12.7 cm) tall from tip to trunk bottom. With the hanging loop it’s about 6.5 in (16.5 cm) tall.
You’ll work the triangle bottom-up in short rows. Each shell row is followed by a narrow chain-mesh row that shifts the next fans to sit between the ones below. Two edging rounds wrap the triangle in a firm single crochet outline. After that you add the trunk in rows off the bottom edge and finish with the loop.
Finished Size and Construction
- Finished size: 4.7 in (11.9 cm) wide x 5 in (12.7 cm) tall; 6.5 in (16.5 cm) including the loop
- Skill level: Easy (advanced beginner)
- Terminology: US crochet terms
- Yarn weight: DK (light worsted, weight 3)
- Hook: 3.5 mm (E-4)
- Number of pieces: 1 (the tree body, edging, trunk and loop are all worked onto the same piece)
- Layout: 3-2-1 shell fans in tiers, triangle pointing up
- Triangle size before border: about 4.2 in (10.7 cm) wide x 3.6 in (9.1 cm) tall
- Triangle size after border: 4.7 in (11.9 cm) per side, about 4 in (10.2 cm) tall
- Border depth: 2 rounds, about 0.25 in (0.6 cm) on each edge
- Trunk: 5 stitches x 4 rows, about 1.1 in (2.8 cm) wide x 1 in (2.5 cm) tall
Materials
Yarn: Use a smooth DK cotton or cotton blend at roughly 120 m per 50 g. Cotton gives crisp shell definition and holds its triangle shape after blocking. Avoid fuzzy or very splitty yarns, because the fans and chain spaces lose their outline.
- Color A, sage green (tree body and edging): 8 g, about 19 m
- Color B, cream (trunk and hanging loop): 3 g, about 7 m
Both quantities include a small safety margin for the gauge swatch and weaving in ends. One 50 g ball of each color is enough for several ornaments.
Tools:
- 3.5 mm (E-4) crochet hook
- Tapestry needle
- Scissors
- Stitch markers (2)
- Ruler or tape measure
- Blocking mat and rust-proof pins
- Spray bottle with water
Abbreviations (US Terms)
- ch – chain
- sl st – slip stitch
- sc – single crochet
- hdc – half double crochet
- dc – double crochet
- sk – skip
- sp(s) – space(s)
- st(s) – stitch(es)
- RS – right side
Special stitch – Shell: Work 7 dc in the same stitch. The 4th dc is the center dc of the shell.
Gauge and Checkpoints
Gauge: 18 sc = 4 in (10.2 cm) with a 3.5 mm hook. Hdc rows in this yarn run about 4 rows per 1 in (2.5 cm).
This ornament is small, so make one tree first and treat it as your gauge test. Check it at each of these points:
- After Row 1: the foundation row of 19 sc measures 4.2 in (10.7 cm).
- After Row 2: the first shell row stands about 0.6 in (1.5 cm) tall above Row 1.
- After Row 7: the triangle is about 4.2 in (10.7 cm) wide and 3.6 in (9.1 cm) tall.
- After Round 1 of the border: the base measures about 4.4 in (11.2 cm).
- After Round 2 of the border: each side measures 4.7 in (11.9 cm).
If your piece is too big: go down to a 3.25 mm (D-3) hook. Also check that your chain spaces aren’t loose. Chains that are too relaxed make the side edging bulge.
If your piece is too small: go up to a 3.75 mm (F-5) hook. Make sure you’re pulling each dc up to its full height, because flat shells shorten the triangle.
A difference of 0.2 in (0.5 cm) either way won’t matter for an ornament. Just keep it consistent if you make a set.
Tree Body (Color A)
Work back and forth in rows. Each row is a little narrower than the one before, so the shape tapers to a point.
Row 1 (foundation, RS): With Color A, ch 20. Sc in the 2nd ch from the hook and in each ch across. Turn. (19 sc)
Don’t pull the foundation chain too tight. Its free loops carry the bottom edging later.
Row 2 (first shell row): Ch 1. Sc in the first sc. Sk 2 sc, shell in next sc, sk 2 sc, sc in next sc. Repeat from * to * 2 more times. Turn. (3 shells and 4 sc = 25 sts)
The math: each repeat uses 6 sc of Row 1. 1 + (3 x 6) = 19, so the last sc lands exactly in the last sc of Row 1.
Row 3 (mesh row): Sl st in the first sc and in each of the next 4 dc. You’re now in the center dc of the first shell. Ch 1, sc in the same dc. Ch 3, sc in the next sc between shells, ch 3, sc in the center dc of the next shell. Repeat from * to * once more. Leave the remaining 3 dc and the end sc unworked. Turn. (5 sc and 4 ch-3 sps = 17 sts)
This row converts the shell tops into a mesh line. The sc between shells are the anchors for the next tier of fans.
Row 4 (second shell row): Ch 1. Sc in the first sc (center of the first old shell). Sk the ch-3 sp, shell in the next sc, sk the ch-3 sp, sc in the next sc. Repeat from * to * once more. Turn. (2 shells and 3 sc = 17 sts)
Each new shell sits right between two lower shells, which makes the small open triangles you see in the finished tree.
Row 5 (mesh row): Sl st in the first sc and in each of the next 4 dc. Ch 1, sc in the same dc. Ch 3, sc in the middle sc, ch 3, sc in the center dc of the next shell. Leave the rest unworked. Turn. (3 sc and 2 ch-3 sps = 9 sts)
Row 6 (top shell row): Ch 1. Sc in the first sc, sk the ch-3 sp, shell in the middle sc, sk the ch-3 sp, sc in the last sc. Turn. (1 shell and 2 sc = 9 sts)
Row 7 (tip): Sl st in the first sc and in each of the next 4 dc. Ch 1, sc in the same center dc. (1 sc)
Don’t fasten off. This sc is the tip, and the border starts here.
Checkpoint: The piece should now be about 4.2 in (10.7 cm) wide and 3.6 in (9.1 cm) tall. The sides look stepped at this stage. The border straightens them.
Border (Color A)
Border gauge: same as the body, 18 sc = 4 in (10.2 cm). In this round, side counts include the chain stitches as well as the sc. Every chain becomes a stitch you’ll work into on Round 2.
Round 1: Continue from the tip sc. Ch 2, sc in the same center dc. (Tip corner made: sc, ch-2 sp, sc.)
- Side 1: Ch 3, sc in the end sc of Row 6. Ch 5, sc in the end sc of Row 4. Ch 5, sc in the end sc of Row 2. Ch 1. In the free loop of the first foundation ch at this corner, work (sc, ch 2, sc).
- Bottom: Working into the free loops of the foundation chain, sc in each of the next 17 loops. In the last free loop, work (sc, ch 2, sc).
- Side 2: Ch 1, sc in the end sc of Row 2. Ch 5, sc in the end sc of Row 4. Ch 5, sc in the end sc of Row 6. Ch 3, sl st in the first sc of the round (the Row 7 tip sc).
Count per side (each count includes that side’s 2 corner sc):
- Side 1: 1 + 3 + 1 + 5 + 1 + 5 + 1 + 1 + 1 = 19 sts
- Bottom: 1 + 17 + 1 = 19 sts
- Side 2: 1 + 1 + 1 + 5 + 1 + 5 + 1 + 3 + 1 = 19 sts
Total: 57 sts and 3 corner ch-2 sps.
The bottom works because Row 1 was made with 19 sc. That leaves 19 free loops, all of which you use: 1 corner + 17 + 1 corner. On the sides, the chain lengths were chosen to give the same total of 19, so all three sides match.
Round 2: Sl st into the tip ch-2 sp. Ch 1, (sc, ch 2, sc) in the same sp. Sc in each of the next 19 sts. Work into the actual chains, not around the spaces. (Sc, ch 2, sc) in the next corner ch-2 sp. Repeat from * to * once more. Sc in each of the last 19 sts, then sl st in the first sc. Fasten off. (21 sts per side = 1 corner sc + 19 sc + 1 corner sc; 63 sc total and 3 ch-2 sps)
Why the math works: Each side grows by exactly 2 sts per round, one new corner sc at each end: 19 → 21. At 4.5 sts per inch, 21 sts = 4.7 in (11.9 cm). Because all three sides have the same count, the triangle stays equilateral, with a height of about 4 in (10.2 cm).
Checkpoint: Each side measures 4.7 in (11.9 cm).
Trunk (Color B)
Hold the tree RS facing with the base at the top, so the trunk grows away from the tree. The bottom edge has 21 sts: 1 corner sc + 19 sc + 1 corner sc. Use the center 5 of the 19 middle sc. That leaves 7 sc on each side.
Skip the corner sc and the next 7 sc, then place a marker in the 8th sc. Place a second marker in the 12th sc.
Row 1: Join Color B with a sl st in the marked 8th sc. Ch 2 (doesn’t count as a st). Hdc in the same st and in each st up to and including the 12th sc. Turn. (5 hdc)
Rows 2–4: Ch 2 (doesn’t count as a st), hdc in each hdc across. Turn. (5 hdc)
Fasten off after Row 4. The trunk measures about 1.1 in (2.8 cm) wide and 1 in (2.5 cm) tall. The finished ornament is now about 5 in (12.7 cm) from tip to trunk bottom.
Hanging Loop (Color B)
Loop: Join Color B with a sl st in the tip ch-2 sp. Ch 16, then sl st in the same tip ch-2 sp to form a ring.
Reinforce: Work 16 sc into the ring, around the chain, so they cover it completely. Sl st into the tip ch-2 sp again. Fasten off.
The loop stands about 1.5 in (3.8 cm) above the tip, which brings the total height to about 6.5 in (16.5 cm).
Final Blocking
- Weave in all ends along the edging or inside the trunk stitches. Keep green tails in green stitches and cream tails in cream stitches.
- Mist the ornament with water until it’s damp but not dripping.
- Lay it face up on the blocking mat.
- Pin the three corners first so each side measures 4.7 in (11.9 cm).
- Pin along each side to straighten the edge, especially over the ch-5 sections from Round 1.
- Gently open each shell into an even fan with your fingertips and pin the small triangular gaps open if needed.
- Pin the trunk square at 1.1 in (2.8 cm) x 1 in (2.5 cm), centered under the base.
- Lay the loop flat above the tip.
- Let it dry completely, at least 6–8 hours, before unpinning.
For a stiffer ornament, brush on a light fabric stiffener after pinning and let it dry fully.
Final Quality-Control Checklist
- Rows 2, 4 and 6 have 3, 2 and 1 shells with 7 dc each
- Each upper shell sits between two lower shells
- Round 1 has 19 sts per side, and Round 2 has 21 sts per side
- All three sides measure 4.7 in (11.9 cm)
- The trunk is 5 hdc wide, centered, with 7 sc showing on each side
- The trunk measures about 1 in (2.5 cm) tall
- The loop is firm, centered at the tip, and about 1.5 in (3.8 cm) tall
- All ends are woven in and invisible from the front
- The ornament lies flat without curling
Troubleshooting
The sides bow outward after the border. Your ch-5 sections are too loose. Redo Round 1 with tighter chains, or go down half a hook size just for the chains.
The sides pull inward and the tree cups. The chains are too tight. Loosen your chain tension or use a hook 0.25 mm larger for Round 1.
The shells look crowded or ruffled. Make sure you skip 2 sc on each side of every shell in Row 2. A missed skip adds width.
The upper shells don’t sit centered. In Rows 3, 5 and 7, count the sl sts carefully: 1 into the sc, then 4 into the dc. You should land in the 4th dc of the shell.
The trunk is off-center. Count again from the corner sc: skip the corner plus 7 sc, then work into the next 5. You should see 7 sc showing on each side.
The loop twists. Work the reinforcing sc snugly and evenly, then block the loop flat.
Care
Hand wash in cool water with mild soap, press out the water in a towel, and dry flat, reshaping the triangle as it dries. Store flat or hanging so the fans keep their shape between seasons.
Final Notes
Here’s the measurement chain in one place. Row 1 gives a 19-sc base of 4.2 in (10.7 cm). Shell rows 3-2-1 build a triangle about 3.6 in (9.1 cm) tall. Border Round 1 sets 19 sts on every side, and Round 2 finishes at 21 sts, or 4.7 in (11.9 cm) per side. The 5-hdc trunk adds 1 in (2.5 cm), bringing the ornament to 5 in (12.7 cm). The cream loop brings the total to about 6.5 in (16.5 cm).
If each checkpoint matches, your tree will match too. Make one, check it, then make as many as your branches can hold.
Happy crocheting!