

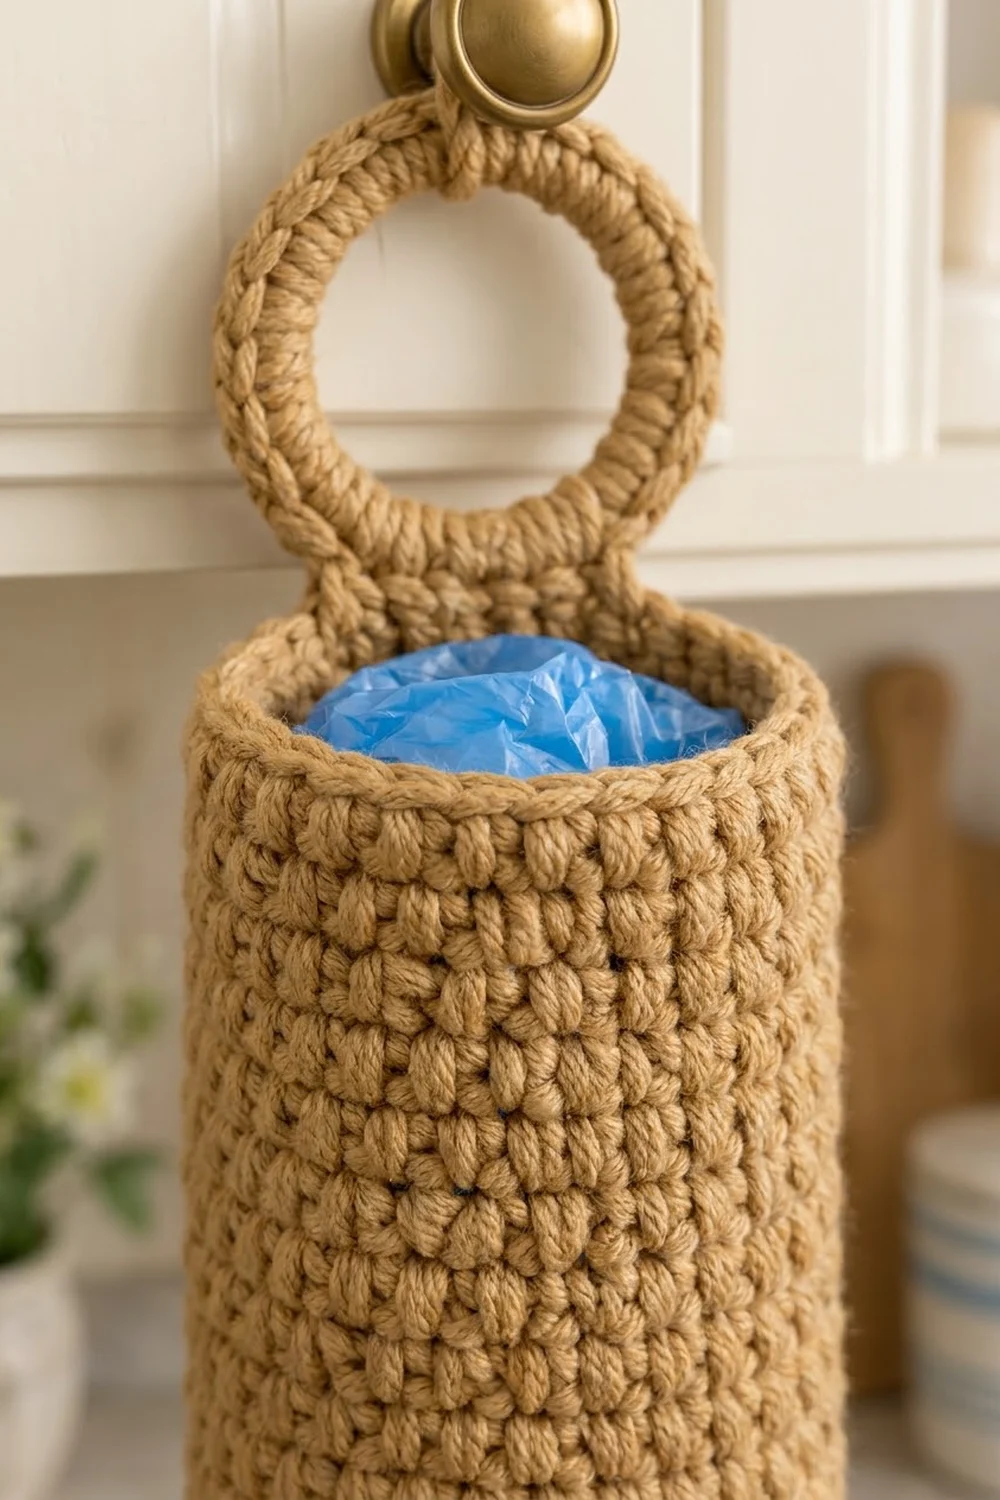
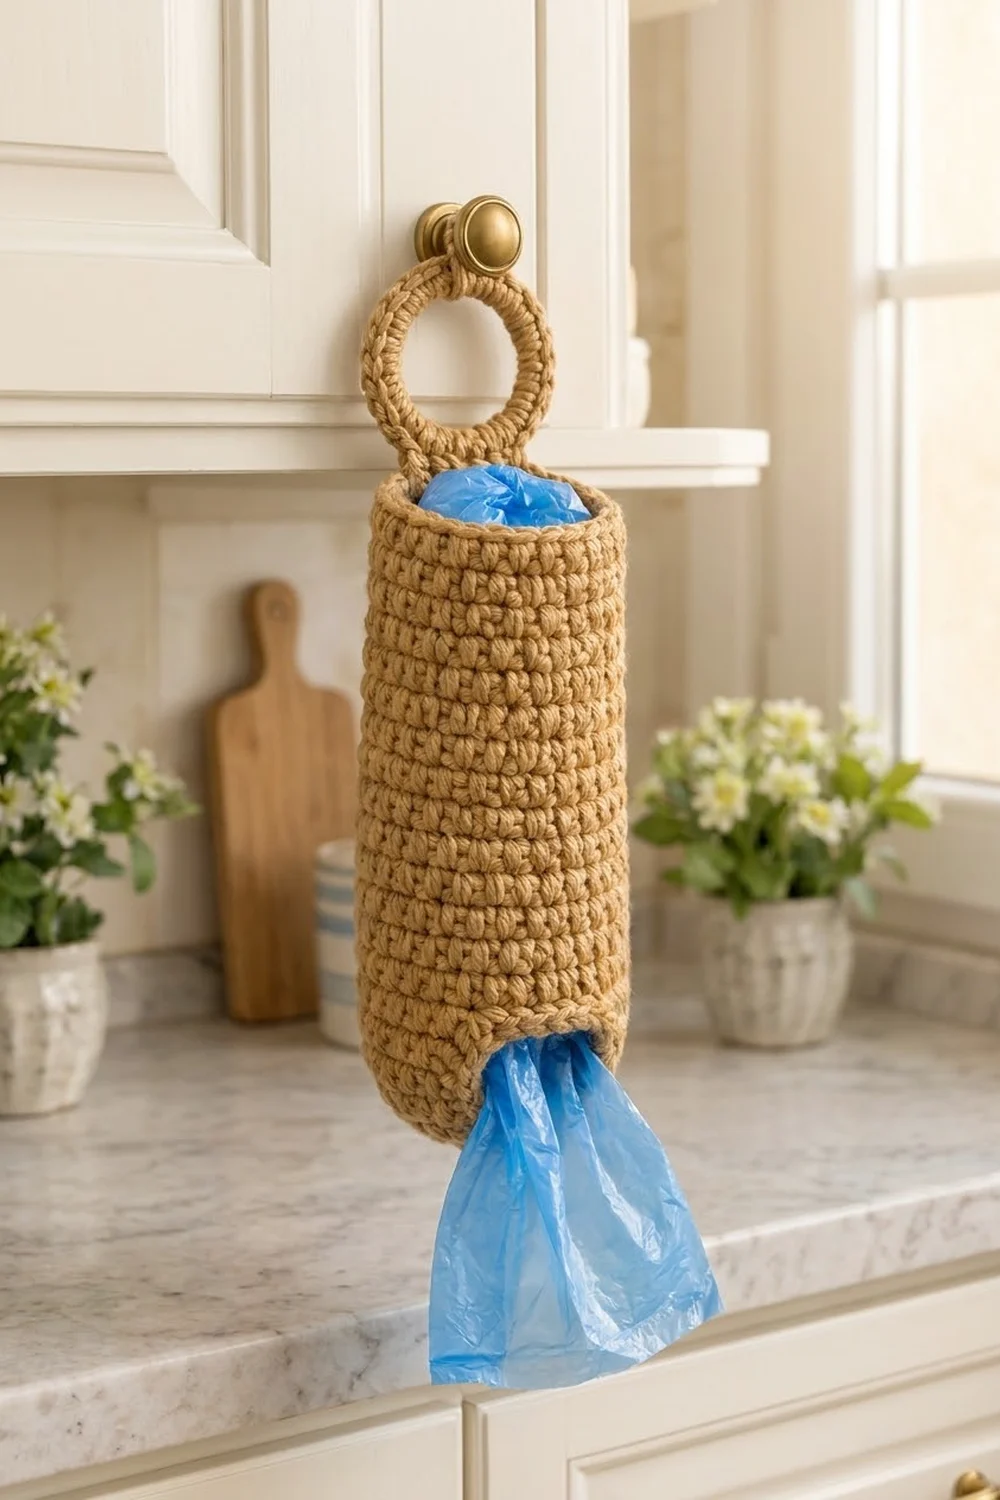
Plastic grocery bags pile up fast, and the Honey Oat Plastic Bag Holder gives them a tidy home. It’s a tall, sturdy tube in warm camel single crochet that hangs from a cabinet knob by a covered ring. You push bags in at the open top and pull them out one at a time through the small hole in the bottom.
The look is simple and natural. One tan shade, tight stitches and a rounded crab-stitch rim make it look at home next to wooden boards, stoneware and white cabinets. Nothing about it is fussy. The dense fabric holds its shape when it’s full and when it’s empty.
This pattern uses US crochet terms. The finished body is about 4.5 in (11.4 cm) wide and 11 in (27.9 cm) tall. With the hanging ring, the total height is about 13.25 in (33.7 cm).
Construction is straightforward. You start with a chain ring that becomes the dispensing hole, increase in flat rounds to make the base, then turn upward with a back-loop round and work even to build the walls. A crab-stitch border finishes the top. Finally, you cover a ring in single crochet and sew it to the back rim.
Finished Size and Construction
- Finished size: 4.5 in (11.4 cm) wide x 11 in (27.9 cm) tall, plus the ring; 13.25 in (33.7 cm) tall overall
- Skill level: Easy
- Terminology: US crochet terms
- Yarn weight: Bulky (#5)
- Hook: 6.0 mm (J-10)
- Number of pieces: 1 finished holder made from 2 components (body and covered ring)
- Layout: Single item; no grid or panel layout
- Piece size: Base 4.5 in (11.4 cm) across, with a hole 1.5 in (3.8 cm) across
- Size before border: 4.5 in (11.4 cm) wide x 10.5 in (26.7 cm) tall
- Border depth: 0.5 in (1.3 cm), 2 rounds
Materials
Yarn: Use a bulky (#5) yarn with good stitch definition. An acrylic or cotton-acrylic blend works best because it’s firm, washable and doesn’t sag much. Avoid very fuzzy or loosely plied yarns, which hide the texture and stretch out when the holder is full.
- Camel/tan (main color): about 180 g / 200 m (219 yd)
This amount includes a margin of about 15 percent for your gauge swatch, joining tails and any frogging.
Tools:
- 6.0 mm (J-10) crochet hook
- One wooden or plastic ring, 2.5 in (6.4 cm) across
- Stitch marker
- Tapestry needle
- Scissors
- Tape measure
- Spray bottle, plus a rolled towel or a 4.5 in (11.4 cm) wide jar for blocking
Abbreviations (US Terms)
- ch – chain
- sl st – slip stitch
- sc – single crochet
- inc – 2 sc in the same stitch
- BLO – back loop only
- st(s) – stitch(es)
- rnd(s) – round(s)
- rep – repeat
Special stitch: Reverse single crochet (crab stitch, rev sc). Work from left to right (right-handed). Insert the hook into the next stitch to the right, yarn over, pull up a loop, then yarn over and pull through both loops on the hook. This makes a twisted, cord-like edge.
Gauge and Checkpoints
Gauge: 12 sc x 13 rnds = 4 in (10.2 cm) in sc worked in joined rounds.
Gauge matters here because the tube has to be wide enough for bags to go in easily and tight enough that they don’t slip through the walls. Before you commit to the whole body, make the base first (Rnds 1–5) and use it as your test piece.
Checkpoints:
- After Rnd 5: The base lies flat and measures 4.5 in (11.4 cm) across. The center hole is about 1.5 in (3.8 cm) across.
- After Rnd 18: The walls measure 4 in (10.2 cm) up from the base fold.
- After Rnd 31: The walls measure 8 in (20.3 cm).
- After Rnd 39: The walls measure 10.5 in (26.7 cm). This is the size before the border.
- After the border: The total height is 11 in (27.9 cm).
If your base is too big: If it’s over 4.75 in (12.1 cm) across, go down to a 5.5 mm hook and restart.
If your base is too small: If it’s under 4.25 in (10.8 cm) across, go up to a 6.5 mm hook.
If the base ruffles or cups: Your tension is changing between rounds. Re-crochet the base at a steady tension before changing hooks.
Pattern
Work in joined rounds. Start each round with ch 1, which doesn’t count as a stitch, and end it with a sl st into the first sc. Don’t turn. The joins form a faint seam line, and that line becomes the back of the holder.
Part 1: Base
Ch 15 and join with a sl st to the first ch to form a ring. Don’t twist the chain. This ring becomes the dispensing hole.
Rnd 1 (conversion round): Ch 1. (Sc in next 4 ch, 2 sc in next ch) 3 times. Join. (18 sts: 15 worked one per chain + 3 extra = 18)
Rnd 2: Ch 1. (Sc in next 2 sts, inc) 6 times. Join. (24 sts)
Rnd 3: Ch 1. (Sc in next 3 sts, inc) 6 times. Join. (30 sts)
Rnd 4: Ch 1. (Sc in next 4 sts, inc) 6 times. Join. (36 sts)
Rnd 5: Ch 1. (Sc in next 5 sts, inc) 6 times. Join. (42 sts)
Checkpoint: the base is 4.5 in (11.4 cm) across, with a hole 1.5 in (3.8 cm) across. Lay it flat. It should be a smooth donut with no ripples.
Part 2: Walls
Rnd 6 (turning round): Ch 1. Sc in the BLO of each st around. Join. (42 sts)
The unworked front loops leave a crisp ridge on the underside, and the fabric starts to rise at a right angle to the base.
Rnds 7–39: Ch 1. Sc in each st around through both loops. Join. (42 sts in each round)
That gives 34 wall rounds in total (Rnds 6–39). Don’t increase or decrease anywhere. Keeping exactly 42 stitches in each round keeps the cylinder straight from bottom to top.
Check the walls against the measurements in Gauge and Checkpoints at Rnds 18, 31 and 39. After Rnd 39, the walls are 10.5 in (26.7 cm) tall and the body is 4.5 in (11.4 cm) wide, or 14 in (35.6 cm) around.
Don’t fasten off. Go straight on to the border.
Part 3: Hanging Ring
Make a slip knot and place it on the hook.
Rnd 1: Hold the 2.5 in (6.4 cm) ring in front of the hook. Insert the hook through the center of the ring, yarn over, pull up a loop and complete a sc around the ring. Rep from * 47 more times, or until the ring is fully covered with no gaps. Join with a sl st to the first sc. (48 sc)
Push the stitches together as you go so they sit side by side, like spokes. If the ring still shows wood or plastic, add sc in multiples of 2 until it’s hidden, and write down your final count.
Rnd 2: Rotate the stitch tops so they face outward. Sl st loosely in the BLO of each sc around. Join. (48 sl st, or your Rnd 1 count)
This round leaves a braided ridge along the outer edge. Fasten off and leave an 18 in (45.7 cm) tail for sewing.
Border
The border keeps the same gauge as the body: 12 sts = 4 in (10.2 cm).
Rnd 40: Ch 1. Sc in each st around. Join. (42 sts)
Rnd 41: Ch 1. Working in reverse (left to right), rev sc in each st around. Join with a sl st to the first rev sc. (42 sts)
Fasten off and weave in the end on the inside.
Why the math works: The holder is round, so it has no corners and no per-side counts. Both border rounds keep the full 42 stitches, so the rim keeps the same 14 in (35.6 cm) circumference as the walls and doesn’t flare or pull in. Crab stitch naturally tightens an edge slightly, which helps the opening hold its round shape. If you added stitches here, the rim would ruffle. If you skipped stitches, the opening would shrink and loading bags would be harder.
Together, the two rounds add 0.5 in (1.3 cm). That takes the body from 10.5 in (26.7 cm) to 11 in (27.9 cm).
Attach the ring: Find the join seam at the back of the body. Hold the covered ring so it overlaps the inside of the back rim by 1 in (2.5 cm), centered over the seam and spanning 6 rim stitches. Using the 18 in (45.7 cm) tail, whipstitch the lower edge of the ring to the inside of the wall through Rnds 38–41.
Then go back over the same 6 stitches a second time. The ring carries the weight of all the bags, so double stitching matters. Knot the tail securely inside and weave it in. About 2.25 in (5.7 cm) of the ring stands above the rim, which brings the overall height to 13.25 in (33.7 cm).
Final Blocking
- Dampen: Mist the whole holder with water until it feels damp but not soaked.
- Shape the tube: Slide in a rolled towel or a tall jar about 4.5 in (11.4 cm) across, so the walls stand straight and round.
- Square the base: Press the base flat around the form. Make sure the hole is centered and about 1.5 in (3.8 cm) across.
- Straighten the seam: Line up the join seam vertically behind the ring.
- Shape the ring: Pat the covered ring into a smooth circle. Make sure the stitches all lean the same way.
- Dry: Let it air-dry completely, which takes about 24 hours. Then remove the form.
- Measure: Confirm 4.5 in (11.4 cm) wide and 11 in (27.9 cm) tall.
Final Quality-Control Checklist
- The base lies flat, with a clean, round hole about 1.5 in (3.8 cm) across.
- Every wall round has 42 sts, and the tube is straight with no taper or flare.
- The BLO ridge at Rnd 6 makes a clear bottom edge.
- The crab-stitch rim is even all the way around, with no skipped stitches.
- The ring is fully covered, with no hard ring material showing.
- The ring is centered over the back seam and double-stitched through Rnds 38–41.
- All ends are woven in on the inside.
- The finished size is 4.5 in (11.4 cm) x 11 in (27.9 cm).
Troubleshooting
The tube flares toward the top: You probably added stitches at the joins. Count every few rounds, and make sure the sl st join isn’t being worked as a stitch.
The tube narrows: You’re skipping the first stitch after the ch 1. Mark the first sc of each round.
The seam slants diagonally: That’s normal for joined rounds. Keep the join in the same stitch each time, and straighten the seam during blocking.
The hole is too big and bags fall out: Go down a hook size for Rnds 1–2, or work a sl st round around the chain ring.
The hole is too tight: Restart with ch 17 and work Rnd 1 as (sc in next 4 ch, 2 sc in next ch) 3 times, sc in last 2 ch, for 20 sts. Then continue Rnds 2–5 as written, but end with 2 extra sts in each round.
The ring droops forward: Move your stitching lower on the ring so more of it is anchored, and stitch through two wall rounds.
The crab stitch looks messy: Loosen your tension and keep a consistent left-to-right rhythm.
Care
Hand wash in cool water with a mild soap, press out the water with a towel, and dry it over a jar or bottle to keep the shape. Don’t put it in the dryer if you used a wooden ring.
Final Notes
Here’s the full measurement chain. A 15-chain ring opens into a 42-stitch base that’s 4.5 in (11.4 cm) across, with a hole 1.5 in (3.8 cm) across. The 34 wall rounds rise 10.5 in (26.7 cm) at a constant 42 stitches. The 2-round crab-stitch border adds 0.5 in (1.3 cm), for a body 11 in (27.9 cm) tall. The covered 2.5 in (6.4 cm) ring adds 2.25 in (5.7 cm), for a total of 13.25 in (33.7 cm).
Check your gauge on the base, count your 42 stitches, and the rest of the holder will turn out right. Happy crocheting!