

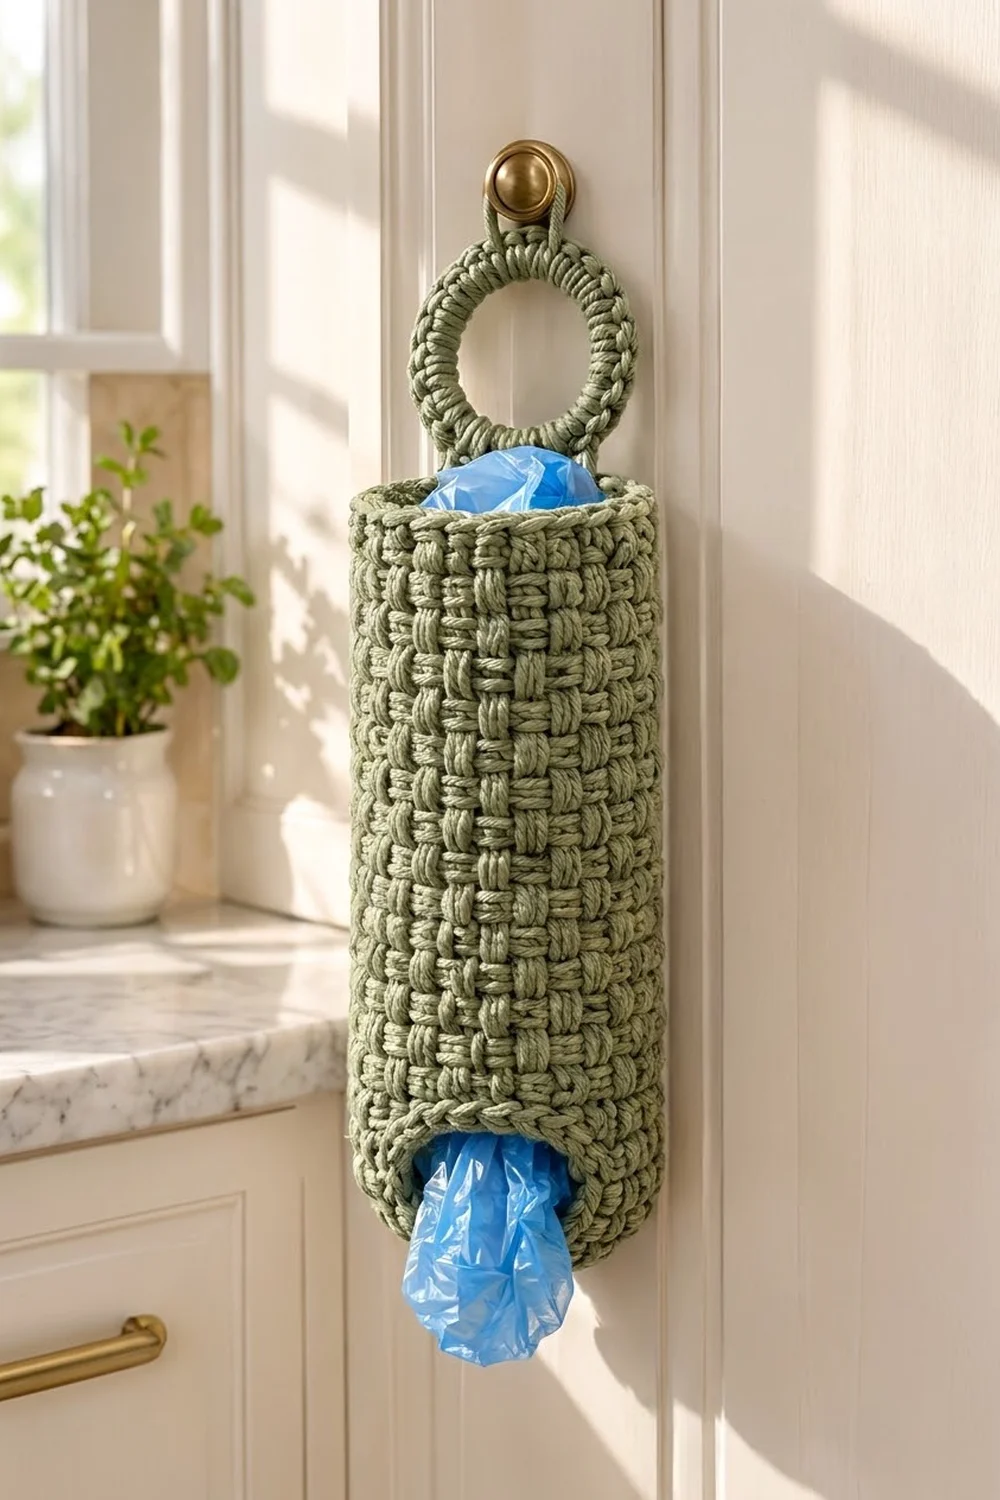
This hanging bag holder turns a pile of loose plastic bags into a tidy, textured column. You stuff bags in through the top and pull them out one at a time through the round opening in the base. A crochet-covered wooden ring at the top hooks over a cabinet knob, door hook or pantry peg.
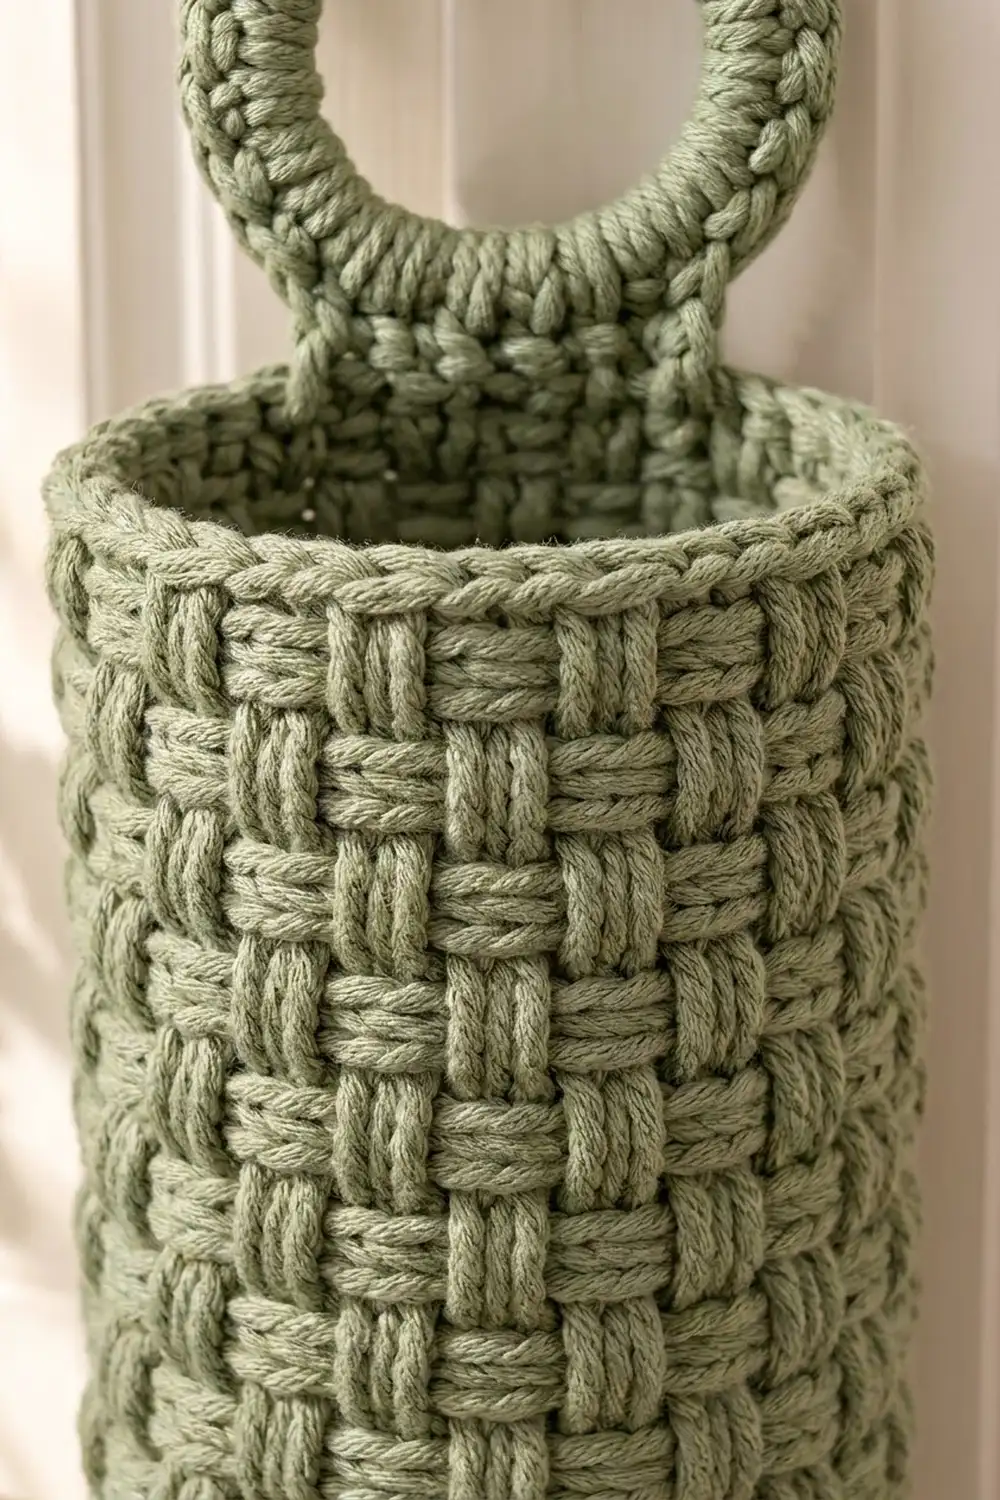
The design uses one calm sage-green yarn and lets the texture do the work. The sides are a 4-stitch basketweave made with front and back post double crochet, which gives a woven, almost wicker-like look. The flat base and the rolled top edge are plain single crochet, so the woven panel stands out clearly. The pattern uses US crochet terms throughout.
The finished body is about 5 in (12.7 cm) across and 15.75 in (40.0 cm) tall. Including the hanging ring, it hangs about 20.5 in (52.1 cm) long.
Construction is simple. You start at the bag opening with a chain ring, then work the flat base outward in single crochet. A back-loop round turns the work upward, and the basketweave sides are worked in joined rounds. A short top edging finishes the rim. Finally, you cover a wooden ring in single crochet, work a small tab from it and sew the tab inside the back of the rim.
Finished Size and Construction
- Finished size: 5 in (12.7 cm) diameter × 15.75 in (40.0 cm) tall body; 20.5 in (52.1 cm) total hanging length
- Skill level: Intermediate (post stitches)
- Terminology: US crochet terms
- Yarn weight: Worsted (#4)
- Hook: 5.0 mm (H-8)
- Number of pieces: 2 (body and covered ring), joined into one holder
- Layout: Ring centered above the back of the rim; body hangs straight below
- Piece size: Body 5 in (12.7 cm) × 15.75 in (40.0 cm); covered ring about 4 in (10.2 cm) across
- Size before border: 5 in (12.7 cm) × 15 in (38.1 cm)
- Border depth: 0.75 in (1.9 cm)
Materials
Yarn: Use a smooth worsted-weight cotton or cotton blend in sage green. Cotton holds the cylinder shape well and shows off the post-stitch texture. Acrylic also works but gives a softer tube that may sag slightly when full. Avoid fuzzy or brushed yarns, which blur the basketweave.
- Sage green: 160 g / 290 m (about 317 yd)
This amount includes a margin of roughly 15% to cover your gauge swatch, tension differences and the sewing tail. Post stitches use noticeably more yarn than plain double crochet, so don’t cut it close.
Tools:
- 5.0 mm (H-8) crochet hook
- 3 in (7.6 cm) wooden or metal ring
- Stitch marker
- Tapestry needle
- Scissors
- Measuring tape
- Spray bottle and a rolled towel or cardboard tube for blocking
Abbreviations (US Terms)
- ch – chain
- sl st – slip stitch
- sc – single crochet
- dc – double crochet
- BLO – back loop only
- FPdc – front post double crochet
- BPdc – back post double crochet
- rev sc – reverse single crochet (crab stitch)
- st(s) – stitch(es)
- rnd(s) – round(s)
Special stitches:
- FPdc: Yarn over and insert the hook from front to back to front around the post of the stitch below. Complete as a dc. The stitch sits raised on the right side.
- BPdc: Yarn over and insert the hook from back to front to back around the post of the stitch below. Complete as a dc. The stitch sits recessed on the right side.
- Rev sc: Working from left to right (right-handed), insert the hook into the next stitch to the right, pull up a loop, yarn over and pull through both loops.
Gauge and Checkpoints
Gauge: 14 sts and 9 rnds = 4 in (10.2 cm) in basketweave. 14 sts and 16 rnds = 4 in (10.2 cm) in sc.
The base works as your test piece. Make Rnds 1–5 and measure before you continue. Your flat base should be about 5 in (12.7 cm) across with a 2.5 in (6.4 cm) opening.
Checkpoints:
- After Rnd 5: the base is about 5 in (12.7 cm) across, lies flat and doesn’t cup.
- After Rnd 11: the side is about 2.5 in (6.4 cm) tall from the base fold. Flattened, the tube is 8 in (20.3 cm) wide, which is half of the 16 in (40.6 cm) circumference.
- After Rnd 23: the side is about 7.75 in (19.7 cm) tall.
- After Rnd 39: the side is about 15 in (38.1 cm) tall.
- After the border: the body is about 15.75 in (40.0 cm) tall.
If your base is too big, go down to a 4.5 mm hook. If it is too small or stiff, go up to a 5.5 mm hook. Rework the base before starting the sides, because the side stitch count depends on it.
Body
Base
The base is worked outward from the bag opening in joined rounds with the right side facing.
Foundation: Ch 28 and join with a sl st to the first ch to form a ring. Don’t twist the chain.
Rnd 1: Ch 1, sc in each ch around, join with a sl st to the first sc. (28 sts)
Rnd 2: Ch 1, sc in next 3 sts, 2 sc in next st; rep from * 7 times total, join. (35 sts)*
Rnd 3: Ch 1, sc in next 4 sts, 2 sc in next st; rep from * 7 times total, join. (42 sts)*
Rnd 4: Ch 1, sc in next 5 sts, 2 sc in next st; rep from * 7 times total, join. (49 sts)*
Rnd 5: Ch 1, sc in next 6 sts, 2 sc in next st; rep from * 7 times total, join. (56 sts)*
Check your measurements now. The 28-stitch ring gives an opening about 8 in (20.3 cm) around, or 2.5 in (6.4 cm) across. The 56-stitch edge gives about 16 in (40.6 cm) around, or about 5 in (12.7 cm) across.
Turning Round
Rnd 6: Ch 1, sc in BLO of each st around, join. (56 sts)
The unused front loops form a neat ridge on the outside, and the work starts to turn upward into a cup.
Sides
Rnd 7 (setup): Ch 2 (does not count as a st), dc in each st around, join with a sl st to the first dc. (56 sts)
This plain round gives the post stitches something to wrap around.
Rnd 8: Ch 2 (does not count as a st), FPdc around next 4 sts, BPdc around next 4 sts; rep from * 7 times total, join. (56 sts: 7 raised blocks and 7 recessed blocks)*
Rnd 9: Repeat Rnd 8. Work FPdc around each FPdc and BPdc around each BPdc. (56 sts)
Rnd 10: Ch 2, BPdc around next 4 sts, FPdc around next 4 sts; rep from * 7 times total, join. (56 sts)*
Rnd 11: Repeat Rnd 10. (56 sts)
Rnds 8–11 make one full basketweave repeat. Because 56 divides into 14 blocks of 4, an even number, the checkerboard lines up perfectly at the join on every round.
Rnds 12–39: Repeat Rnds 8–11 seven more times. (56 sts in every round)
You now have 8 repeats, which is 32 pattern rounds or 16 rows of blocks. The side should measure about 15 in (38.1 cm) from the base fold.
Tip: place a marker in the first stitch of each round. Post-stitch joins can drift, and the marker keeps your blocks stacked straight.
Hanging Ring
Covering rnd: Make a slip knot on your hook. Working over the 3 in (7.6 cm) ring, sc around the ring until it is fully covered and the stitches are packed shoulder to shoulder. Join with a sl st to the first sc. (60 sts)
If the ring still shows, add 2–4 sc evenly before joining. If the stitches buckle, remove 2–4. The covered ring measures about 4 in (10.2 cm) across.
Tab: Don’t fasten off.
Row 1: Ch 1, sc in the outer loops of the next 6 sts of the cover. (6 sts)
Rows 2–8: Ch 1, turn, sc in each st across. (6 sts per row)
The tab measures about 1.75 in (4.4 cm) wide × 2 in (5.1 cm) long. Fasten off, leaving a 12 in (30.5 cm) tail for sewing.
Border
The border is worked around the top rim of the body, followed by one finishing round around the bag opening.
Border gauge: 14 sts = 4 in (10.2 cm) in sc, the same as the basketweave.
Top Rim
Border Rnd 1: With the body’s right side facing, ch 1. Sc in each st around, join. (56 sts: 56 worked 1 per existing st + 0 added) If you flatten the tube, that is 28 sts across the front half and 28 sts across the back half.
Border Rnd 2: Ch 1, sc in each st around, join. (56 sts; 28 front, 28 back)
Border Rnd 3: Ch 1, rev sc in each st around, join. (56 sts; 28 front, 28 back) Fasten off and weave in the end.
Why the math works: the border keeps exactly 56 stitches, the same count as the sides. At 14 sts per 4 in (10.2 cm), 56 stitches equal 16 in (40.6 cm), matching the body’s circumference. The rim stays the same width as the tube without flaring or pulling in. Three rounds of sc add about 0.75 in (1.9 cm) of height, bringing the body from 15 in (38.1 cm) to 15.75 in (40.0 cm).
Bag Opening Trim
Opening Rnd: Join yarn to the free loop of any foundation chain at the base opening. Ch 1, then sc in each foundation ch around, join. (28 sts: 28 worked 1 per existing ch + 0 added) Fasten off.
This round firms up the opening so it doesn’t stretch out as bags are pulled through. The opening stays at 2.5 in (6.4 cm) across.
Attaching the Ring
Choose the back of the body, centered on a recessed block so the ring sits in line with the pattern. Slide the tab inside the rim so that 1.25 in (3.2 cm) overlaps the inside wall. That leaves 0.75 in (1.9 cm) of tab between the top of the rim and the bottom of the ring.
Using the tail, whipstitch all four edges of the overlapped section to the inner wall, going through the back bumps of the stitches only. Your sewing will be hidden on the outside. Make a second pass across the top edge of the rim for strength, because this seam carries the full weight of the bags.
Final Blocking
- Lightly mist the whole holder with water until it is damp but not soaked.
- Slide a rolled towel or a 5 in (12.7 cm) cardboard tube into the body.
- Smooth the basketweave blocks so the columns run straight up and down.
- Lay the base flat and gently ease the opening into a true circle.
- Pinch the reverse sc rim into an even, rounded edge.
- Press the covered ring flat so the stitches all face outward.
- Let it dry completely, about 24 hours, before removing the form.
Final Quality-Control Checklist
- Every side round has 56 sts, and the blocks form a clean checkerboard.
- The basketweave columns run vertically with no spiral at the join.
- The base lies flat, and the opening is a smooth 2.5 in (6.4 cm) circle.
- The body measures about 5 in (12.7 cm) across and 15.75 in (40.0 cm) tall.
- The ring cover hides the ring completely.
- The tab is sewn securely on all four sides and can’t be seen from the front.
- All ends are woven in at least 2 in (5.1 cm) along post stitches.
Troubleshooting
Blocks are drifting into a spiral: Always make the join sl st into the top of the first stitch, not the ch-2. Keep your marker in place.
Base cups or ruffles: Cupping means the base is too tight, so go up a hook size. Ruffling means it is too loose, so go down a hook size.
Tube is too narrow: Post stitches pull in. Use a larger hook for the sides only, and keep 56 sts.
Rim flares: Work Border Rnds 1–2 with a hook one size smaller.
Ring tilts forward: Shorten the visible part of the tab by sewing in more overlap, up to 1.5 in (3.8 cm).
Bags fall out on their own: Work a second round of sc around the bag opening, decreasing evenly to 24 sts.
Care
Hand wash in cool water, press out the water in a towel and dry flat over a tube to keep the shape. Remove the bags before washing.
Final Notes
Each stage builds on the one before. The 28-stitch ring gives a 2.5 in (6.4 cm) opening. Increasing to 56 stitches gives a 5 in (12.7 cm) base. Keeping those 56 stitches through 33 side rounds builds 15 in (38.1 cm) of basketweave. The 56-stitch border adds 0.75 in (1.9 cm) for a 15.75 in (40.0 cm) body. The covered ring and tab bring the total hanging length to 20.5 in (52.1 cm). If you check each measurement as you go, the holder will come out straight and sturdy.
Happy crocheting!