

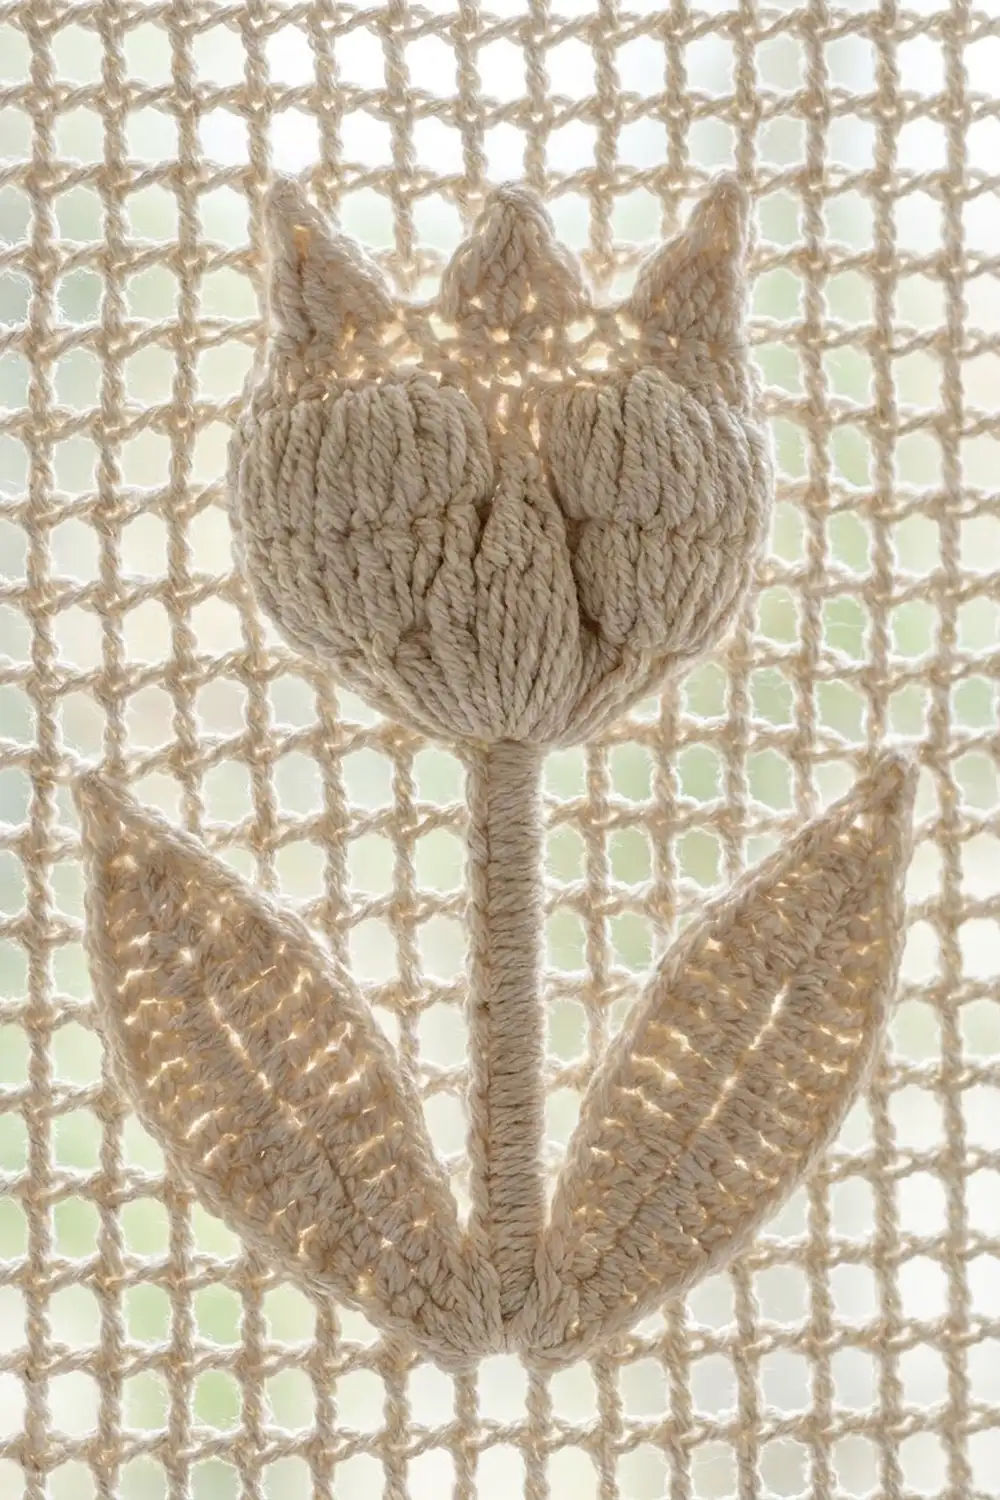
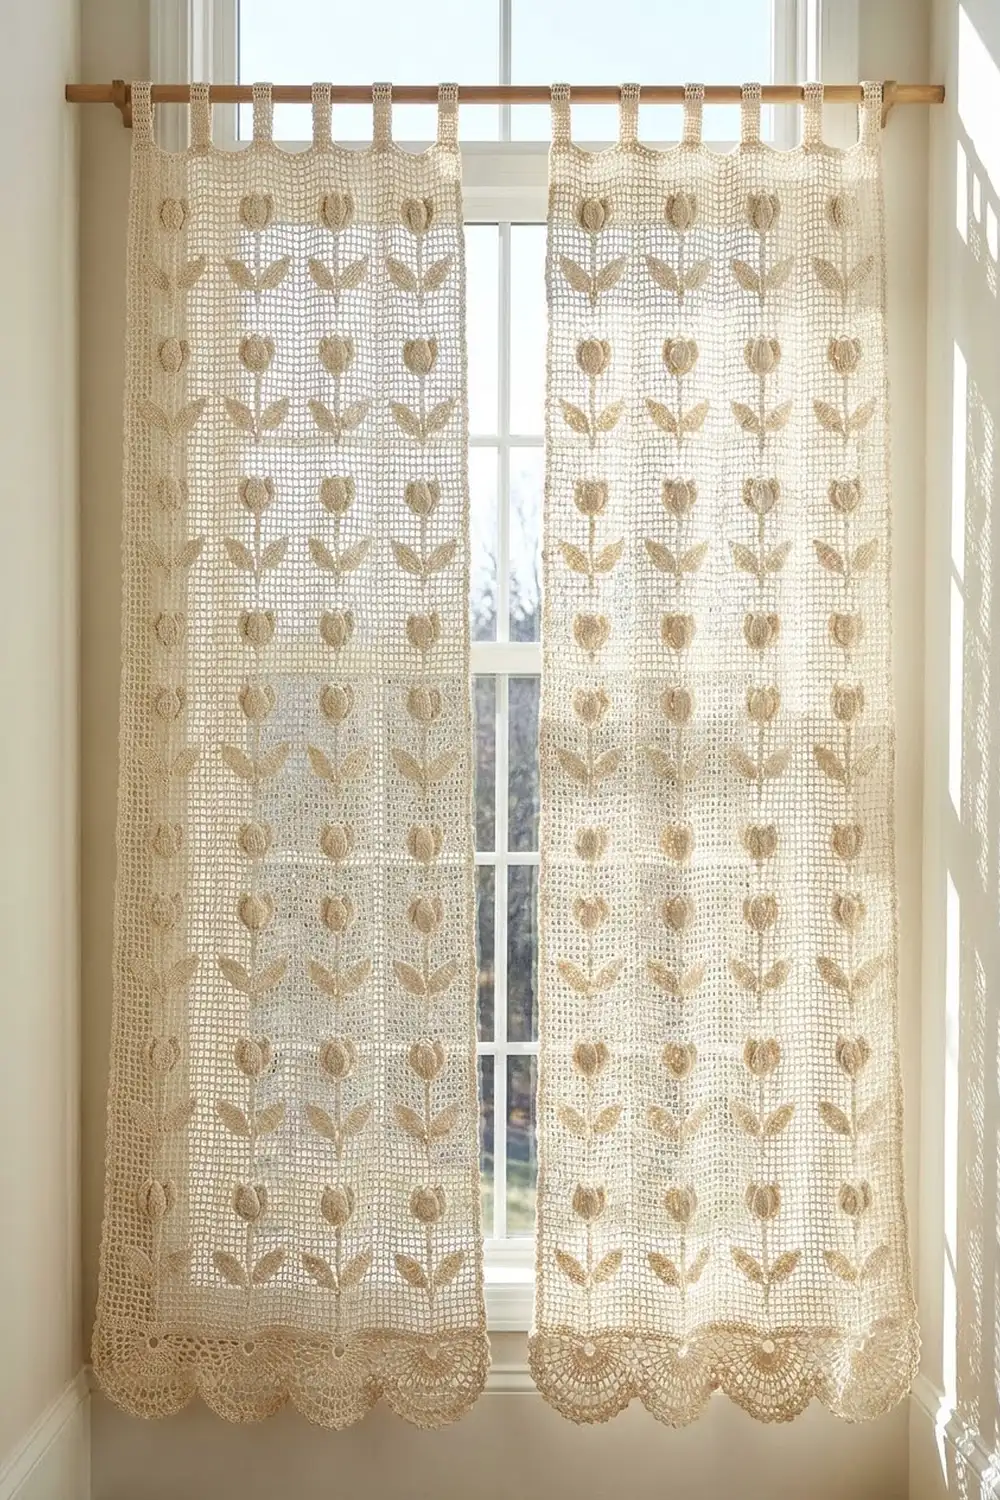
The Tulip Lattice Curtain is a tall, airy filet crochet panel in soft cream cotton. Columns of raised tulips grow up through an open square mesh. Each tulip has a solid stem, two pairs of angled leaves, and a plump puff-stitch flower head. A deep border of lacy fans finishes the lower edge, and loop tabs at the top slide straight onto a curtain rod.
The style is calm and cottage-like, using one color and plenty of open mesh. The texture shows best when sun comes through the panel. Make one panel for a narrow window or door, or make two identical panels to frame a window as a pair.
This pattern uses US crochet terms. After blocking, one finished panel measures 30 in (76.2 cm) wide and 75.8 in (192.5 cm) long from the top of the tabs to the points of the scallops.
You work the panel in one piece from the bottom up in filet rows. Open mesh squares form the background, solid blocks form the stems and leaves, and puff blocks form the tulip heads. Next you work ten loop tabs off the top edge and add the fan border along the foundation chain. A row of sc finishes each long side.
Finished Size and Construction
- Finished size (one panel): 30 in (76.2 cm) × 75.8 in (192.5 cm), including tabs and border
- Skill level: Intermediate
- Terminology: US crochet terms
- Yarn weight: DK (#3 light) cotton
- Hook: 4.0 mm (US G-6)
- Number of pieces: 1 panel, worked in one piece (for a pair, make a second identical panel)
- Layout: 5 tulip columns across × 6 tulips up = 30 tulips
- Motif repeat: 15 squares × 27 rows = 6 in (15.2 cm) × 12 in (30.5 cm)
- Size before border: 30 in (76.2 cm) × 72 in (182.9 cm), which is 75 squares × 162 rows
- Border depth: 2 in (5.1 cm)
- Tab loops: 1.8 in (4.6 cm) tall when folded
Materials
Yarn: Use a smooth mercerized or combed DK cotton in cream, ivory, or natural. Cotton keeps the mesh crisp, shows off the puff texture, and hangs straight without stretching. Avoid fuzzy yarns, because they blur the squares.
- Cream: 650 g / approx. 1430 m (1564 yd) per panel
- For a pair: 1300 g / approx. 2860 m (3128 yd)
These amounts include a margin of about 10% for the swatch and small differences in tension. Buy all the yarn from one dye lot.
Tools:
- 4.0 mm (US G-6) crochet hook
- Tapestry needle
- 4–6 locking stitch markers
- Measuring tape
- Rust-proof pins and blocking mats
- Spray bottle
- Curtain rod, up to 1 in (2.5 cm) in diameter
Abbreviations (US Terms)
- ch – chain
- sc – single crochet
- dc – double crochet
- yo – yarn over
- sk – skip
- sp(s) – space(s)
- st(s) – stitch(es)
- RS / WS – right side / wrong side
Special stitches and filet units:
- Puff st: (yo, insert hook in st or sp, yo and pull up a loop to dc height) 3 times, yo and pull through all 7 loops on hook.
- M (mesh): ch 2, sk the next 2 sts (or the ch-2 sp), dc in next dc.
- B (block): over a mesh, 2 dc in the ch-2 sp, then dc in next dc. Over a block, dc in each of the next 3 dc.
- P (puff block): over a mesh, (puff st, ch 1) in the ch-2 sp, then dc in next dc. Over a puff block, (puff st, ch 1) in the next ch-1 sp, then dc in next dc. Over a block, sk 1 dc, puff st in next dc, ch 1, then dc in next dc.
Every M, B, and P uses exactly 3 sts, so the stitch count never changes from row to row.
Gauge and Checkpoints
Gauge: in filet mesh after blocking, 10 squares = 4 in (10.2 cm) wide and 9 rows = 4 in (10.2 cm) tall.
Test a swatch first. Ch 41. Dc in 8th ch from hook, then ch 2, sk 2 ch, dc in next ch 11 times, for 12 squares. Work 9 more rows of mesh. Block the swatch, then measure 10 squares and 9 rows in the center.
- Too many squares per 4 in (panel will be too small): go up a hook size.
- Too few squares per 4 in (panel will be too big): go down a hook size.
- Width is right but rows are too short: pull each dc up a little taller instead of changing hooks.
Checkpoints:
- After Row 1: 30 in (76.2 cm) wide, 75 squares, 226 sts.
- After Row 27 (one motif): 12 in (30.5 cm) tall.
- After Row 81 (three motifs): 36 in (91.4 cm) tall.
- After Row 162: 72 in (182.9 cm) tall, still 30 in (76.2 cm) wide.
If the width drifts more than 0.5 in (1.3 cm), check whether you are adding or missing a dc at the row ends.
Body of the Panel
Turning rule: start every row from Row 2 onward with ch 3, turn (counts as first dc), then work 75 squares. Work the last dc of each row into the top of the turning chain. Every row has 226 sts: 76 dc posts plus 150 sts in the squares between them.
Row 1 (foundation): Ch 230. Dc in 8th ch from hook (the skipped chs count as first dc, ch-2, and 2 skipped chs). Ch 2, sk 2 ch, dc in next ch, repeat 74 times. (75 M; 226 sts.) At the end of Row 2, work the last dc into the top corner ch of those skipped 7 chs.
Rows 2–162: Follow the motif below. Each line gives one 15-square repeat; work it 5 times across each row (75 squares). Body Rows 1–27 are motif Rows 1–27, Rows 28–54 repeat the motif, and so on, for 6 repeats. Body Rows 160–162 are the header (see below).
Tulip Motif (15 squares × 27 rows)
The motif is symmetrical, so read every row the same way on both RS and WS rows. The stitch totals in parentheses are for the full row.
- Motif Rows 1–2: M15. (75 M.)
- Motif Rows 3–4 (stem): M7, B1, M7. (5 B, 70 M.)
- Motif Row 5 (leaf base): M5, B5, M5. (25 B, 50 M.)
- Motif Row 6: M4, B2, M1, B1, M1, B2, M4. (25 B, 50 M.)
- Motif Row 7: M3, B2, M2, B1, M2, B2, M3. (25 B, 50 M.)
- Motif Row 8 (leaf tips): M3, B1, M3, B1, M3, B1, M3. (15 B, 60 M.)
- Motif Rows 9–10 (stem): M7, B1, M7. (5 B, 70 M.)
- Motif Row 11 (upper leaf base): M5, B5, M5. (25 B, 50 M.)
- Motif Row 12: M4, B2, M1, B1, M1, B2, M4. (25 B, 50 M.)
- Motif Row 13 (upper leaf tips): M4, B1, M2, B1, M2, B1, M4. (15 B, 60 M.)
- Motif Rows 14–15 (stem): M7, B1, M7. (5 B, 70 M.)
- Motif Row 16 (tulip base): M6, P3, M6. (15 P, 60 M.)
- Motif Rows 17–19 (tulip cup): M5, P5, M5. (25 P, 50 M.)
- Motif Row 20 (petal tips): M5, P1, M1, P1, M1, P1, M5. (15 P, 60 M.)
- Motif Rows 21–27: M15. (75 M.)
Each leaf starts at the stem, moves one square outward on each row, and ends in a single-square tip, so the leaves angle up and away from the stem. The cup is 5 squares (2 in / 5.1 cm) wide and 5 rows tall. On Row 20, the three single puff blocks make the pointed petal tips. As you work, push each puff toward the RS so the heads stay raised.
Header (Body Rows 160–162)
In the sixth repeat, work motif Rows 1–24 as usual (body Rows 136–159), then:
- Rows 160–162: Ch 3, turn, B75 across. (226 dc in each row.)
Checkpoint: 72 in (182.9 cm) tall, 30 in (76.2 cm) wide.
Loop Tabs
With RS facing, work the tabs onto the 226 dc of Row 162. Each tab is 10 sts wide, and 14 sts are left unworked between tabs.
Tab Row 1: Join yarn in the first st of the tab. Ch 3 (counts as dc), dc in next 9 sts. (10 dc.)
Tab Rows 2–8: Ch 3, turn, dc in each st across. (10 dc.)
Fasten off, leaving a 12 in (30.5 cm) tail.
Start the tabs in sts 1, 25, 49, 73, 97, 121, 145, 169, 193, and 217. The last tab ends in st 226, so both outer tabs line up with the side edges: 10 tabs × 10 sts + 9 gaps × 14 sts = 226.
Each tab is 1.3 in (3.3 cm) wide and 3.6 in (9.1 cm) long. Fold each tab to the WS and whipstitch its last row along Row 162, just below the top edge. This makes a 1.8 in (4.6 cm) loop.
Border
Border gauge: each fan spans 3 squares, so each scallop is 1.2 in (3.0 cm) wide. 25 fans × 1.2 in = 30 in (76.2 cm), which matches the panel width. The border adds 2 in (5.1 cm) of depth.
With RS facing, turn the panel so the foundation chain is at the top. Join yarn at the base of the first dc on the right.
Border Row 1: Ch 1, sc in base of same dc, ch 3, sc in base of next dc, repeat 75 times. (76 sc, 75 ch-3 sps.) Each ch-3 is one chain longer than the ch-2 it spans, which stops the edge from pulling in.
Border Row 2: Ch 1, turn, sc in first sc, sk next ch-3 sp and next sc, 9 dc in next ch-3 sp, sk next sc and next ch-3 sp, sc in next sc, repeat 25 times. (25 fans of 9 dc and 26 sc; 251 sts.)
Border Row 3: Ch 1, turn, sc in first sc, ch 2, dc in next dc, (ch 1, dc in next dc) 8 times, ch 2, sc in next sc, repeat 25 times. (Each fan: 9 dc, 8 ch-1 sps, 2 ch-2 sps. Total: 225 dc, 200 ch-1 sps, 50 ch-2 sps, 26 sc.)
Border Row 4: Ch 1, turn, sc in first sc, ch 1, sk ch-2 sp, sc in next ch-1 sp, (ch 3, sc in next ch-1 sp) 7 times, ch 1, sk ch-2 sp, sc in next sc, repeat 25 times. (Each fan: 8 sc, 7 ch-3 loops. Total: 226 sc, 175 ch-3 loops.) Fasten off.
Why the math works: 75 squares divide evenly into groups of 3, so you get 25 fans with nothing left over and an sc anchor at each corner.
Side Edging
With RS facing, join yarn at the top corner of one long side (the end of Row 162). Ch 1. Work 2 sc around each dc row-end down the 162 body rows (324 sc). Then work 1 sc in the end of Border Row 1, 2 sc in each end of Border Rows 2 and 3, and 1 sc in the end of Border Row 4 (6 sc). (330 sc per side.) Fasten off. Repeat on the other side, starting at the bottom corner.
Two sc per dc row matches the row height, so the edge lies flat without ruffling or tightening.
Final Blocking
- Weave in all ends along solid blocks or header rows, where they hide best.
- Soak the panel in cool water with a little wool wash for 15 minutes. Press out the water; don’t wring it.
- Roll the panel in towels to remove extra water.
- Lay it flat RS up and pin the top corners 30 in (76.2 cm) apart.
- Pin down each side to 72 in (182.9 cm), measured from the top of the header to the base of Border Row 1. Keep the squares square.
- Pin each of the 25 scallops at its center loop, and keep the dips between fans in a straight line.
- Pinch each tulip head from behind so the puffs stand up, and shape the leaf tips into points.
- Leave the panel to dry completely, for at least 24 hours.
Final Quality-Control Checklist
- The panel is 30 in (76.2 cm) wide at the top, middle, and bottom.
- The body is 72 in (182.9 cm) long, and the total length is 75.8 in (192.5 cm).
- All 30 tulips sit in 5 straight columns.
- Every row has 75 squares, with no extra or missing dc at the edges.
- The leaves come in matching pairs on both sides of each stem.
- The 10 tabs are evenly spaced, and the outer tabs line up with the edges.
- All 25 fans are the same size.
- No ends show on the RS.
Troubleshooting
- Squares look rectangular: your dc are too short. Pull each dc up taller, or block more firmly.
- Tulip heads look flat: pull the puff loops up to full dc height and push them to the RS.
- Motif is off by one square: count squares instead of stitches, and place a marker at the start of each 15-square repeat.
- Bottom edge pulls in: keep the Border Row 1 chains loose, or ch 4 instead of ch 3.
- Fans ruffle: use a hook half a size smaller for Border Rows 2–4.
- Tabs twist: whipstitch across the full width of each tab.
Care
Hand wash in cool water and dry flat, pinning lightly if the mesh shifts. Over time, strong direct sun can yellow cotton.
Final Notes
Here is the measurement chain. Since 10 squares = 4 in (10.2 cm), 75 squares = 30 in (76.2 cm). Since 9 rows = 4 in (10.2 cm), each 27-row motif = 12 in (30.5 cm), and 162 rows = 72 in (182.9 cm). Adding 2 in (5.1 cm) of border and 1.8 in (4.6 cm) of tab loops gives 75.8 in (192.5 cm). Check your gauge before you start and again after the first motif, and the panel will hang straight.
Happy crocheting!