

The Ember Bell is a flat, lacy Christmas bell ornament. It has a solid little crown, five slim spokes that open into airy windows, and a sturdy flared rim with a round clapper at the bottom. It looks like a classic filigree bell, but you can finish it in under an hour.
The sample is worked in one color, a warm rust orange that looks great against green branches and gold lights. Any single color works well. Deep red, cream, metallic gold, or forest green all keep the bell’s outline crisp.
This pattern uses US crochet terms. The finished bell measures 4.6 in (11.7 cm) wide and 4.5 in (11.4 cm) tall including the hanging loop. The bell body without loop or clapper is 3.2 in (8.1 cm) tall.
Construction is simple and done in stages. You crochet the crown in rows from the top down, then chain-and-slip-stitch five spokes off its lower edge. The rim is built across the spoke tips and worked in rows. Then you add a single crochet border around the rim, sew on a small circle as the clapper, and finish with a twisted hanging loop.
Finished Size and Construction
- Finished size: 4.6 in (11.7 cm) wide × 4.5 in (11.4 cm) tall with loop
- Bell body height (crown to border): 3.2 in (8.1 cm)
- Skill level: Easy / Advanced Beginner
- Terminology: US crochet terms
- Yarn weight: DK (3), cotton or cotton blend
- Hook: 3.5 mm (E-4)
- Number of pieces: 1 ornament (bell body plus a small sewn-on clapper disc)
- Layout: single bell, worked flat
- Crown width: 1.8 in (4.6 cm)
- Rim width before border: 4.2 in (10.7 cm)
- Border depth: 0.2 in (0.5 cm) per edge
Materials
Yarn: Choose a smooth, firmly plied DK cotton. Cotton holds its shape and shows stitch definition, so the spokes stay straight and the windows stay open. Avoid fuzzy or very stretchy acrylics, because the spokes will droop.
- Rust orange (Main Color): 8 g, about 20 m
Tools:
– 3.5 mm (E-4) crochet hook
– Tapestry needle
– Scissors
– 2 stitch markers
– Blocking mat and rust-proof pins
– Optional: spray starch or fabric stiffener
All yarn quantities include a small margin for gauge swatching and weaving in ends. One bell actually uses about 6 g.
Abbreviations (US Terms)
- ch – chain
- sl st – slip stitch
- sc – single crochet
- hdc – half double crochet
- BLO – back loop only
- st(s) – stitch(es)
- RS / WS – right side / wrong side
- [ ] – repeat the instructions inside brackets as directed
Special stitch – Braided Spoke: Ch the stated number, then sl st in the 2nd ch from the hook and in each remaining ch back to the crown. Work the sl sts into the back bump of the chain. This doubles the chain into a firm, rope-like bar with a slightly braided look. The skipped chain at the bottom is called the spoke tip.
Standing sc: Start with a slip knot on the hook, insert the hook in the stitch, yarn over, pull up a loop, yarn over, and pull through both loops.
Gauge and Checkpoints
Gauge: 20 sc × 22 rows = 4 in (10.2 cm) in sc with a 3.5 mm hook.
Spoke gauge: about 6 sl sts = 1 in (2.5 cm) along a braided spoke.
Gauge matters here, because the spoke lengths have to match the crown and rim widths. Make the crown first and measure it before you continue.
Checkpoints:
– After Row 4: crown is 9 sts and 1.8 in (4.6 cm) wide.
– After Row 5: crown is 0.9 in (2.3 cm) tall.
– Inner spokes: 1.3 in (3.3 cm) long. Outer spokes: 1.5 in (3.8 cm) long.
– After Row 7: rim foundation is 3.4 in (8.6 cm) wide.
– After Row 10: rim is 4.2 in (10.7 cm) wide and 0.8 in (2.0 cm) tall.
– After border: bell is 4.6 in (11.7 cm) wide.
If your crown is too big (over 1.9 in / 4.8 cm), go down to a 3.25 mm hook. If it is too small (under 1.7 in / 4.3 cm), go up to a 3.75 mm hook. Spokes that are too long make the windows sag. Spokes that are too short pull the rim upward.
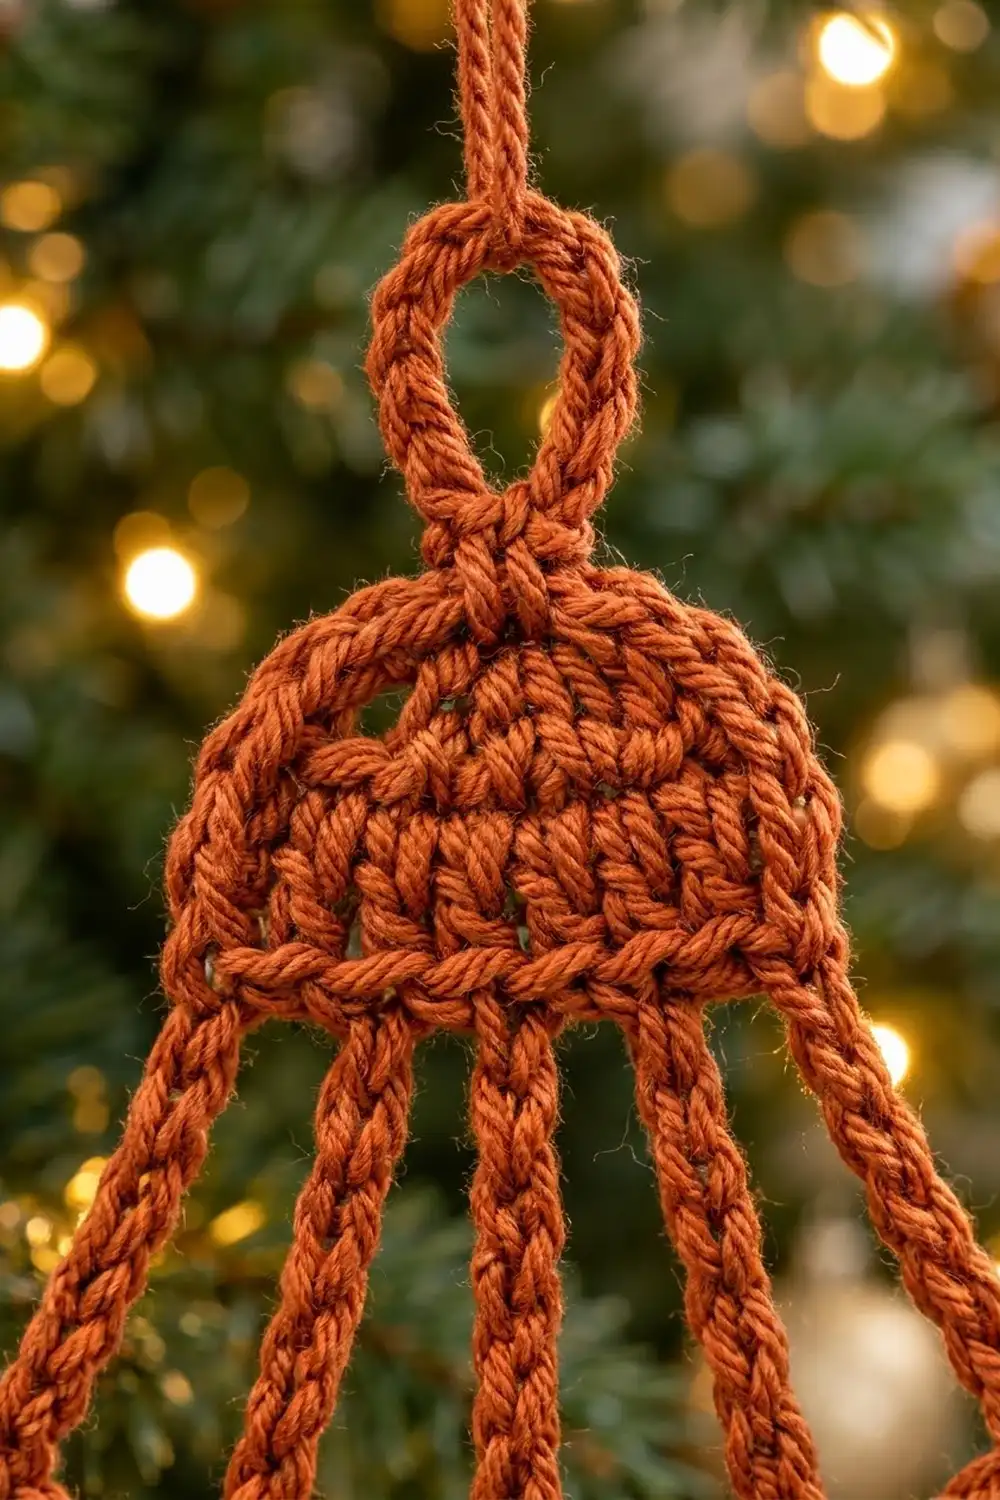
Crown (Rows 1–5)
The crown is worked flat in rows from the top down. It widens into a rounded dome.
Row 1 (RS): Ch 4. Sc in 2nd ch from hook and in each of next 2 ch, turn. (3 sc)
Row 2 (WS): Ch 1 (does not count as a st here and throughout). 2 sc in first st, sc in next st, 2 sc in last st, turn. (5 sc)
Row 3: Ch 1, 2 sc in first st, sc in next 3 sts, 2 sc in last st, turn. (7 sc)
Row 4: Ch 1, 2 sc in first st, sc in next 5 sts, 2 sc in last st, turn. (9 sc)
Checkpoint: 1.8 in (4.6 cm) wide.
Row 5 (RS): Ch 1, sc in BLO of each st across, turn. (9 sc)
Working in the back loop leaves the front loops showing on the RS. They form the raised ridge line along the bottom of the crown.
Checkpoint: crown is 0.9 in (2.3 cm) tall.
The increases at both ends of Rows 2–4 step outward evenly, which gives the crown its rounded dome shape.
Spokes (Row 6)
All five spokes come off Row 5, in sts 1, 3, 5, 7, and 9. That leaves one unused st between neighboring spokes.
Row 6 (WS): Ch 1, sl st in first st.
- Outer Spoke 1: Ch 10, sl st in 2nd ch from hook and in each of next 8 ch (9 sl sts). Sl st again in the same crown st.
- [Sl st in next 2 sts. Inner Spoke: Ch 9, sl st in 2nd ch from hook and in each of next 7 ch (8 sl sts), sl st again in the same crown st] 3 times. These spokes sit in sts 3, 5, and 7.
- Sl st in next 2 sts, ending in st 9.
- Outer Spoke 2: Ch 10, sl st in 2nd ch from hook and in each of next 8 ch (9 sl sts), sl st again in the same crown st.
Fasten off and weave in the end.
Spoke count check: 2 outer spokes × 9 sl sts plus 3 inner spokes × 8 sl sts makes 5 spokes total.
Checkpoint: inner spokes 1.3 in (3.3 cm), outer spokes 1.5 in (3.8 cm).
The outer spokes are one stitch longer because they run at an angle. The rim foundation is 0.8 in (2.0 cm) wider than the crown on each side. With a 1.3 in (3.3 cm) drop, that diagonal works out to about 1.5 in (3.8 cm).
Rim (Rows 7–10)
Lay the crown flat with the RS facing you and the spokes hanging straight down in order. Check that none of the spokes are twisted.
Row 7 (RS, foundation): Join yarn with a standing sc in the tip of the right-hand outer spoke. [Ch 3, sc in tip of next spoke] 4 times, turn. (5 sc + 12 ch = 17 sts)
Checkpoint: 3.4 in (8.6 cm) wide.
Three chains per gap matches the sc gauge, so the rim lies flat without pulling the spokes together. The bell’s flare comes from this row being nearly twice as wide as the crown.
Row 8 (WS): Ch 1, sc in each sc and in each ch across, turn. (17 sc)
Row 9 (RS): Ch 2 (does not count as a st), 2 hdc in first st, hdc in next 15 sts, 2 hdc in last st, turn. (19 hdc)
Row 10 (WS): Ch 1, 2 sc in first st, sc in next 17 sts, 2 sc in last st. (21 sc)
Fasten off.
Checkpoint: 4.2 in (10.7 cm) wide, rim 0.8 in (2.0 cm) tall.
Rows 9 and 10 each add 1 stitch at each end, so the rim spreads outward like a bell mouth.
Border
The border goes around the rim only: down one end, across the bottom, and up the other end. It neatens the edges and rounds the corners.
Border gauge: Along the bottom, the border uses the 5 sc per inch fabric gauge. Along the rim ends, work 1 sc per row end.
Border Row (RS): With RS facing, join yarn with a standing sc at the top corner of the left rim end, in the end of Row 7.
- Left end: Work 1 sc in the end of each of Rows 7, 8, 9, and 10. Count the standing sc as the first of these. (4 sc)
- Bottom edge: 3 sc in first st of Row 10 (corner), sc in next 19 sts, 3 sc in last st (corner). (3 + 19 + 3 = 25 sc)
- Right end: Work 1 sc in the end of each of Rows 10, 9, 8, and 7. (4 sc)
Total: 4 + 25 + 4 = 33 sc. Fasten off.
The bottom count of 25 already includes both 3-sc corner groups, so don’t add corner stitches again on the ends.
Why the math works:
– Rows 7, 8, and 10 are sc rows of about 0.18 in (0.5 cm) each. Row 9 is an hdc row of about 0.25 in (0.6 cm). Together the rim ends are about 0.8 in (2.0 cm) tall.
– Four sc at 5 per inch also measure 0.8 in (2.0 cm), so the ends lie flat without ruffling or cupping.
– Along the bottom, the 19 straight sc match the 19 inner sts of Row 10 one-for-one. The 3-sc groups add just enough fullness to turn the corners smoothly.
Checkpoint: width 4.6 in (11.7 cm). Each border edge adds 0.2 in (0.5 cm).
Clapper
Rnd 1: Make a magic ring. Ch 1, 6 sc in ring, sl st to first sc to join. (6 sc)
Rnd 2: Ch 1, 2 sc in each st around, sl st to first sc to join. (12 sc)
Fasten off, leaving an 8 in (20.3 cm) tail. Pull the ring tight.
Checkpoint: 0.6 in (1.5 cm) across.
Attach: Find the center of the bottom border. It is the 13th of the 25 bottom stitches; mark it. Center the clapper below this st so it overlaps the border by 0.2 in (0.5 cm), and whipstitch it in place through 3–4 sts on each side. The clapper hangs 0.4 in (1.0 cm) below the rim.
Hanging Loop
Join yarn with a sl st in the center chain of the Row 1 foundation, on the top edge of the crown. Ch 14. Twist the chain once, then sl st in the same st where you joined. Fasten off and weave in the ends through the crown.
The twist crosses the loop just above the crown, matching the knotted look of the sample. Checkpoint: the loop stands about 0.9 in (2.3 cm) above the crown.
Final Blocking
- Weave in all remaining ends through solid areas (crown, rim, or clapper), never along the spokes.
- Dampen the bell lightly with water, or soak it and gently press out the excess in a towel.
- Lay it RS up on a blocking mat.
- Pin the crown top and the two bottom rim corners first, then check the width: 4.6 in (11.7 cm).
- Straighten each spoke and pin its midpoint so the four windows are even.
- Pin the clapper round and the loop upright.
- Optional: mist with spray starch for a crisp ornament finish.
- Let it dry completely, about 6–12 hours, before you unpin it.
Final Quality-Control Checklist
- Crown has 9 sts on Row 5, with a visible ridge on the RS.
- There are 5 spokes, evenly spaced on alternate crown sts, with no twists.
- The four windows are roughly symmetrical.
- Rim counts are 17, 17, 19, 21.
- The border has 33 sc, with corners rounded rather than pointed.
- The clapper is centered under the bottom border’s 13th stitch.
- Finished size is 4.6 in (11.7 cm) wide × 4.5 in (11.4 cm) tall with loop.
- All ends are hidden in solid fabric.
Troubleshooting
Spokes are wavy or slack: The sl sts are too loose. Rework them a bit tighter, or go down a hook size just for Row 6.
Rim pulls the spokes together: Your chains are too tight in Row 7. Make the ch-3 gaps more relaxed, or use ch 4 and skip one ch in Row 8 to keep 17 sts.
Rim ends ruffle: You have too many border sc on the ends. Keep strictly to 1 sc per row end.
Corners look pointed: Make sure the 3 sc go into the very first and last sts of Row 10, not into the row ends.
Crown curls: This is normal before blocking. Pin it flat and starch it.
Clapper droops: Sew it through more border stitches, or overlap it slightly more.
Care
Hand wash in cool water with mild soap and lay flat to dry, re-pinning the spokes if needed. Store flat or hanging, away from crushing weight.
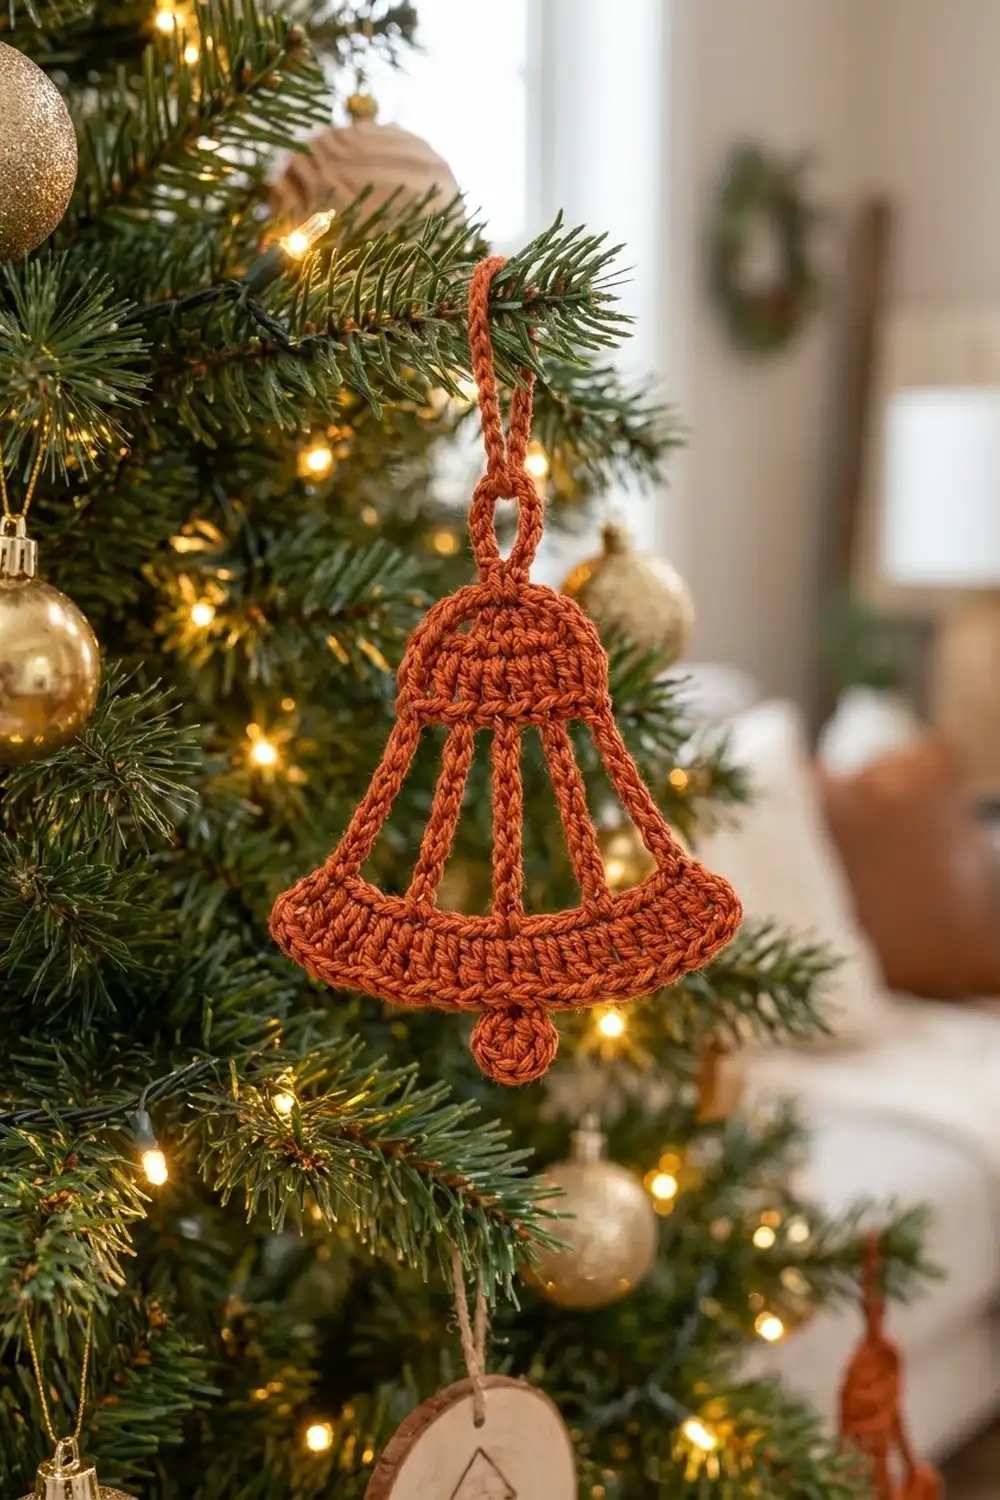
Final Notes
The whole bell follows a short measurement chain:
– The crown is 9 sts and 1.8 in (4.6 cm) wide.
– Spokes of 8 and 9 sl sts drop 1.3 in (3.3 cm) to a 17-stitch foundation that is 3.4 in (8.6 cm) wide.
– The rim grows to 21 sts and 4.2 in (10.7 cm).
– A 33-stitch border brings the bell to 4.6 in (11.7 cm) wide.
If you check each stage against these numbers, the finished bell will lie flat, hang straight, and look neat on the tree.
Happy crocheting!