

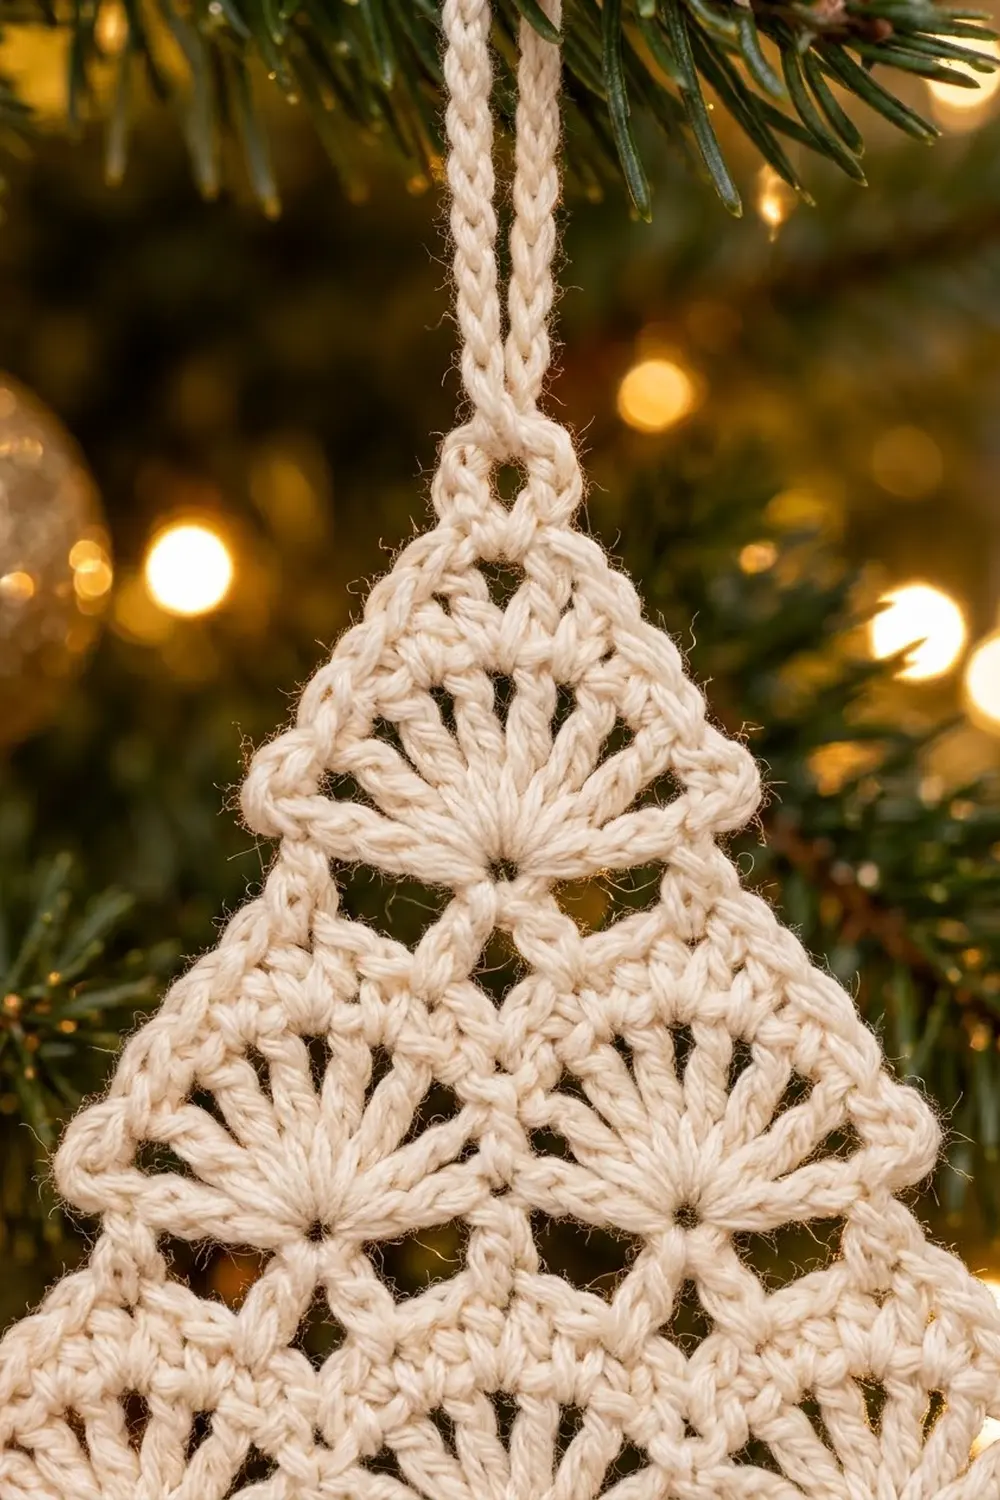
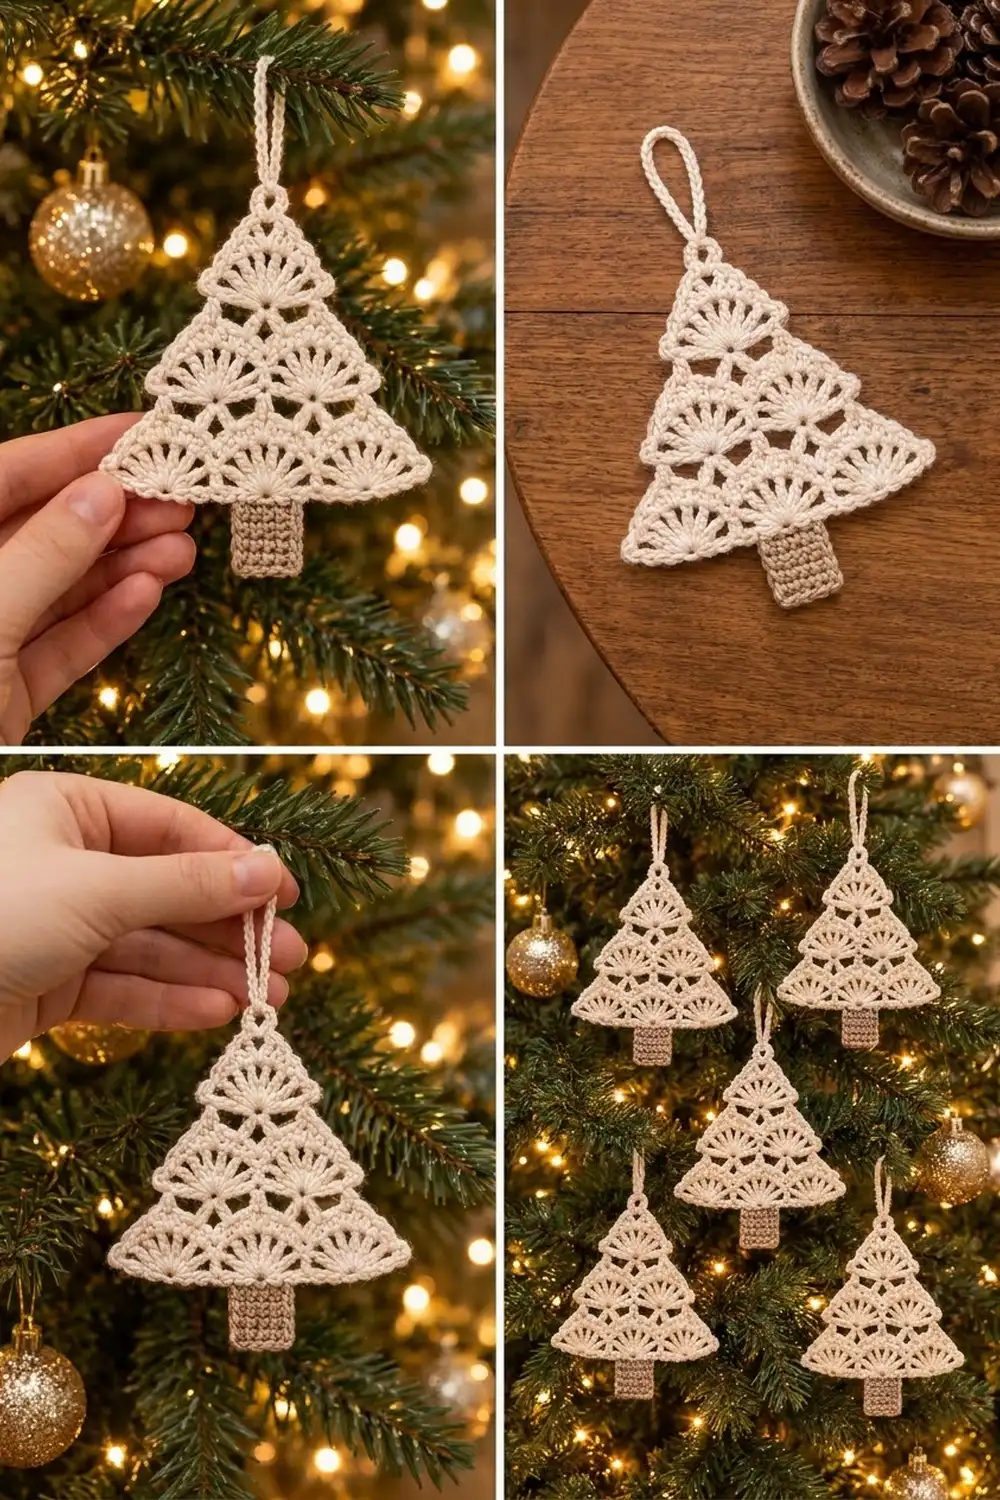
The Frosted Fan Tree is a flat, lacy Christmas tree ornament made from stacked tiers of tall treble fans. Three fans make the bottom tier and two sit offset above them. One fan forms the top, so the tree narrows into a neat triangle with small open windows between the shells.
The tree is worked in soft cream cotton, with a short single-crochet trunk in light tan. A thin single-crochet border outlines the whole triangle, and a simple chain loop at the tip lets it hang from a branch. The look is light, classic and a little vintage, and it suits a natural or Scandinavian-style tree.
This pattern uses US crochet terms. The finished ornament measures about 4.75 in (12.1 cm) wide and about 5 in (12.7 cm) tall from tip to trunk base, not counting the hanging loop. With the loop, the total length is about 6.5 in (16.5 cm).
Construction is simple. You work the tree canopy flat in rows from the bottom up, alternating fan rows with narrower bridge rows. Next you work one border round, then add the trunk in rows directly onto the bottom edge. Last, you chain the hanging loop. There is no sewing and no joining.
Finished Size and Construction
- Finished size: about 4.75 in (12.1 cm) wide x 5 in (12.7 cm) tall, plus a 1.5 in (3.8 cm) hanging loop
- Skill level: Easy-intermediate
- Terminology: US crochet terms
- Yarn weight: Fine (2), smooth mercerized or combed cotton
- Hook: 2.75 mm (US C-2)
- Number of pieces: 1 (the trunk is worked onto the tree, not sewn)
- Layout: A single flat triangle with 3 tiers of fans (3, 2, 1) and a centered trunk
- Canopy size before border: about 4.5 in (11.4 cm) wide x 3.5 in (8.9 cm) tall
- Border depth: 1 round of sc, about 0.125 in (0.3 cm) per side
- Canopy size after border: about 4.75 in (12.1 cm) wide x 3.75 in (9.5 cm) tall
- Trunk size: about 1.25 in (3.2 cm) wide x 1.33 in (3.4 cm) tall
Materials
Choose a smooth, tightly plied cotton in fine (2) weight. Cotton gives crisp stitch definition, so the fan rays stay distinct and the open spaces stay open. Avoid fuzzy or very soft acrylics, because the lace blurs and the tree loses its shape.
- Cream (canopy, border, loop): about 8 g, 30 m (33 yd)
- Light tan (trunk): about 2 g, 8 m (9 yd)
These amounts include a small safety margin. One ornament uses much less than a full ball, so one ball of each color is enough for a whole set.
Tools:
- 2.75 mm (US C-2) crochet hook
- Tapestry needle
- Scissors
- Stitch markers (2-3)
- Ruler or tape measure
- Blocking mat and rust-proof pins
- Spray bottle with water
Abbreviations (US Terms)
- ch – chain
- sl st – slip stitch
- sc – single crochet
- tr – treble crochet
- sk – skip
- st(s) – stitch(es)
- sp – space
- RS / WS – right side / wrong side
Special stitch – Fan: Work 9 tr in the same stitch. The 5th tr of the fan is its center tr. You will come back to this stitch in the bridge rows.
The ch 1 at the start of each row does not count as a stitch.
Gauge and Checkpoints
Gauge: 22 sc and 24 rows = 4 in (10.2 cm) in sc rows with a 2.75 mm hook.
Make one full ornament as your test piece before you start a set. The canopy is small, so the real piece tells you more than a swatch. Check these points as you go:
- After Row 1: 25 sc measure about 4.5 in (11.4 cm).
- After Row 2: the three fans span about 4.5 in (11.4 cm), and Rows 1-2 stand about 1 in (2.5 cm) tall.
- After Row 4: the 17-st row measures about 3.1 in (7.9 cm) wide. Total height is about 1.25 in (3.2 cm).
- After Row 7: the 9-st row measures about 1.6 in (4.1 cm) wide. Total height is about 2.5 in (6.4 cm).
- After Row 8: the canopy measures about 4.5 in (11.4 cm) wide x 3.5 in (8.9 cm) tall.
If your piece is too big: go down to a 2.5 mm hook or use a slightly thinner cotton. Check that your tr stitches aren’t loose. Long, loopy trebles make the tree tall and floppy.
If your piece is too small: go up to a 3 mm hook. Tight trebles also make the fans cup, so relax your tension when you wrap the yarn twice.
The stitch counts never change with gauge. Only the size changes.
Tree Canopy
Use cream. Work in rows, turning at the end of each row.
Foundation: Ch 26.
Row 1 (RS): Sc in 2nd ch from hook and in each ch across. Turn. (25 sc)
Row 2 (fan row, 3 fans): Ch 1, sc in first st, sk 3 sts, Fan in next st, sk 3 sts, sc in next st; repeat from * 2 more times. Turn. (31 sts: 3 fans of 9 tr = 27 tr, plus 4 sc)*
Check: 1 + 3 x (3 + 1 + 3 + 1) = 25 sts of Row 1 used. The last sc lands in the last st.
Row 3 (bridge row): Ch 1, sl st in first 6 sts (the sc and the first 5 tr of Fan 1), ending in its center tr. Ch 1, sc in the same center tr. Ch 3, sk 4 tr, tr in next sc (between fans), ch 3, sk 4 tr, sc in center tr of next fan; repeat from * once more. Turn, leaving the last 4 tr and the sc of Fan 3 unworked. (17 sts: 3 sc + 2 tr + 4 ch-3 sps of 3 ch each)*
Each tr worked into the sc between two fans rises to fan height. These posts make the “Y” lines and small open windows that separate the shells.
Row 4: Ch 1, sc in first sc, 3 sc in ch-3 sp, sc in tr, 3 sc in ch-3 sp, sc in sc; repeat from * once more. Turn. (17 sc)*
Check: 1 + 2 x 8 = 17.
Row 5 (fan row, 2 fans): Ch 1, sc in first st, sk 3 sts, Fan in next st, sk 3 sts, sc in next st; repeat from * once more. Turn. (21 sts: 18 tr + 3 sc)*
Each new fan sits directly above a tr post from Row 3, so the tiers lock together in a brick pattern.
Row 6 (bridge row): Ch 1, sl st in first 6 sts, ending in the center tr of Fan 1. Ch 1, sc in the same center tr, ch 3, sk 4 tr, tr in next sc, ch 3, sk 4 tr, sc in center tr of Fan 2. Turn, leaving the rest unworked. (9 sts: 2 sc + 1 tr + 2 ch-3 sps of 3 ch each)
Row 7: Ch 1, sc in first sc, 3 sc in ch-3 sp, sc in tr, 3 sc in ch-3 sp, sc in last sc. Turn. (9 sc)
Row 8 (top fan): Ch 1, sc in first st, sk 3 sts, Fan in next st, sk 3 sts, sc in last st. (11 sts: 9 tr + 2 sc)
Fasten off. The center tr of this top fan is the tip of the tree.
Checkpoint: The canopy is a triangle about 4.5 in (11.4 cm) wide x 3.5 in (8.9 cm) tall. Each slope shows three fan edges, stepped by two short pairs of sc row-ends.
Border
The border is one round of cream sc at the same gauge as the canopy, about 5.5 sc per inch (2.2 sc per cm). With the RS facing, join cream with a sl st in the center tr of the top fan.
Border Round:
- Tip: Ch 1, 3 sc in the center tr of the top fan. (3 sc)
- Side A: Working down the slope:
- 1 sc in each of the next 4 tr and the end sc of Row 8 (5 sc)
- 1 sc in the row-ends of Row 7 and Row 6 (2 sc)
- 1 sc in each of the 5 outer sts of the Row 5 fan (5 sc)
- 1 sc in the row-ends of Row 4 and Row 3 (2 sc)
- 1 sc in each of the 5 outer sts of the Row 2 fan (5 sc)
- 1 sc in the row-end of Row 1 (1 sc)
(20 sc: 5 + 2 + 5 + 2 + 5 + 1)
3. Bottom corner A: 3 sc in the first foundation ch. (3 sc)
4. Bottom edge: 1 sc in each of the next 23 foundation chs. (23 sc)
5. Bottom corner B: 3 sc in the last foundation ch. (3 sc)
6. Side B: Work up the other slope in the reverse order of Side A. (20 sc: 1 + 5 + 2 + 5 + 2 + 5)
Sl st to the first sc of the round. (72 sc: 3 + 20 + 3 + 23 + 3 + 20)
On one slope, the outer fan sts of Rows 2 and 5 are covered by the sl sts from Rows 3 and 6. Work the border sc through those sl sts. On the other slope, the same 5 sts were left unworked, so work into them directly. Both sides still get exactly 5 sc per fan.
Why the math works: The bottom edge has 25 foundation chs. The two corners use the first and last ch, and the 23 chs between them get 1 sc each, so 1 + 23 + 1 = 25 chs. Along each slope, every fan gives 5 outer sts (the edge sc plus 4 tr), and every sc row gives one row-end. Each slope is about 4.2 in (10.7 cm) long. The 20 side sc plus about one shared corner st at each end come to about 22 sts. At 5.5 sc per inch, that is 4 in (10.2 cm). Border stitches stretch a little, so the edge lies flat without ruffling or pulling.
Hanging loop: Sl st into the next sc (the center sc of the tip group). Ch 24, sl st in the same sc. Fasten off. The loop hangs about 1.5 in (3.8 cm) above the tip.
Checkpoint: The bordered canopy measures about 4.75 in (12.1 cm) wide x 3.75 in (9.5 cm) tall.
Trunk
Use light tan. The trunk is worked in rows straight down from the center of the bottom edge.
Count the 23 bottom-edge sc between the two corner groups. The center st is the 12th. The trunk uses the 7 sts centered on it, which are sts 9 through 15. Mark st 9 and st 15.
Row 1: With the bottom edge facing up, join tan with a sl st in st 9. Ch 1, sc in the same st and in each of the next 6 sts, ending in st 15. Turn. (7 sc)
Rows 2-8: Ch 1, sc in each st across. Turn. (7 sc)
Fasten off after Row 8.
Checkpoint: The trunk measures about 1.25 in (3.2 cm) wide x 1.33 in (3.4 cm) tall. Exactly 8 plain border sc remain between the trunk and each 3-sc corner group. The whole ornament is about 5 in (12.7 cm) tall without the loop.
Final Blocking
- Weave in all ends through stitches of the same color. Hide cream ends inside the fans and tan ends inside the trunk rows.
- Mist the ornament with water until it is damp but not soaking.
- Lay it RS up on a blocking mat.
- Pin the three corners first: the tip and the two bottom corners. The bottom width should be 4.75 in (12.1 cm), and the tip should sit 3.75 in (9.5 cm) above the bottom edge.
- Pin the trunk square at 1.25 in (3.2 cm) wide x 1.33 in (3.4 cm) tall, centered under the canopy.
- Use your fingertips to open each fan so the rays spread evenly. Open each small window between the fans.
- Pin the side slopes straight, with 2-3 pins per side.
- Let it dry completely, which takes about 6-12 hours. For extra stiffness, mist with a light spray starch before it dries.
Final Quality-Control Checklist
- Row 1 has 25 sc, Row 4 has 17 sc and Row 7 has 9 sc.
- There are 6 fans in total (3, 2, 1), and each fan has 9 tr.
- The fans in each tier sit above the tr posts of the row below, not above the fans.
- The border has 72 sc: 3 at the tip, 20 per side, 3 per bottom corner and 23 along the bottom.
- The trunk is 7 sc wide, 8 rows tall and exactly centered.
- The hanging loop is attached at the tip’s center sc and isn’t twisted.
- The finished size is about 4.75 in (12.1 cm) x 5 in (12.7 cm), plus the loop.
- All ends are woven in and can’t be seen from the front.
Troubleshooting
The fans cup or curl. Your trebles are too tight. Relax your tension, go up a hook size, or block more firmly with starch.
The fans look floppy and the tree is too tall. Your trebles are loose. Snug the first loop of each tr before you finish it, or go down to a 2.5 mm hook.
A bridge row doesn’t end at a center tr. Recount the sl sts at the start. There should be exactly 6, ending in the 5th tr of the first fan. Then check that you skipped exactly 4 tr each time.
Row 4 or Row 7 has the wrong count. Make sure you worked exactly 3 sc into each ch-3 sp and 1 sc into each tr and sc.
The slopes ripple after the border. You added extra sc in the row-ends. Use exactly 1 sc per row-end and 5 sc per fan edge.
The trunk is off-center. Recount the 23 bottom sts between the corner groups and start the trunk in st 9.
Care
Hand wash in cool water with mild soap, roll in a towel and dry flat. Reshape and re-block after washing. Store the ornament flat or hanging so the fans keep their shape.
Final Notes
The measurement chain is short and easy to check. Row 1 sets the width at 25 sc, about 4.5 in (11.4 cm). Each tier narrows by exactly one fan, from 25 to 17 to 9 sts. The canopy reaches about 3.5 in (8.9 cm) tall before the border. One 72-st sc round brings it to 4.75 in (12.1 cm) x 3.75 in (9.5 cm). The 7 x 8 trunk adds about 1.33 in (3.4 cm), for a finished ornament about 5 in (12.7 cm) tall.
When your first tree matches every checkpoint, the rest of your set will match too. Make a handful in cream, or try white, gold or soft green for a mixed set.
Happy crocheting!