

The Frosted Lantern Star is a lacy, eight-pointed motif built around an almond-shaped window. Two dense treble fans open out from the sides, light double crochet ladders reach toward the long top and bottom tips, and a padded outer frame with picot points finishes the edge.
It is worked in one soft cream cotton, which gives it a frosty, heirloom look. It suits a winter window, a gift tag, a tree ornament or a card topper. The pattern uses US crochet terms throughout.
The finished motif measures 6 in (15.2 cm) tall and 5.5 in (14.0 cm) wide, measured point to point after blocking.
Construction is simple and fully in the round. You chain a ring and shape it into an almond, then cover it with single crochet (Round 1). Next comes the spoke round with ladders and fans (Round 2). Rounds 3 and 4 form the border: a round of chain loops and a padded single crochet edge with picot points. You make one piece, and no joining is needed.
Finished Size and Construction
- Finished size: 6 in (15.2 cm) tall x 5.5 in (14.0 cm) wide, point to point
- Skill level: Intermediate (easy lace; you need to read chain spaces)
- Terminology: US crochet terms
- Yarn weight: Sport (2) mercerized cotton, or size 3 crochet thread
- Hook: 2.75 mm (US C-2)
- Number of pieces: 1
- Layout: single motif, vertical almond center, 8 points
- Piece size: 6 in x 5.5 in (15.2 cm x 14.0 cm)
- Size before border (after Round 2): 4.5 in x 4 in (11.4 cm x 10.2 cm)
- Border depth (Rounds 3–4): about 0.75 in (1.9 cm) on each side
Materials
Yarn advice: Choose a smooth, tightly plied mercerized cotton. Plied cotton shows off the braid-like single crochet frame and holds crisp points after blocking. Avoid fuzzy or very soft acrylics, because they blur the lace and won’t hold a starched shape well.
- Cream (one color): 8 g, about 24 m (26 yd)
Quantities include a margin of about 25% for your gauge swatch and weaving in ends.
Tools:
– 2.75 mm (US C-2) crochet hook
– Tapestry needle with a blunt tip
– Small scissors
– Blocking mat or folded towel
– Rustproof pins (about 16)
– Spray bottle with water
– Optional: fabric stiffener or spray starch
– Ruler or tape measure
Abbreviations (US Terms)
- ch – chain
- sl st – slip stitch
- sc – single crochet
- dc – double crochet
- tr – treble crochet (yarn over twice, insert hook, pull up a loop, [yarn over, pull through 2 loops] 3 times)
- sp(s) – space(s)
- st(s) – stitch(es)
- sk – skip
Special stitch: Point Group. (3 sc, ch 3, 3 sc) all worked in the same chain loop. The ch-3 makes the picot tip of each point.
Special stitch: Tip Group. (2 dc, ch 3, 2 dc) all worked in the same chain space. When it is the first stitch group of a round, ch 3 counts as the first dc.
Gauge and Checkpoints
Lace gauge is checked through measurements rather than a formal swatch. Make the full motif once as a test piece before committing to a batch.
Basic gauge: 13 sc = 2 in (5.1 cm) in mercerized sport cotton with a 2.75 mm hook. Ten foundation chains should measure about 1.5 in (3.8 cm) laid flat.
Checkpoints (lightly pressed flat, not yet blocked):
– After Round 1: the almond opening is about 2.25 in (5.7 cm) tall and 1.5 in (3.8 cm) wide inside the sc ring.
– After Round 2: the motif measures 4.5 in (11.4 cm) tip to tip vertically and 4 in (10.2 cm) across from fan to fan.
– After Round 4: 6 in x 5.5 in (15.2 cm x 14.0 cm) point to point. It may be up to 0.25 in (0.6 cm) smaller before blocking.
If your motif is too big: go down to a 2.5 mm hook, or tighten your chain loops so they don’t sag. Loose ch-3 loops in Round 3 are the most common cause of oversizing.
If your motif is too small: go up to a 3.0 mm hook. Also make sure each tr in the fans is pulled up to full height, because short trebles make the side fans crowd and cup.
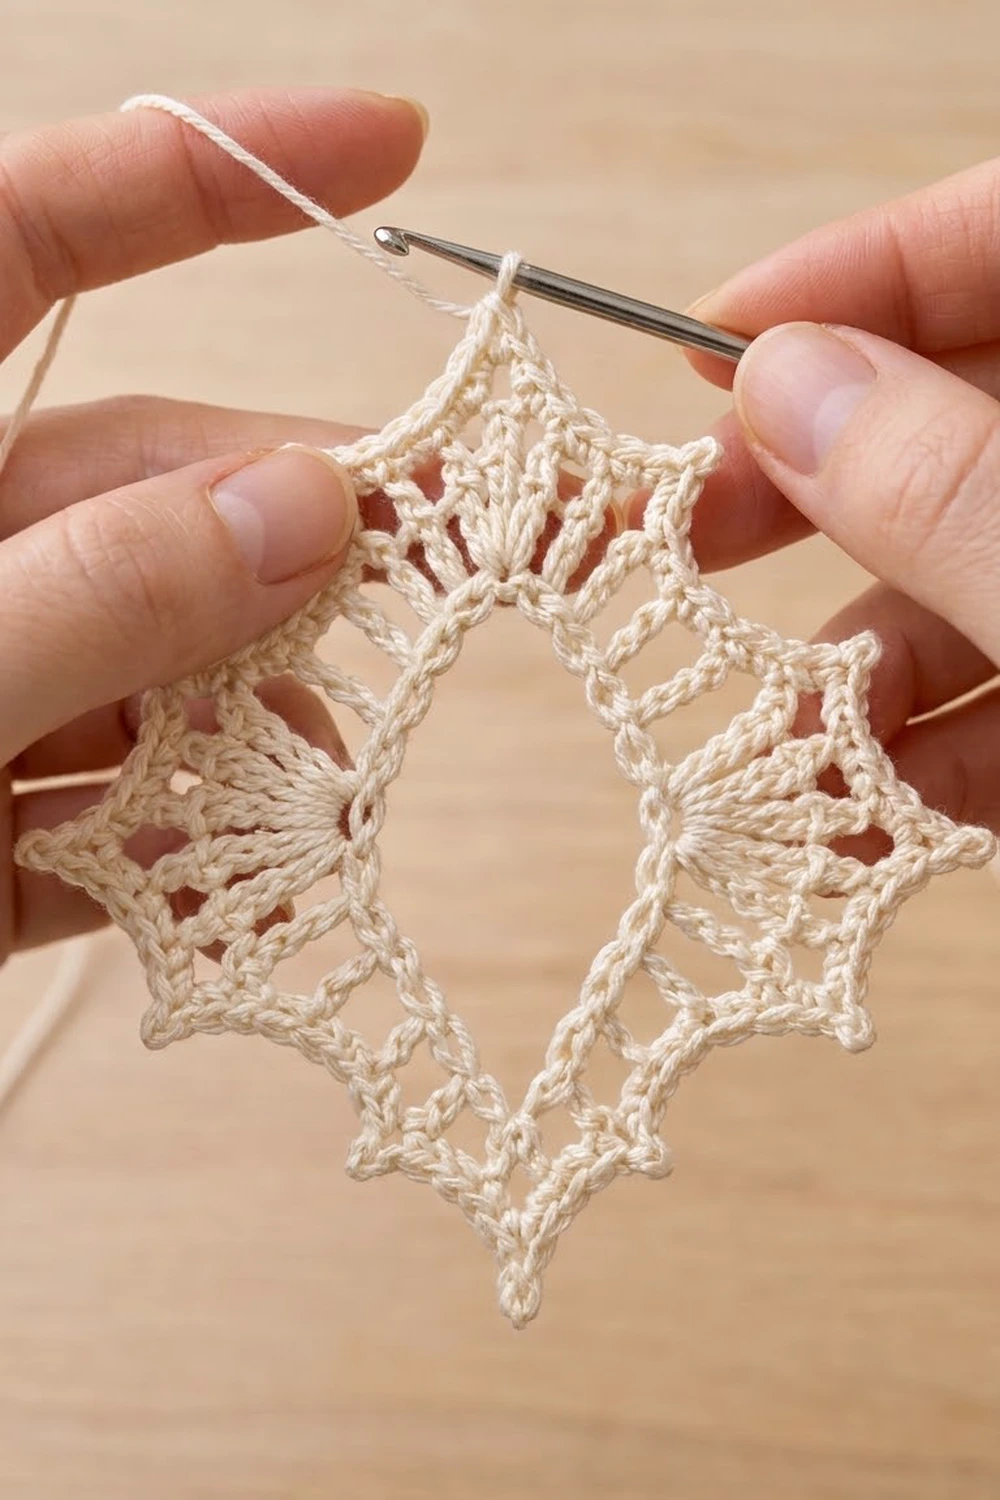
Pattern
Foundation Ring
Ch 40. Join with a sl st in the first ch to form a ring, taking care not to twist the chain.
Lay the ring flat and pinch it into an almond shape. The joining ch is the top tip, and ch 21 (the 21st ch counting the joined ch as ch 1) is the bottom tip.
Count: 40 ch.
Round 1 – Almond Frame
Ch 1. (Sc, ch 2, sc) in the first ch (top tip). Sc in each of the next 19 ch. (Sc, ch 2, sc) in the next ch (bottom tip). Sc in each of the next 19 ch. Join with a sl st in the first sc.
Check: 1 + 19 + 1 + 19 = 40 foundation ch used.
Count: 42 sc and 2 ch-2 tip spaces.
Each side now has exactly 21 sc between the two ch-2 tip spaces. Number them 1 to 21 from top to bottom. Sc 11 is the center of each side, where the fan will sit. This dense sc ring is the braided-looking frame around the almond window.
Round 2 – Ladders and Fans
Sl st in the next sc and into the top ch-2 sp.
Top tip: Ch 3 (counts as dc), (dc, ch 3, 2 dc) in the same sp. This completes the first Tip Group.
First side (sc 1–21):
1. Ch 2, sk sc 1–2, dc in sc 3.
2. (Ch 2, sk 1 sc, dc in next sc) 2 times, ending with dc in sc 7. This is the upper ladder.
3. Ch 2, sk sc 8, tr in sc 9.
4. (Ch 1, tr in next sc) 4 times, through sc 13. This is the fan of 5 tr, with the center tr in sc 11.
5. Ch 2, sk sc 14, dc in sc 15.
6. (Ch 2, sk 1 sc, dc in next sc) 2 times, ending with dc in sc 19. This is the lower ladder.
7. Ch 2, sk sc 20–21.
Bottom tip: Tip Group (2 dc, ch 3, 2 dc) in the bottom ch-2 sp.
Second side: Repeat Steps 1–7 along the other 21 sc.
Join with a sl st in the top of the beginning ch-3.
Per side: 6 dc and 5 tr (11 spokes), 8 ch-2 sps and 4 ch-1 sps.
Count: 30 sts (20 dc including the beginning ch-3, plus 10 tr), 16 ch-2 sps, 8 ch-1 sps and 2 ch-3 tip sps.
The dc count works out as 2 tips x 4 dc = 8, plus 2 sides x 6 dc = 12, for 20 total.
Checkpoint: 4.5 in x 4 in (11.4 cm x 10.2 cm).
Name the side spaces for the next round. On each side, the ch-2 sps are A, B, C, D above the fan and E, F, G, H below it. The fan’s ch-1 sps are f1–f4.
Border
The border is Rounds 3 and 4. It turns the spoke tips into a continuous frame with eight points.
Border gauge: Each ch-3 loop in Round 3 should span about 0.4 in (1.0 cm) when laid flat. After Round 4, the border adds about 0.75 in (1.9 cm) beyond the Round 2 outline at every point.
Round 3 – Chain-Loop Frame
Sl st in the next dc and into the top ch-3 tip sp. Ch 1, then (sc, ch 5, sc) in the same sp. This is the top point loop.
Each side:
1. Ch 3, sc in sp A.
2. Ch 3, sc in sp B.
3. Ch 3, (sc, ch 4, sc) in sp C. This makes the upper diagonal point.
4. Ch 3, sc in sp D.
5. Ch 3, sc in f1.
6. Ch 3, sc in f2.
7. Ch 5, sc in f3. This makes the side point, directly above the center tr.
8. Ch 3, sc in f4.
9. Ch 3, sc in sp E.
10. Ch 3, (sc, ch 4, sc) in sp F. This makes the lower diagonal point.
11. Ch 3, sc in sp G.
12. Ch 3, sc in sp H.
13. Ch 3.
Bottom tip: (Sc, ch 5, sc) in the bottom ch-3 sp.
Work the second side the same way. End with the final ch 3 and join with a sl st in the first sc.
Per side: 14 sc, 12 ch-3 loops, 2 ch-4 loops and 1 ch-5 loop.
The loops fall in a repeating rhythm: 3 ch-3 loops, then a point loop, three times over, then a final 3 ch-3 loops.
Count: 32 sc (14 per side x 2, plus 2 at each tip), 24 ch-3 loops and 8 point loops (2 tip ch-5, 2 side ch-5, 4 diagonal ch-4).
Round 4 – Padded Edge with Picot Points
Sl st into the top ch-5 loop. Ch 1, then work a Point Group (3 sc, ch 3, 3 sc) in the same loop.
Each side:
– [4 sc in each of the next 3 ch-3 loops, Point Group in the next point loop] 3 times.
– Then 4 sc in each of the next 3 ch-3 loops.
Bottom tip: Point Group in the bottom ch-5 loop.
Work the second side the same way, then join with a sl st in the first sc. Fasten off, leaving an 8 in (20.3 cm) tail.
Per side: 12 loops x 4 sc = 48 sc, plus 3 Point Groups x 6 sc = 18 sc, for 66 sc and 3 picots.
Count: 66 x 2 = 132 sc, plus 2 tip Point Groups x 6 sc = 12 sc, for 144 sc and 8 ch-3 picots.
Why the math works:
– A ch-3 loop is about as long as 3 sc, so working 4 sc into it lets the sc lie shoulder to shoulder and pads the loop into the thick, braided look without rippling.
– Each point loop is longer (ch-4 or ch-5) and carries 6 sc plus a ch-3 picot. The extra length and stitches let the edge turn a sharp outward corner instead of cupping.
– Because each side holds an identical 3-3-3-3 loop rhythm, both halves match, and the motif blocks symmetrically.
Checkpoint: 6 in x 5.5 in (15.2 cm x 14.0 cm). Up to 0.25 in (0.6 cm) smaller is fine before blocking.
Final Blocking
- Weave in both tails along the backs of sc stitches, working in at least two directions. Don’t trim yet.
- Soak the motif in cool water for 5 minutes, then roll it in a towel to remove excess water.
- Mark a 6 in x 5.5 in (15.2 cm x 14.0 cm) rectangle on your blocking mat, with a vertical center line.
- Pin the top and bottom picots on the vertical line, 6 in (15.2 cm) apart.
- Pin the left and right picots 5.5 in (14.0 cm) apart, centered on the motif.
- Pin the four diagonal picots so they sit evenly between their neighbors.
- Shape the center almond with your fingers, keeping the sc ring smooth and the opening open. Push the fan trebles so they radiate evenly.
- Optional: mist with fabric stiffener or spray starch for a crisp ornament finish.
- Let it dry completely, at least 6 hours. Unpin it and trim the tails close.
Final Quality-Control Checklist
- Round 1 has 42 sc, with 21 sc per side between the tip spaces.
- Round 2 has 30 sts: 5 tr in each fan and 3 dc in each ladder segment.
- Round 3 has 24 ch-3 loops and 8 point loops.
- Round 4 has 144 sc and 8 picots.
- Both sides match: 66 sc and 3 picots per side.
- The center almond is vertical, open and evenly shaped.
- The finished size is 6 in x 5.5 in (15.2 cm x 14.0 cm), point to point.
- All ends are secure and invisible from the front.
Troubleshooting
The almond twists or the ring looks lopsided. The foundation chain was twisted at the join. Restart, and lay the chain flat before joining.
The fans ruffle. Your trebles are taller than the ladder dc can support. Use a tighter tension on the tr, or drop a hook size for Round 2 only.
The motif cups like a bowl. Your Round 3 chain loops are too short or too tight. Make each chain a full, relaxed loop.
The edge waves between points. The ch-3 loops are too long for 4 sc. Tighten the chains, or check that you didn’t work 5 sc into a loop.
The points look blunt. You may have skipped the ch-3 picot, or worked the Point Group into a ch-3 loop instead of the point loop. Recount the 3-3-3-3 rhythm.
One side has more stitches. Check Round 2 placement: the fan must be worked in sc 9–13 so that sc 11 is in the center.
Care
Hand wash in cool water with mild soap, roll it in a towel and dry it flat, pinned to shape. Re-starch after washing if you want a crisp ornament finish.

Final Notes
The measurement chain is short and reliable:
– Round 1: 40 foundation ch and 42 sc make an almond opening about 2.25 in x 1.5 in (5.7 cm x 3.8 cm).
– Round 2: spokes bring the motif to 4.5 in x 4 in (11.4 cm x 10.2 cm).
– Rounds 3–4: the border adds about 0.75 in (1.9 cm) per side, for a blocked finish of 6 in x 5.5 in (15.2 cm x 14.0 cm).
If each checkpoint matches, the final piece will too. Make one, block it well, and hang it with a thread loop through the top picot as a frosty ornament.
Happy crocheting!