

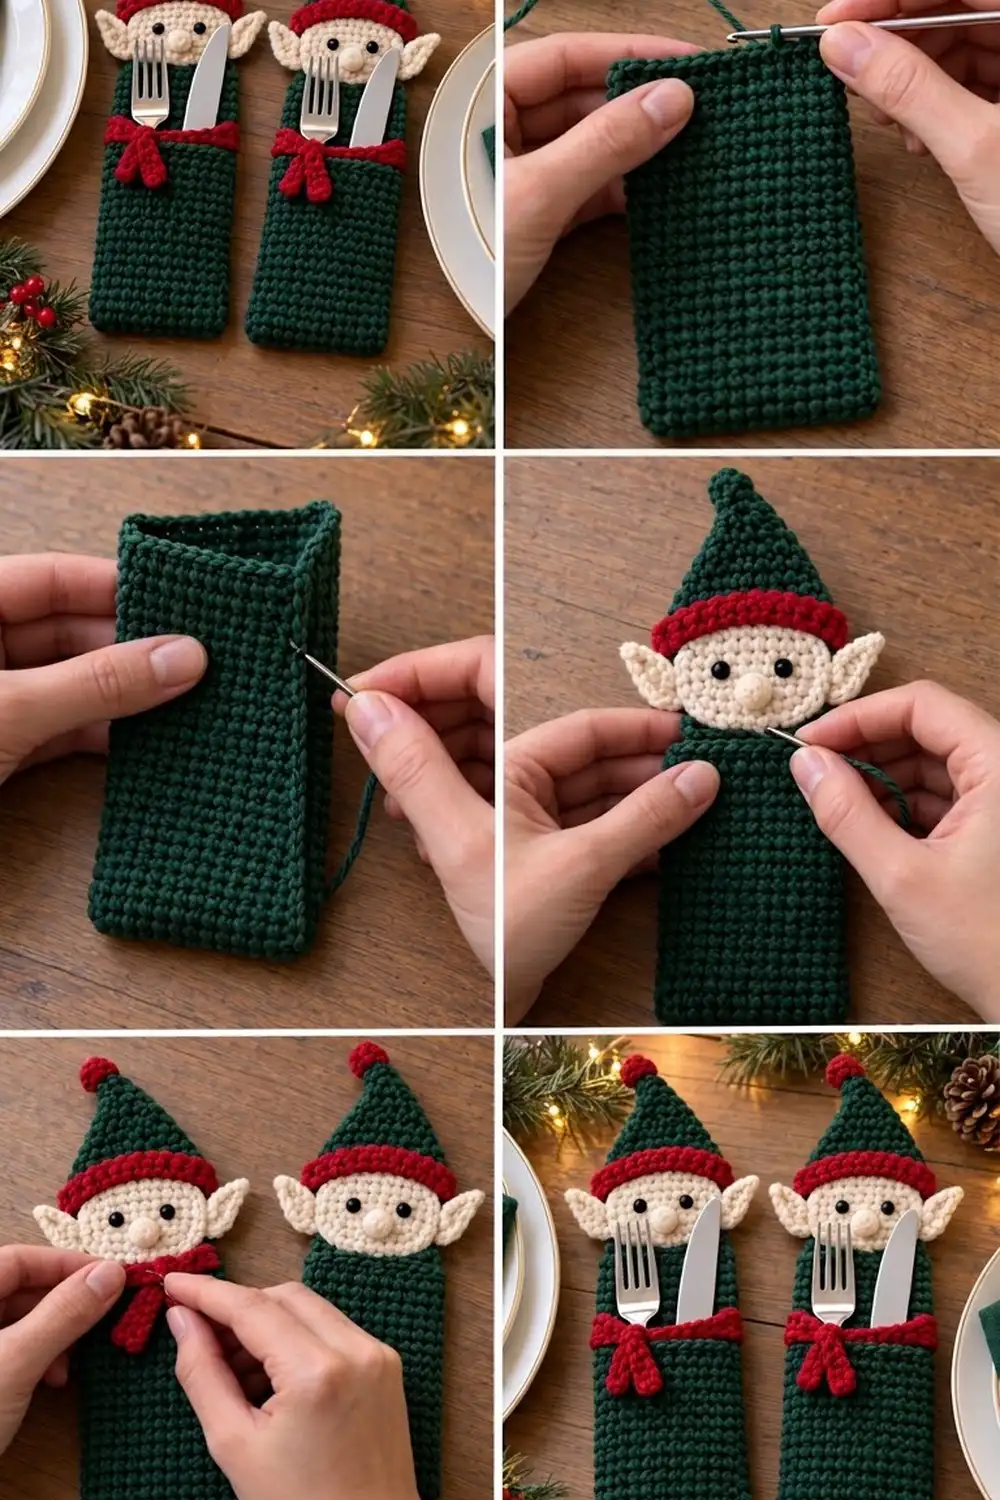
Set a festive table with this cheerful little elf who holds a fork and knife in his pocket. The body is a slim dark green pocket. At the top sits a round cream face with black bead eyes, a bobble nose and pointed ears, under a green hat with a ridged red brim and a red pompom. A red scarf with a knot and two tails trims the pocket opening.
The pattern uses US crochet terms and almost nothing but single crochet, so it suits confident beginners. The finished holder measures about 4 in (10.2 cm) wide and 8.5 in (21.6 cm) tall at the pocket body. With the head and hat it stands about 13.5 in (34.3 cm) tall.
Here’s how it goes together. You work one long rectangle in rows, fold the bottom part up to make the pocket, then work one border round that seams the sides and neatens the edge. Then you make the face, ears, nose, hat, pompom and scarf and sew them on.
The pattern makes one holder. The photo shows two identical holders, so just repeat the pattern for each place setting.
Finished Size and Construction
- Finished body size: 4 in × 8.5 in (10.2 cm × 21.6 cm)
- Total height with hat: about 13.5 in (34.3 cm)
- Skill level: Easy
- Terminology: US crochet terms
- Yarn weight: Worsted (#4)
- Hook: 4.0 mm (US G-6)
- Number of pieces: 1 body plus 9 small appliqué parts (face, 2 ears, nose, hat, pompom, scarf band, scarf tails, knot)
- Layout: Single holder. The body is folded into a pocket with the head on top.
- Body strip before folding: 3.5 in × 14 in (8.9 cm × 35.6 cm)
- Size before border: 3.5 in × 8 in (8.9 cm × 20.3 cm), folded
- Border depth: 1 round, about 0.25 in (0.6 cm) on each edge
Materials
Use a smooth worsted-weight cotton or acrylic. Cotton gives crisp, washable stitches that stand up to cutlery. Pick a deep forest green, a warm cream and a true red.
- Dark green (MC): 35 g / 70 m (body, border, hat)
- Cream (CC1): 10 g / 20 m (face, ears, nose)
- Red (CC2): 10 g / 20 m (hat brim, pompom, scarf)
The quantities include a safety margin of about 20% for gauge swatches and tails.
Tools:
– 4.0 mm (US G-6) crochet hook
– Tapestry needle
– Two 6 mm (0.2 in) black shank beads or sew-on buttons for eyes
– Black sewing thread and a sharp sewing needle
– Stitch marker
– Rust-proof pins
– Scissors
– A pinch of fiberfill or yarn scraps (optional, for the nose and pompom)
Abbreviations (US Terms)
- ch – chain
- sc – single crochet
- sl st – slip stitch
- st(s) – stitch(es)
- inc – 2 sc in the same stitch
- sc2tog – single crochet 2 together (insert hook in the next st, pull up a loop, insert hook in the following st, pull up a loop, yarn over and draw through all 3 loops)
- BLO – back loop only
- MR – magic ring
- RS – right side
Special technique – 8-in-9 edging: When working sc into row ends, work 1 sc in each of 8 row ends, then skip the 9th. This matches row height to stitch width so the edge stays flat.
Gauge and Checkpoints
Gauge: 16 sc × 18 rows = 4 in (10.2 cm) in sc worked in rows. That works out to 4 sts and 4.5 rows per 1 in (2.5 cm).
Work the body strip first. It is your gauge test, and every other part is sized from it.
Checkpoints:
– After Row 1 of the body, the strip is 3.5 in (8.9 cm) wide.
– After Row 27, the strip is 6 in (15.2 cm) long.
– After Row 63, the strip is 14 in (35.6 cm) long.
– After the face’s final round (Rnd 6), the face is 3 in (7.6 cm) across.
– The hat brim is 3.5 in (8.9 cm) wide.
If your piece is too big: go down to a 3.75 mm (US F-5) hook.
If your piece is too small: go up to a 4.5 mm (US 7) hook.
Don’t change the stitch counts. The border math depends on them.
Body
Work in dark green (MC). Ch 1 at the start of each row does not count as a stitch.
Foundation: Ch 15.
Row 1 (RS): Sc in the 2nd ch from hook and in each ch across. (14 sc)
Rows 2–27: Ch 1, turn, sc in each st across. (14 sc)
Checkpoint: the strip measures 3.5 in × 6 in (8.9 cm × 15.2 cm). Rows 1–27 will become the front pocket, and Row 1 will be the pocket opening. Place a marker at the end of Row 27 to mark the fold line.
Rows 28–63: Ch 1, turn, sc in each st across. (14 sc)
Rows 28–63 are the back panel: 36 rows, 8 in (20.3 cm). Checkpoint: the whole strip is 63 rows and 3.5 in × 14 in (8.9 cm × 35.6 cm).
Don’t fasten off. Leave the loop on a stitch marker.
Fold: Lay the strip flat with the RS down. Fold Rows 1–27 up along the line between Rows 27 and 28 so they lie over Rows 28–54, and line up the side edges. Pin. The folded piece is 3.5 in × 8 in (8.9 cm × 20.3 cm). The front reaches 6 in (15.2 cm) up the back, so 2 in (5.1 cm) of the back panel stands above the opening.
Elf Face
Work in cream (CC1) in joined rounds. Ch 1 at the start of each round does not count as a stitch.
Rnd 1: 6 sc in MR, sl st to the first sc. (6 sc)
Rnd 2: Ch 1, inc in each st around, sl st to join. (12 sc)
Rnd 3: Ch 1, (sc, inc) 6 times, sl st to join. (18 sc)
Rnd 4: Ch 1, (2 sc, inc) 6 times, sl st to join. (24 sc)
Rnd 5: Ch 1, (3 sc, inc) 6 times, sl st to join. (30 sc)
Rnd 6: Ch 1, (4 sc, inc) 6 times, sl st to join. (36 sc)
Fasten off and leave a 12 in (30.5 cm) tail. Checkpoint: the face is flat and 3 in (7.6 cm) across. If it cups, go up a hook size for this piece.
Eyes: Sew the two beads between Rnds 3 and 4, about 1 in (2.5 cm) apart and slightly above center. Use black thread and stitch through each bead twice.
Ears (make 2)
Work in cream (CC1).
Row 1: Ch 2, sc in the 2nd ch from hook. (1 sc)
Row 2: Ch 1, turn, inc in the st. (2 sc)
Row 3: Ch 1, turn, sc in the first st, inc in the last st. (3 sc)
Row 4: Ch 1, turn, sc in the next 2 sts, inc in the last st. (4 sc)
Row 5: Ch 1, turn, sc in the next 3 sts, inc in the last st. (5 sc)
Row 6: Ch 1, turn, sc in each st across. (5 sc)
Fasten off and leave a tail. Each ear is a pointed triangle about 1.25 in (3.2 cm) wide at the base and 1.25 in (3.2 cm) tall. Row 1 is the tip.
Nose
Work in cream (CC1).
Rnd 1: 6 sc in MR, sl st to join. (6 sc)
Rnd 2: Ch 1, sc in each st around, sl st to join. (6 sc)
Fasten off and leave a 6 in (15.2 cm) tail. Tuck a pinch of filling inside. Weave the tail through the last round, pull it tight into a ball about 0.5 in (1.3 cm) across, and keep the tail for sewing.
Hat
Brim (red, CC2):
Foundation: Ch 15.
Row 1: Sc in the 2nd ch from hook and in each ch across. (14 sc)
Rows 2–4: Ch 1, turn, sc in BLO of each st across. (14 sc)
These BLO rows make the chunky ridges seen on the brim. Checkpoint: the brim is 3.5 in (8.9 cm) wide and about 1 in (2.5 cm) tall. Change to green on the last yarn over of Row 4 and fasten off the red.
Crown (dark green, MC). Work through both loops:
Row 1: Ch 1, turn, sc in each st across. (14 sc)
Row 2: Ch 1, turn, sc2tog, sc in the next 10 sts, sc2tog. (12 sc)
Row 3: Ch 1, turn, sc in each st across. (12 sc)
Row 4: Ch 1, turn, sc2tog, sc in the next 8 sts, sc2tog. (10 sc)
Row 5: Ch 1, turn, sc in each st across. (10 sc)
Row 6: Ch 1, turn, sc2tog, sc in the next 6 sts, sc2tog. (8 sc)
Row 7: Ch 1, turn, sc in each st across. (8 sc)
Row 8: Ch 1, turn, sc2tog, sc in the next 4 sts, sc2tog. (6 sc)
Row 9: Ch 1, turn, sc in each st across. (6 sc)
Row 10: Ch 1, turn, sc2tog, sc in the next 2 sts, sc2tog. (4 sc)
Row 11: Ch 1, turn, sc in each st across. (4 sc)
Row 12: Ch 1, turn, sc2tog twice. (2 sc)
Row 13: Ch 1, turn, sc in each st across. (2 sc)
Row 14: Ch 1, turn, sc2tog. (1 sc)
Fasten off. The crown is a triangle about 3 in (7.6 cm) tall, so the whole hat is about 4 in (10.2 cm) tall.
Pompom
Work in red (CC2).
Rnd 1: 6 sc in MR, sl st to join. (6 sc)
Rnd 2: Ch 1, inc in each st around, sl st to join. (12 sc)
Rnd 3: Ch 1, sc2tog 6 times, sl st to join. (6 sc)
Stuff it with red scraps, gather it closed and leave a tail. The finished ball is about 0.75 in (1.9 cm) across.
Scarf
Work in red (CC2).
Band: Ch 19. Row 1: sc in the 2nd ch from hook and in each ch across (18 sc). Row 2: ch 1, turn, sc in each st across (18 sc). The band is 4.5 in × 0.5 in (11.4 cm × 1.3 cm).
Tails (make 2): Ch 10. Sc in the 2nd ch from hook and in each ch across (9 sc). Each tail is 2.25 in (5.7 cm) long.
Knot: Ch 6. Row 1: sc in the 2nd ch from hook and across (5 sc). Row 2: ch 1, turn, sc across (5 sc). The knot is 1.25 in (3.2 cm) long.
Border
Work this round with the green loop left after Row 63 of the body. Border gauge is the same as the body: 4 sc per 1 in (2.5 cm) along stitch edges, and the 8-in-9 rule along row ends.
Rnd 1: Ch 1. Work along the top of the back panel:
- Top edge: sc in each st of Row 63. (14 sc) Ch 1 for the corner.
- First long side: Work into the row ends.
- Upper back panel (Rows 63–55, 9 row ends, single layer): 8 sc using the 8-in-9 rule.
- Pocket section (Rows 54–28 of the back together with Rows 1–27 of the front, 27 row-end pairs): insert the hook through both layers each time and work 24 sc, skipping every 9th pair. This round is what seams the side.
- Side total: 32 sc. Ch 1 for the corner.
- Fold edge: Work 1 sc under the outer strand of each st along the fold. (14 sc) Ch 1 for the corner.
- Second long side: Work 24 sc through both layers, then 8 sc through the back panel alone, using the 8-in-9 rule. (32 sc) Ch 1 for the corner.
- Sl st to the first sc.
Total: 92 sc (14 + 32 + 14 + 32) plus 4 ch-1 corner spaces. The corner chains are not stitches and are not part of any side count.
Why the math works: 14 sc at 4 sts per inch = 3.5 in (8.9 cm), which matches the body width exactly. Each side covers 36 rows, and 36 rows at 4.5 rows per inch = 8 in (20.3 cm). Dropping every 9th row end leaves 32 sc, and 32 sc at 4 sts per inch = 8 in (20.3 cm). Since the stitch counts match the measurements, the edge won’t ruffle or pull in. The ch-1 corners let the edge turn without bunching.
Fasten off and weave in the ends. The pocket opening (Row 1) stays unbordered because the scarf covers it. Checkpoint: the body measures 4 in × 8.5 in (10.2 cm × 21.6 cm).
Assembly
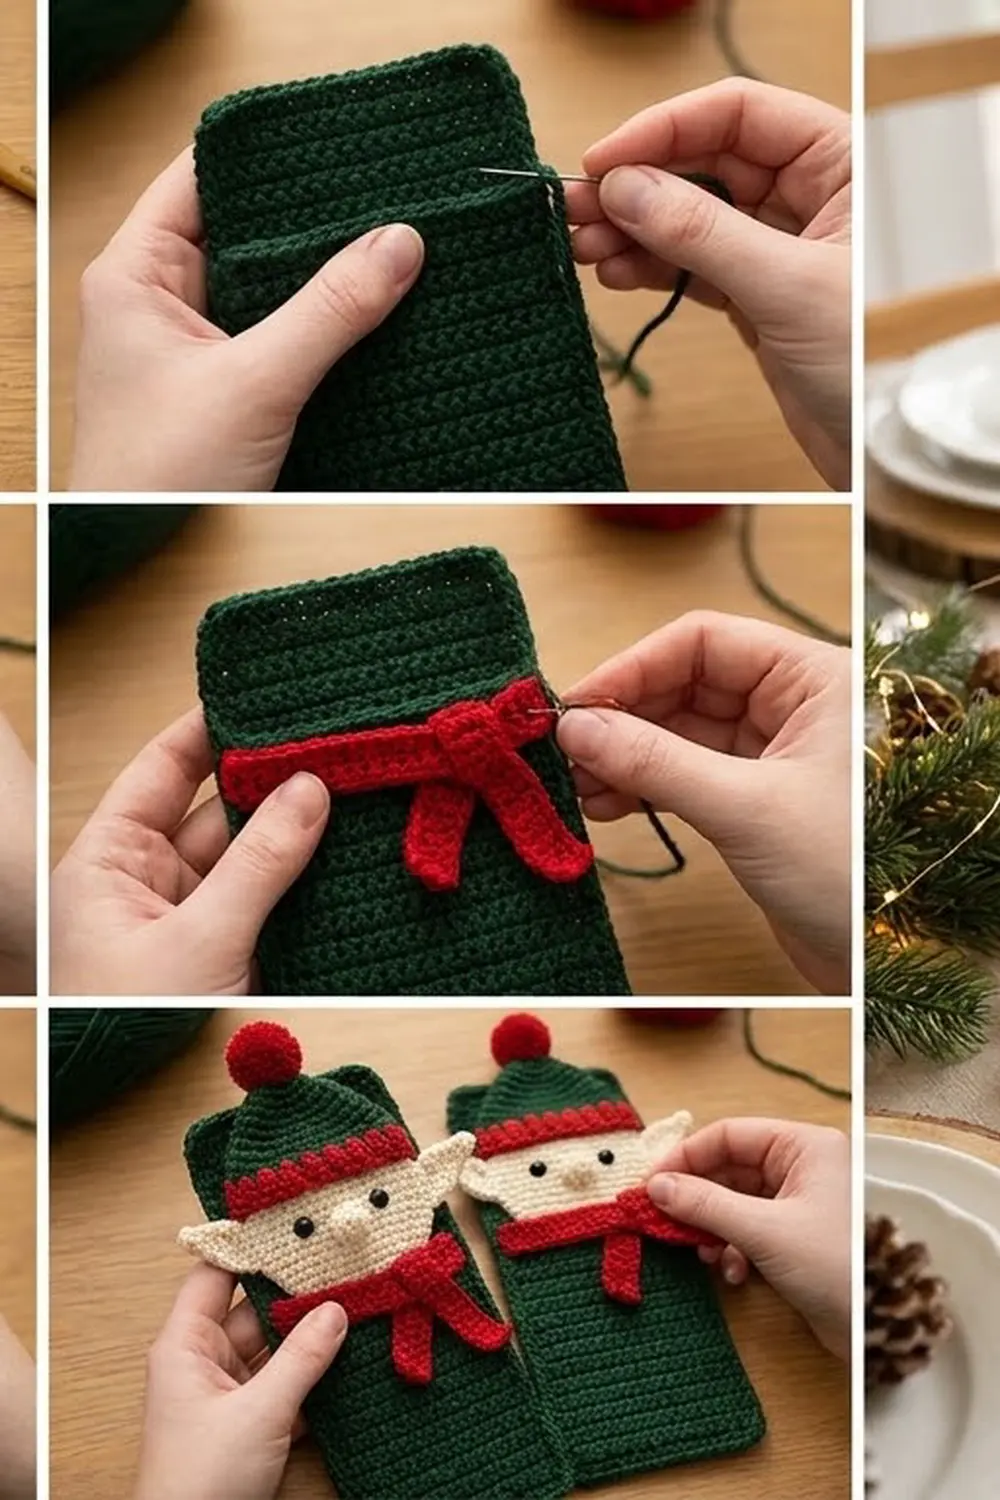
- Face: Center the face on the back panel so its lower 1 in (2.5 cm) overlaps the top of the back. Its top edge then sits 2 in (5.1 cm) above the body. Whipstitch around the overlap through the back panel only.
- Ears: Tuck the base of each ear about 0.25 in (0.6 cm) behind the left and right edges of the face, at eye level, with the tips pointing outward and slightly up. Sew them in place from the back.
- Nose: Sew it centered just below the eye line.
- Hat: Lay the brim so its lower 0.75 in (1.9 cm) covers the top of the face. The brim’s ends will extend slightly past the face on both sides. Whipstitch the brim to the face, and sew the crown to the face from the back.
- Pompom: Sew it over the hat tip.
- Scarf: Lay the band along the front pocket opening and wrap its ends 0.25 in (0.6 cm) around each side. Sew it through the front layer only, or you will close the pocket. Place the two tails in an inverted V, about 1.5 in (3.8 cm) from the left edge. Wrap the knot around the tops of the tails and the band, then sew its ends together at the back of the band.
Final Blocking
- Lightly mist the whole holder with water.
- Slip a piece of cardboard 3.5 in (8.9 cm) wide into the pocket to keep its shape.
- Pin the body to 4 in × 8.5 in (10.2 cm × 21.6 cm) on a blocking mat.
- Pin the face round and the ears pointed, and open out the hat tip.
- Let it dry completely, then remove the cardboard.
For acrylic yarn, steam from above without touching the fabric.
Final Quality-Control Checklist
- Body is 4 in × 8.5 in (10.2 cm × 21.6 cm)
- Border is 92 sc plus 4 ch-1 corners, with 32 sc on each long side
- Pocket opening still opens and is 6 in (15.2 cm) deep
- Face is 3 in (7.6 cm) across, flat and centered
- Eyes are level and secure, and the nose is centered
- Ears are symmetric
- Hat brim covers the top of the face evenly
- Scarf is sewn to the front layer only
- All ends are woven in
- A fork and knife slide in easily
Troubleshooting
- Side edge ruffles: You worked 1 sc per row end. Redo the round with the 8-in-9 rule.
- Side edge puckers: You skipped too many row ends. Each long side needs exactly 32 sc.
- Face cups: Go up a hook size, or check that each round adds 6 stitches.
- Face ruffles: You have extra increases. Recount to 36 sc.
- Hat leans to one side: Make the decreases at both ends of the same row.
- Pocket gapes: Work the scarf band more firmly, or sew it down at the center.
- Ears flop: Sew deeper behind the face, or work them on a smaller hook.
Care
Hand wash in cool water and lay flat to dry, reshaping the pocket while damp. Remove the cutlery before washing, and don’t tumble dry.
Final Notes
The sizing follows one chain of measurements. Fourteen sc make the 3.5 in (8.9 cm) width. That strip folds into a 3.5 in × 8 in (8.9 cm × 20.3 cm) pocket. The border round of 14 and 32 sc per side brings it to 4 in × 8.5 in (10.2 cm × 21.6 cm). The 3 in (7.6 cm) face and 4 in (10.2 cm) hat bring the finished elf to about 13.5 in (34.3 cm) tall. Check your gauge first and you can make a matching elf for every place setting.
Happy crocheting!