

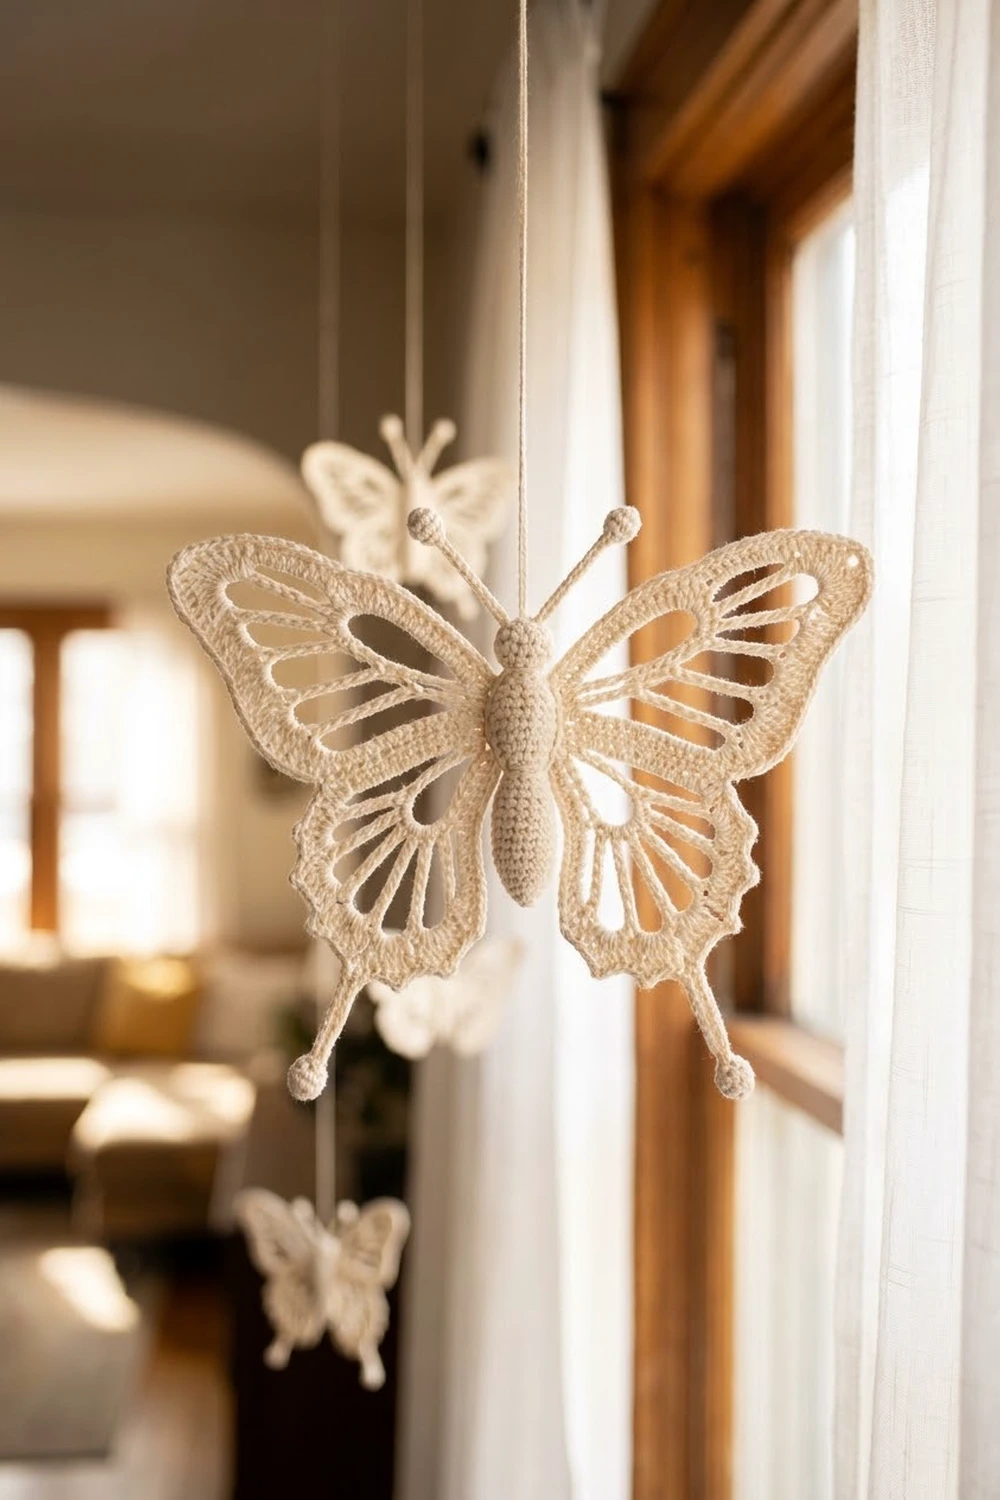
The Moonlace Swallowtail is a single lace butterfly with open, airy wings and a small padded body. Each wing has one large teardrop “eye” opening near the body, ringed by radiating spokes and a firm, crisp outer edge. The lower wings finish in slim swallowtail tails, each tipped with a round popcorn knob.
The sample is worked in one color, a soft cream cotton thread, which gives the butterfly a vintage, heirloom look. It reads beautifully laid flat on a table, tucked into a gift, or hung in a sunny window where light shines through the openwork.
This pattern uses US crochet terms. The finished butterfly measures about 6 in (15.2 cm) across the wingspan and 5.5 in (14.0 cm) from the upper wing tips to the tail knobs.
Construction is simple and modular. You crochet two upper wings and two lower wings in the round, each starting from a chain ring that becomes the eye. Then you make a small stuffed body with segment ridges and two knobbed antennae, sew the wings to the body, and finish with a slip-stitch border that sharpens every outline.
Finished Size and Construction
- Finished size: 6 in (15.2 cm) wide x 5.5 in (14.0 cm) tall
- Skill level: Intermediate
- Terminology: US crochet terms
- Yarn weight: Size 3 cotton crochet thread (Lace / Category 0)
- Hook: 2.25 mm (US B-1)
- Number of pieces: 5 (2 upper wings, 2 lower wings, 1 body with antennae), assembled into one butterfly
- Layout: Upper wings angled up and out, lower wings angled down and out, body centered
- Piece size: Upper wing 3 in (7.6 cm) long x 2.25 in (5.7 cm) wide; lower wing 2 in (5.1 cm) long x 1.75 in (4.4 cm) wide plus a 1.5 in (3.8 cm) tail; body 1.75 in (4.4 cm) long x 0.5 in (1.3 cm) wide
- Size before border: 6 in (15.2 cm) x 5.5 in (14.0 cm)
- Border depth: Under 1/16 in (0.2 cm); the slip-stitch border defines the edge without adding size
Materials
Choose a smooth, tightly plied mercerized cotton thread in size 3. Mercerized cotton shows each stitch clearly and holds a blocked shape well. Avoid fuzzy or very soft yarns, because the lace spokes will blur and the wings will droop.
- Cream (one color only): 15 g, about 40 m (44 yd)
Tools:
- 2.25 mm (US B-1) crochet hook
- Tapestry needle with a small eye
- A pinch of scrap thread or fiberfill for stuffing the body
- Rustproof pins and a foam blocking board
- Spray bottle with water, or light spray starch
- Optional: 8 in (20.3 cm) of thread for a hanging loop
The quantity above includes a margin of roughly 25 percent for gauge swatching and weaving in ends.
Abbreviations (US Terms)
- ch – chain
- sl st – slip stitch
- sc – single crochet
- dc – double crochet
- tr – treble crochet
- sc2tog – single crochet 2 together
- BLO – back loop only
- MR – magic ring
- sk – skip
- sp(s) – space(s)
- pc – popcorn (see below)
Special stitch – Popcorn (pc): Work 5 dc in the indicated stitch. Remove the hook from the loop, insert the hook front to back into the top of the first dc of the group, pick up the dropped loop, and pull it through. Ch 1 to close. The 5 dc fold into a firm round knob.
Special stitch – Mini popcorn (mini pc): Same as the popcorn, but with 4 dc. Used for the antenna tips.
Gauge and Checkpoints
Gauge: 8 sc and 10 sc rounds = 1 in (2.5 cm) with size 3 thread and a 2.25 mm hook.
Make one upper wing first and use it as your test piece. Measure it against these checkpoints:
- Upper wing, after Round 1: eye ring about 1.75 in (4.4 cm) long x 1 in (2.5 cm) wide when shaped into a teardrop
- Upper wing, after Round 2: about 2.25 in (5.7 cm) long
- Upper wing, after Round 4: 3 in (7.6 cm) long x 2.25 in (5.7 cm) wide
- Lower wing, after Round 1: eye ring about 1.25 in (3.2 cm) long x 0.75 in (1.9 cm) wide
- Lower wing, after Round 4: 2 in (5.1 cm) x 1.75 in (4.4 cm), plus the 1.5 in (3.8 cm) tail
- Body: 1.75 in (4.4 cm) long x 0.5 in (1.3 cm) wide
If your upper wing is more than 1/4 in (0.6 cm) too large, go down to a 2.0 mm hook. If it is too small, go up to a 2.5 mm hook. Pin the wing lightly before measuring, because lace always looks smaller while it is still crumpled.
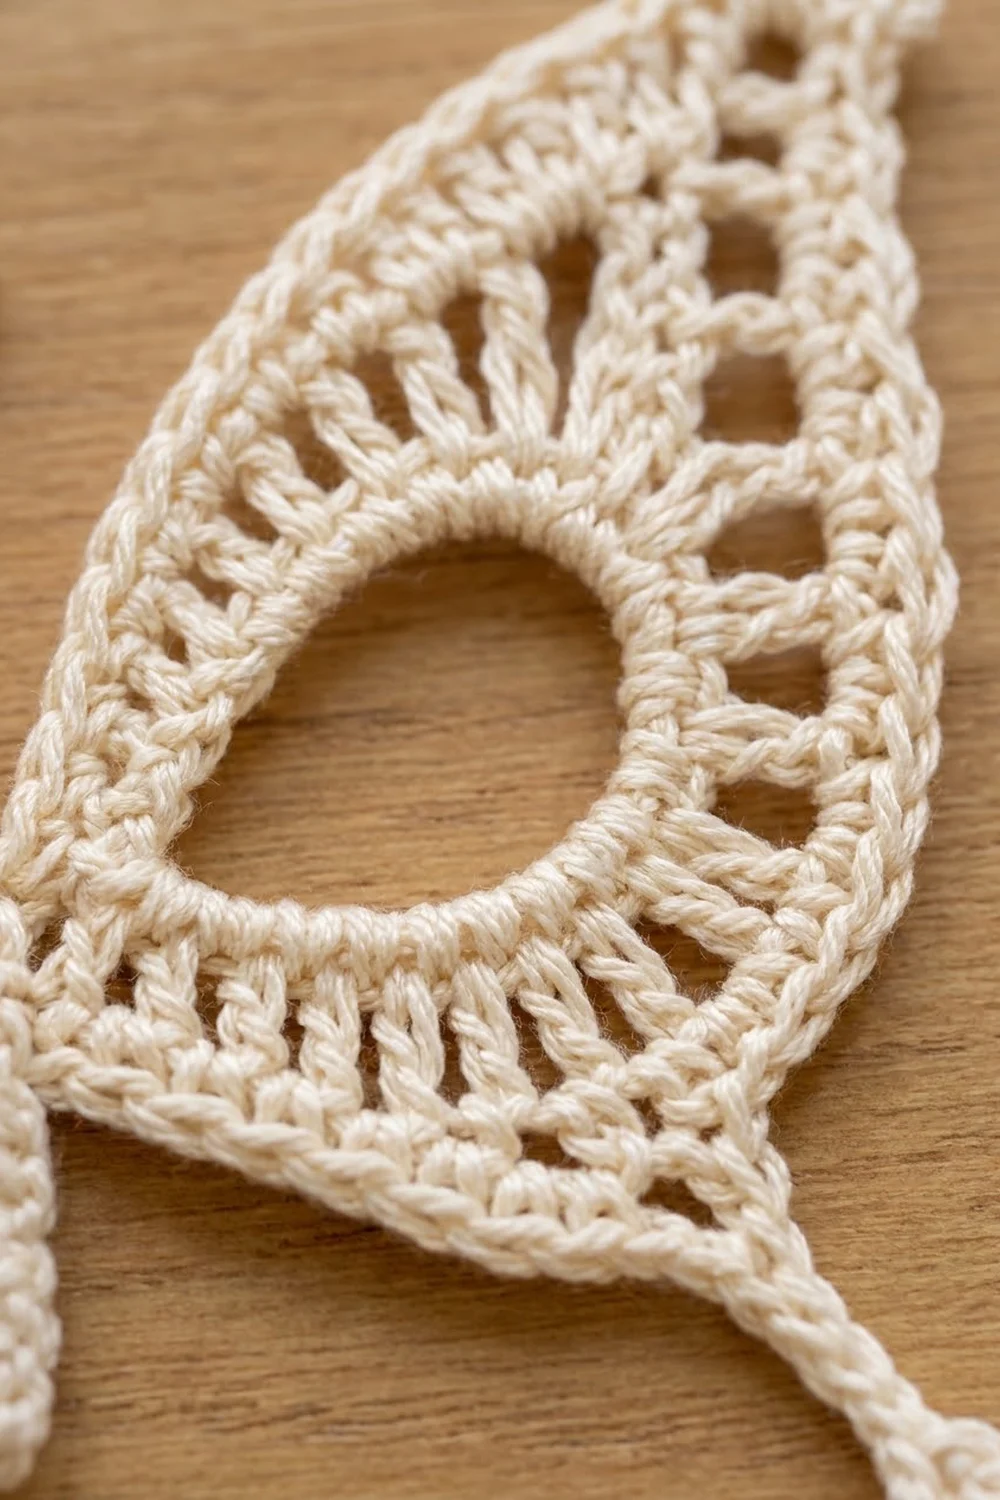
Upper Wing (Make 2)
The eye ring is 40 sc. Stitches 1–8 form the base that attaches to the body. Stitches 9–40 form the outer curve and tip.
Foundation: Ch 30, sl st in first ch to form a ring. Take care not to twist the chain.
Round 1: Ch 1, work 40 sc into the ring (over the chain, not into it). Sl st in first sc. (40 sc)
Round 2: Ch 1, sc in each of first 8 sts; dc in next st, ch 2, sk next st; repeat from * 16 times total. Sl st in first sc. (8 sc, 16 dc, 16 ch-2 sps)
The short sc stitches keep the base flat against the body. The dc spokes start the radiating lace on the outer side of the eye.
Round 3: Ch 1, sc in each of first 8 sc; tr in next dc, ch 3; repeat from * 7 times total; (tr, ch 3, tr, ch 3) all in next dc for the tip; tr in next dc, ch 3; repeat from ** 8 times total. Sl st in first sc. (8 sc, 17 tr, 17 ch-3 sps)
The two tr worked into the 8th dc make the pointed wing tip. Because 7 dc come before it and 8 come after, the tip sits just off center, which gives the wing its swept-back angle.
Round 4: Ch 1, sc in each of first 8 sc; sc in next tr, 3 sc in next ch-3 sp; repeat from * 7 times total; sc in next tr, (2 sc, ch 2, 2 sc) in tip ch-3 sp; sc in next tr, 3 sc in next ch-3 sp; repeat from ** 9 times total. Sl st in first sc. Fasten off, leaving a 10 in (25.4 cm) tail for sewing. (77 sc: 8 base sc + 69 outer sc, plus 1 tip ch-2 sp)
Count check: 8 + 17 (one per tr) + 48 (3 in each of 16 regular sps) + 4 (tip group) = 77.
For the second upper wing, work exactly the same, then flip it over so it mirrors the first.
Lower Wing (Make 2)
The eye ring is 30 sc. Stitches 1–6 form the base.
Foundation: Ch 22, sl st in first ch to form a ring.
Round 1: Ch 1, work 30 sc into the ring. Sl st in first sc. (30 sc)
Round 2: Ch 1, sc in each of first 6 sts; dc in next st, ch 2, sk next st; repeat from * 12 times total. Sl st in first sc. (6 sc, 12 dc, 12 ch-2 sps)
Round 3: Ch 1, sc in each of first 6 sc; tr in next dc, ch 3; repeat from * 12 times total. Sl st in first sc. (6 sc, 12 tr, 12 ch-3 sps)
Round 4 (with tail): Ch 1, sc in each of first 6 sc; sc in next tr, 3 sc in next ch-3 sp; repeat from * 6 times total; sc in 7th tr.
Tail: Ch 14, pc in 4th ch from hook, sc in each of next 10 ch back toward the wing, sl st in the sc just worked in the 7th tr.
Continue: 3 sc in next ch-3 sp; sc in next tr, 3 sc in next ch-3 sp; repeat from * 5 times total. Sl st in first sc. Fasten off, leaving a 10 in (25.4 cm) tail. (54 sc: 6 base sc + 48 outer sc, plus a tail of 10 sc and 1 pc)
Count check: 6 + 12 (one per tr) + 36 (3 in each of 12 sps) = 54.
Flip the second lower wing so it mirrors the first.
Body and Antennae (Make 1)
The body is worked in continuous rounds. Mark the first stitch of each round.
- Round 1: 6 sc in MR. (6)
- Round 2: (sc, 2 sc in next) 3 times. (9)
- Round 3: Sc in each st. (9)
- Round 4: (sc, sc2tog) 3 times. (6) This is the neck.
- Round 5: 2 sc in each st. (12)
- Rounds 6–15: Sc in each st, working Rounds 7, 10, and 13 in BLO. (12 each round)
The BLO rounds leave raised front-loop ridges that read as body segments.
- Round 16: (sc, sc2tog) 4 times. (8)
- Round 17: Sc in each st. (8)
Stuff the head and body lightly with scrap thread. Keep the body slim, about 0.5 in (1.3 cm) wide.
- Round 18: Sc2tog 4 times. (4) Fasten off and close the hole.
Antennae (make 2): Join thread at one side of Round 3 of the head. Ch 14, mini pc in 4th ch from hook, sl st in each of next 10 ch, sl st into the head. Fasten off. Repeat on the other side. Each antenna is about 1.25 in (3.2 cm) long.
Make All Pieces
All pieces use cream thread.
- Upper wings: 2
- Lower wings: 2
- Body with antennae: 1
Layout (front view):
 [Upper L]  (body)  [Upper R]
 [Lower L]  (body)  [Lower R]
Joining
Sew the wings to the sides of the body using the long tails you left.
- Weave the tail through the 8 base sc of an upper wing and pull gently to gather the base to 0.5 in (1.3 cm).
- Place the gathered base against one side of the body, covering Rounds 6–10.
- Tack each base stitch to a body round: base st 1 to Round 6, sts 2–3 to Round 7, sts 4–5 to Round 8, sts 6–7 to Round 9, st 8 to Round 10.
- Gather the 6 base sc of a lower wing to 0.5 in (1.3 cm) and tack it to Rounds 11–15: st 1 to Round 11, st 2 to Round 12, sts 3–4 to Round 13, st 5 to Round 14, st 6 to Round 15.
- Repeat on the other side with the mirrored wings.
Tension: pull each tack firmly enough to hide the thread, but not so tight that the body puckers. The wings should angle outward on their own.
Size checkpoint: Lay the butterfly flat. It should measure 6 in (15.2 cm) across and 5.5 in (14.0 cm) tall.
Border
The border is a round of sl st worked into the outer edge of each wing after joining. It firms the outline and gives the edge its crisp, corded look.
Border gauge: 8 sl st = 1 in (2.5 cm), one sl st into each sc of the edge.
Upper wing border (each): Join at the first outer sc next to the body. Sl st in each of next 31 sc, (sl st, ch 2, sl st) in tip ch-2 sp, sl st in each of next 38 sc. Fasten off. (71 sl st + 1 tip ch-2)
That is 69 outer sc worked one-to-one, plus 2 sl st in the tip space.
Lower wing border (each): Join at the first outer sc next to the body. Sl st in each of next 25 sc (up to and including the sc in the 7th tr). Along the tail: sl st in each of 10 tail sc, sl st in top of pc, sl st in each of 10 free ch loops on the other side of the tail. Sl st in each of remaining 23 sc. Fasten off. (69 sl st)
That is 48 outer sc (25 + 23) plus 21 tail stitches (10 + 1 + 10).
Why the math works: Every border stitch goes into exactly one existing stitch, so the edge neither ruffles nor pulls in. The only extra stitches are the 2 sl st at each upper tip, which keep the point sharp. Total border: 2 x 71 + 2 x 69 = 280 sl st.
Final Blocking
- Weave in all ends along the edge stitches, not through the open lace.
- Lightly mist the butterfly with water or spray starch until damp, not soaked.
- Pin the body straight on the board.
- Pin each upper wing tip so the wings angle up and out and the wingspan is 6 in (15.2 cm).
- Pin each tail knob so the height reaches 5.5 in (14.0 cm).
- Pin each eye opening into a smooth teardrop, and pin the end of every tr spoke so the spokes fan evenly.
- Shape the antennae into gentle outward curves.
- Let it dry completely, at least 12 hours, before unpinning.
Final Quality-Control Checklist
- Upper wing Round 4 has 77 sc and one tip ch-2 sp.
- Lower wing Round 4 has 54 sc plus a tail with 10 sc and 1 pc.
- Body counts: 6, 9, 9, 6, 12 (Rounds 5–15), 8, 8, 4.
- Wings mirror each other left to right.
- Wingspan is 6 in (15.2 cm); height is 5.5 in (14.0 cm).
- Border: 71 sl st per upper wing, 69 per lower wing.
- All ends are woven in invisibly.
Troubleshooting
- Wing cups or curls: Your tr may be too tight. Loosen the ch-3 spaces or go up a hook size.
- Wing edge ruffles: You may have worked 4 sc into some ch-3 spaces. Recount Round 4.
- Tip is rounded, not pointed: Check for (tr, ch 3, tr, ch 3) in one dc in Round 3 and (2 sc, ch 2, 2 sc) in Round 4.
- Popcorn looks flat: Insert the hook into the first dc of the group, not the chain below it.
- Body leans or bulges: Remove some stuffing; the body should stay slim.
- Eye openings sag after washing: Reblock with spray starch.
Care
Hand wash in cool water with mild soap, roll in a towel to remove moisture, and reblock flat to dry. Use light spray starch if you want extra stiffness for hanging.
Final Notes
Each measurement leads to the next. An upper eye ring of 40 sc grows to a 3 in (7.6 cm) wing, and a lower ring of 30 sc grows to a 2 in (5.1 cm) wing plus a 1.5 in (3.8 cm) tail. Both are gathered to 0.5 in (1.3 cm) at the base and sewn to a 1.75 in (4.4 cm) body. That gives a 6 in (15.2 cm) by 5.5 in (14.0 cm) butterfly, and the one-to-one slip-stitch border locks in that size without changing it.
Happy crocheting!