

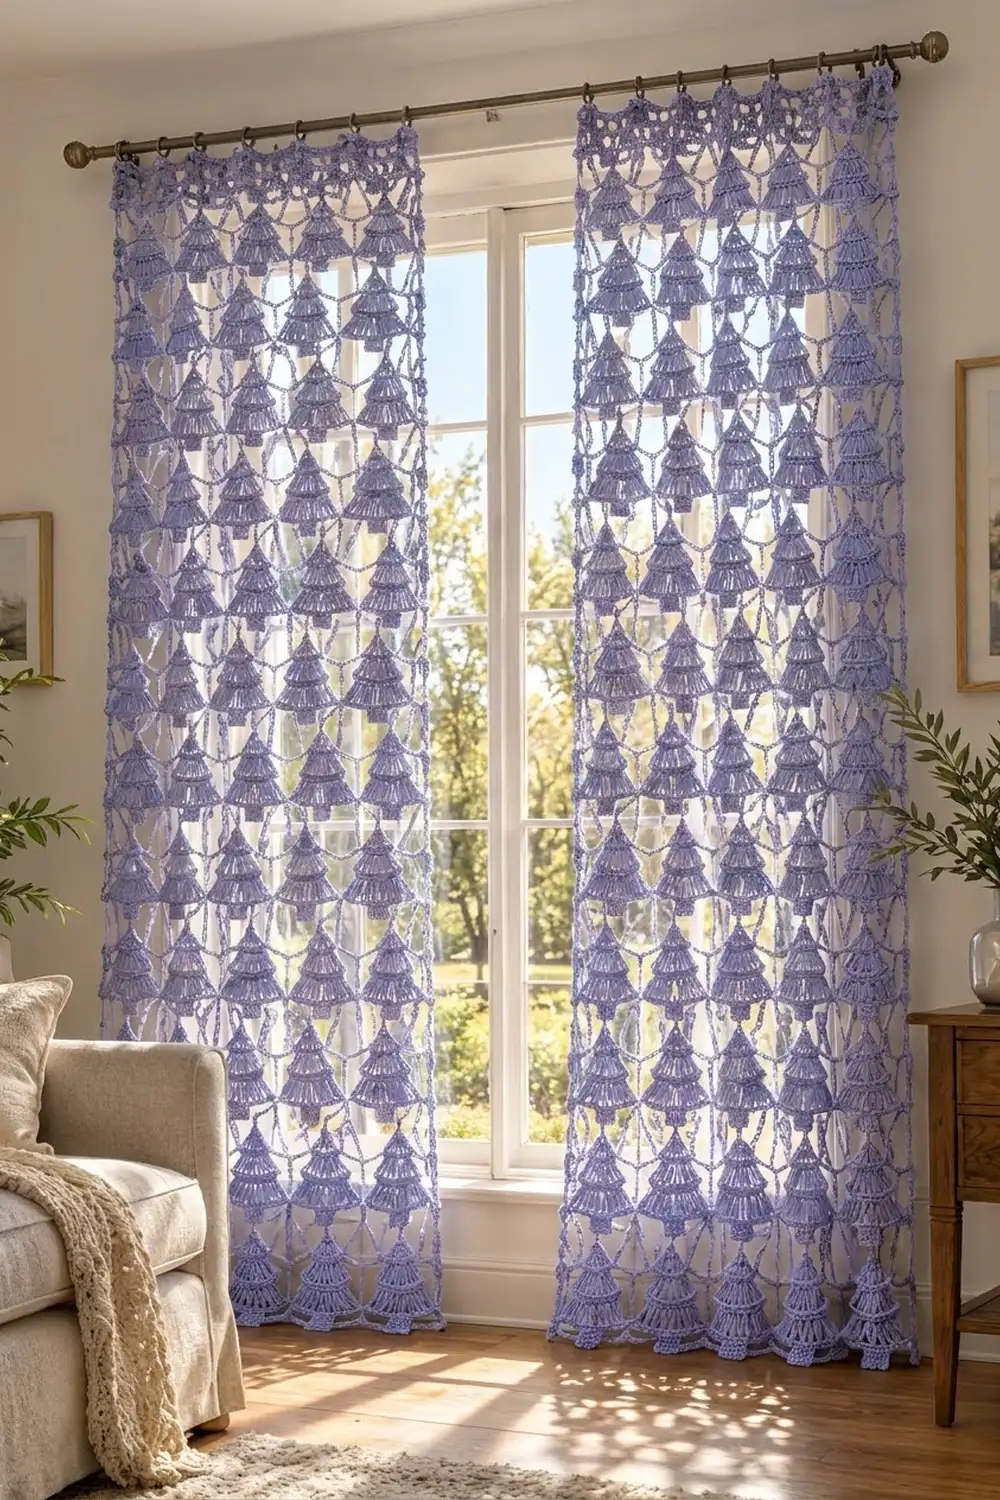
Lavender Pines is a lace curtain made from a forest of small, airy Christmas trees. Each tree has three tiers of long fanned stitches separated by neat single crochet ridges, with a solid little trunk at the base. When the curtain hangs in a window, light passes between the long stitches and through the chain mesh, so the trees seem to float.
The sample uses one soft lavender (periwinkle) cotton. With only one color, the look stays calm and modern and the stitch texture does the work. It reads as a winter forest rather than a novelty piece, so you can leave it up well past the holidays.
This pattern uses US crochet terms. Each tree measures 6.25 in (15.9 cm) wide and 6.25 in (15.9 cm) tall. One finished panel measures 38.25 in (97.2 cm) wide and 78.25 in (198.8 cm) long, including the hanging loops. The pattern makes a pair of panels.
Construction is modular. You make 59 identical trees per panel and lay them out in staggered rows. Then you connect them with chain “rails” and short doubled links, add a header band with rod loops across the top, and finish with a chain cord down each side.
Finished Size and Construction
- Finished panel size: 38.25 in (97.2 cm) wide x 78.25 in (198.8 cm) long, including loops
- Skill level: Intermediate
- Terminology: US crochet terms
- Yarn weight: Worsted (#4) cotton or cotton blend
- Hook: 5.0 mm (US H-8)
- Number of pieces: 59 trees per panel, 118 for the pair
- Layout: 13 staggered rows; odd rows hold 5 trees, even rows hold 4
- Piece size: 6.25 in (15.9 cm) wide x 6.25 in (15.9 cm) tall
- Size before border: 38.25 in (97.2 cm) wide x 75.25 in (191.1 cm) long
- Border depth: 3 in (7.6 cm) at the top (a 1 in / 2.5 cm solid band plus 2 in / 5.1 cm loops); the side cords add no width
Materials
Choose a smooth, combed or mercerized worsted-weight cotton. Cotton gives crisp stitch definition, keeps the fanned tiers open, and stretches less than acrylic under the weight of a long curtain. Avoid fuzzy or splitty yarns, because the long stitches should look like clean, separate strands.
- Lavender (only color): 850 g, about 1,445 m (based on 170 m per 100 g). One panel uses about 360 g, so the pair uses about 720 g.
This amount includes a margin of about 15% for the gauge swatch, a test tree, and differences in tension.
Tools:
- 5.0 mm (US H-8) crochet hook
- Tapestry needle and scissors
- Stitch markers
- Measuring tape
- A large blocking surface (foam mats, or a carpeted floor covered with a sheet)
- Rust-proof pins and a spray bottle
Abbreviations (US Terms)
- ch – chain
- sl st – slip stitch
- sc – single crochet
- dc – double crochet
- tr – treble crochet
- dtr – double treble crochet
- sk – skip
- st(s) – stitch(es)
- sp – space
- RS / WS – right side / wrong side
Double treble (dtr): Yarn over 3 times, insert the hook in the stitch, yarn over and pull up a loop (5 loops on hook), then [yarn over, pull through 2 loops] 4 times.
Link: Ch the stated number, sl st into the target, then sl st in each link ch back to the rail. This doubles the link so it stays firm.
Gauge and Checkpoints
Gauge: 16 sc and 16 rows = 4 in (10.2 cm). Chain gauge: 16 ch = 4 in (10.2 cm).
Make one complete test tree first, then mist it lightly and measure it. Every later number depends on this tree.
Checkpoints:
- After Row 3: 2.75 in (7.0 cm) wide
- After Row 6: 4.25 in (10.8 cm) wide
- After Row 8: 6.25 in (15.9 cm) wide, and 4.75 in (12.1 cm) from the top of the apex ring to the bottom of Row 8
- After Row 14: 6.25 in (15.9 cm) tall; trunk 1.25 in (3.2 cm) wide and 1.5 in (3.8 cm) long
If the tree is too big, go down 0.5 mm in hook size. If it is too small, go up 0.5 mm. If the width is right but the tiers look short, pull each long stitch fully up to height before you start yarning over.
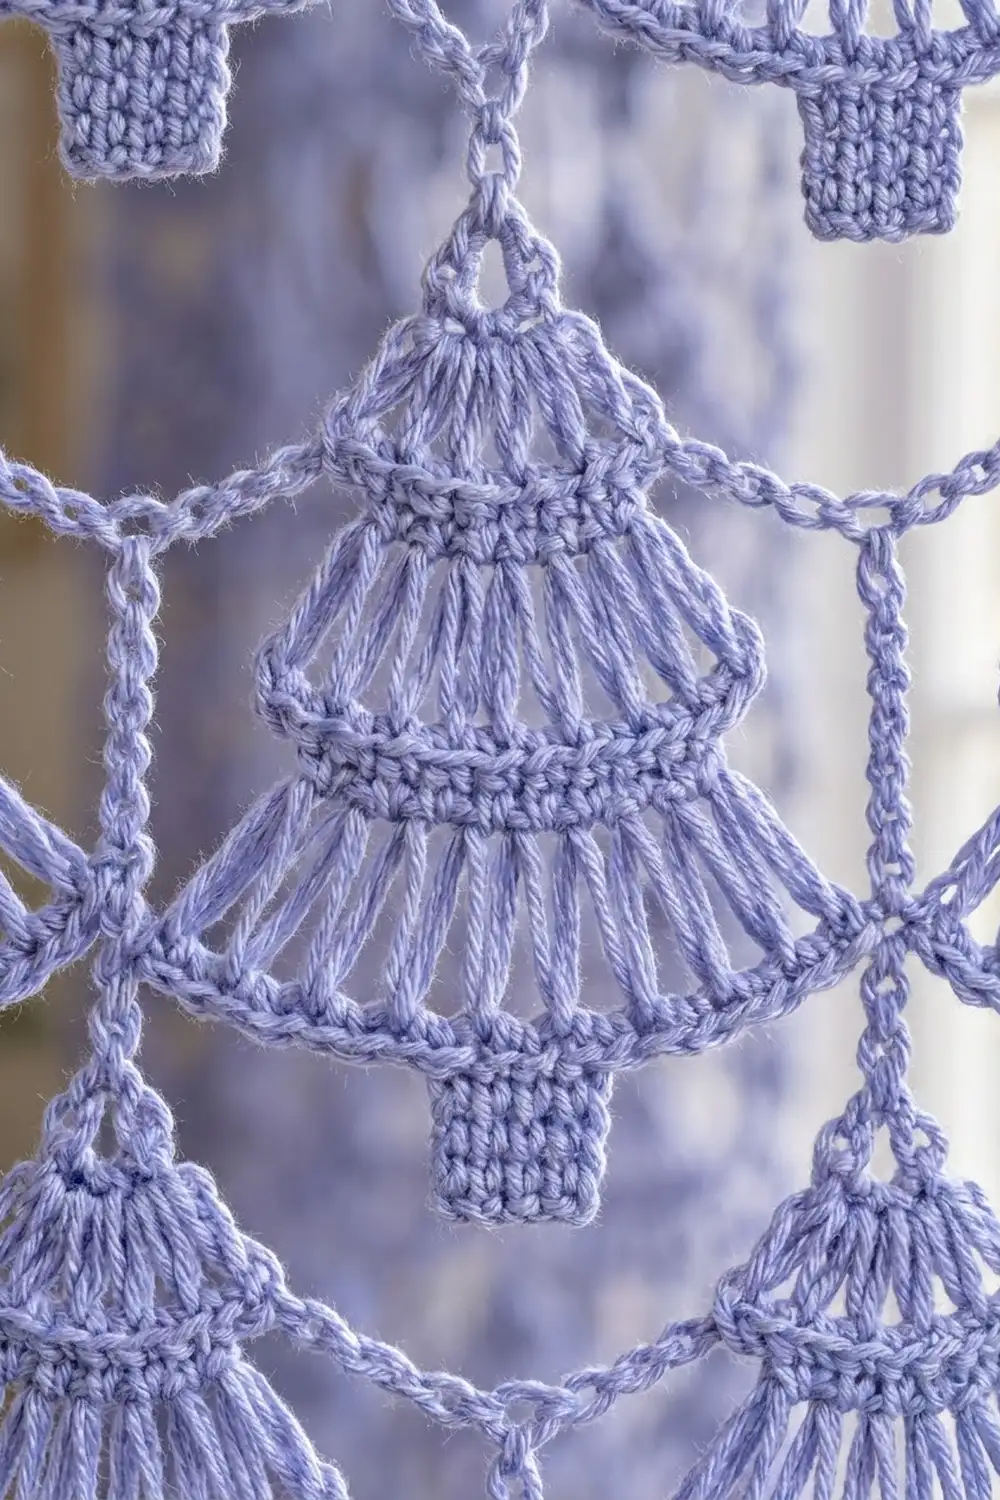
Tree Motif (Make 59 per Panel)
The tree is worked from the top down in turned rows.
Apex: Ch 4, sl st in first ch to form a ring.
Row 1 (RS, Tier 1): Ch 4 (counts as tr), 8 tr in ring, turn. (9 tr)
The fan fills the lower part of the ring. The top of the ring stays open as a small loop, called the apex ring, which you will use for joining.
Row 2 (ridge): Ch 1 (does not count, here and throughout), 2 sc in first st, sc in next 7 sts, 2 sc in last st, turn. (11 sc)
Row 3 (ridge): Ch 1, sc in each st across, turn. (11 sc)
Row 4 (Tier 2): Ch 4 (counts as tr), tr in same st, *tr in next st, 2 tr in next st; rep from * 4 more times, turn. (17 tr)
Check: the first st gets 2, and each of the 5 repeats adds 3, so 2 + 15 = 17. The 2, 1, 2 … 2 sequence is symmetric, so the tier flares evenly on both sides.
Rows 5–6 (ridge): Ch 1, sc in each st across, turn. (17 sc)
Row 7 (Tier 3): Ch 5 (counts as dtr), *2 dtr in next st, dtr in next st; rep from * 7 more times, turn. (25 dtr)
Check: 1 + (8 x 3) = 25. The 1, 2, 1 … 1 sequence is symmetric.
Row 8 (base edge): Ch 1, sc in each st across, turn. (25 sc)
St 1 and st 25 are the tree tips, and st 13 is the center.
Row 9 (WS, trunk): Do not ch. Sl st in each of the first 11 sts, ch 1, sc in same st as last sl st and in next 4 sts, turn. (5 sc, centered over sts 11–15)
Rows 10–14: Ch 1, sc in each st across, turn. (5 sc)
Fasten off and weave in the ends. The trunk has 6 rows and measures 1.5 in (3.8 cm).
Make All Pieces
Make 59 trees per panel, or 118 for the pair, all in Lavender. Steam each batch lightly so the tiers fan open.
Layout grid for one panel (T = tree, · = gap):
Row 1:   T · T · T · T · T    (5)
Row 2:   · T · T · T · T ·    (4)
Row 3:   T · T · T · T · T    (5)
Row 4:   · T · T · T · T ·    (4)
...alternate...
Row 13:  T · T · T · T · T    (5)
There are 7 odd rows x 5 trees = 35, plus 6 even rows x 4 trees = 24, for a total of 59. Every tree sits centered under a gap in the row above.
Joining
Lay the trees face up in the grid. Leave 1.75 in (4.4 cm) between neighboring tips, and 1 in (2.5 cm) between each rail and the apex below it. Pin every tree in place.
Stitch positions: The panel is 153 positions wide. Odd-row trees occupy positions 1–25, 33–57, 65–89, 97–121, and 129–153, with gap centers at 29, 61, 93, and 125. Even-row trees are centered on those gap centers, so they occupy 17–41, 49–73, 81–105, and 113–137. Their gap centers, 45, 77, and 109, match the centers of the odd-row trees.
Odd-row rail (Rows 1, 3 … 13): Join with sl st in st 1 of Row 8 on the first tree, then sl st through back loops in sts 2–25. *Ch 4 (the 4th ch is the junction), work the links, ch 3, sl st in st 1 of Row 8 on the next tree, then sl st through back loops in sts 2–25; rep from * 3 more times. Fasten off.
Count: 5 x 25 + 4 x 7 = 153.
Even-row rail (Rows 2, 4 … 12): Make a slipknot. Ch 13 (the 13th ch is a junction), work the links, ch 3, sl st in st 1 of Row 8 on the first tree, then sl st through back loops in sts 2–25. *Ch 4, work the links, ch 3, sl st in st 1 of the next tree, then sl st through back loops in sts 2–25; rep from * 2 more times. Ch 4, work the links, ch 12. Fasten off.
Count: 16 + 4 x 25 + 3 x 7 + 16 = 153.
Links at each junction (work the up link first):
- Up link (skip on Row 1): Ch 17, sl st in the center st of Row 14 on the trunk above, then sl st back down the 17 ch.
- Down link (skip on Row 13): Ch 4, sl st in the apex ring below, then sl st back up the 4 ch.
Every junction lines up with one trunk above and one apex below, so no link pulls sideways.
Tension: Make the chains match your gauge chains. Tight links pucker the trees, and loose links make the curtain sag. Keep the sl sts across Row 8 relaxed so the tiers don’t curl.
Size checkpoint: Each rail measures 38.25 in (97.2 cm). The spacing from one rail to the next is 1 in (2.5 cm) of down link plus 4.75 in (12.1 cm) from apex to Row 8, which equals 5.75 in (14.6 cm). From Rail 1 to Rail 13 the distance is 12 x 5.75 = 69 in (175.3 cm).
Border
The border has two parts: a header across the top and a chain cord down each side. The border gauge is the same as the body: 16 sts = 4 in (10.2 cm).
Header Row 1: Make a slipknot. Ch 12, sc in the apex ring of the first Row 1 tree, [ch 31, sc in the apex ring of the next tree] 4 times, ch 12, turn. (153 sts)
Check: 12 + 5 + (4 x 31) + 12 = 153. The sc’s land on positions 13, 45, 77, 109, and 141, which are the exact tree centers, so the top side equals 5 trees x 25 sts + 4 gaps x 7 ch.
Header Row 2: Ch 1, sc in each st across, turn. (153 sc)
Header Row 3: Ch 4 (counts as dc + ch 1), sk next st, dc in next st, *ch 1, sk next st, dc in next st; rep from * across, turn. (77 dc + 76 ch-1 sps = 153)
Header Row 4: Ch 1, sc in each dc and each ch-1 sp across, turn. (153 sc)
Rows 2–4 form a 1 in (2.5 cm) solid band.
Header Row 5: Ch 1, sc in first st, *ch 14, sk 7 sts, sc in next st; rep from * 18 more times, turn. (20 sc + 19 loops)
Check: 1 + 19 x 8 = 153.
Header Row 6: Ch 1, sc in first sc, *18 sc in next loop, sc in next sc; rep from * 18 more times. Fasten off. (1 + 19 x 19 = 362 sc)
The loops stand about 2 in (5.1 cm) tall and fit rods up to 1 in (2.5 cm) in diameter.
Side cords (one on each side): Join with sl st in the end st of Header Row 1. Ch 19, sl st in the end st of Rail 1. *Ch 23, sl st in the end st of the next rail; rep from * 11 more times. Fasten off. (295 ch, 13 joins)
Check: 19 ch is 4.75 in (12.1 cm), the drop from apex to Rail 1. Each 23 ch is 5.75 in (14.6 cm), which is one rail space. The total is 19 + 12 x 23 = 295 ch, or 73.75 in (187.3 cm), which is exactly where Rail 13 sits, so the sides hang straight.
The bottom edge stays free. The Row 13 trunks hang 1.5 in (3.8 cm) below Rail 13, so the body is 75.25 in (191.1 cm) long.
Final Blocking
- Weave in all the ends along chains or through the ridges.
- Lay the panel RS up on your blocking surface.
- Pin the header straight at 38.25 in (97.2 cm).
- Pin the side cords straight and square to the header.
- Pin the Row 8 tips of each tree to 6.25 in (15.9 cm).
- Spread the long stitches so each tier fans evenly.
- Mist until damp but not soaked.
- Let the panel dry completely, then unpin it.
- Hang it for 24 hours and recheck the length.
Final Quality-Control Checklist
- Every tree is 6.25 in (15.9 cm) wide and tall
- Every rail is 38.25 in (97.2 cm) wide
- Every tree is joined at both tips and the apex, and every trunk except in Row 13 is linked
- No links are twisted
- Header Row 6 has 362 sc and 19 loops
- Each side cord has 295 ch
- Each panel is 78.25 in (198.8 cm) long
- The two panels match within 0.5 in (1.3 cm)
Troubleshooting
Tiers cup or ruffle: The long stitches are too short. Pull the loops up fully, or use a hook one size larger for Rows 1, 4, and 7.
Trees lean: The trunk is off center. Recount Row 9: you need 11 sl sts, then 5 sc.
The bottom is narrower than the top: The rails got tighter as you went. Remeasure each rail and redo any that are short.
The curtain grows after hanging: The up links have stretched. Rework them with a hook 0.5 mm smaller.
The header waves: Row 1 is loose. Rework it with a smaller hook and confirm 153 sts.
Care
Hand wash in cool water with mild soap, roll the panel in a towel to press out the water, and dry it flat. Don’t hang it while wet, because the weight will stretch the chains.
Final Notes
Here is how the measurements build: one 6.25 in (15.9 cm) tree plus a 7-ch gap makes an 8 in (20.3 cm) repeat. Five trees and four gaps give 153 sts, or 38.25 in (97.2 cm) of width. On the length side, the first 4.75 in (12.1 cm) drop, plus twelve 5.75 in (14.6 cm) rail spaces, plus the 1.5 in (3.8 cm) trunk, gives 75.25 in (191.1 cm). The 3 in (7.6 cm) header brings the panel to 78.25 in (198.8 cm). If you keep your gauge, the forest lines up on its own.
Happy crocheting!