

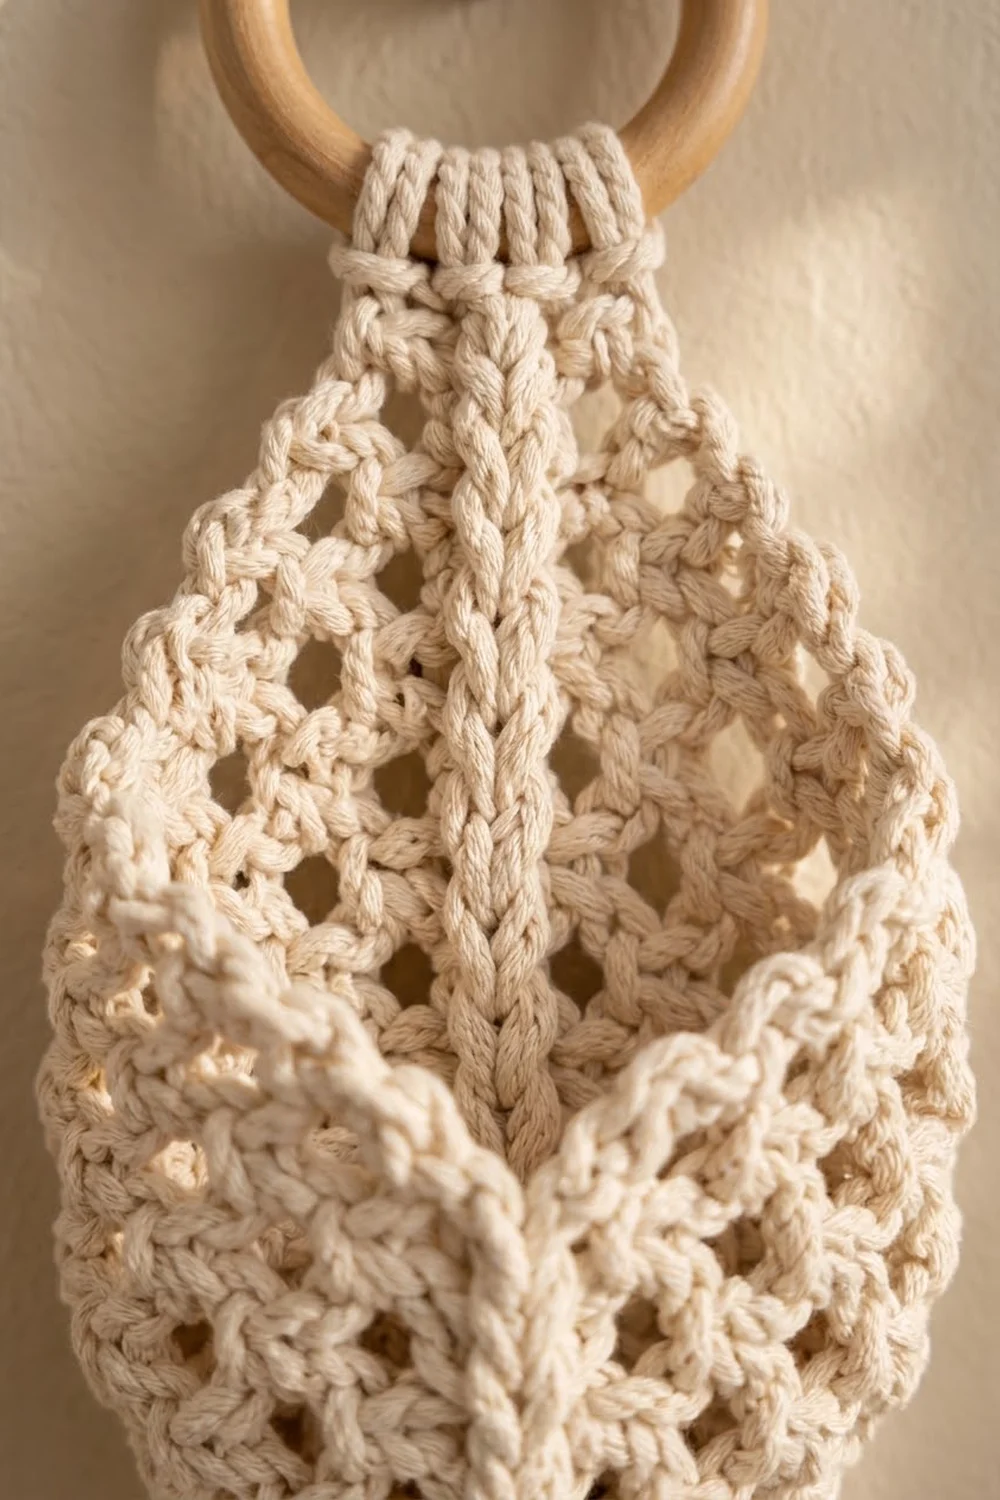
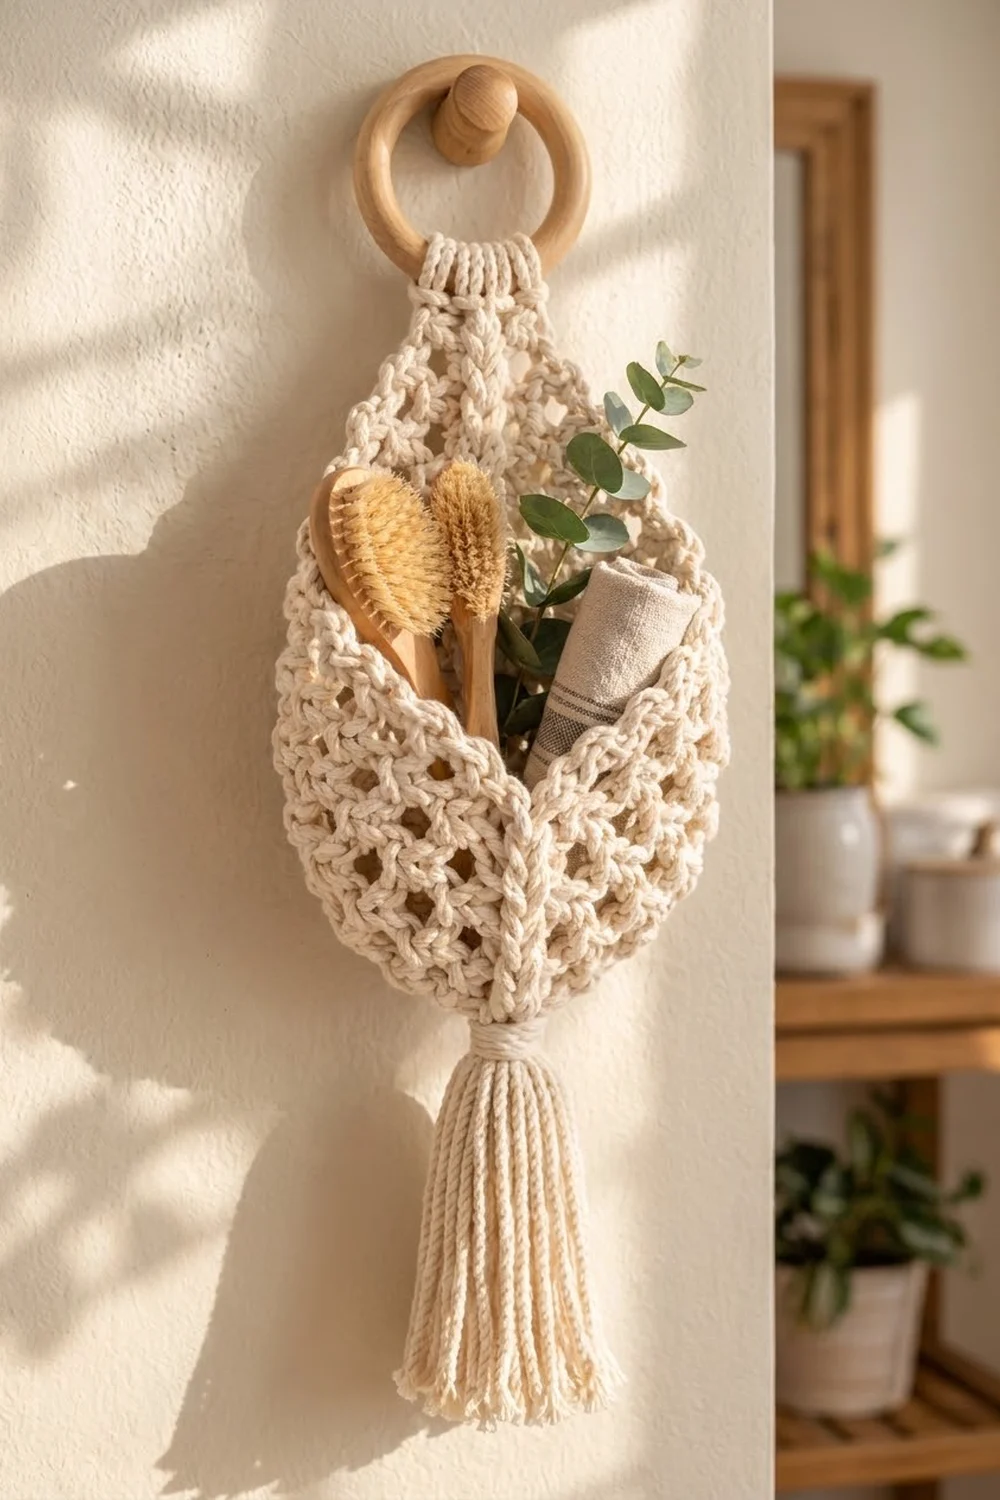
The Linden Leaf Wall Pocket is a teardrop-shaped hanging organizer in chunky cream cotton cord. An open mesh gives it a light, lacy look. A raised braided spine runs up the center like the vein of a leaf, and a wooden ring and long cord tassel finish it in a calm boho style.
The pocket is made in one natural cream color, so the texture does all the work. It holds rolled hand towels, a small potted plant, or bath brushes, and it looks just as good hung alone or repeated along a wall.
This pattern uses US crochet terms. The finished body measures 7 in (17.8 cm) wide and 13 in (33.0 cm) tall. The tassel adds about 7 in (17.8 cm), so the pocket hangs about 23 in (58.4 cm) from the top of the ring to the tassel tip.
You crochet a back panel in rows, from the bottom tip up to a narrow neck, then a slightly wider front panel with a V-shaped opening. A surface slip-stitch spine goes on each panel. A single border round joins the front to the back, and then you add a short strap that wraps around the ring and a tassel.
Finished Size and Construction
- Finished size: 7 in × 13 in (17.8 cm × 33.0 cm) body, plus a 7 in (17.8 cm) tassel
- Skill level: Easy-intermediate
- Terminology: US crochet terms
- Yarn weight: #6 super bulky / 5 mm cotton cord
- Hook: 6 mm (J-10)
- Number of pieces: 2 crochet panels (back and front pocket), plus a strap and a tassel
- Layout: front pocket layered over the lower two-thirds of the back panel
- Piece size: back 7 in × 13 in (17.8 cm × 33.0 cm); front about 8 in (20.3 cm) wide when flat × 8.5 in (21.6 cm) tall at the side points
- Back size before border: 6.5 in × 12.5 in (16.5 cm × 31.8 cm)
- Border depth: 0.25 in (0.6 cm) on each edge
Materials
Yarn: Use a soft 4–5 mm single-twist or braided cotton cord, or a #6 super bulky cotton yarn. Choose something with body: a limp yarn will make the pocket sag. Cord weight varies a lot from brand to brand, so buy by length, not by grams.
- Cream / natural ecru: about 320 g, 70 m (77 yd)
This quantity includes a margin of about 15% for your gauge swatch, the tassel, and the wraps.
Tools:
- 6 mm (J-10) crochet hook
- Wooden ring, 3 in (7.6 cm) diameter
- Large-eye blunt tapestry needle
- Scissors
- Stitch markers (4)
- Rust-proof pins and a blocking mat
- Measuring tape
Abbreviations (US Terms)
- ch – chain
- sl st – slip stitch
- sc – single crochet
- dc – double crochet
- sk – skip
- sp – space
- st(s) – stitch(es)
- RS / WS – right side / wrong side
- rep – repeat
Special stitch: Surface slip stitch (surface sl st). Hold the working cord behind the fabric. Insert the hook from front to back through the fabric, pull up a loop, and draw it through the loop on your hook. Move one half-row up and repeat. This makes a raised chain on the front.
Stitch counting: In the mesh, every dc and every ch-1 space counts as 1 stitch. A row of “dc, ch 1, dc, ch 1, dc” is 5 stitches.
Gauge and Checkpoints
Gauge: 13 sts and 6 rows = 5 in (12.7 cm) in the mesh pattern.
Rows 1–4 of the back panel are your gauge test. Work them first and measure before you go on.
- After back Row 4 (17 sts): width 6.5 in (16.5 cm)
- After back Row 8: height about 6.7 in (17.0 cm) from the tip
- After back Row 15: height 12.5 in (31.8 cm), neck about 2 in (5.1 cm) wide
- After front Row 5 (21 sts): width about 8 in (20.3 cm)
- After front Row 10: height about 8.3 in (21.1 cm) at the side points
Too big? Switch to a 5.5 mm (I-9) hook. Too small? Switch to a 6.5 mm (K-10.5) hook. Height matters more than width here: if your rows are too tall, the front and back will still line up, but the pocket will hang longer. A difference of up to 0.25 in (0.6 cm) is fine.
Back Panel
Work in rows from the bottom tip to the neck.
Straight row (used throughout): Ch 4 (counts as dc + ch-1), sk first ch-1 sp, dc in next dc. *Ch 1, sk next ch-1 sp, dc in next dc. Rep from * across, working the last dc in the top of the turning chain. Turn. The stitch count stays the same.
Row 1: Ch 5. Work (dc, ch 1, dc) in the 5th ch from the hook. The 4 skipped ch count as dc + ch-1. Turn. (5 sts)
Row 2 (increase): Ch 4 (counts as dc + ch-1), dc in the first dc at the base of the chain. Ch 1, sk ch-1 sp, dc in next dc. Rep from * until you reach the turning chain. Ch 1, then work (dc, ch 1, dc) in the 3rd ch of the turning chain. Turn. (9 sts)*
Row 3: Work as Row 2. (13 sts)
Row 4: Work as Row 2. (17 sts)
Each increase row adds a new dc + ch-1 at both edges, so it gains exactly 4 sts. Checkpoint: 6.5 in (16.5 cm) wide.
Rows 5–8: Work a straight row. (17 sts each row)
Row 9 (decrease): Sl st in the first ch-1 sp and the next dc. Ch 3 (counts as dc). Ch 1, sk ch-1 sp, dc in next dc. Rep from * until 2 sts remain, then leave the last ch-1 sp and the turning chain unworked. Turn. (13 sts)*
Row 10: Work a straight row, working the last dc in the top of the ch-3. (13 sts)
Row 11: Work as Row 9. (9 sts)
Row 12: Work a straight row. (9 sts)
Row 13: Work as Row 9. (5 sts)
Rows 14–15: Work a straight row. (5 sts each row) Fasten off.
The center dc (stitch 3, 5, 7, or 9 depending on the row) stacks into one straight column from the tip to the neck, because every shaping row adds or removes the same number of stitches at each edge.
Front Pocket Panel
Rows 1–4: Work exactly as Back Rows 1–4. (5, 9, 13, 17 sts)
Row 5: Work as Row 2 (increase). (21 sts)
Rows 6–8: Work a straight row. (21 sts each row) Do not fasten off.
The front is 4 sts wider than the back, about 1.5 in (3.8 cm). It has the same number of rows, so the sides still line up row for row, and the extra width bows outward to give the pocket its depth.
Left side point, Row 9: Sl st in the first ch-1 sp and the next dc. Ch 3 (counts as dc). Ch 1, sk ch-1 sp, dc in next dc. Rep from * 3 times. Turn. (7 sts, covering sts 3–9)*
Left side point, Row 10: Sl st in the first ch-1 sp and the next dc. Ch 3 (counts as dc). Ch 1, sk ch-1 sp, dc in next dc. Rep from * 2 more times, working the last dc in the top of the ch-3. Fasten off. (5 sts)*
Right side point, Row 9: Skip 3 sts after the left point (ch-1 sp, center dc, ch-1 sp; these form the bottom of the V). Join the cord in the next dc (st 13) and ch 3 (counts as dc). Ch 1, sk ch-1 sp, dc in next dc. Rep from * 3 times. Leave the last 2 sts unworked. Turn. (7 sts, covering sts 13–19)*
Right side point, Row 10: Ch 4 (counts as dc + ch-1), sk ch-1 sp, dc in next dc, ch 1, sk ch-1 sp, dc in next dc. Leave the last 2 sts unworked. Fasten off. (5 sts)
Opening edge: With RS facing, join the cord at the outer top corner of the left point. Work 1 sc in each of the 5 sts across the top of the left point (5). Work 2 sc in each row end of Rows 10 and 9 down the inside edge (4). Work 1 sc in each of the 3 skipped sts at the bottom of the V (3). Work 2 sc in each row end of Rows 9 and 10 up the right inside edge (4). Work 1 sc in each of the 5 sts across the top of the right point (5). Fasten off. (21 sc)
Braided Spine
The spine goes on each panel separately, before joining. With RS facing, work a line of surface sl sts up the column of ch-1 spaces on one side of the center dc column, 2 surface sl sts per row. Fasten off. Work a second line up the other side.
- Back: 15 rows × 2 = 30 surface sl sts per line, from the tip to the top of Row 15
- Front: 8 rows × 2 = 16 surface sl sts per line, from the tip to the bottom of the V
The two raised chains lean toward each other around the center dc and close up the holes next to it. This makes a solid braid about 3 sts wide, with the open mesh on either side.
Make All Pieces
- Back panel: 1, cream
- Front pocket panel: 1, cream
- Tassel: 1, cream (14 strands)
- Strap: 1, worked directly onto the back panel
Layout, viewed from the front (stacked layers):
        [ ring ]
        [strap ]
     /  back neck  \
    |  back only    |   Rows 11-15 (back)
    |  \   front  / |   front side points + V
    |   front over  |   Rows 1-10 (both layers)
     \  back       /
          tip
        [tassel]
Joining
Method: The back’s border round joins the panels. Each stitch on the lower edges goes through both layers.
- Lay the back panel RS up. Place the front panel RS up on top, with the front’s foundation tip on the back’s foundation tip.
- Pin the front’s row ends to the back’s row ends: front Row 1 to back Row 1, and so on up to Row 10 on both sides. The extra front width will pucker up between the side edges. That puckering is the pocket.
- Put a marker at the Row 10 row end on each side of the back. The border joins both layers from the tip up to these markers.
Stitch logic: Each side has 10 row ends on both panels, and each row end gets 2 sc through both layers. That makes 20 joined sc per side, 1:1, with nothing added at the seam.
Tension: Keep your sc firm but not tight. Pull each stitch snug through both layers so the front lies flush against the back, with no gap at the edge.
Size checkpoint: Before you start, the pinned piece should measure 6.5 in (16.5 cm) across the back and 12.5 in (31.8 cm) from the tip to the neck.
Border
Border gauge: 2 sc per dc row end and 1 sc per stitch along the top edges. One sc round plus one sl st round adds 0.25 in (0.6 cm) to each edge.
Round 1 (joining sc): With RS facing, join the cord at the right top corner of the back neck.
- Top edge: 1 sc in each of the 5 sts of Row 15. (5)
- First side: 2 sc in each row end of Rows 15–11, back only (10). Then 2 sc in each row end of Rows 10–1, through both layers (20). Side total 30.
- Tip: 3 sc in the base of the foundation chain, through both layers. (3)
- Second side: 2 sc in each row end of Rows 1–10, through both layers (20). Then 2 sc in each row end of Rows 11–15, back only (10). Side total 30.
- Sl st to the first sc to join. (68 sc: 5 + 30 + 3 + 30)
Round 2 (rolled edge): Ch 1, then work a loose sl st in each sc around. Join. (68 sl sts) Do not fasten off.
Why the math works: A dc row end is about as tall as 2 sc, so 15 rows × 2 = 30 sc per side, and the edge lies flat. The front and back have the same row counts in Rows 1–10, so the two layers meet in matching pairs. The teardrop has no square corners, so you don’t need corner increases. The 3 sc at the tip turn the point. Width: 6.5 in + 2 × 0.25 in = 7 in (17.8 cm). Height: 12.5 in + 2 × 0.25 in = 13 in (33.0 cm).
Strap and Ring
Rows 1–6: Ch 1, then sc in each of the 5 top-edge sts. Turn. (5 sc each row)
This makes a strap about 2 in (5.1 cm) long. Fold it over the wooden ring to the WS and sew the last row to the WS of back Row 14.
Cut 30 in (76.2 cm) of cord and wrap it tightly 5 times around the folded strap just below the ring to make the gathered collar. Thread the ends under the wraps with the tapestry needle and trim.
Tassel
- Cut 14 strands of 16 in (40.6 cm) and 1 tie of 12 in (30.5 cm).
- Thread the tie through the tip, through both layers. Lay the strands centered over it and fold them in half. Tie tightly.
- Wrap a 24 in (61.0 cm) length tightly around the bundle, 1 in (2.5 cm) below the tip. Bury the ends inside the tassel.
- Trim the tassel to 7 in (17.8 cm), measured from the tie.
Final Blocking
- Weave in all ends along the border or the spine. Leave the tassel for later.
- Spray the pocket with water until it is damp. Don’t soak cotton cord.
- Pin the back flat to 7 in × 13 in (17.8 cm × 33.0 cm), keeping the teardrop curve smooth.
- Stuff the pocket loosely with a rolled towel so the front dries curved and open.
- Pin the two side points up and straighten the V edge.
- Let it dry completely, then dampen the tassel, comb it straight, and re-trim it to 7 in (17.8 cm).
Final Quality-Control Checklist
- Back is 7 in (17.8 cm) wide and 13 in (33.0 cm) tall
- Border Round 1 has 68 sc (5 + 30 + 3 + 30)
- Front opening edge has 21 sc
- The spine runs straight up the center on both panels
- The front side points sit at the same height
- No gaps where the panels are joined from tip to marker
- The ring hangs level and the collar wraps are tight
- The tassel hangs centered at 7 in (17.8 cm)
Troubleshooting
- The spine wanders off-center: You have missed a turning chain or an edge stitch. Check that every shaping row changes the count by exactly 4.
- Pocket is flat with no depth: The front has 17 sts instead of 21. Redo Row 5.
- Edges ripple: Work fewer sc per row end, or go down a hook size for the border only.
- Edges cup: Your border is too tight. Loosen Round 2 or go up a hook size.
- Panel sags on the wall: Your cord is too soft. Switch to a firmer cord or a smaller hook.
- Tassel is thin: Add 4 more strands before wrapping.
Care
Spot clean, or hand wash cool and lay flat to dry, reshaping over a rolled towel. Don’t tumble dry, as the cord can fuzz and the wooden ring can crack.
Final Notes
Here is the measurement chain. Gauge of 13 sts and 6 rows = 5 in (12.7 cm). The back is 17 sts wide at 6.5 in (16.5 cm) and 15 rows tall at 12.5 in (31.8 cm). The front is 21 sts wide for 1.5 in (3.8 cm) of pocket ease, over 10 matching rows. The border adds 0.25 in (0.6 cm) per edge with 68 sts, for a finished 7 in × 13 in (17.8 cm × 33.0 cm) pocket and a 7 in (17.8 cm) tassel. Check each step against these numbers and the pocket will turn out as planned.
Happy crocheting!