

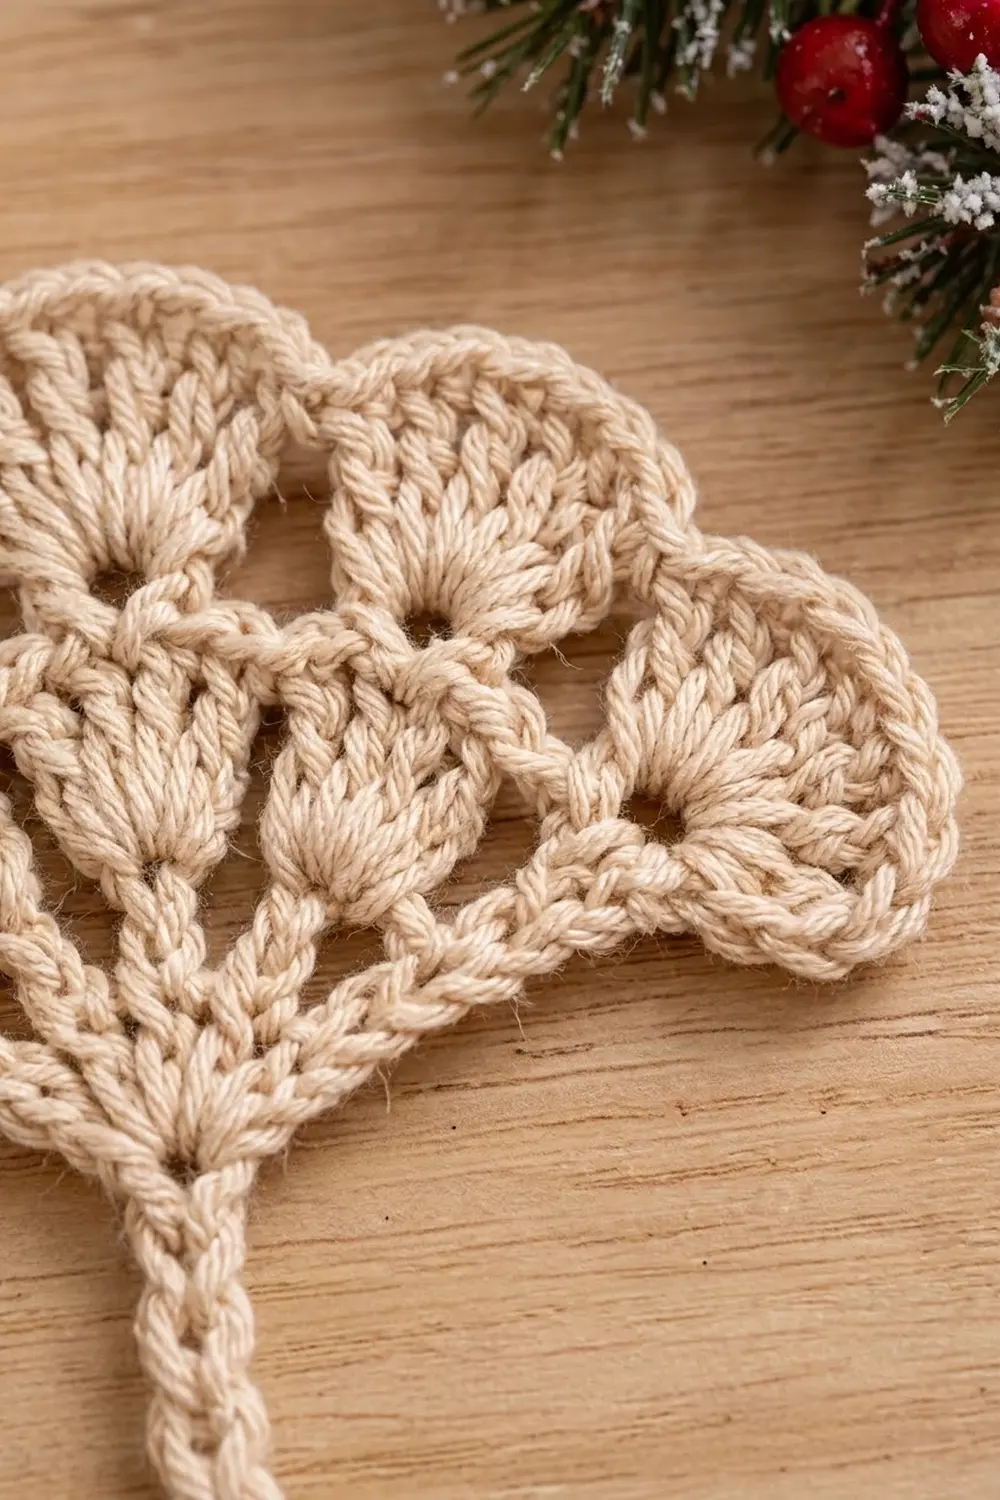
The Ginkgo Fan Motif is a single lace fan in natural cream cotton. Three small inner shells sit inside five larger rounded scallops, and a slim, firm stem hangs from the base. The open eyelets between the shells let light through, and the outlined edge gives the fan a neat, raised rim.
It has a quiet, rustic holiday look. Made in one solid neutral, it works as a gift-tag topper, an ornament, a table scatter, or a bookmark-style accent. All instructions use US crochet terms.
The finished motif measures 7 in (17.8 cm) wide and 3.5 in (8.9 cm) tall across the fan. The stem adds 2.25 in (5.7 cm), for an overall height of 5.75 in (14.6 cm).
You make the fan in five turned rows that radiate from a small chain ring. Then you work one round of edging over the scalloped top and both lower edges. The stem is chained and slip-stitched into place as part of that same edging round, so there is no sewing.
Finished Size and Construction
- Finished size: 7 in (17.8 cm) wide x 3.5 in (8.9 cm) tall (fan); 5.75 in (14.6 cm) tall including stem
- Skill level: Easy
- Terminology: US crochet terms
- Yarn weight: Worsted (#4), cotton
- Hook: 5.0 mm (H-8)
- Number of pieces: 1
- Layout: Single fan, worked flat in turned rows from the base point outward
- Piece size before edging: 6.5 in (16.5 cm) wide x 3.25 in (8.3 cm) tall
- Edging depth: 0.25 in (0.6 cm)
- Stem length: 2.25 in (5.7 cm)
Materials
Yarn advice: Use a smooth, tightly plied worsted-weight cotton or cotton blend. Cotton gives the shells crisp definition and keeps the stem firm. Acrylic works too, but it blocks less sharply and the scallops may curl. The sample assumes a yarn of about 100 g = 170 m (186 yd).
- Cream (natural/ecru): 12 g, about 20 m (22 yd)
One motif uses about 8 g (14 m / 15 yd). The quantity above includes a margin for a gauge swatch, practice rows, and weaving in ends.
Tools:
– 5.0 mm (H-8) crochet hook
– Tapestry needle
– Scissors
– Stitch marker (optional, for marking shell centers)
– Rust-proof pins and a blocking mat or folded towel
– Spray bottle with water
– Ruler or tape measure
Abbreviations (US Terms)
- ch – chain
- sl st – slip stitch
- sc – single crochet
- dc – double crochet
- sp – space
- st(s) – stitch(es)
- rep – repeat
Special stitches:
– 7-dc shell: Work 7 dc into the same stitch. The center (4th) dc is the shell’s peak.
– 9-dc shell: Work 9 dc into the same stitch.
The turning ch-3 counts as a dc throughout. The turning ch-1 does not count as a stitch.
Gauge and Checkpoints
Gauge: 14 dc and 8 dc rows = 4 in (10.2 cm) in standard rows with a 5.0 mm hook.
A radial fan is hard to measure as a flat swatch, so the motif is its own gauge test. Make one fan, check it at each row against the checkpoints below, and adjust before making more.
Checkpoints (measured straight across the widest point, lying flat, unstretched):
– After Row 1: 1.75 in (4.4 cm) wide
– After Row 2: 2.75 in (7.0 cm) wide
– After Row 3: 4 in (10.2 cm) wide
– After Row 4: 5 in (12.7 cm) wide
– After Row 5: 6.5 in (16.5 cm) wide x 3.25 in (8.3 cm) tall
– After Edging: 7 in (17.8 cm) wide x 3.5 in (8.9 cm) tall, plus a 2.25 in (5.7 cm) stem
If your fan is too big: Go down to a 4.5 mm (7) hook. Also check that your dc are not too tall. Pull the first loop snug before you yarn over again.
If your fan is too small: Go up to a 5.5 mm (I-9) hook. If the shells cup upward and won’t lie flat, that is usually tight tension rather than wrong counts, so a larger hook fixes both.
If Row 3 ruffles: Your Row 2 chain spaces are probably too short. Keep each ch-2 relaxed so the spokes fan out evenly.
Pattern
Base Ring
Ch 6, sl st in the first ch to form a ring.
Row 1 (half-circle base)
Ch 3 (counts as dc), work 6 dc in the ring. Turn.
Count: 7 dc.
The stitches should form a neat half-circle and leave the other half of the ring empty. That empty lower half is where the stem attaches later. Checkpoint: 1.75 in (4.4 cm) wide.
Row 2 (spoke row)
Ch 5 (counts as dc + ch 2). [Dc in next dc, ch 2] 5 times, dc in top of turning ch-3. Turn.
Count: 7 dc and 6 ch-2 sps (19 sts total: 7 dc + 12 ch).
The dc now stand like seven evenly spaced spokes. Checkpoint: 2.75 in (7.0 cm) wide.
Row 3 (inner shells)
Ch 1 (does not count), sc in first dc. Skip next ch-2 sp, work a 7-dc shell in next dc, skip next ch-2 sp, sc in next dc. Rep from * to * 2 more times. The last sc goes into the 3rd ch of the turning ch-5. Turn.
Count: 3 shells (21 dc) + 4 sc = 25 sts.
The shells sit on spokes 2, 4, and 6, and the sc anchor on spokes 1, 3, 5, and 7. These are the three stacked inner fans. If you like, place a marker in the 4th dc of each shell. Checkpoint: 4 in (10.2 cm) wide.
Row 4 (arch row)
Ch 1, sc in first sc. Ch 5, sc in 4th (center) dc of next shell. Rep from * to * 2 more times. Ch 5, sc in last sc. Turn.
Count: 5 sc + 4 ch-5 loops (25 sts total: 5 sc + 20 ch).
Each ch-5 loop bridges over one of the middle sc from Row 3. That leaves the small eyelets between the inner fans. Checkpoint: 5 in (12.7 cm) wide.
Row 5 (outer scallops)
Ch 3 (counts as dc), work 8 dc in first sc (one 9-dc shell). Sc in next ch-5 loop, 9-dc shell in next sc. Rep from * to * 3 more times. Do not turn.
Count: 5 shells (45 dc) + 4 sc = 49 sts.
The three middle shells sit directly above the three inner shells. The two end shells sit on the end sc, so they hang lower at the sides and give the fan its leaf-like silhouette. Checkpoint: 6.5 in (16.5 cm) wide x 3.25 in (8.3 cm) tall.
Do not fasten off. Go straight on to the Edging.
Edging
Edging gauge: One round of sc adds about 0.25 in (0.6 cm) to every outer edge. That makes the fan 0.5 in (1.3 cm) wider overall and 0.25 in (0.6 cm) taller.
The edging runs in one continuous round in four parts: the scalloped top arc, the first lower edge, the stem, and the second lower edge.
Edging Round
Part 1 – Top arc: Ch 1, turn so you are working back across the top of Row 5. Sc in each of the 9 dc of the shell, sl st in next sc. Rep from * to * 3 more times. Then sc in each of the 9 dc of the last shell. The final sc goes into the top of the ch-3.
- Top arc count: 45 sc + 4 sl st = 49 sts
Part 2 – First lower edge: Rotate the work and sc down the row ends toward the base ring. Use 2 sc around the Row 5 end dc, 1 sc in the Row 4 end sc, 1 sc in the Row 3 end sc, 2 sc around the Row 2 end dc, and 2 sc around the Row 1 end dc.
- First lower edge count: 8 sc
Part 3 – Stem: You are now at the base ring. Ch 12. Sl st in 2nd ch from hook and in each of the remaining 10 ch. Then sl st into the empty lower half of the base ring.
- Stem count: 12 ch, 11 sl st back along the chain, plus 1 sl st into the ring
Part 4 – Second lower edge: Work up the opposite row ends to match Part 2: 2 sc around Row 1, 2 sc around Row 2, 1 sc in Row 3, 1 sc in Row 4, and 2 sc around Row 5.
- Second lower edge count: 8 sc
Sl st in the first sc of the round to join. Fasten off.
Round total (excluding stem): 49 + 8 + 8 = 65 sts.
Why the Math Works
- Top arc: You work 1 sc into each of the 45 dc and 1 sl st into each of the 4 dips between shells, for a 1-to-1 count of 49 over 49. No extra stitches are needed. Each 9-dc shell already flares, so 1 sc per dc follows its curve without cupping. The sl st in the dips pulls the edge in between the scallops, so each scallop stays distinct.
- Corners: The fan has no squared corners, so there are no corner stitches to add or double-count. The rounded end shells turn the corner naturally into the lower edges.
- Lower edges: The ratio is 2 sc per dc row end and 1 sc per sc row end. That matches the row heights, since a dc is about twice as tall as a sc. Three dc rows (Rows 1, 2, 5) give 6 sc and two sc rows (Rows 3, 4) give 2 sc, so 6 + 2 = 8 sc per side. Both sides match, so the fan stays symmetrical.
- Stem: You slip-stitch back along 11 of the 12 chains. The first chain past the hook is skipped and becomes the small rounded tip. The sl st firm the chain into a cord that hangs straight and doesn’t stretch.
Final Blocking
- Weave in both ends along the back of the edging sc, not through the lace, so they stay hidden.
- Mist the motif lightly with water until it is damp but not dripping.
- Lay it face up on the blocking mat.
- Pin the base ring first, then pin the stem straight down so it measures 2.25 in (5.7 cm).
- Pin the center top scallop so the fan measures 3.5 in (8.9 cm) from the ring to the top of the edging.
- Pin the tips of the two end shells so the fan measures 7 in (17.8 cm) across.
- Pin each of the remaining two outer scallops at its peak, and pin each sl st dip slightly inward to sharpen the scallops.
- Push a pin or needle tip into each eyelet between the inner shells to open it evenly.
- Leave to dry completely, usually 4–6 hours, before unpinning.
Final Quality-Control Checklist
- [ ] Row 1 has 7 dc in a clean half-circle
- [ ] Row 2 has 7 evenly spaced dc spokes and 6 ch-2 sps
- [ ] Row 3 has 3 inner shells of 7 dc each and 4 sc (25 sts)
- [ ] Row 4 has 5 sc and 4 ch-5 loops
- [ ] Row 5 has 5 outer shells of 9 dc each and 4 sc (49 sts)
- [ ] The three middle outer shells sit directly above the three inner shells
- [ ] The top arc edging has 45 sc + 4 sl st
- [ ] Each lower edge has exactly 8 sc
- [ ] The stem is 12 ch with 11 sl st and hangs straight from the base ring
- [ ] The fan measures 7 in (17.8 cm) x 3.5 in (8.9 cm) after blocking
- [ ] The overall height with the stem is 5.75 in (14.6 cm)
- [ ] All ends are woven in invisibly
Troubleshooting
The fan cups like a bowl. Your tension is too tight in Rows 3 and 5. Go up a hook size, or relax your yarn hand when working the shells.
The fan ruffles. Your stitches are too loose, or there are extra dc in the shells. Count each shell: 7 in Row 3 and 9 in Row 5.
The outer shells don’t line up over the inner shells. In Row 4, check that every sc after a ch-5 goes into the 4th (center) dc of a shell, not into the 3rd or 5th.
The two sides are different lengths. Recount the lower-edge sc. Both must be 8, using the 2-1-1-2-2 row-end pattern.
The stem twists or curls. You may have worked the sl st into the front loop of the chain. Work into the back bump or both loops, then block the stem pinned straight.
The eyelets have closed up. Your ch-5 loops in Row 4 are too tight. Chain loosely, or redo them at full length.
There is a gap at the base ring. Pull the beginning tail firmly before weaving it in, and make sure the stem sl st goes through the ring itself.
Care
Hand wash in cool water with mild soap, press out the water in a towel, and dry flat, reshaping the scallops while damp. Avoid tumble drying, which can soften the shell definition.

Final Notes
The measurement chain is short and easy to check. The fan grows from 1.75 in (4.4 cm) after Row 1, to 2.75 in (7.0 cm), 4 in (10.2 cm), and 5 in (12.7 cm), then to 6.5 in (16.5 cm) wide and 3.25 in (8.3 cm) tall after Row 5. The edging brings it to 7 in (17.8 cm) by 3.5 in (8.9 cm), and the 2.25 in (5.7 cm) stem gives a total height of 5.75 in (14.6 cm).
The stitch counts are 7, 19, 25, 25, and 49 through the rows, then 65 sts around the edging plus the stem. If each checkpoint matches, the finished fan will match too. Once you are happy with one fan, you can make more in the same yarn, and each one will come out the same size.
Happy crocheting!