

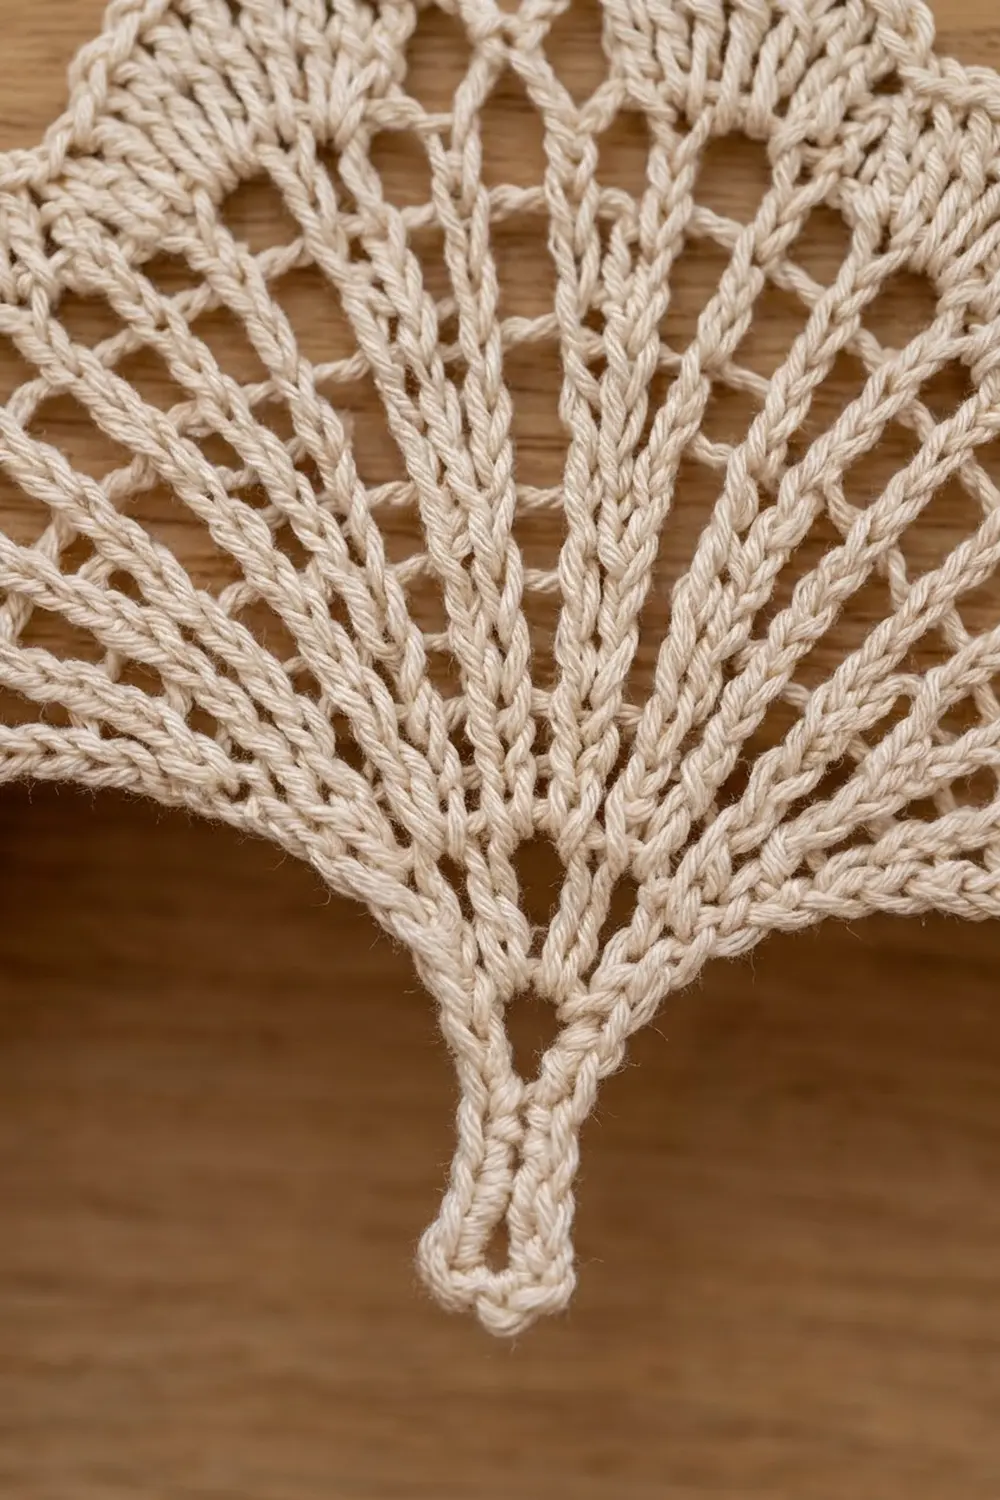
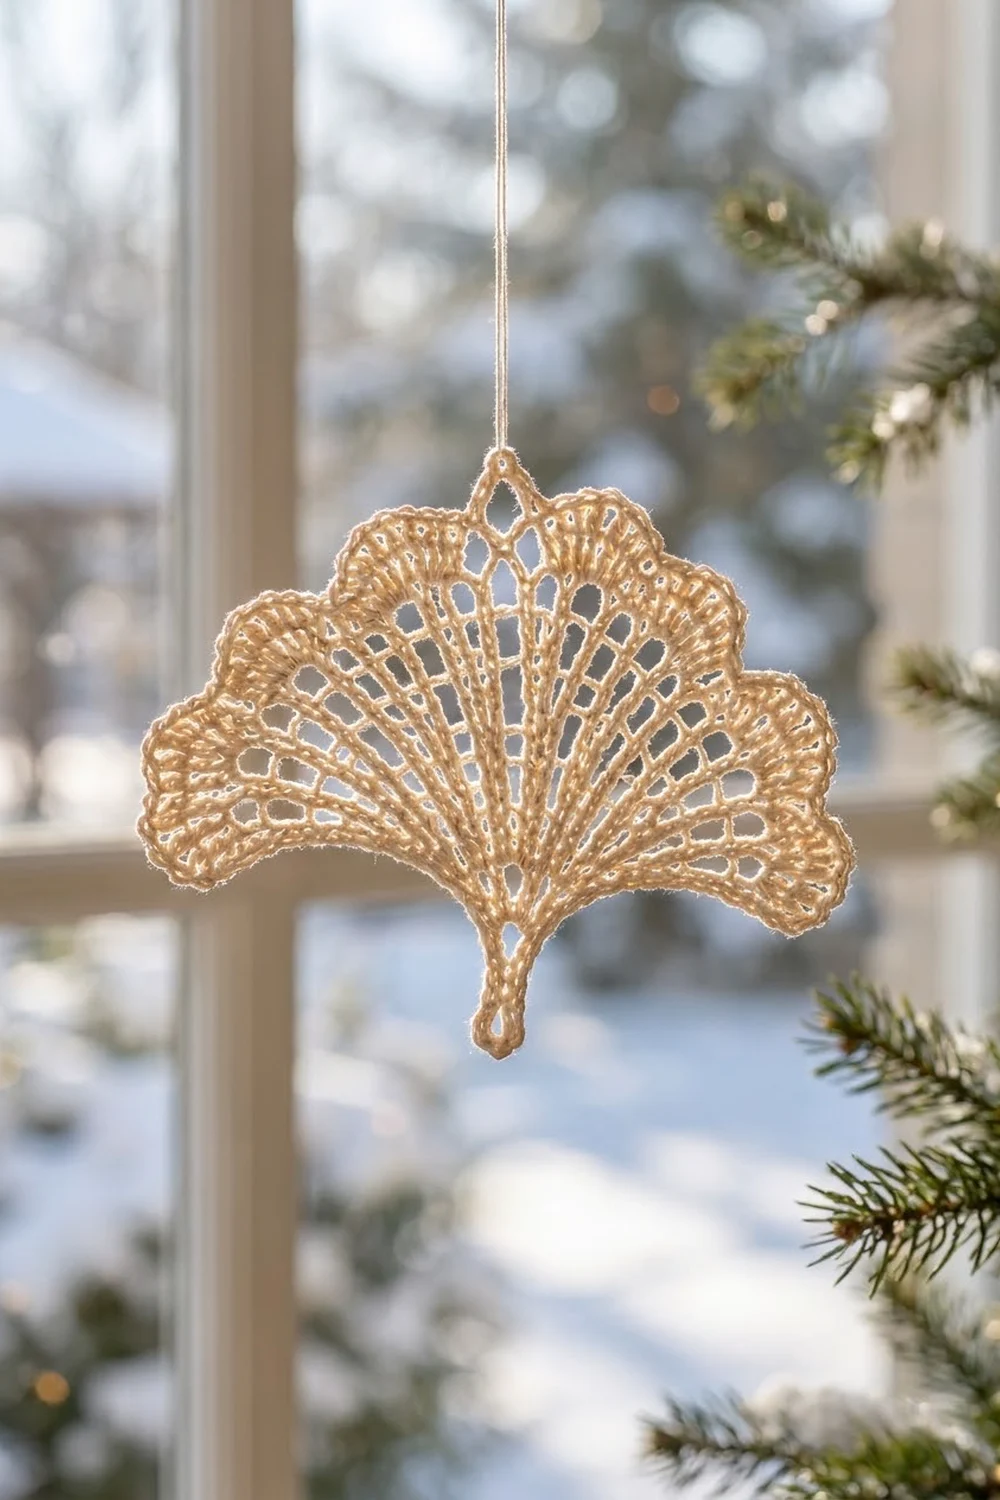
The Winter Light Ginkgo Leaf is a single lace motif shaped like a fan-shaped ginkgo leaf. Tall stitches fan out from a narrow base like leaf veins, and open slots sit between them. The top edge breaks into six soft scallops with a small notched loop at the center. A fine picot edge and a firm little stem finish the shape.
It is worked in one color, a warm cream or ivory cotton thread, so the lace texture does all the work. The style is classic thread lace with an airy, vintage feel. It looks lovely as an ornament, a gift tag, or a tabletop decoration.
This pattern uses US crochet terms. After blocking, the finished motif measures 6.5 in (16.5 cm) wide and 4.5 in (11.4 cm) tall including the stem.
You work the fan back and forth in rows out of a magic ring: 7 rows of double and treble crochet spokes, then a lobed row of shells. One edging round adds picots around the leaf and builds the stem at the base. You make only one piece, so there is no joining.
Finished Size and Construction
- Finished size: 6.5 in (16.5 cm) wide x 4.5 in (11.4 cm) tall, including stem
- Skill level: Intermediate (thread lace, reading stitch counts)
- Terminology: US crochet terms
- Yarn weight: Size 3 mercerized cotton crochet thread (Lace/#0 to Super Fine/#1)
- Hook: 2.25 mm (US B-1)
- Number of pieces: 1
- Layout: Single motif, no joining
- Piece size: 6.5 in (16.5 cm) wide; fan body 3.25 in (8.3 cm) tall; stem 1.25 in (3.2 cm)
- Size before border: 6.25 in (15.9 cm) wide; fan body 3.125 in (7.9 cm) tall
- Border depth: about 0.125 in (0.3 cm) per edge, plus the stem
Materials
Choose a smooth, mercerized cotton thread in size 3. Mercerized cotton gives crisp stitch definition, blocks well, and holds the scallops open. Avoid fuzzy or very stretchy fibers, because they blur the vein lines. A soft cream or ivory shows the openwork best, but any light solid color will work.
- Cream / ivory (only color): about 5 g, roughly 20 m (22 yd)
Tools:
- 2.25 mm (US B-1) crochet hook
- Tapestry needle
- Small scissors
- Stitch marker
- Blocking mat or folded towel
- Rustproof pins
- Spray bottle with water
- Optional: light spray starch
The quantity above includes a margin for a gauge test and weaving in ends.
Abbreviations (US Terms)
- ch – chain
- sl st – slip stitch
- sc – single crochet
- dc – double crochet
- tr – treble crochet
- sp(s) – space(s)
- tch – turning chain
- st(s) – stitch(es)
- RS / WS – right side / wrong side
- rep – repeat
Special stitch – picot: Ch 3, sl st in 3rd ch from hook.
Gauge and Checkpoints
Gauge for this motif: 7 dc = 1 in (2.5 cm), and 3 dc rows = 1 in (2.5 cm). One tr row is about 0.42 in (1.1 cm) tall.
This is a single small piece, so the motif itself is your gauge test. At each checkpoint, measure the straight bottom edge from corner to corner, through the center ring:
- After Row 1: 1 in (2.5 cm) wide
- After Row 4: 3 in (7.6 cm) wide
- After Row 7: 5.5 in (14.0 cm) wide
- After Row 8: 6.25 in (15.9 cm) wide
- After edging, blocked: 6.5 in (16.5 cm) wide, 4.5 in (11.4 cm) tall including stem
If you are more than 0.25 in (0.6 cm) over at Row 4, go down to a 2.0 mm (US 4 steel) hook. If you are more than 0.25 in (0.6 cm) under, try a 2.5 mm (US C-2) hook. The stitch counts stay the same either way.
If the fan cups upward, your spokes are too tight. If it ruffles, your chain spaces are too loose. Fix this before Row 5, because the tr rows make any problem bigger.
Pattern Notes
- Turning chains count as stitches throughout, so always work the last stitch of a row into the top of the turning chain.
- Row 1 is a WS row. That means Row 8 and the edging are worked with the RS facing.
- Every chain space is skipped unless the instructions say to work into it.
- Leave a 6 in (15.2 cm) starting tail. You will use it to secure the magic ring.
Fan Body (Rows 1–7)
Row 1 (WS): Make a magic ring. Ch 3 (counts as dc), 6 dc in ring. Pull the ring closed so the stitches form a half circle. Turn. (7 dc)
Row 2 (RS): Ch 4 (counts as dc + ch 1), skip first dc, dc in next dc, ch 1; rep from * 4 more times, dc in top of beg ch-3. Turn. (7 dc, 6 ch-1 sps)*
Row 3: Ch 3 (counts as dc), dc in same st, ch 1, skip ch-1 sp, 2 dc in next dc; rep from * across, working last 2 dc in 3rd ch of tch. Turn. (14 dc in 7 pairs, 6 ch-1 sps)*
These pairs become the paired veins of the leaf.
Row 4: Ch 4 (counts as dc + ch 1), dc in next dc, ch 1, skip ch-1 sp, dc in next dc, ch 1, dc in next dc; rep from * 5 more times, working the last dc in top of tch. Turn. (14 dc, 13 ch-1 sps)*
Checkpoint: 3 in (7.6 cm) across the bottom edge.
Row 5: Ch 6 (counts as tr + ch 2), skip first dc, tr in next dc, ch 2; rep from * 11 more times, tr in 3rd ch of tch. Turn. (14 tr, 13 ch-2 sps)*
Row 6: Ch 4 (counts as tr), tr in same st, ch 2, skip ch-2 sp, 2 tr in next tr; rep from * across, working last 2 tr in 4th ch of tch. Turn. (28 tr in 14 pairs, 13 ch-2 sps)*
Row 7: Ch 5 (counts as tr + ch 1), skip first tr, tr in next tr, ch 1; rep from * 25 more times (skipping the ch-2 sps as you pass them), tr in 4th ch of tch. Turn. (28 tr, 27 ch-1 sps)*
Checkpoint: 5.5 in (14.0 cm) across the bottom edge, with a fan radius of 2.75 in (7.0 cm). Place a marker in the 14th ch-1 sp. This is the center sp.
Lobed Edge (Row 8)
This row turns the 27 ch-1 sps into six scallops and a center notch. Each lobe uses 4 sps. The center sp is sp 14, with 13 sps on each side of it.
Lobe: Sc in next ch-1 sp, 4 dc in next ch-1 sp, 4 dc in next ch-1 sp, sc in next ch-1 sp. (10 sts: 2 sc + 8 dc)
Row 8 (RS): Ch 1, sc in first tr. Work Lobe 3 times (sps 1–12). Sc in next sp (sp 13). (Sc, ch 6, sc) in next sp (sp 14, center). Sc in next sp (sp 15). Work Lobe 3 times (sps 16–27). Sc in top of tch. Do not turn.
Count: 1 + 30 + 1 + 2 + 1 + 30 + 1 = 66 sts plus 1 ch-6 loop, using all 27 sps (12 + 1 + 1 + 1 + 12).
The 2 sc that meet between lobes form the valleys. The run of sc at the center forms the notch, and the ch-6 loop sits in it.
Checkpoint: 6.25 in (15.9 cm) across the bottom edge, with a fan radius of 3.125 in (7.9 cm).
Border: Picot Edging and Stem (Round 9)
Border gauge: Along the side edges, work 2 sc in each dc row end and 3 sc in each tr row end. That gives 17 sc over 2.75 in (7.0 cm), or about 6 sc per inch. Across the top, work 1 sc in each Row 8 stitch, which matches the fan’s 7 sts per inch.
With RS facing, continue from the last sc of Row 8. Do not turn.
Side 1 (down the row ends): Ch 1. Working into the row ends from Row 7 down to Row 1, sc 2, picot, sc 3; rep from * 4 more times. (17 sc, 5 picots: 3 sc in each of the 3 tr row ends + 2 sc in each of the 4 dc row ends)*
Stem: At the base of the ring, ch 13. Sl st in 4th ch from hook to form the tip loop. Sc in each of the next 9 ch. Sl st in the base of Row 1 at the ring. (9 sc + ch-3 tip loop)
Side 2 (up the row ends): Working into the row ends from Row 1 up to Row 7, sc 3, picot; rep from * 4 more times, sc 2. (17 sc, 5 picots)*
Top:
- Sc in the first sc of Row 8 (corner). (1 sc)
- [Sc in next sc, (sc in each of next 2 dc, picot) 4 times, sc in next sc] 3 times. (30 sc, 12 picots)
- Sc in next sc (the sp 13 sc). (1 sc)
- Sc in next sc, (3 sc, picot, 3 sc) in ch-6 loop, sc in next sc. (8 sc, 1 picot)
- Sc in next sc (the sp 15 sc). (1 sc)
- [Sc in next sc, (sc in each of next 2 dc, picot) 4 times, sc in next sc] 3 times. (30 sc, 12 picots)
- Sc in last sc of Row 8 (corner). (1 sc)
Join with a sl st to the first sc of Side 1. Fasten off.
Top count: 1 + 30 + 1 + 8 + 1 + 30 + 1 = 72 sc and 25 picots. That is 1 sc in each of the 66 Row 8 sts, plus 6 sc in the loop.
Round total: 17 + 9 + 17 + 72 = 115 sc and 35 picots.
Why the math works: Row 8 already fits the arc of the fan, so 1 sc per stitch keeps the top flat. The picots sit between dc pairs, so they add texture without adding width. On the sides, 2 sc per dc row and 3 sc per tr row match each row’s height, so the straight edges stay flat and don’t flare.
Checkpoint: about 6.5 in (16.5 cm) wide before blocking, with the stem hanging about 1.25 in (3.2 cm) below the ring.
Final Blocking
- Weave in both tails along the stem and a side edge. Do not trim them yet.
- Soak the motif in cool water for 10 minutes, then press out the water in a towel. Do not wring it.
- Lay it RS up on the mat. Pin the two bottom corners 6.5 in (16.5 cm) apart, with the ring centered between them.
- Pin the center ch loop straight up so the fan body measures 3.25 in (8.3 cm) from the ring to the notch.
- Pin the tip of each lobe outward so the six scallops are evenly spaced, with the valleys slightly lower.
- If you want a crisp edge, open each picot with the tip of a pin.
- Pin the stem straight down. The full height should be 4.5 in (11.4 cm).
- Mist with water, or with light starch for an ornament, and let it dry completely.
- Unpin, then trim the woven tails close.
Final Quality-Control Checklist
- Row 7 has 28 tr and 27 ch-1 sps.
- Row 8 has 66 sts plus the ch-6 loop, with 3 lobes on each side of the center.
- The edging has 17 sc and 5 picots on each side, 72 sc and 25 picots across the top, and 9 sc in the stem.
- The motif measures 6.5 in (16.5 cm) wide and 4.5 in (11.4 cm) tall.
- The spokes run straight from the ring to the lobes without twisting.
- The lobes on both sides of the notch match in size.
- The fan lies flat, without cupping or ruffling.
- The ends are secure and can’t be seen from the RS.
Troubleshooting
The fan cups like a bowl. Your chain spaces are too tight. Loosen your chains, or use a hook half a size larger for the chains only.
The edge ruffles. You probably added stitches in Row 8 or in the edging. Recount: Row 8 should have 66 sts, and the top of the edging 72 sc.
The lobes are lopsided. You may have miscounted the spaces. Check that the marker is in sp 14 and that there are 13 sps on each side.
The magic ring loosens. Weave the starting tail through the ring twice, in opposite directions, before trimming.
The side edges flare. Use exactly 2 sc per dc row and 3 sc per tr row, no more.
The stem curls. Work the sc back along the chain a little more loosely, then pin it straight while blocking.
Care
Hand wash in cool water with mild soap, press dry in a towel, and lay flat to dry, reshaping as needed. Re-block with light starch whenever the lobes start to soften.
Final Notes
The measurement chain is simple. Row 1 is 1 in (2.5 cm) across. Row 4 reaches 3 in (7.6 cm), Row 7 reaches 5.5 in (14.0 cm), and Row 8 reaches 6.25 in (15.9 cm). The picot edging and blocking bring the motif to 6.5 in (16.5 cm) wide and 4.5 in (11.4 cm) tall, including its 1.25 in (3.2 cm) stem. Check your counts and measurements at each of these points, and the leaf will come out even and flat.
Happy crocheting!