

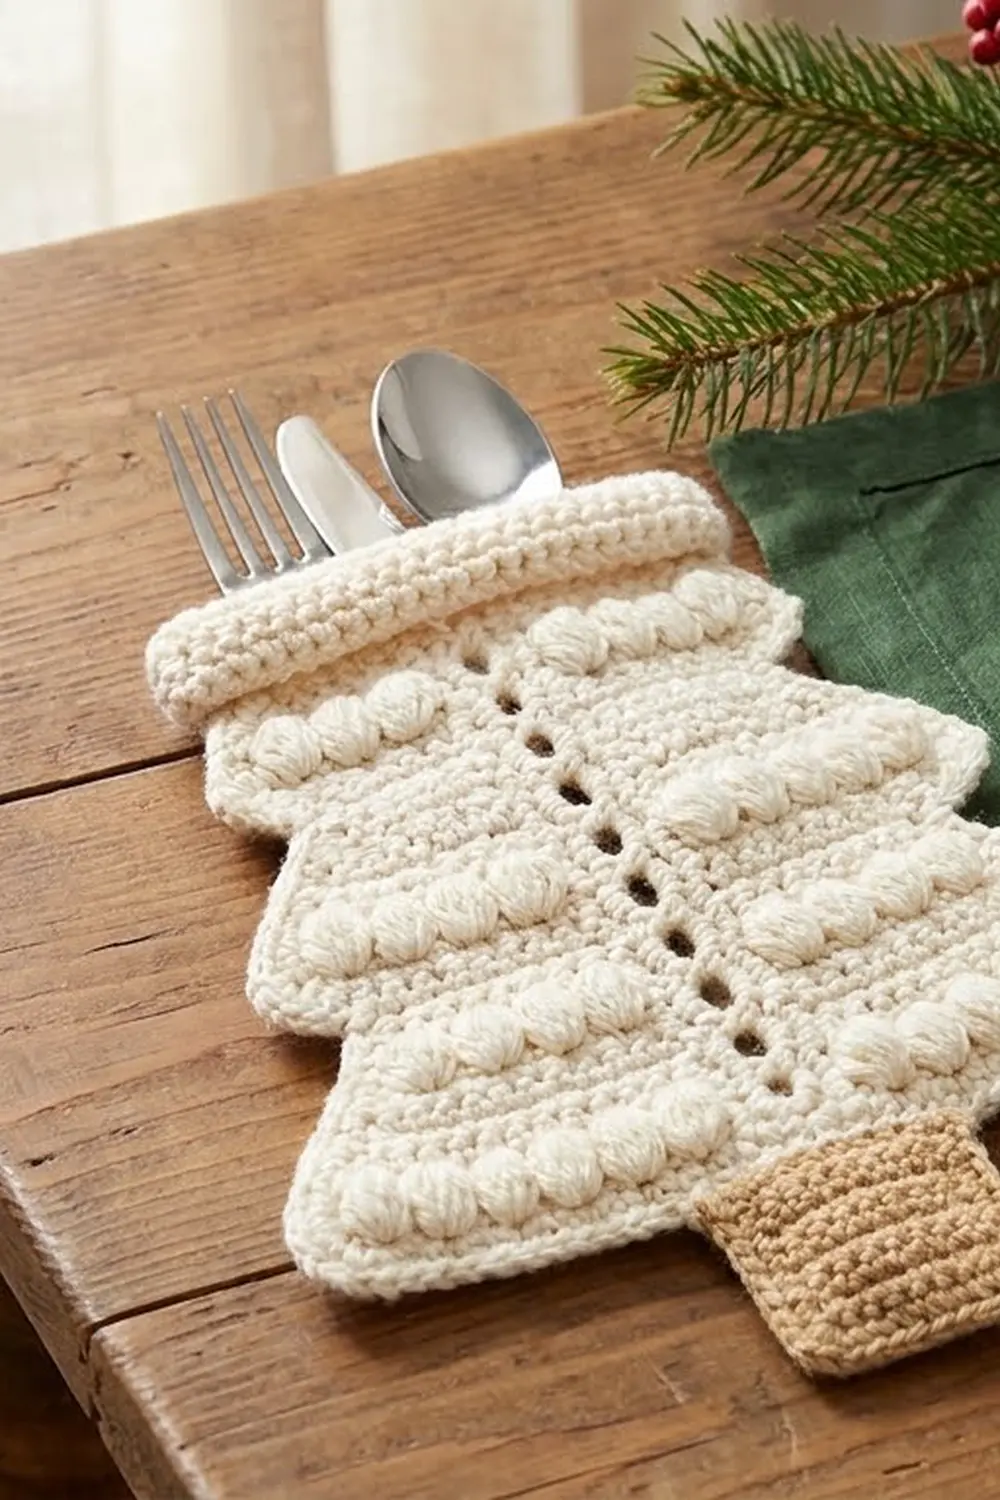
This little tree is a cutlery pocket for the holiday table. A fork and spoon slide into the open top, and the tree lies flat beside each plate. It has three stepped tiers with puff stitches, a column of small eyelets down the center, a rolled cuff at the opening, and a small caramel trunk.
The tree is soft cream and the trunk is warm tan. Together they look like a snowy pine on a rustic or classic red-and-green table.
The pattern uses US crochet terms. The finished pocket is 5 in (12.7 cm) wide at the bottom tier and 6 5/8 in (16.8 cm) tall from the cuff to the bottom edge. The trunk adds 1 in (2.5 cm) below, for a total height of 7 5/8 in (19.4 cm).
You make two identical tree panels top-down in rows and one small square trunk. Then you hold the panels together with the trunk tucked between them, outline the sides and bottom with a single crochet joining round, and finish the open top with a two-round rolled cuff.
Finished Size and Construction
- Finished size: 5 in (12.7 cm) wide x 6 5/8 in (16.8 cm) tall, plus 1 in (2.5 cm) of visible trunk
- Skill level: Easy-intermediate
- Terminology: US
- Yarn weight: Worsted (#4)
- Hook: 4.5 mm (US 7)
- Number of pieces: 3 (front panel, back panel, trunk)
- Layout: Front and back panels stacked wrong sides together, with the trunk centered at the bottom between the layers
- Panel size: 4.75 in (12.1 cm) wide at the widest tier x 6 in (15.2 cm) tall
- Size before border: 4.75 in (12.1 cm) x 6 in (15.2 cm)
- Border depth: 1/8 in (0.3 cm) along the sides and bottom; 1/2 in (1.3 cm) cuff at the top
Materials
Choose a smooth worsted-weight cotton or cotton blend. Cotton gives crisp puffs, holds its shape around metal cutlery, and washes well after dinner.
- Cream (tree): 30 g, about 51 m
- Tan/caramel (trunk): 5 g, about 9 m
These amounts are for one pocket and include a margin for your gauge swatch and weaving in ends. Multiply them by the number of place settings you need.
Tools:
- 4.5 mm (US 7) crochet hook
- Tapestry needle
- Scissors
- Stitch markers (4)
- Ruler or measuring tape
- Blocking mat and pins
- Spray bottle
Abbreviations (US Terms)
- ch – chain
- sc – single crochet
- sl st – slip stitch
- sk – skip
- st(s) – stitch(es)
- sp – space
- rep – repeat
- RS/WS – right side/wrong side
- rev sc – reverse single crochet (crab stitch): work from left to right, making a single crochet in the next stitch to the right
Special stitch – Puff: [Yo, insert hook in st, yo, pull up a loop to about 1/2 in (1.3 cm)] 3 times (7 loops on hook); yo, draw through all 7 loops. A puff counts as 1 st. Do not add a closing chain.
Gauge and Checkpoints
Pattern gauge: 16 sts and 12 rows = 4 in (10.2 cm) in the puff-and-sc row pattern.
Single crochet gauge: 16 sc and 16 rows = 4 in (10.2 cm).
Make one panel first and measure it before you start the second one. Lay it flat without stretching.
- After Row 6: height 2 in (5.1 cm); Row 5 width (15 sts) 3.75 in (9.5 cm)
- After Row 12: height 4 in (10.2 cm); Row 11 width (17 sts) 4.25 in (10.8 cm)
- After Row 18: height 6 in (15.2 cm); width (19 sts) 4.75 in (12.1 cm)
If your panel is too big, go down to a 4.0 mm hook. If it is too small, go up to a 5.0 mm hook. If the width is right but the height is off, check your puffs. Loops pulled up too long make tall rows, and loops that are too short make squat rows. Aim for loops about 1/2 in (1.3 cm) high.

Tree Panel (Make 2)
You work the panel top-down. Each tier grows through increases on WS rows. A new tier starts by stepping in 1 st at each end on a RS row. The ch-1 at the center of every RS row stacks up to form the eyelet column.
With cream, ch 12.
Tier 3 (top tier)
Row 1 (WS): Sc in 2nd ch from hook and in each ch across, turn. (11 sts)
Row 2 (RS): Ch 1, sc in first st, [puff in next st, sc in next st] 2 times, ch 1, sk next st, [sc in next st, puff in next st] 2 times, sc in last st, turn. (11 sts: 6 sc, 4 puffs, 1 ch-1 sp)
Row 3 (WS): Ch 1, 2 sc in first st, sc in each st and ch-1 sp across to last st, 2 sc in last st, turn. (13 sts)
Row 4 (RS): Ch 1, sc in first st, [puff in next st, sc in next st] 2 times, puff in next st, ch 1, sk next st, puff in next st, [sc in next st, puff in next st] 2 times, sc in last st, turn. (13 sts: 6 sc, 6 puffs, 1 ch-1 sp)
Row 5 (WS): Rep Row 3. (15 sts)
Tier 2 (middle tier)
Row 6 (RS, step-in): Ch 1, sk first st (leave it unworked), sc in next st, [puff in next st, sc in next st] 2 times, puff in next st, ch 1, sk next st, puff in next st, [sc in next st, puff in next st] 2 times, sc in next st, leave last st unworked, turn. (13 sts)
Place a marker in each skipped st. These are the ledges you will outline later.
Row 7 (WS): Rep Row 3. (15 sts)
Row 8 (RS): Ch 1, sc in first st, [puff in next st, sc in next st] 3 times, ch 1, sk next st, [sc in next st, puff in next st] 3 times, sc in last st, turn. (15 sts: 8 sc, 6 puffs, 1 ch-1 sp)
Row 9 (WS): Rep Row 3. (17 sts)
Row 10 (RS): Ch 1, sc in first st, [puff in next st, sc in next st] 3 times, puff in next st, ch 1, sk next st, puff in next st, [sc in next st, puff in next st] 3 times, sc in last st, turn. (17 sts: 8 sc, 8 puffs, 1 ch-1 sp)
Row 11 (WS): Ch 1, sc in each st and ch-1 sp across, turn. (17 sts)
Tier 1 (bottom tier)
Row 12 (RS, step-in): Ch 1, sk first st, sc in next st, [puff in next st, sc in next st] 3 times, ch 1, sk next st, [sc in next st, puff in next st] 3 times, sc in next st, leave last st unworked, turn. (15 sts)
Mark both skipped sts as ledges.
Row 13 (WS): Rep Row 3. (17 sts)
Row 14 (RS): Rep Row 10. (17 sts)
Row 15 (WS): Rep Row 3. (19 sts)
Row 16 (RS): Ch 1, sc in first st, [puff in next st, sc in next st] 4 times, ch 1, sk next st, [sc in next st, puff in next st] 4 times, sc in last st, turn. (19 sts: 10 sc, 8 puffs, 1 ch-1 sp)
Row 17 (WS): Rep Row 11. (19 sts)
Row 18 (RS): Rep Row 16. (19 sts)
Fasten off and weave in the ends. The finished panel has 9 center eyelets, and its tiers are 15, 17, and 19 sts at their widest.
Trunk (Make 1)
With tan, ch 6.
Row 1: Sc in 2nd ch from hook and in each ch across, turn. (5 sc)
Rows 2–5: Ch 1, sc in each st across, turn. (5 sc)
Fasten off. The trunk measures 1.25 in (3.2 cm) square.
Make All Pieces
For one pocket you need:
- Cream: 2 tree panels
- Tan: 1 trunk
Layout (side view of the stack):
[ Front panel, RS facing out ]
[ Back panel,  RS facing out ]
        [ Trunk ]   <- top 1/4 in (0.6 cm) tucked between panels,
                       centered under bottom sts 8–12
Joining
Place the panels wrong sides together, matching the edges and tiers, with the foundation-chain edges at the top. Slide the top row of the trunk 1/4 in (0.6 cm) between the layers, centered under bottom sts 8–12, and pin it.
You work the joining round through both layers, and through all three layers where the trunk sits. It runs down the left side, across the bottom, and up the right side. Leave the top open.
Joining round: With the front facing, join cream at the top left corner (the Row 1 end).
- Left side: Working into the row ends of both panels, work 1 sc in each sc-row end and 2 sc in each puff-row end. At each marked ledge, work 1 sc into the skipped st. That is 9 sc rows x 1 + 9 puff rows x 2 + 2 ledges = 29 sc.
- Bottom edge: Working into the Row 18 sts, work 3 sc in the first st (corner), sc in each of the next 17 sts (catching the trunk at sts 8–12), then 3 sc in the last st (corner). That is 3 + 17 + 3 = 23 sc. The corner groups are counted only here, not in the side counts.
- Right side: Work as for the left side, from bottom to top. (29 sc)
Fasten off. Total: 29 + 23 + 29 = 81 sc.
Tension: Keep your sc relaxed and even. A tight round makes the tiers curl inward, and a loose one makes the edges ruffle.
Size checkpoint: The joined pocket should measure 5 in (12.7 cm) across the bottom tier and 6 1/8 in (15.6 cm) tall before the cuff.
Border
The border has two parts: the joining round, which outlines the sides and bottom, and a rolled cuff around the open top.
Border gauge: 16 sc = 4 in (10.2 cm).
Cuff Round 1: With the front facing, join cream at the top of the right side seam. Working in the free loops of the foundation chain, sc in each of the 11 front sts. Then work 1 sc in the top of the left seam, sc in each of the 11 back sts, and 1 sc in the top of the right seam. Join with sl st to first sc. (24 sc: 11 + 1 + 11 + 1)
Cuff Round 2: Ch 1, rev sc in each st around, join with sl st to first rev sc. (24 rev sc)
Fasten off and weave in the ends.
Why the math works:
- Top: At border gauge, 24 sc measure 6 in (15.2 cm) around the opening, or 3 in (7.6 cm) flat. That matches the 2.75 in (7.0 cm) neck plus 1/8 in (0.3 cm) of side outline on each edge, so the cuff lies flat.
- Sides: Each side is 6 in (15.2 cm) tall, but the edge zigzags out along the tiers and back in at the ledges, which makes it about 7.25 in (18.4 cm) long. At border gauge, 29 sc also measure 7.25 in (18.4 cm).
- Bottom: The 17 straight sc match the 17 inner bottom sts one to one, and the 3-sc groups turn the corners cleanly.
Final Blocking
- Slide a piece of cardboard 4.75 in (12.1 cm) wide into the pocket so the layers don’t dry stuck together.
- Lay the pocket flat and shape it to 5 in (12.7 cm) x 6 5/8 in (16.8 cm).
- Pin the outer point of each tier so the three steps look crisp and even.
- Pin the trunk straight, with 1 in (2.5 cm) showing below the bottom edge.
- Mist with water until damp, then round each puff gently with a fingertip.
- Let it dry completely, then remove the pins and cardboard.
Final Quality-Control Checklist
- Both panels have 19 sts in Row 18 and 9 eyelets in a straight center line.
- The tiers are 15, 17, and 19 sts wide, and the step-ins match front and back.
- The joining round has 29 + 23 + 29 = 81 sc.
- The trunk is centered, with 1 in (2.5 cm) visible.
- The cuff has 24 sts and rolls evenly.
- The finished size is 5 in (12.7 cm) x 6 5/8 in (16.8 cm), plus the trunk.
Troubleshooting
Eyelets drift off center: Recount the RS rows. The ch-1 must sit on the center st, with equal stitch counts on each side.
Puffs look flat: Pull up all three loops to the same height, and work the sc between the puffs a little firmer.
Tiers don’t step in: Check that you skipped the first and last sts on Rows 6 and 12. The counts should drop from 15 to 13 and from 17 to 15.
Panels don’t match: Block both panels lightly before joining, or ease in the fuller panel as you work the joining round.
Cuff flares: Use a hook one size smaller for Cuff Round 2.
Care
Hand wash in cool water with mild soap, roll in a towel to press out the water, and dry flat, reshaping the tiers. Don’t tumble dry, because heat flattens the puffs.
Final Notes
Each measurement builds on the last one. A gauge of 16 sts and 12 rows = 4 in (10.2 cm) gives a 4.75 in x 6 in (12.1 cm x 15.2 cm) panel. The 81-sc joining round brings the pocket to 5 in (12.7 cm) wide. The 24-st cuff adds 1/2 in (1.3 cm), for a finished height of 6 5/8 in (16.8 cm), and the trunk hangs 1 in (2.5 cm) below. If you check your panel at Rows 6, 12, and 18, everything else will fit.
Happy crocheting!