

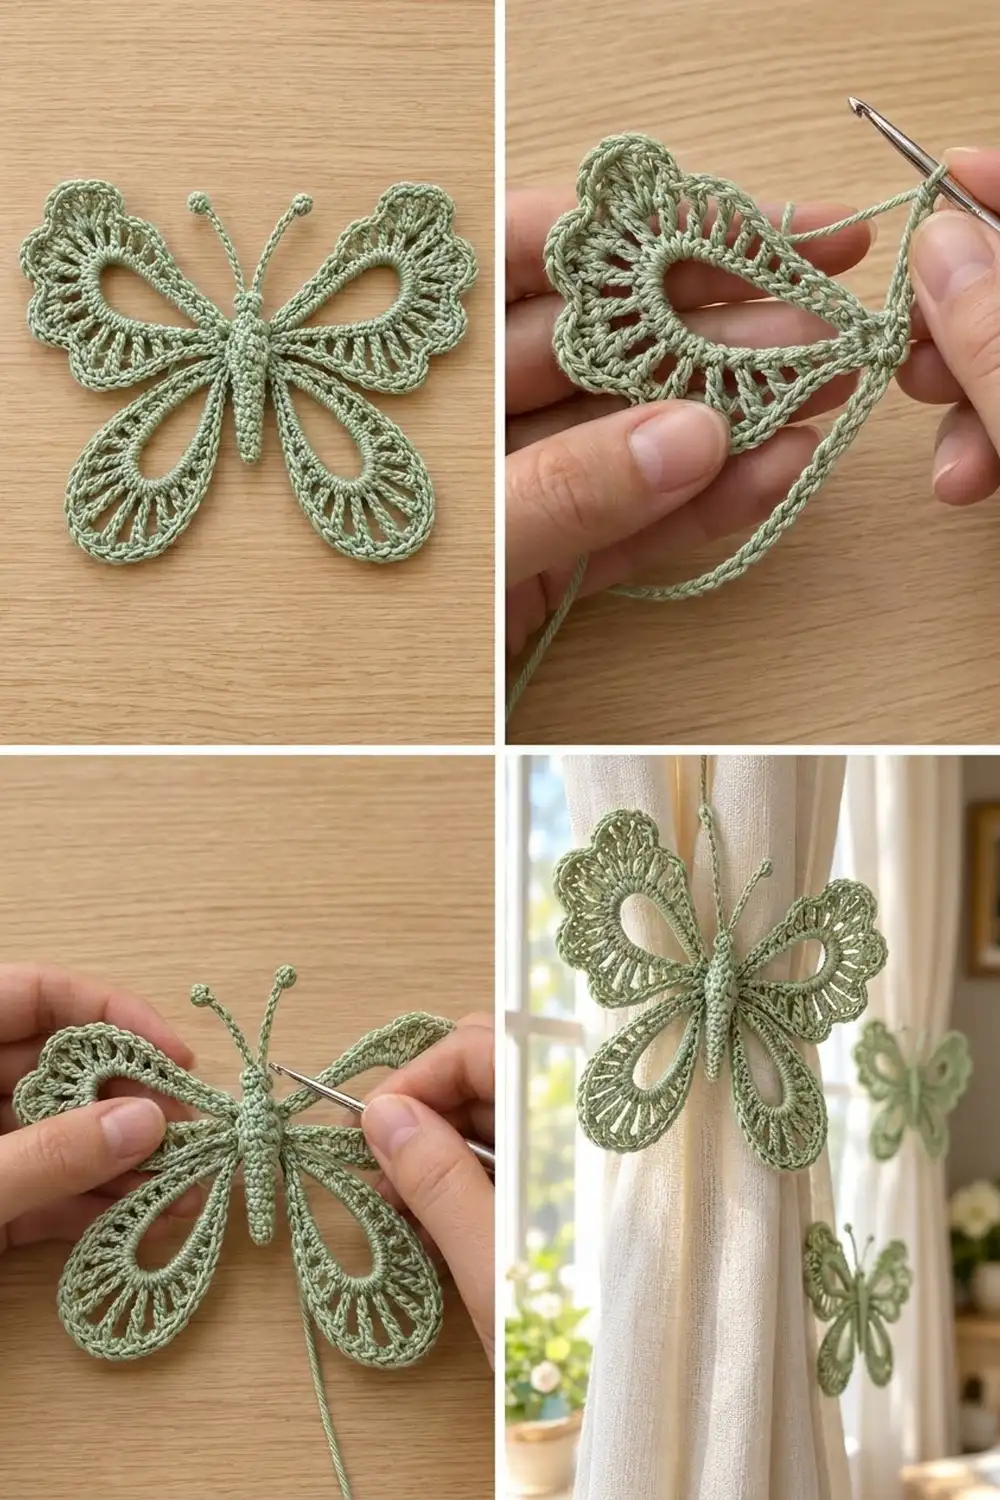
The Sage Meadow Lace Butterfly is a single, lightweight butterfly motif with four open, airy wings and a small, raised, segmented body. Each wing frames a teardrop-shaped window outlined in a firm band of single crochet. Treble spokes fan out from that band like the veins of a real wing.
The whole butterfly is worked in one soft sage green, in fingering-weight mercerized cotton. The two upper wings finish with three rounded scallops along the outer edge. The two lower wings are smooth teardrops with a neat corded rim. Two slip-stitch antennae with small popcorn knobs finish the head.
This pattern uses US crochet terms. The finished butterfly measures about 6.5 in (16.5 cm) across the wingspan and 5.5 in (14.0 cm) from the top of the upper wings to the tips of the lower wings, not counting the antennae.
The construction is simple. You chain a small center ring, then work four wings off it one after another without cutting the yarn. A continuous two-round edging goes around all four wings. Finally, you crochet the body in the round, add the antennae, and sew the body over the center ring.
Finished Size and Construction
- Finished size: 6.5 in (16.5 cm) wingspan x 5.5 in (14.0 cm) tall, not counting the antennae
- Skill level: Intermediate
- Terminology: US crochet terms
- Yarn weight: Fingering (#1 super fine) cotton
- Hook: 2.5 mm
- Number of pieces: One butterfly motif (one wing unit plus a sewn-on body)
- Layout: Four wings coming out from one center ring, two upper and two lower
- Body size: 2.75 in (7.0 cm) long x 0.6 in (1.5 cm) wide
- Size before edging: About 5.75 in (14.6 cm) x 4.75 in (12.1 cm)
- Edging depth: About 0.375 in (1.0 cm) at the upper scallop peaks, about 0.25 in (0.6 cm) on the lower wings
Materials
Choose a smooth, mercerized cotton with good stitch definition. A crisp cotton holds the open spokes and scallops much better than a soft acrylic, and it blocks flat.
- Sage green fingering-weight cotton: 12 g, about 41 m
- 2.5 mm crochet hook
- Tapestry needle
- 2 stitch markers
- A small pinch of fiberfill for the body
- Rustproof pins and a blocking mat or folded towel
- Spray bottle, plus optional spray starch
The yarn amount includes a comfortable margin for a gauge test and for weaving in ends.
Abbreviations (US Terms)
- ch – chain
- sl st – slip stitch
- sc – single crochet
- hdc – half double crochet
- dc – double crochet
- tr – treble crochet
- sc2tog – single crochet 2 together
- inc – 2 sc in the same stitch
- BLO – back loop only
- MR – magic ring
- sp(s) – space(s)
- st(s) – stitch(es)
Special stitch – 4-dc popcorn: Work 4 dc in the stitch indicated. Drop the loop from your hook. Insert the hook from front to back into the top of the first dc, pick up the dropped loop, and pull it through. Ch 1 to close.
Gauge and Checkpoints
Gauge: 14 sc = 2 in (5.1 cm) worked flat. One tr stands about 0.5 in (1.3 cm) tall.
Test one wing first. Work the center ring and a full upper wing through Row C, then measure before you go on.
- Upper wing after Round B: about 1.75 in (4.4 cm) from ring to tip. The open window is about 1.5 in (3.8 cm) long and 0.75 in (1.9 cm) wide.
- Upper wing after Row C: about 2.75 in (7.0 cm) from ring to outer edge.
- Lower wing after Round B: about 1.5 in (3.8 cm) long, with a window about 1.25 in (3.2 cm) long.
- Lower wing after Row C: about 2.25 in (5.7 cm) long.
- All four wings before edging: about 5.75 in (14.6 cm) x 4.75 in (12.1 cm).
- After edging and blocking: 6.5 in (16.5 cm) x 5.5 in (14.0 cm).
If your wing is too big, go down to a 2.25 mm hook. If it is too small, try a 2.75 mm hook. Make sure each tr is pulled up to its full height, because short spokes make the wings cup.

Pattern: Center Ring and Wings
Work the wings in this order around the ring: upper right, lower right, lower left, upper left. Do not fasten off between wings.
Center Ring
Ch 8, sl st in first ch to form a ring.
Upper Wing (make 2, worked off the ring)
Round A: Ch 26, sl st into the ring. This makes a teardrop-shaped chain loop with its point at the ring.
Round B: Ch 1, work 40 sc into the ch-26 loop, working over the chain into the loop space. Sl st into the ring. (40 sc)
Spread the sc evenly along the loop so they sit snugly without crowding. This band becomes the firm outline of the open window.
Row C (spokes): Turn. Working into the 40 sc of Round B:
sc in each of next 4 sts, hdc in next st, dc in next st, [tr in next st, ch 2, skip next st] 14 times, dc in next st, hdc in next st, sc in each of last 4 sts. Sl st into the ring.
Row C count: 8 sc, 2 hdc, 2 dc, 14 tr, 14 ch-2 sps. Check: 4 + 1 + 1 + 28 + 1 + 1 + 4 = 40 sts of Round B used.
The plain sc and hdc at each end keep the wing narrow where it meets the body. The 14 tr spokes fan out around the wide end of the teardrop.
Lower Wing (make 2, worked off the ring)
Round A: Sl st in the next ch of the ring. Ch 20, sl st into the ring.
Round B: Ch 1, work 32 sc into the ch-20 loop. Sl st into the ring. (32 sc)
Row C (spokes): Turn. sc in each of next 4 sts, hdc in next st, dc in next st, [tr in next st, ch 2, skip next st] 10 times, dc in next st, hdc in next st, sc in each of last 4 sts. Sl st into the ring.
Row C count: 8 sc, 2 hdc, 2 dc, 10 tr, 10 ch-2 sps. Check: 4 + 1 + 1 + 20 + 1 + 1 + 4 = 32 sts used.
Wing Order
- Center ring, then upper right wing (Rounds A–C).
- Sl st in next ch of ring, then work the lower right wing.
- Sl st in next ch of ring, then work the lower left wing.
- Sl st in next ch of ring, then work the upper left wing, starting with ch 26 as for the first upper wing.
Lay the piece flat. The two upper wings should point diagonally up and out, and the two lower wings diagonally down and out. Check the “before edging” measurement now.
Body
Work in continuous rounds. Place a marker in the first st of each round.
Rnd 1: 6 sc in MR. (6)
Rnd 2: (sc, inc) 3 times. (9)
Rnd 3: sc in each st. (9)
Rnd 4: (sc, sc2tog) 3 times. (6) This round closes the head. Push a tiny bit of fiberfill into the head.
Rnd 5: inc in each st. (12)
Rnds 6–7: sc in each st. (12)
Rnd 8: (sc, sc2tog) 4 times. (8) This is the waist between thorax and abdomen.
Rnd 9: (sc, inc) 4 times. (12)
Rnd 10: sc in each st. (12)
Rnd 11: BLO sc in each st. (12)
Rnd 12: sc in each st. (12)
Rnd 13: BLO sc in each st. (12)
Rnd 14: sc in each st. (12)
Rnd 15: BLO sc in each st. (12)
Stuff the thorax and abdomen lightly. The body should stay slightly flat, not round.
Rnd 16: (sc, sc2tog) 4 times. (8)
Rnd 17: sc in each st. (8)
Rnd 18: BLO sc in each st. (8)
Rnd 19: sc2tog 4 times. (4)
Fasten off, leaving a 12 in (30.5 cm) tail. Close the opening and keep the tail for sewing. The unworked front loops of Rnds 11, 13, 15, and 18 form the raised segment ridges on the abdomen.
The body should measure 2.75 in (7.0 cm) long and about 0.6 in (1.5 cm) wide when lightly flattened.
Antennae (make 2)
Join yarn with a sl st at the top of the head, in Rnd 2, slightly off center. Ch 18, work a 4-dc popcorn in the 4th ch from hook, sl st in each of the remaining 14 ch. Sl st into the head next to the starting point and fasten off.
Repeat on the other side of the head. Each antenna is about 1.5 in (3.8 cm) long, including the knob.
Edging (Border)
The edging is one continuous round around all four wings, with a sl st into the center ring between wings. These sl sts are hidden under the body later.
Edging gauge: same as the main gauge, 14 sc = 2 in (5.1 cm).
Edging Round 1: Continue from the last wing, or join yarn at the base of the upper left wing. Working along the top of Row C:
– Each upper wing: sc in each of the first 6 sts (4 sc, hdc, dc), [sc in tr, 2 sc in next ch-2 sp] 14 times, sc in each of the last 6 sts (dc, hdc, 4 sc). (54 sc)
– Each lower wing: sc in each of the first 6 sts, [sc in tr, 2 sc in next ch-2 sp] 10 times, sc in each of the last 6 sts. (42 sc)
– Sl st into the ring between wings.
Round 1 total: 54 + 42 + 42 + 54 = 192 sc, plus 4 sl sts into the ring.
Edging Round 2: Do not turn. Sl st into the ring, then continue around each wing:
– Each upper wing: sc in each of the first 6 sts. Then work 3 scallops over the next 42 sts. Each scallop is: sl st in next st, sc in next st, hdc in next st, dc in each of next 2 sts, 2 dc in each of next 4 sts, dc in each of next 2 sts, hdc in next st, sc in next st, sl st in next st. Sc in each of the last 6 sts. (66 sts)
– Each lower wing: sl st loosely in each st across. (42 sl sts)
– Sl st into the ring between wings.
Round 2 total: 66 + 42 + 42 + 66 = 216 sts, plus 4 sl sts into the ring. Fasten off and weave in ends.
Why the math works: Each scallop uses 14 sts (1 + 1 + 1 + 2 + 4 + 2 + 1 + 1 + 1 = 14) and makes 18 sts (1 + 1 + 1 + 2 + 8 + 2 + 1 + 1 + 1 = 18). Three scallops use exactly the 42 middle sts that sit over the 14 spokes (14 x 3 = 42) and make 54 sts. Adding the 6 plain sc at each end gives 6 + 54 + 6 = 66. On the lower wings, the 6 + 30 + 6 = 42 sc of Round 1 are covered one-for-one by 42 sl sts. That makes a neat corded rim without adding width.
Assembly
Center the body over the ring, with the head between the upper wings and the tail between the lower wings. Pin it in place. Using the body tail, whipstitch along both sides of the body through the ring and the wing bases. Keep the stitches small and hidden under the body. Weave in all ends.
Final Blocking
- Lightly mist the butterfly with water until it is damp, not soaked.
- Lay it on a blocking mat, right side up, with the body centered.
- Pin the center first. Then pin the tip of each wing so the wingspan is 6.5 in (16.5 cm) and the height is 5.5 in (14.0 cm).
- Pin each upper scallop peak and the end of each tr spoke so the spokes fan out evenly.
- Open each teardrop window with your fingers and shape it to a smooth point at the body.
- Shape the antennae into gentle outward curves.
- Apply light spray starch if you want extra stiffness, then let the piece dry fully before unpinning.
Final Quality-Control Checklist
- Each upper wing has 14 tr spokes, and each lower wing has 10.
- Each upper wing has three even scallops.
- Edging Round 1 counts are 54 per upper wing and 42 per lower wing.
- The windows on the left side match the windows on the right in size and shape.
- The body covers the center ring completely.
- Segment ridges are visible on the abdomen.
- Both antennae are the same length with round knobs.
- Finished size is 6.5 in (16.5 cm) x 5.5 in (14.0 cm).
Troubleshooting
Wings cup or ruffle: Your Round B sc may be too crowded. Spread them evenly, or try a slightly larger hook for Round B only.
Spokes lean to one side: Block again, pinning each spoke tip separately.
Scallops look flat: Make sure you work 2 dc in each of the 4 center stitches of each scallop.
Window is lopsided: The chain loop may be twisted. Check that the chain is not twisted before the sl st in Round A.
Body is too round: Remove some stuffing and flatten it before sewing.
Antennae droop: Tighten your sl sts along the chain, or use spray starch.
Care
Hand wash in cool water with mild soap, press out the water in a towel, and reshape flat to dry. Re-starch if needed.
Final Notes
The measurement chain is short and easy to check. Gauge is 14 sc = 2 in (5.1 cm), and an upper wing reaches 2.75 in (7.0 cm) after Row C. All four wings measure 5.75 in (14.6 cm) x 4.75 in (12.1 cm) before edging, and the finished butterfly blocks to 6.5 in (16.5 cm) x 5.5 in (14.0 cm). Once the first upper wing measures correctly, the other three wings work up the same way.
Use it as a curtain tie-back accent, a bag charm, or a gift topper.
Happy crocheting!