

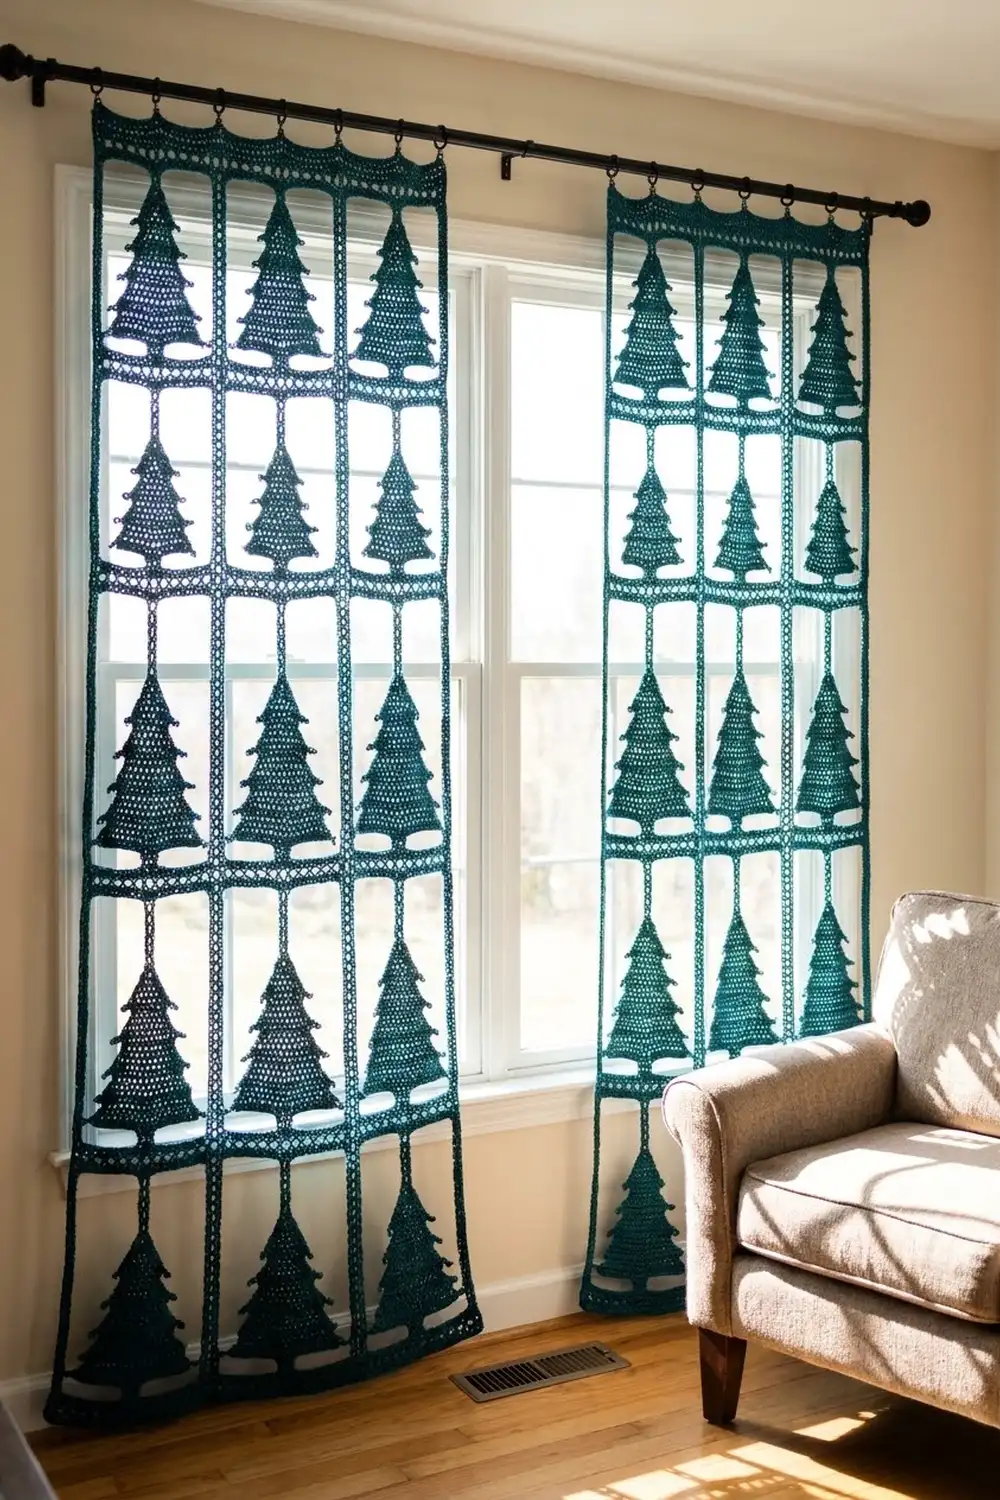
Evergreen Tiers is an openwork curtain made of small crocheted pine trees. Each panel has columns of trees linked by short chains, so the trees seem to hang in the window. Daylight shows through the gaps and the eyelet bands, and each tree’s outline stands out against the glass.
The project uses a single color, a deep pine teal. Without a second color, the texture does the work: dc ribbing on every tier, a raised sc ridge along each tier’s lower edge, and small picot tips at the tier ends. It suits a winter window and still looks fine after the holidays. This pattern uses US crochet terms throughout.
Each finished panel is 41 in wide × 90 in tall (104.1 × 228.6 cm), plus rod loops. This pattern makes two panels.
Here is how it’s built. You crochet each tree flat in turned rows, from the top loop down to the trunk. Next you link the trees into columns with short chains and join the columns with chain bars at the tier tips. Last, a sc header band with rod loops goes along the top.
Finished Size and Construction
- Panel size: 41 × 90 in (104.1 × 228.6 cm), excluding rod loops
- Skill level: Intermediate
- Terminology: US
- Yarn weight: Worsted (#4)
- Hook: US H-8 (5.0 mm)
- Number of pieces: 54 trees per panel, 108 trees for the pair
- Layout: 6 columns × 9 trees per panel
- Piece size: 9 in tall × 6 in tip to tip (22.9 × 15.2 cm)
- Size before border: 41 × 89 in (104.1 × 226.1 cm)
- Border depth: 1 in (2.5 cm) header band, plus rod loops about 2 in (5.1 cm) tall
Materials
Yarn: Choose a smooth worsted yarn that holds its shape. Cotton-acrylic blends work well because they hang straight and don’t fuzz in sunlight. Avoid very fuzzy or splitty yarns, because the ribbing and eyelets need clear stitch definition.
- Deep Pine Teal: 1,100 g total, about 1,980 m (2,165 yd). That’s 550 g and about 990 m (1,083 yd) per panel.
All quantities include a margin of about 10% for gauge swatches, joining strands, and weaving in ends.
Tools:
– US H-8 (5.0 mm) crochet hook
– Tapestry needle
– Stitch markers
– Rust-proof pins and blocking mats
– Spray bottle
– Measuring tape
– Curtain rod up to 1 in (2.5 cm) in diameter
Abbreviations (US Terms)
- ch – chain
- sl st – slip stitch
- sc – single crochet
- dc – double crochet
- st(s) – stitch(es)
- sp – space
- tch – turning chain
- sk – skip
Special stitches
- Picot: ch 3, sl st in the sc just made.
- Surface sl st: Hold the working yarn behind the fabric. Insert the hook from front to back just below the next edge-row sc, pull up a loop, and draw it through the loop on the hook.
Gauge and Checkpoints
Gauge:
– 14 dc and 8 dc rows = 4 in (10.2 cm)
– 16 sc and 16 sc rows = 4 in (10.2 cm)
– Chains: 4 ch = 1 in (2.5 cm)
Test one tree first. Make a complete tree and check these measurements as you go:
- After Row 4: Tier 1 is about 2.5 in (6.4 cm) wide.
- After Row 5: The tree is 2.5 in (6.4 cm) tall, and Tier 1 measures about 3 in (7.6 cm) from picot tip to picot tip.
- After Row 10: The tree is 4.75 in (12.1 cm) tall, and Tier 2 measures about 4.25 in (10.8 cm) from tip to tip.
- After Row 15: Tier 3 is about 5.5 in (14.0 cm) wide.
- After Row 16: The tree is 7.5 in (19.1 cm) tall and measures 6 in (15.2 cm) from tip to tip.
- After Row 22: The tree is 9 in (22.9 cm) tall. The trunk is 1.25 in (3.2 cm) wide and 1.5 in (3.8 cm) tall.
If your tree is too big, go down one hook size. If it’s too small, go up one size. Even a 0.25 in (0.6 cm) difference per tree adds up to more than 2 in (5.1 cm) across a column of 9 trees, so match the gauge before you continue.

Tree Motif (Make 108)
Each tree is worked flat in turned rows, from the top down. The ch-3 at the start of a row counts as a dc throughout.
Foundation: Ch 6, sl st in the first ch to form a ring.
Tier 1
Row 1: Ch 3, 2 dc in the ring. Work only into one half of the ring and leave the other half open; that open half is the hanging loop. (3 dc)
Row 2: Turn, ch 3, dc in the same st, dc in the next st, 2 dc in the top of the tch. (5 dc)
Row 3: Turn, ch 3, dc in the same st, dc in each st to the tch, 2 dc in the top of the tch. (7 dc)
Row 4: Repeat Row 3. (9 dc)
Row 5 (edge row): Turn, ch 1, sc in the first st, picot, sc in each of the next 7 sts, sc in the top of the tch, picot. (9 sc + 2 picots)
Tier 2
Row 6 (eyelet row): Turn. Sl st in the first sc and the next sc. Ch 4 (counts as dc + ch 1), sk the next sc, dc in the next sc. [Ch 1, sk the next sc, dc in the next sc] 2 times. Leave the last sc unworked. (4 dc + 3 ch-1 sps = 7 sts)
This row is centered on the edge row, so Tier 2 starts narrower than the bottom of Tier 1. That’s what gives the stacked, layered look.
Row 7: Turn, ch 3, dc in the same st. [Dc in the ch-1 sp, dc in the next dc] 2 times. Dc in the last ch-1 sp, then 2 dc in the 3rd ch of the tch. (9 dc) That’s 7 sts worked once each, plus 2 increases.
Row 8: Repeat Row 3. (11 dc)
Row 9: Repeat Row 3. (13 dc)
Row 10 (edge row): Turn, ch 1, sc in the first st, picot, sc in each of the next 11 sts, sc in the top of the tch, picot. (13 sc + 2 picots)
Tier 3
Row 11 (eyelet row): Turn. Sl st in the first 2 sc. Ch 4, sk the next sc, dc in the next sc. [Ch 1, sk the next sc, dc in the next sc] 4 times. Leave the last sc unworked. (6 dc + 5 ch-1 sps = 11 sts)
Row 12: Turn, ch 3, dc in the same st. [Dc in the ch-1 sp, dc in the next dc] 4 times. Dc in the last ch-1 sp, then 2 dc in the 3rd ch of the tch. (13 dc) That’s 11 sts worked once each, plus 2 increases.
Row 13: Repeat Row 3. (15 dc)
Row 14: Repeat Row 3. (17 dc)
Row 15: Repeat Row 3. (19 dc)
Row 16 (edge row): Turn, ch 1, sc in the first st, picot, sc in each of the next 17 sts, sc in the top of the tch, picot. (19 sc + 2 picots)
Trunk
Row 17: Turn. Sl st in each of the first 8 sc. Ch 1, then sc in the same sc and in each of the next 4 sc. (5 sc) These are sc 8 through 12, which centers the trunk under the tree.
Rows 18–22: Turn, ch 1, sc in each sc across. (5 sc)
Fasten off, then weave in the ends.
Stitch count check: The dc rows go 3, 5, 7, 9 / 7, 9, 11, 13 / 11, 13, 15, 17, 19. Each solid row adds 2 sts. Each eyelet row resets to a narrower width by working across the center of the edge row below it.
Make All Pieces
- Deep Pine Teal: 108 trees, 54 for each panel
Before joining, steam or spray-block the trees in batches (see Final Blocking). Flat trees are much easier to measure and join.
Layout per panel (T = tree, | = vertical link, = = horizontal bars):
T = T = T = T = T = T     Row 1
|   |   |   |   |   |
T = T = T = T = T = T     Row 2
|   |   |   |   |   |
...  continue  ...
T = T = T = T = T = T     Row 9
Each “=” stands for three horizontal bars, one at each tier.
Joining
Vertical Links (8 per column, 48 per panel)
- With the RS facing, join the yarn with a sl st in the center sc (sc 3) of the trunk’s last row.
- Ch 4.
- Sl st around the open half of the ring on the tree below.
- Fasten off.
Each link is 1 in (2.5 cm). Always join the center trunk stitch to the center of the ring so each column hangs straight.
Horizontal Bars (3 strands per tree row, 27 per panel)
The trees sit on a 7 in (17.8 cm) column pitch. Each bar fills the gap between two trees at one tier level:
- Tier 1: 7 in − 3 in tip span = 4 in gap, so ch 16.
- Tier 2: 7 in − 4.25 in = 2.75 in (7.0 cm) gap, so ch 11.
- Tier 3: 7 in − 6 in = 1 in gap, so ch 4.
For each tier strand:
- Join the yarn with a sl st in the right picot of that tier on the Column 1 tree.
- Ch the bar length for that tier.
- Sl st in the left picot of the same tier on the next tree.
- Surface sl st across that tier’s edge row (9, 13, or 19 surface sl sts), then sl st in the right picot.
- Repeat Steps 2–4 for the trees in Columns 3, 4, and 5.
- Ch the bar length, then sl st in the left picot of the Column 6 tree. Fasten off.
Tension: Keep the chains relaxed but not loose. Check each bar against the 4-ch-per-inch gauge. If a bar is too tight, the tiers pucker. If it’s too loose, the bar sags.
Size checkpoint: The joined body should measure 41 × 89 in (104.1 × 226.1 cm). Width: 6 trees × 6 in + 5 gaps × 1 in = 41 in. Height: 9 trees × 9 in + 8 links × 1 in = 89 in.
Border (Top Header Band)
The border runs along the top edge only. The sides and bottom stay open so the trees hang freely.
Border gauge: 16 sc = 4 in (10.2 cm).
Row 1: Ch 10. Work 4 sc around the open half of the ring on the first top-row tree. [Ch 24, 4 sc around the ring of the next tree] 5 times. Ch 10. (164 sts) That’s 6 trees × 4 sc = 24 sc, plus 5 × 24 ch = 120 ch, plus 2 × 10 ch = 20 ch at the ends.
Row 2: Turn, ch 1, sc in each ch and sc across. (164 sc)
Row 3: Turn, ch 1, sc in each sc across. (164 sc)
Row 4 (rod loops): Turn, ch 1, sc in the first 2 sc. [Ch 16, sc in the next 20 sc] 8 times. Ch 16, sc in the last 2 sc. (164 sc + 9 ch-16 loops) Check: 2 + 8 × 20 + 2 = 164.
Fasten off and weave in the ends.
Why the math works: In the header, each 4-sc ring anchor is 1 in wide and each 24-ch gap is 6 in, which matches the 7 in column pitch exactly. The 10-ch tails at each end are 2.5 in (6.4 cm). That’s the distance from the center of an outer ring to the outer tree tip (3 in) minus half a ring (0.5 in, 1.3 cm). So the 164 sts measure 41 in, the same width as the body. The rod loops are 5 in (12.7 cm) apart and sit symmetrically, with 2 sc outside the first and last loops.
Final Blocking
- Lay the panel flat on mats or a clean sheet, working in sections if needed.
- Mist it until it’s evenly damp. Don’t soak it.
- Pin each tree so its tips are level and its trunk is centered.
- Pin the vertical links straight, at 1 in (2.5 cm) each.
- Pin the horizontal bars taut but relaxed.
- Pin the header straight and check that it measures 41 in (104.1 cm).
- Let the panel dry completely before unpinning.
- Hang the panel for 24 hours. Gravity relaxes the chains, so re-measure the height afterward.
Final Quality-Control Checklist
- Every tree is 9 in (22.9 cm) tall and 6 in (15.2 cm) from tip to tip.
- All 108 trees have their stitch counts confirmed (19 dc in Row 15).
- The eyelet rows are centered and the picots point outward.
- All 48 vertical links per panel join center to center.
- All 27 bar strands per panel use the correct chain length for their tier.
- The header has 164 sc and 9 loops.
- The panel measures 41 × 90 in (104.1 × 228.6 cm).
- All ends are woven in securely on the WS.
Troubleshooting
- The tiers flare or ripple: You probably added extra increases. Recount for +2 per solid row.
- The tree leans to one side: The eyelet row is off center. Make sure you sl st across exactly 2 sts before starting it.
- The trunk is off center: Count the sl sts again. You need exactly 8 before Row 17.
- The columns drift apart at the bottom: The bars are too loose. Rework them with tighter chains.
- The header is narrower than the body: Use a looser tension on the Row 1 chains.
- The panel is too short: Add ch 1 to each vertical link. Each extra ch adds about 0.25 in (0.6 cm) per link, which is 2 in (5.1 cm) per panel.
Care
Hand wash in cool water, roll the panel in a towel to remove excess water, and dry it flat or rehang it while damp. Don’t tumble dry, because the chains can stretch and tangle.
Final Notes
The measurements build on each other in a fixed chain:
- The 14-dc gauge makes a 6 in tree, 9 in tall.
- Trees spaced on a 7 in pitch with 1 in gaps give a 41 in width.
- Nine 9 in trees plus eight 1 in links give 89 in.
- The 1 in header brings each panel to 41 × 90 in (104.1 × 228.6 cm).
If your test tree matches gauge, everything after it follows the same numbers.
Happy crocheting!