

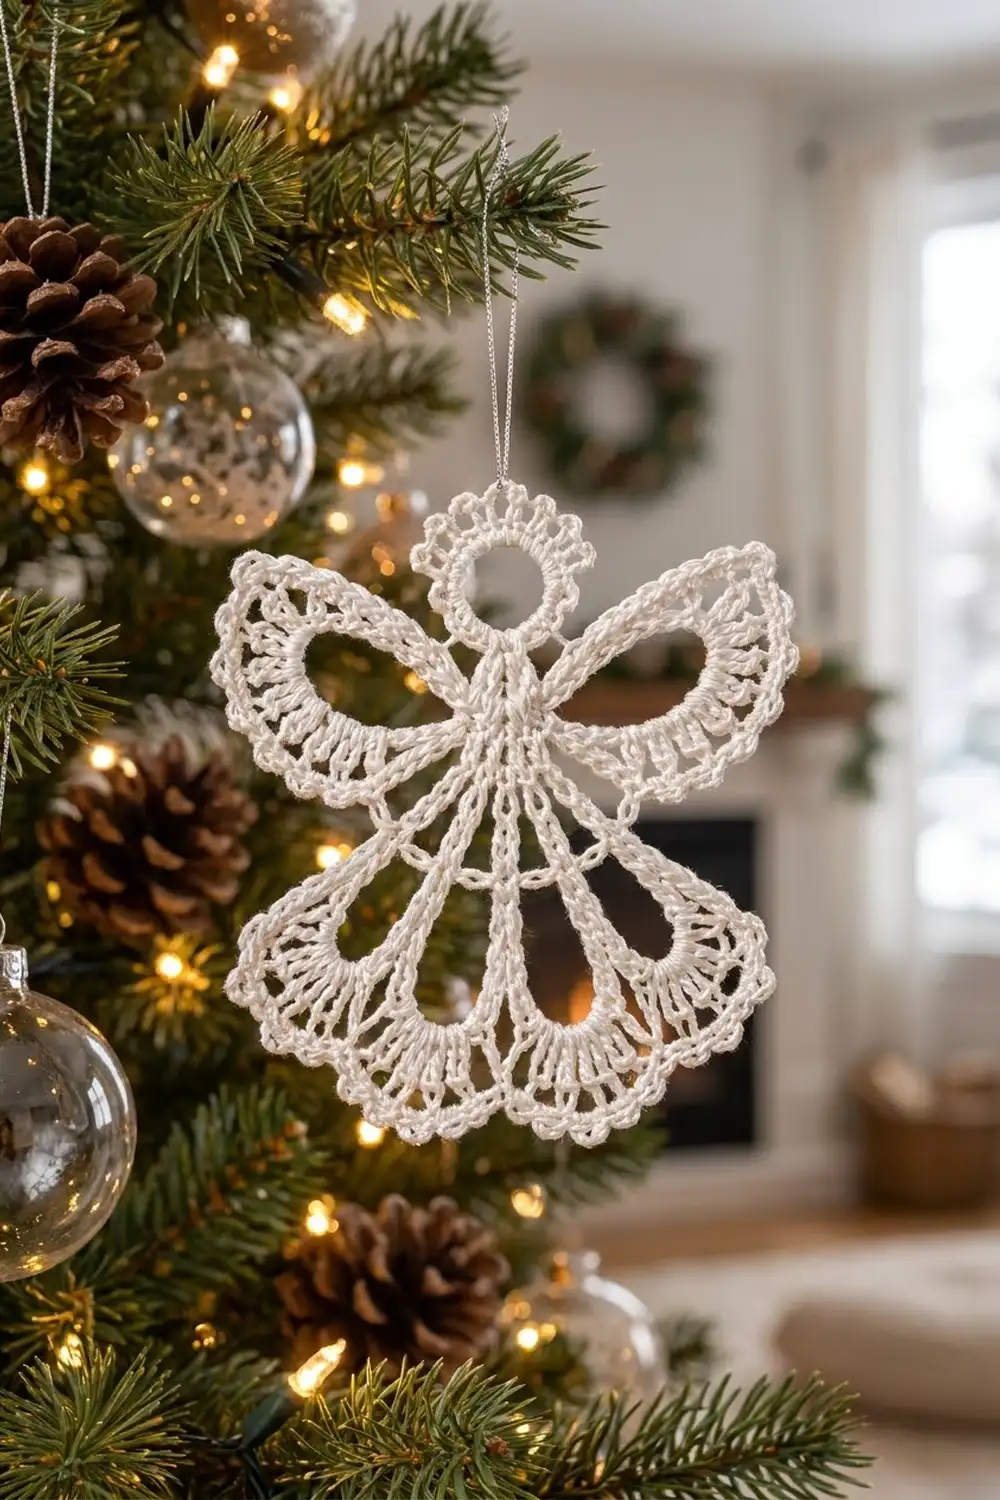
The Snowlight Angel is a small, airy thread-lace angel that looks great on a tree branch, a gift tag, or a frosted window. She has an open ring for a head, a scalloped halo, two teardrop wings with frilled edges, and a bell skirt with open windows that ends in a picot hem.
The angel is worked in one color: a soft, bright white mercerized cotton thread. The single color lets the lace texture stand out, so it suits classic Christmas, Scandinavian, or farmhouse decor.
This pattern uses US crochet terms. The finished angel measures about 5 in (12.7 cm) tall and 5 in (12.7 cm) wide across the wings after blocking and stiffening.
The angel is made in one piece. First you crochet the head ring and halo. Then you work the bodice and skirt downward from the bottom of the head, in turned rows. Next you add the hem border, and finally you work each wing straight off the shoulders. There is no sewing apart from weaving in ends.
Finished Size and Construction
- Finished size: 5 in (12.7 cm) tall × 5 in (12.7 cm) wide
- Skill level: Intermediate (thread work, shells, picots)
- Terminology: US crochet terms
- Yarn weight: Size 3 crochet thread (super fine, #1)
- Hook: 2.25 mm (US B-1)
- Number of pieces: 1 (single motif, worked in one piece)
- Layout: One angel, no joining
- Head and halo: 1.5 in (3.8 cm) tall
- Body before border: 3 in (7.6 cm) long from neck to Row 9
- Total height before border: 4.5 in (11.4 cm)
- Border depth: 0.5 in (1.3 cm)
Materials
Thread: Use a smooth, mercerized size 3 cotton crochet thread in white or soft white. Mercerized cotton gives crisp stitch definition and holds its shape well after stiffening. Avoid fuzzy or acrylic thread, because the open windows will blur and the shape won’t hold.
- White: about 10 g (approx. 40 m / 44 yd) per angel
This quantity includes a margin of about 30% for your gauge swatch, tails, and any ripping back.
Tools:
- 2.25 mm (US B-1) crochet hook
- Fine tapestry needle
- Small sharp scissors
- Blocking board or foam mat, plus rustproof pins
- Fabric stiffener, or a starch solution
- Ruler or measuring tape
- Optional: 8 in (20.3 cm) of thread or fine ribbon for a hanging loop
Abbreviations (US Terms)
- ch – chain
- sl st – slip stitch
- sc – single crochet
- dc – double crochet
- tr – treble crochet
- sk – skip
- sp – space
- st(s) – stitch(es)
- rep – repeat
- Rnd – round
Special stitches:
- Picot: Ch 3, sl st in the 3rd ch from the hook.
- Shell: 5 dc in the same st.
Gauge and Checkpoints
Gauge: 7 dc and 3.5 dc rows = 1 in (2.5 cm), worked flat with a 2.25 mm hook.
Make a test angel first. Thread lace is very sensitive to tension, so measure at each checkpoint below rather than waiting until the end:
- Head ring (after Head Rnd 1): outer diameter 1 in (2.5 cm).
- Head plus halo: 1.5 in (3.8 cm) tall.
- After Body Row 4: 1.25 in (3.2 cm) below the neck.
- After Body Row 7: 2.25 in (5.7 cm) below the neck.
- After Body Row 9: 3 in (7.6 cm) below the neck. The hem should measure 4.25 in (10.8 cm) across when laid flat.
- After Border: 3.5 in (8.9 cm) below the neck. The hem should measure 4.75 in (12.1 cm) across.
If your angel is too big: go down to a 2.0 mm hook, or tighten the long chains in Rows 6–8.
If your angel is too small: go up to a 2.5 mm hook.
Change hook size rather than changing stitch counts. The shell math in the border depends on the exact counts given.

Head and Halo
Head
Rnd 1: Ch 16, sl st in the first ch to form a ring. Ch 1, work 24 sc into the ring (not into the chains). Sl st in the first sc to join. (24 sc)
Number the stitches from the first sc: sc 1 is the first stitch and sc 24 is the last. Hold the ring so that sc 1 is at the bottom (this will be the neck). Sc 13 is then directly opposite it, at the top of the head. Don’t fasten off yet.
Halo
The halo is worked over the top 13 sts of the ring only (sc 7 through sc 19). It is centered on sc 13.
Row 1: Sl st in each sc from sc 2 to sc 7. Ch 1, sc in sc 7. Ch 3, sk 1, sc in next sc, rep from * 5 more times; the last sc lands in sc 19. (7 sc, 6 ch-3 loops)
Row 2: Do not turn. Work into each ch-3 loop: (sc, dc, picot, dc, sc). (6 scallops: 12 sc, 12 dc, 6 picots)
Sl st into sc 19, and fasten off with a 4 in (10.2 cm) tail.
Checkpoint: The halo forms a fan about 0.5 in (1.3 cm) deep. Together with the head, it measures 1.5 in (3.8 cm) tall.
Body (Bodice and Skirt)
The body is worked downward from the bottom of the head ring, in turned rows. A ch-3 turning chain counts as 1 dc, and a ch-4 turning chain counts as 1 tr.
Row 1: With the halo pointing up, join thread in sc 24. Ch 3, dc in sc 1, dc in sc 2. Turn. (3 dc)
This centers the neck on sc 1, directly below the halo.
Row 2: Ch 3, dc in the same st, 2 dc in the next dc, 2 dc in the top of the turning ch. Turn. (6 dc)
The bodice is now about 0.9 in (2.3 cm) wide.
Row 3: Ch 5 (counts as dc + ch 2). Dc in next dc, ch 2, rep from * 3 more times. Dc in the top of the turning ch. Turn. (6 dc, 5 ch-2 sps)
The 6 dc are the six skirt spokes.
Row 4: Ch 6 (counts as dc + ch 3). Dc in next dc, ch 3, rep from * 3 more times. Dc in the 3rd ch of the turning ch. Turn. (6 dc, 5 ch-3 sps)
Checkpoint: 1.25 in (3.2 cm) below the neck.
Row 5: Ch 3, dc in the same st. Ch 4, 2 dc in next dc, rep from * 4 more times; the last 2 dc go into the 3rd ch of the turning ch. Turn. (12 dc, 5 ch-4 sps)
Each spoke is now 2 dc wide.
Row 6: Ch 3, dc in next dc. Ch 6, dc in each of next 2 dc, rep from * 4 more times. Turn. (12 dc, 5 ch-6 sps)
Row 7 (arch band): Ch 3, dc in next dc. Ch 3, sc in next ch-6 sp, ch 3, dc in each of next 2 dc, rep from * 4 more times. Turn. (12 dc, 5 sc, 10 ch-3 sps)
The sc in each space pulls the chains into the small arches that cross the middle of the skirt.
Checkpoint: 2.25 in (5.7 cm) below the neck.
Row 8 (windows): Ch 4 (counts as tr), tr in next dc. Ch 9, sk (ch-3, sc, ch-3), tr in each of next 2 dc, rep from * 4 more times. Turn. (12 tr, 5 ch-9 sps)
The tall tr spokes and long chains make the five teardrop-shaped open windows.
Row 9 (hem base, conversion row): Ch 3, dc in next tr. 9 dc in next ch-9 sp, dc in each of next 2 tr, rep from * 4 more times. Don’t turn. (12 dc over the spokes + 45 dc in the spaces = 57 dc)
Checkpoint: 3 in (7.6 cm) below the neck. The hem should measure 4.25 in (10.8 cm) wide when laid flat, and the whole angel 4.5 in (11.4 cm) tall.
Turn now, and continue straight into the Border.
Border (Skirt Hem)
Border gauge: One shell repeat (sk 1, shell, sk 1, sc) uses 4 sts of Row 9. Each repeat measures about 0.3 in (0.8 cm) across after blocking.
The border has two sections that are counted separately: the hem across the bottom of the skirt, and the frilled edge of each wing (see Wings).
Row 10 (shells): Ch 1, sc in the first dc. Sk 1, shell in next dc, sk 1, sc in next dc, rep from * 13 more times. Turn. (14 shells, 15 sc)
Why the math works: The first sc uses 1 st, and each of the 14 repeats uses 4 sts. That gives 1 + (14 × 4) = 57, which uses every stitch of Row 9 exactly. The last sc lands in the turning chain of Row 9, so the hem is symmetrical with a sc at each end.
Row 11 (picot edge): Ch 1, sl st in the first sc. Sc in each of next 2 dc, (sc, picot, sc) in the center dc, sc in each of next 2 dc, sl st in next sc, rep from * 13 more times. (84 sc, 14 picots, 15 sl sts)
Each shell takes 6 sc and 1 picot: 14 × 6 = 84 sc. Fasten off.
Checkpoint: The border adds 0.5 in (1.3 cm). The body is now 3.5 in (8.9 cm) below the neck, and the hem measures 4.75 in (12.1 cm) across.
Wings (make 2, worked directly onto the body)
Base: With the right side facing, join thread at the side edge of Bodice Row 2, at the outer end of the row. Ch 16, then sl st in the same place to form a loop.
Rnd 1: Ch 1. Work 26 sc into the loop, starting along the lower strand (the side nearest the skirt). Sl st in the first sc. (26 sc)
Rnd 2: Ch 1, sc in each of the first 6 sc. Sk 1, shell in next sc, sk 1, sc in next sc, rep from * 4 more times. Sl st in the first sc. (5 shells, 11 sc)
Check the count: 6 + (5 × 4) = 26 sts, so every stitch is used. The 6 plain sc form the smooth lower inner edge. The shells run around the tip and along the upper outer edge.
Rnd 3: Sl st in each of the first 6 sc. Sc in each of next 2 dc, (sc, picot, sc) in the center dc, sc in each of next 2 dc, sl st in next sc, rep from * 4 more times. Sl st in the first sl st. (30 sc, 5 picots, 11 sl sts)
Fasten off, and anchor the tail through the bodice.
Repeat on the other side of Bodice Row 2 for the second wing.
Checkpoint: Each wing is about 2 in (5.1 cm) long and 1.25 in (3.2 cm) wide. When the wings are angled upward, the angel measures 5 in (12.7 cm) across.
Optional hanging loop: Thread 8 in (20.3 cm) of thread or ribbon through the halo picot at sc 13, then tie the ends together.
Final Blocking
- Weave in all ends along stitch posts, never through open chain spaces.
- Soak the angel in fabric stiffener, or a starch solution mixed following the package directions.
- Gently squeeze out the excess liquid, then blot with a towel. Don’t wring the angel.
- Lay the angel on the blocking board and pin the neck first, then the top of the head.
- Pin the 6 skirt spokes so they fan out evenly from the neck. Pull the hem out to 4.75 in (12.1 cm) across.
- Pin each of the 14 hem picots so the scallops curve evenly.
- Angle the wings upward at about 45°. Open each wing loop into a teardrop and pin each of the 5 wing picots.
- Pin the 6 halo picots into a neat fan.
- Check the angel against the 5 in (12.7 cm) height and width, then let it dry completely, about 24 hours.
Final Quality-Control Checklist
- [ ] Head ring has 24 sc and an open, round center
- [ ] Halo has 6 scallops, centered over the top of the head
- [ ] Skirt has 6 spokes, 5 arches, and 5 open teardrop windows
- [ ] Row 9 has 57 dc
- [ ] Hem has 14 shells, each with a picot at its center
- [ ] Each wing has 6 plain sc and 5 picot shells
- [ ] Both wings are the same size and attached at the same row
- [ ] Angel measures 5 in (12.7 cm) tall and 5 in (12.7 cm) wide
- [ ] All ends are hidden and the angel holds its shape when hung
Troubleshooting
Halo sits off-center: Count the slip stitches again. The halo must start in sc 7 and end in sc 19.
Skirt cups or curls: The chains in Rows 6–8 are too tight. Work them more loosely, or go up one hook size just for those rows.
Hem ruffles: Your dc are looser than the chains. Make sure there are exactly 9 dc in each ch-9 space, or use a smaller hook for Rows 9–11.
Shells don’t fit evenly: Recount Row 9. Any total other than 57 will throw off the 4-stitch repeat.
Wings are different sizes: Make sure both base loops are exactly 16 ch, and that both rounds start on the lower strand.
Angel goes limp later: Stiffen again with a stronger solution.
Care
Hand wash the angel in cool water if needed, then stiffen and block it again. Store it flat or hanging, away from moisture and direct sunlight.
Final Notes
The measurement chain is:
- Head ring: 1 in (2.5 cm)
- Head plus halo: 1.5 in (3.8 cm)
- Body to Row 4: 1.25 in (3.2 cm)
- Body to Row 7: 2.25 in (5.7 cm)
- Body to Row 9: 3 in (7.6 cm), with a hem of 4.25 in (10.8 cm)
- Border: adds 0.5 in (1.3 cm), bringing the hem to 4.75 in (12.1 cm)
- Wings: 2 in (5.1 cm) each
- Finished angel: 5 in (12.7 cm) by 5 in (12.7 cm)
If you hit each checkpoint, your angel will block out to size with no guesswork.
Happy crocheting!