

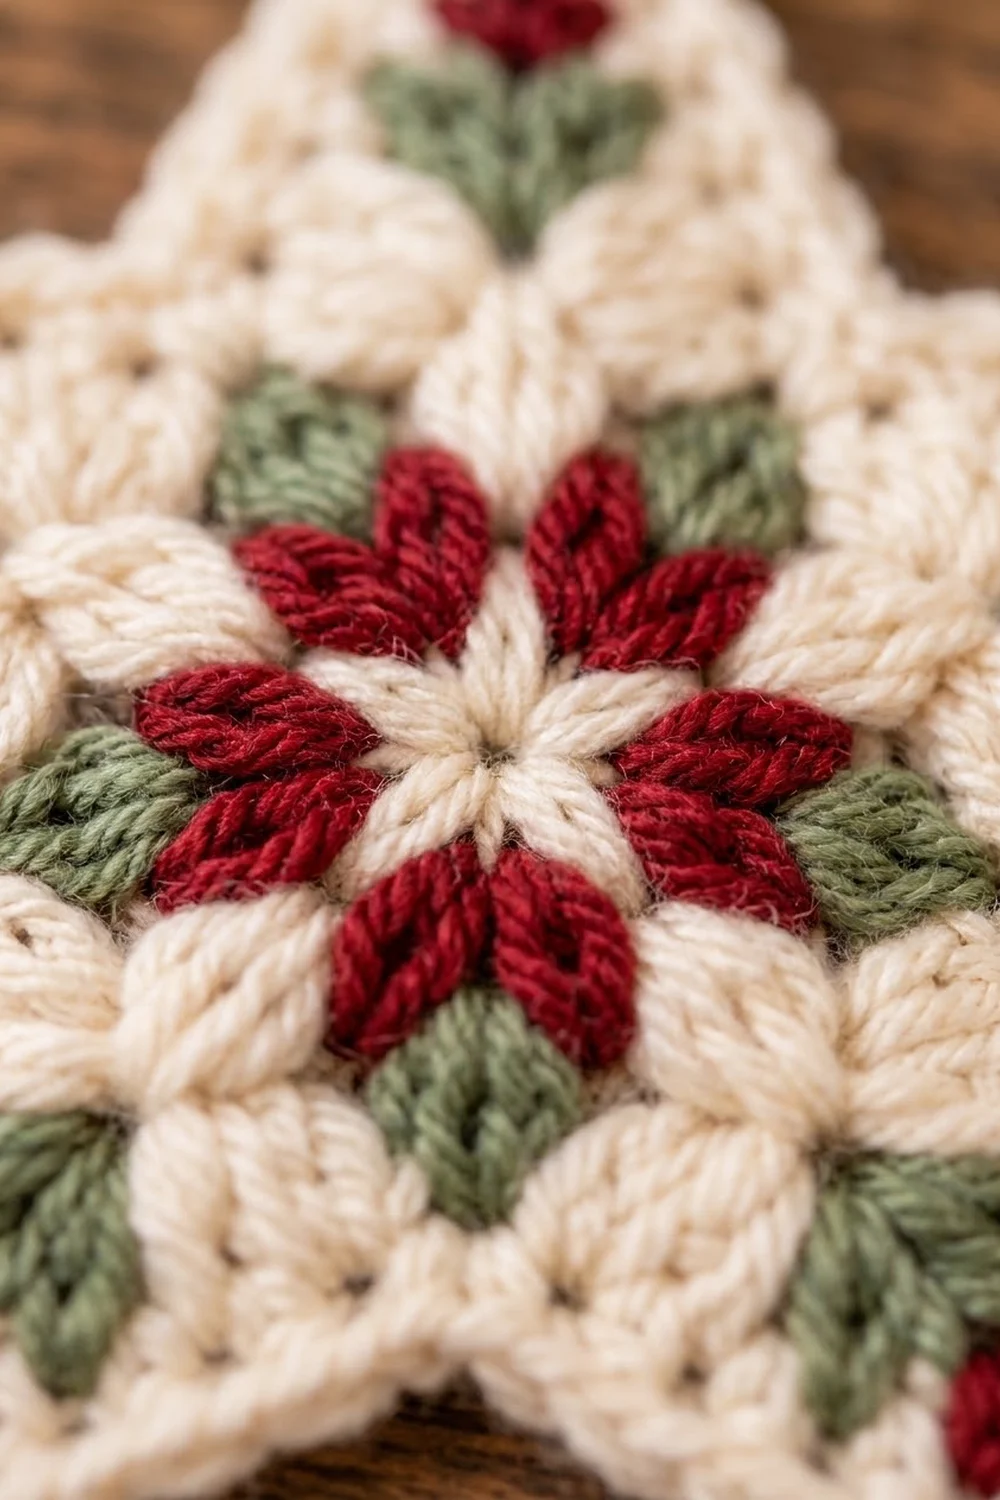
This Winter Berry Star is a small, sturdy Christmas ornament worked in one piece. It has a cream background, a deep cranberry puff-stitch flower in the center, and little sage-green leaves with red berries at all five points. The colors look like an old-fashioned holiday table, and the puff stitches add a soft texture.
The star measures about 5 in (12.7 cm) from point to point and 4.75 in (12.1 cm) tall without the loop. With the loop, it is about 6.25 in (15.9 cm) tall. It is a good size for a tree branch, a gift tag or a window hook.
The pattern uses US crochet terms throughout.
You work the whole star in joined rounds from the center out. You start with a ring of double crochet, add red puff petals and green clusters, then make a solid cream round that gives you exactly 40 stitches. Those 40 stitches split into five groups of 8. Each group becomes a point, shaped by stitch height alone, and a single round of single crochet finishes the edge. You don’t need to sew any pieces together.
Finished Size and Construction
- Finished size: 5 in (12.7 cm) wide point to point, 4.75 in (12.1 cm) tall
- Hanging loop: adds about 1.5 in (3.8 cm)
- Skill level: Easy-intermediate (puff stitches, color changes, carried yarn)
- Terminology: US crochet terms
- Yarn weight: DK (light worsted, weight 3)
- Hook: 3.5 mm (E-4)
- Number of pieces: 1
- Layout: One five-pointed star, worked in the round
- Size before border: 4.5 in (11.4 cm) wide, 4.25 in (10.8 cm) tall
- Border depth: 0.25 in (0.6 cm), one round of sc
Materials
Yarn: Use a smooth DK yarn with good stitch definition. Cotton or a cotton blend shows the puff stitches clearly and holds the star shape well. Soft acrylic also works, but the points may need a little more blocking. Avoid fuzzy or brushed yarns, because they hide the leaf and berry details.
- Cream (MC): 10 g, about 25 m (27 yd)
- Cranberry red (A): 4 g, about 10 m (11 yd)
- Sage green (B): 3 g, about 8 m (9 yd)
These amounts include a margin for swatching and weaving in ends. One star uses slightly less than this.
Tools:
- 3.5 mm (E-4) crochet hook
- Tapestry needle
- Scissors
- Stitch marker
- Blocking mat and rustproof pins
- Spray bottle with water
Abbreviations (US Terms)
- ch – chain
- sl st – slip stitch
- sc – single crochet
- hdc – half double crochet
- dc – double crochet
- tr – treble crochet
- sc2tog – single crochet 2 together
- dc2tog – double crochet 2 together
- st(s) – stitch(es)
- sp – space
- sk – skip
- rep – repeat
- MC, A, B – cream, red, green
Puff stitch (puff): (Yarn over, insert hook in the stitch or space, pull up a loop to about 0.5 in (1.3 cm)) 4 times, so you have 9 loops on the hook. Yarn over and pull through all 9 loops, then ch 1 to close. The closing ch 1 is not counted as a stitch.
Beginning puff (beg puff): Ch 2. Then work (yarn over, insert hook, pull up a loop) 3 times in the same stitch, yarn over and pull through all 7 loops, then ch 1 to close.
Beginning cluster (beg cl): Ch 2, then dc in the same space. This counts as one dc2tog.
Carrying yarn: In Round 5, lay the unused color along the tops of the stitches and work over it. Change color on the last yarn over of the stitch before the new color.
Gauge and Checkpoints
The star is small, so the first star you make is your gauge swatch. Measure it at each checkpoint below:
- After Round 1: 1 in (2.5 cm) across
- After Round 2: 1.75 in (4.4 cm) across, puff tip to puff tip
- After Round 3: 2.25 in (5.7 cm) across
- After Round 4: 2.75 in (7.0 cm) across, which is the key checkpoint
- After Round 5: 3.25 in (8.3 cm) across
- After Round 6: 4.5 in (11.4 cm) point to point
- After Round 7: 5 in (12.7 cm) point to point
If your circle is too big after Round 4 (more than 3 in / 7.6 cm), change to a 3.25 mm (D-3) hook. Also check that your puffs are not pulled up too tall.
If your circle is too small (less than 2.5 in / 6.4 cm), change to a 3.75 mm (F-5) hook.
If Round 4 ruffles or cups, fix it before you go on. Every later round depends on a flat 40-stitch circle.
Pattern
Round 1 – Cream Center
With MC, make a magic ring.
Ch 3 (counts as dc), then work 15 dc into the ring. Pull the ring closed and sl st to the top of the ch-3. (16 dc)
Fasten off MC, leaving a 6 in (15.2 cm) tail.
Round 2 – Red Petals
Join A with a sl st in any dc.
Work a beg puff in the same st, ch 2, and sk the next dc. Puff in the next dc, ch 2, sk the next dc. Rep from * 6 more times. Sl st to the top of the beg puff. (8 puffs, 8 ch-2 sps)
The puffs use all 16 dc: 8 puffs plus 8 skipped stitches. Fasten off A.
Round 3 – Green Clusters
Join B with a sl st in any ch-2 sp.
Work a beg cl in the same sp, then ch 4. Dc2tog in the next ch-2 sp, ch 4. Rep from * 6 more times. Sl st to the top of the beg cl. (8 clusters, 8 ch-4 sps)
The green clusters sit between the red petals. Each ch-4 arches over the top of a puff. Fasten off B.
Round 4 – Cream Base (Conversion Round)
Join MC with a sl st in the top of any cluster.
Ch 3 (counts as dc). Work 4 dc in the next ch-4 sp. Dc in the next cluster, 4 dc in the next ch-4 sp. Rep from * 6 more times. Sl st to the top of the ch-3.
Count: 8 dc (1 in each cluster) + 32 dc (4 in each of 8 ch-4 sps) = 40 dc
Do not fasten off. Check the 2.75 in (7.0 cm) measurement now.
Place a marker in the first st. Mentally divide the round into five groups of 8 dc, one group for each point.
Round 5 – Leaf Pairs
Keep working with MC. Lay B along the tops of the stitches so that you crochet over it.
Ch 1. With MC, sc in the next 3 dc. With B, puff in the next dc, ch 1, puff in the next dc. With MC, sc in the next 3 dc. Rep from * 4 more times. Sl st to the first sc.
Count per group: 6 sc + 2 puffs + 1 ch-1 sp, using 8 base stitches.
Total: 30 sc + 10 puffs = 40 sts, plus 5 ch-1 sps
Each pair of green puffs leans into a V shape, which makes the leaves. Cut B and weave over the tail as you go.
Round 6 – Shaping the Points
Keep working with MC. Lay A along the tops of the stitches.
Ch 1. Work the following for each group:
With MC: sc in the next sc, hdc in the next sc, dc in the next sc, 2 tr in the next puff. With A: (puff, ch 2, puff) in the ch-1 sp. With MC: 2 tr in the next puff, dc in the next sc, hdc in the next sc, sc in the next sc.
Rep from * 4 more times. Sl st to the first sc.
Count per point: 1 sc + 1 hdc + 1 dc + 2 tr + 2 puffs + 2 tr + 1 dc + 1 hdc + 1 sc = 12 sts, plus 1 ch-2 tip sp
Total: 60 sts (50 MC, 10 A), plus 5 ch-2 sps
The stitch heights rise from sc to tr, then fall again. This is what shapes each point. Where the last sc of one group meets the first sc of the next group, the fabric dips and forms a valley.
The red puff pair sits just below each tip and makes the berry. Fasten off A and MC.
Checkpoint: The star should measure 4.5 in (11.4 cm) point to point and 4.25 in (10.8 cm) tall.
Border
Border gauge: One round of sc adds about 0.25 in (0.6 cm) to every edge. Work it with firm, even tension so the edge stays smooth.
Round 7 – Cream Edging
Join MC with a sl st in the hdc (the 2nd st) of any point.
Ch 1. Sc in the same st or the next st as needed and in the following sts up the side, for 5 sc total (hdc, dc, tr, tr, puff). Work 3 sc in the ch-2 tip sp. Sc in the next 5 sts (puff, tr, tr, dc, hdc). Sc2tog over the next 2 sc, which are the last sc of this point and the first sc of the next point. Rep from * 4 more times. Sl st to the first sc.
Count per point: 5 sc + 3 sc + 5 sc + 1 sc2tog = 14 sts
Total: 70 sts
Why the math works:
- Each 12-stitch point uses 10 stitches for its sides and 2 stitches for its valleys.
- The ch-2 tip adds 3 sc, so the corner is sharp and doesn’t pull.
- At each valley, the sc2tog takes away 1 stitch, so the inner angle stays crisp instead of puckering.
- So 12 − 2 + 3 + 1 = 14 stitches per point, and 14 × 5 = 70.
Hanging Loop
Choose one point as the top. Join MC with a sl st in the center sc of its 3 tip sc.
Ch 20, then sl st in the same st to form a loop. Ch 1 and work 26 sc into the loop, covering the chain completely. Sl st in the tip st.
Fasten off, leaving a 6 in (15.2 cm) tail. Use the tail to stitch through the base of the loop once to make it stronger. The loop should stand about 1.5 in (3.8 cm) tall.
Final Blocking
- Weave in all ends on the wrong side, through stitches of the same color. Trim the ends to about 0.25 in (0.6 cm).
- Lay the star right side up on the blocking mat.
- Spray it lightly until it is damp but not soaked.
- Pin the five tips evenly so they measure 5 in (12.7 cm) point to point.
- Pin each valley so the points look equal.
- Push the puffs up gently from below with your fingertip so they stand out.
- Pin the hanging loop straight up.
- Leave it to dry completely, usually 6 to 8 hours.
- For stiffer ornaments, brush on a light fabric stiffener before drying. This is optional.
Final Quality-Control Checklist
- The star measures 5 in (12.7 cm) wide and 4.75 in (12.1 cm) tall.
- All five points are the same length within 1/8 in (0.3 cm).
- There are 8 red petals and 8 green clusters in the center.
- Every point has one green V-shaped leaf pair and one red berry pair.
- The border has 70 sc, with 3 sc at every tip.
- The valleys are crisp, with no gaps or puckering.
- No carried strands show on the right side.
- The hanging loop is fully covered and firmly attached.
- All ends are secure and hidden.
Troubleshooting
The center ring has a hole. Pull the magic ring tight before you join. Then weave the starting tail around the ring once more.
The puffs look flat. Pull every loop up to the same height before you close the puff. Pushing them out from the back during blocking also helps.
Round 4 ruffles. Your ch-4 arches may be too loose. Redo Round 3 with ch 3 instead, and keep 4 dc per space.
Round 4 cups. Work the chains in Round 3 more loosely, or change to a larger hook for that round.
Carried yarn shows through. Keep the carried strand flat along the tops of the stitches. Make sure it doesn’t sit behind the puffs.
The points are uneven. Count 12 sts per point in Round 6 before you start the border.
The tips curl. Block flat and pin the tips firmly.
There are gaps at the valleys. Use sc2tog exactly at the valley. Don’t work 2 separate sc there.
Care
Hand wash in cool water with mild soap and press out the water in a towel. Lay flat to dry, reshaping the points, and store flat between holidays.

Final Notes
Here is the measurement chain to keep each star accurate:
- 16 dc gives a ring 1 in (2.5 cm) across.
- 8 red puffs and 8 green clusters bring it to 2.25 in (5.7 cm).
- The cream conversion round gives exactly 40 stitches at 2.75 in (7.0 cm).
- Those 40 stitches split into five groups of 8. The leaf round brings the star to 3.25 in (8.3 cm).
- The point round adds up to 60 stitches and 4.5 in (11.4 cm).
- The 70-stitch border finishes the star at 5 in (12.7 cm).
If you check each stage, every Winter Berry Star will match the last one, whether you make one for a gift or a dozen for the tree.
Happy crocheting!