

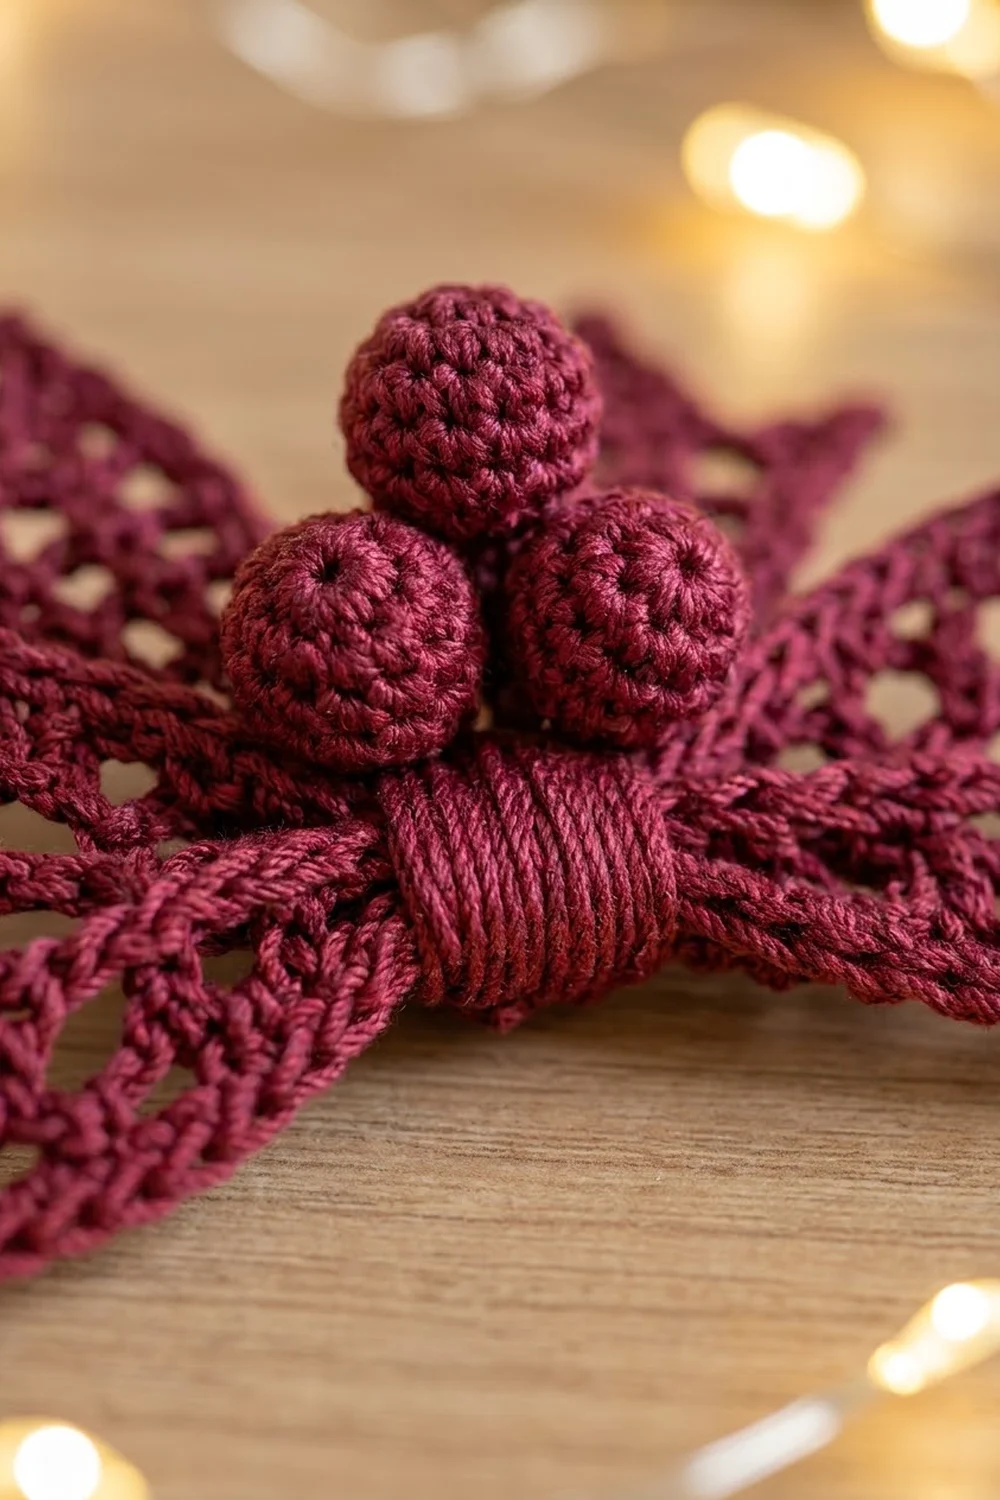
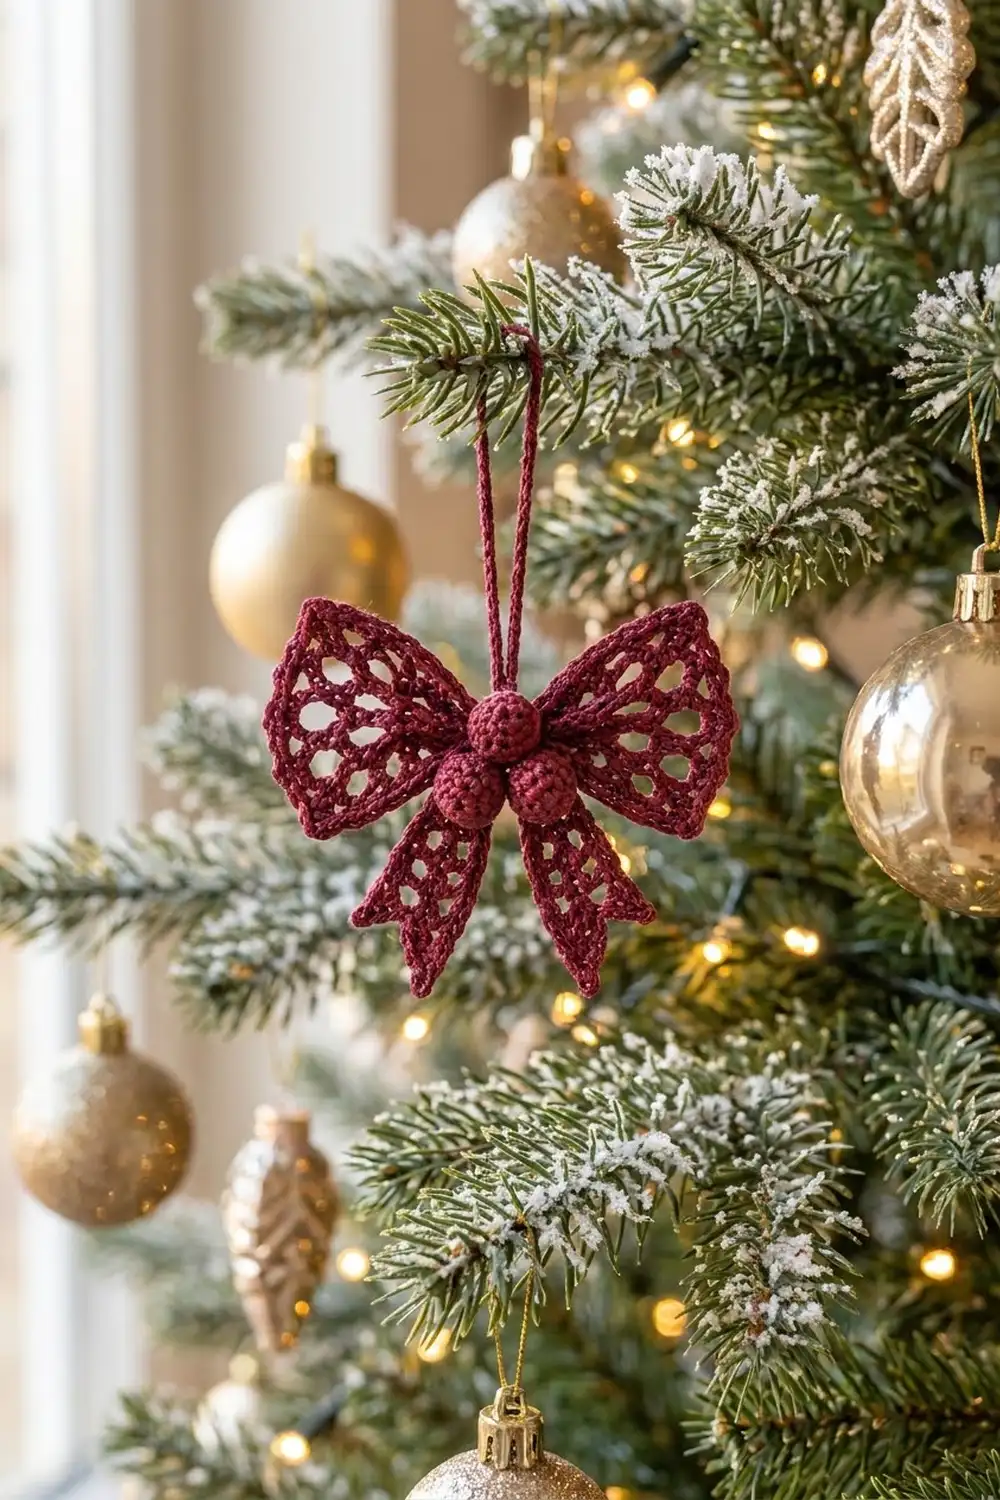
This little bow ornament is worked in a single deep cranberry color. It has two open lace wings, a narrow center band, three round berries clustered at the center, and two lacy tails with notched ends. A slim corded loop at the top lets you hang it on a branch, a gift or a wreath.
The style is traditional and a bit vintage, a lot like a tatted or thread-lace bow, but it is made only with basic crochet stitches. The wings fan out from a tiny ring, so they look like the open loops of a real ribbon bow. The berries add some sculpted texture on top of the airy mesh.
The pattern uses US crochet terms. The finished bow measures about 3.75 in (9.5 cm) wide and 3 in (7.6 cm) tall without the hanger, or about 5 in (12.7 cm) tall with the hanging loop.
You’ll make the ornament from small parts: two fan-shaped wings, two tails, one center band, three berries and one hanging cord. The wings and tails each get a simple edging. Then everything is stacked, wrapped with the band and sewn into one finished ornament.
Finished Size and Construction
- Finished size: 3.75 in (9.5 cm) wide x 3 in (7.6 cm) tall, plus a 2 in (5.1 cm) hanging loop
- Skill level: Intermediate (fine thread, small parts)
- Terminology: US crochet terms
- Yarn weight: Size 3 crochet thread (fine cotton)
- Hook: 2.0 mm
- Number of pieces: 1 finished ornament, assembled from 9 small components (2 wings, 2 tails, 1 band, 3 berries, 1 hanger)
- Layout: Wings left and right, tails angled down in a V, band wrapped around the center, berries arranged one above two on the front
- Wing size before border: 1.5 in (3.8 cm) long x 1.9 in (4.8 cm) across the outer edge
- Wing size after border: 1.65 in (4.2 cm) long x 2.2 in (5.6 cm) across the outer edge
- Border depth: 0.15 in (0.4 cm), 2 rounds
Materials
Yarn: Use a mercerized cotton crochet thread in size 3. Mercerized cotton holds crisp stitch definition and shows off the open mesh. Avoid fuzzy or very soft yarns, because the lace holes will fill in and the wings will droop.
- Cranberry / deep burgundy: 10 g, approximately 40 m (44 yd)
This quantity includes a margin for your gauge swatch and sewing tails. One ornament uses about 25 m (27 yd).
Tools:
- 2.0 mm crochet hook
- Small tapestry needle with a sharp or semi-sharp tip
- Small scissors
- A pinch of polyester fiberfill or matching thread scraps for the berries
- Rustproof pins and a small foam blocking board
- Spray bottle with water
- Optional: diluted fabric stiffener
Abbreviations (US Terms)
- ch – chain
- sl st – slip stitch
- sc – single crochet
- dc – double crochet
- sc2tog – single crochet 2 together
- rev sc – reverse single crochet (crab stitch)
- sp(s) – space(s)
- tch – turning chain
- st(s) – stitch(es)
- RS – right side
Special stitch – rev sc: Work from left to right (right to left if you crochet left-handed). Insert your hook into the next stitch to the right, yarn over and pull up a loop. Then yarn over and pull through both loops. This makes the twisted, corded edge on the wings.
Gauge and Checkpoints
Gauge: 9 sc and 9 rows of sc = 1 in (2.5 cm). A swatch of 18 sc x 18 rows should measure 2 in (5.1 cm) square.
In this pattern, 1 row of dc measures about 0.3 in (0.8 cm).
Make one wing before you make anything else. It’s the best test of your gauge.
Checkpoints:
- After Wing Row 3: About 0.9 in (2.3 cm) from the ring to the top edge.
- After Wing Row 5: 1.5 in (3.8 cm) long, with the outer edge 1.9 in (4.8 cm) across.
- After the wing border: 1.65 in (4.2 cm) long, with the outer edge 2.2 in (5.6 cm) across.
- Finished tail: 0.55 in (1.4 cm) wide x 2 in (5.1 cm) long.
If the wing is too big, go down to a 1.75 mm hook. If it’s too small, or the mesh looks cramped, go up to a 2.25 mm hook. Stitch counts stay the same. Only the hook size changes.
Wings (Make 2)
Each wing is worked in rows, fanning out from a small ring. The ring end becomes the pinched center of the bow.
Foundation: Ch 4, sl st in first ch to form a ring.
Row 1 (RS): Ch 3 (counts as dc), 4 dc in ring. Turn. (5 dc)
Row 2: Ch 4 (counts as dc + ch 1), dc in next dc, ch 1; repeat from * 2 more times, dc in top of tch. Turn. (5 dc, 4 ch-1 sps)*
Row 3: Ch 5 (counts as dc + ch 2), dc in next dc, ch 2; repeat from * 2 more times, dc in 3rd ch of tch. Turn. (5 dc, 4 ch-2 sps)*
The longer chains spread the dc apart like the ribs of a fan.
Row 4 (increase row): Ch 4 (counts as dc + ch 1), dc in next ch-2 sp, ch 1, dc in next dc, ch 1, dc in next ch-2 sp, ch 1; repeat from * 2 more times, dc in 3rd ch of tch. Turn. (9 dc, 8 ch-1 sps)*
Count check for Row 4: 1 beginning dc + 4 dc in the spaces + 3 dc in the middle dc + 1 last dc = 9 dc.
Row 5: Ch 4 (counts as dc + ch 1), dc in next dc, ch 1; repeat from * 6 more times, dc in 3rd ch of tch. (9 dc, 8 ch-1 sps)*
Don’t fasten off. The outer edge is now 17 sts across (9 dc + 8 ch-1 sps) and should measure 1.9 in (4.8 cm). Go on to the wing border in the Border section.
Tails (Make 2)
Each tail is a straight lace strip with a V-notched end.
Foundation: Ch 6.
Row 1: Sc in 2nd ch from hook and in each ch across. Turn. (5 sc)
Row 2: Ch 3 (counts as dc), dc in next sc, ch 1, skip next sc, dc in last 2 sc. Turn. (4 dc, 1 ch-1 sp = 5 sts)
Row 3: Ch 1, sc in first 2 dc, sc in ch-1 sp, sc in next dc, sc in top of tch. Turn. (5 sc)
Rows 4–9: Repeat Rows 2–3 three more times. The tail now has 4 eyelet rows. (5 sc at the end of Row 9)
Point A:
- Row 10: Ch 1, sc in first 2 sc. Turn. (2 sc)
- Row 11: Ch 1, sc2tog. (1 sc) Fasten off.
Point B:
- Row 10: Skip the center (3rd) sc of Row 9. Join thread with a sc in the 4th sc, then sc in the 5th sc. Turn. (2 sc)
- Row 11: Ch 1, sc2tog. (1 sc) Don’t fasten off.
The skipped center stitch opens up the notch between the two points. The tail measures 0.55 in (1.4 cm) wide x 2 in (5.1 cm) long.
Center Band (Make 1)
Foundation: Ch 5.
Row 1: Sc in 2nd ch from hook and in each ch across. Turn. (4 sc)
Rows 2–10: Ch 1, sc in each sc across. Turn. (4 sc)
Fasten off, leaving a 6 in (15.2 cm) tail for sewing. The band measures 0.45 in (1.1 cm) x 1.1 in (2.8 cm).
Berries (Make 3)
Work in continuous rounds, without joining.
Rnd 1: 6 sc in a magic ring. (6 sc)
Rnd 2: 2 sc in each st around. (12 sc)
Rnd 3: Sc in each st around. (12 sc)
Stuff firmly with a tiny pinch of fiberfill or thread scraps.
Rnd 4: Sc2tog 6 times. (6 sts)
Fasten off, leaving a 6 in (15.2 cm) tail. Weave the tail through the front loops of the last 6 sts and pull tight to close. Roll the berry between your palms to round it out. Each berry measures 0.5 in (1.3 cm) across.
Hanging Cord (Make 1)
Ch 41. Sl st in 2nd ch from hook and in each ch across. (40 sl st)
Fasten off, leaving a 6 in (15.2 cm) tail. The cord measures about 4 in (10.2 cm) long and folds into a 2 in (5.1 cm) loop.
Border
The border gives the wings and tails their firm, corded outline. It also keeps the open mesh from stretching out of shape.
Border gauge: 1 sc per st or space along the top edge, 2 sc per dc row end, and 1 sc per sc row end. One dc row is about as tall as 2 sc rows, so these ratios keep the edges flat. They won’t ruffle or cup.
Wing Border (Both Wings)
You start at the last dc of Row 5, which is one corner of the outer edge, with the RS facing.
Rnd 1: Ch 1. Work the sides first, then the outer edge:
- Side 1: Turn the wing so you’re working down the row ends. Work 2 sc in each row end of Rows 5, 4, 3, 2 and 1. (10 sc)
- Center point: 1 sc in the ring. (1 sc)
- Side 2: Work 2 sc in each row end of Rows 1, 2, 3, 4 and 5. (10 sc)
- Outer edge: 3 sc in the beginning-ch corner of Row 5. Then sc in next ch-1 sp, sc in next dc; repeat from * 8 times in total, but on the last repeat work 3 sc in the final corner dc instead of 1 sc. (3 + 15 + 3 = 21 sc)*
Sl st to the first sc. (42 sc total: 10 + 1 + 10 + 21)
Outer edge count check: 8 ch-1 sps + 7 middle dc = 15 sc, plus 3 sc at each of the 2 corners = 21. The 2 corner dc are counted only once, inside the corner groups.
Rnd 2: Ch 1, rev sc in each sc around. Sl st to the first st. (42 rev sc)
Fasten off, leaving an 8 in (20.3 cm) tail on one wing for assembly.
Why the math works: Each side has 5 rows. Four of them are dc rows, and Row 1 is dc worked into the ring. At 2 sc per row end, that’s 10 sc per side, which matches the side length of about 1.1 in (2.8 cm). Along the outer edge, the 17 working sts become 15 sc plus 2 three-sc corners. The corners add just enough ease to turn without pulling. The 2 rounds add 0.15 in (0.4 cm) on each side, so the wing goes from 1.9 in (4.8 cm) to 2.2 in (5.6 cm) across.
Tail Border (Both Tails)
Continue from the end of Point B with sl st, RS facing:
- Point B tip: 1 sl st. (1)
- Point B inner edge (Rows 11–10): 2 sl st. (2)
- Notch center (skipped st): 1 sl st. (1)
- Point A inner edge (Rows 10–11): 2 sl st. (2)
- Point A tip: 1 sl st. (1)
- Point A outer edge (Rows 11–10): 2 sl st. (2)
- Side 1 (Rows 9–1): 1 sl st per sc row end (5) + 2 sl st per dc row end (8). (13)
- Foundation edge: 1 sl st in each ch. (5)
- Side 2 (Rows 1–9): Same as Side 1. (13)
- Point B outer edge (Rows 10–11): 2 sl st. (2)
Join to the first sl st. (42 sl st total)
Fasten off. The sl st outline adds almost no width, so the tail stays 0.55 in (1.4 cm) wide.
Assemble the Bow
- Lay the wings RS up with their ring points touching at the center and their outer edges facing left and right.
- Lay the tails under the wings in a V. Their foundation edges should overlap the center, and the notched ends should point down and out.
- Pinch the wings slightly at the center. Whip-stitch all 4 pieces together through the ring points and the tail foundations.
- Wrap the band around the center from front to back. Sew its short ends together at the back, snugly enough to cinch the wings.
- Fold the hanging cord in half and sew both ends to the back of the band, at the top.
- Sew one berry onto the top half of the band. Sew the other two side by side just below it, overlapping the lower edge of the band.
Final Blocking
- Lightly mist the whole ornament with water until it’s damp but not dripping.
- Pin it face up on the blocking board.
- Pin each wing open with a pin in each of the 2 outer corners and 1 at the middle of the outer edge. Check that each wing measures 2.2 in (5.6 cm) across.
- Pin each tail straight, then pin each notch point separately so the V stays open.
- Check the overall size: 3.75 in (9.5 cm) wide and 3 in (7.6 cm) tall.
- Optional: brush diluted fabric stiffener onto the wings and tails only. Keep it off the berries.
- Let it dry completely, at least 12 hours, before you unpin it.
Final Quality-Control Checklist
- Each wing has 9 dc on Row 5 and 42 sts in each border round.
- Each tail has 4 eyelet rows and two even points with a clear notch.
- Both wings are the same size: 1.65 in (4.2 cm) long and 2.2 in (5.6 cm) across.
- Both tails are 2 in (5.1 cm) long.
- The band cinches the center firmly and its seam is hidden at the back.
- The berries are round, firm and arranged one above two.
- The hanger is secure and centered.
- All yarn ends are woven in and trimmed.
Troubleshooting
Wings curl or cup: You probably worked too few sc along the sides. Check for 10 sc per side and re-block.
Wing edge ruffles: You may have too many sc on the outer edge. Recount to 21 and make sure you didn’t add extra sc in the corners.
Mesh holes look closed: Your thread may be too soft, or your tension too tight. Go up a hook size.
Tail points are uneven: Check that exactly 1 center stitch was skipped before Point B.
Berries are lumpy: Stuff them more firmly and roll them before you close them.
Bow tilts on the hanger: Re-sew the cord so it sits exactly at the center top of the band.
Care
Spot clean or hand wash in cool water, then reshape and dry flat, pinning again if needed. Store it flat in a box between seasons so the wings keep their shape.
Final Notes
The measurement chain is short and easy to check. A gauge of 9 sc = 1 in (2.5 cm) gives a 5-row wing that is 1.9 in (4.8 cm) across. The 42-stitch border brings it to 2.2 in (5.6 cm) across and 1.65 in (4.2 cm) long. Two bordered wings with the 0.45 in (1.1 cm) band between them make a bow 3.75 in (9.5 cm) wide. The 2 in (5.1 cm) tails bring the height to 3 in (7.6 cm). If you check each stage as you go, every ornament will match.
Happy crocheting!