

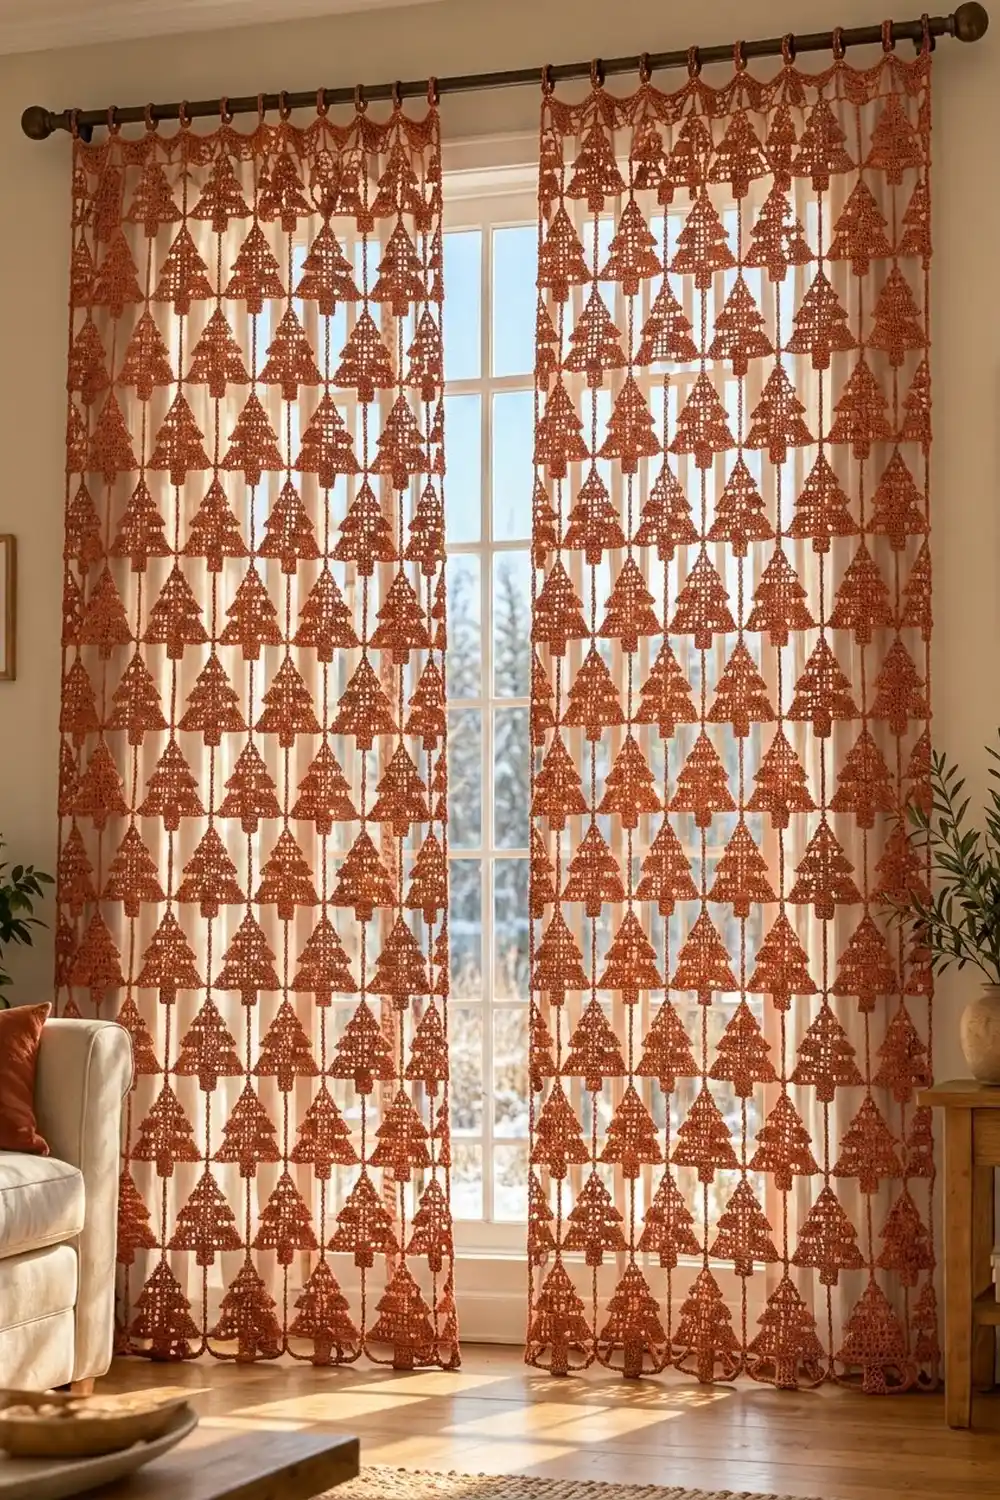
This pair of curtain panels is made from small filet-crochet Christmas trees, hung in airy vertical strands. Light comes through the open mesh squares in each canopy, and the solid bands and trunks give the trees a clear outline against a winter window.
Everything is worked in one warm terracotta cotton, so the curtain looks seasonal without being loud and can stay up from late autumn through winter. The pattern uses US crochet terms.
Each panel is 36 in (91.4 cm) wide and 81.25 in (206.4 cm) from the top of the header to the bottom of the longest strand. The rod loops add about 2 in (5.1 cm) above the header. Each tree is 5.5 in (14.0 cm) wide and 6 in (15.2 cm) tall.
You make each tree flat in rows, starting at the base of the canopy and working up to the tip. Then you add the trunk to the underside of the foundation chain. The trees are linked into strands with chain links, and the strands are then caught into a single crochet header band with rod loops.
Finished Size and Construction
- Finished panel size: 36 × 81.25 in (91.4 × 206.4 cm), plus about 2 in (5.1 cm) of rod loops
- Skill level: Intermediate (simple stitches, lots of repetition)
- Terminology: US
- Yarn weight: Fingering (#1) cotton
- Hook: 2.75 mm (US C-2)
- Number of pieces: 114 trees and 2 header bands
- Layout: 6 strands per panel, alternating 10-tree and 9-tree strands, half-drop offset
- Piece size: 5.5 × 6 in (14.0 × 15.2 cm) per tree
- Size before border: 36 in (91.4 cm) layout width; longest strand 80 in (203.2 cm)
- Border (header) depth: 1.25 in (3.2 cm) of solid band, plus the rod loops
Materials
Use a smooth mercerized cotton or cotton blend in fingering weight. It shows the filet squares clearly, holds its shape when hanging, and doesn’t stretch much over time. Avoid fuzzy or very stretchy yarns, because the strands will slowly lengthen under their own weight.
- Terracotta: 350 g, about 1,190 m (seven 50 g/170 m balls)
These quantities include a margin of roughly 25% for swatching, tails, and differences in tension.
Tools:
– 2.75 mm (US C-2) crochet hook
– Tapestry needle
– Stitch markers
– Tape measure
– Blocking mats and rust-proof pins
– Spray bottle
– Optional: light spray starch
Abbreviations (US Terms)
- ch – chain
- sl st – slip stitch
- sc – single crochet
- dc – double crochet
- st(s) – stitch(es)
- sp – space
- tch – turning chain
Filet blocks: Each block is 3 sts wide plus a shared edge dc. A row of N blocks has (3 × N) + 1 sts, and each chain counts as 1 st.
– Solid block (S): dc in next 2 sts (or 2 dc in a ch-2 sp), dc in next dc.
– Open block (O): ch 2, skip the next 2 sts (or the ch-2 sp), dc in next dc.
The ch 3 at the start of a row counts as the first dc.
Block decrease: Sl st in each of the first 4 sts, then ch 3. You are now starting one block in from the edge. At the end of the row, leave the last 3 sts unworked.
Gauge and Checkpoints
Filet gauge: 8 blocks = 4 in (10.2 cm) wide, and 10 dc rows = 4 in (10.2 cm) tall. One block is 0.5 in (1.3 cm) wide, and one row is 0.4 in (1.0 cm) tall.
Chain gauge: 5 ch = 1 in (2.5 cm).
Header gauge: 6 sc = 1 in (2.5 cm), and 4 sc rows = 1 in (2.5 cm).
Use your first complete tree as your gauge swatch. Check it at each of these points:
- After Row 1: 5.5 in (14.0 cm) wide
- After Row 6: 2.4 in (6.1 cm) tall
- After Row 12: 4.8 in (12.2 cm) tall
- With the trunk added: 6 in (15.2 cm) tall overall
Aim to stay within 0.25 in (0.6 cm) of these numbers. If your tree is too big, go down to a 2.5 mm hook. If it’s too small, go up to a 3.0 mm hook. Also check that your dc rows aren’t too tall. Tall rows make the canopy narrow and pointed, and they also make the strands longer.
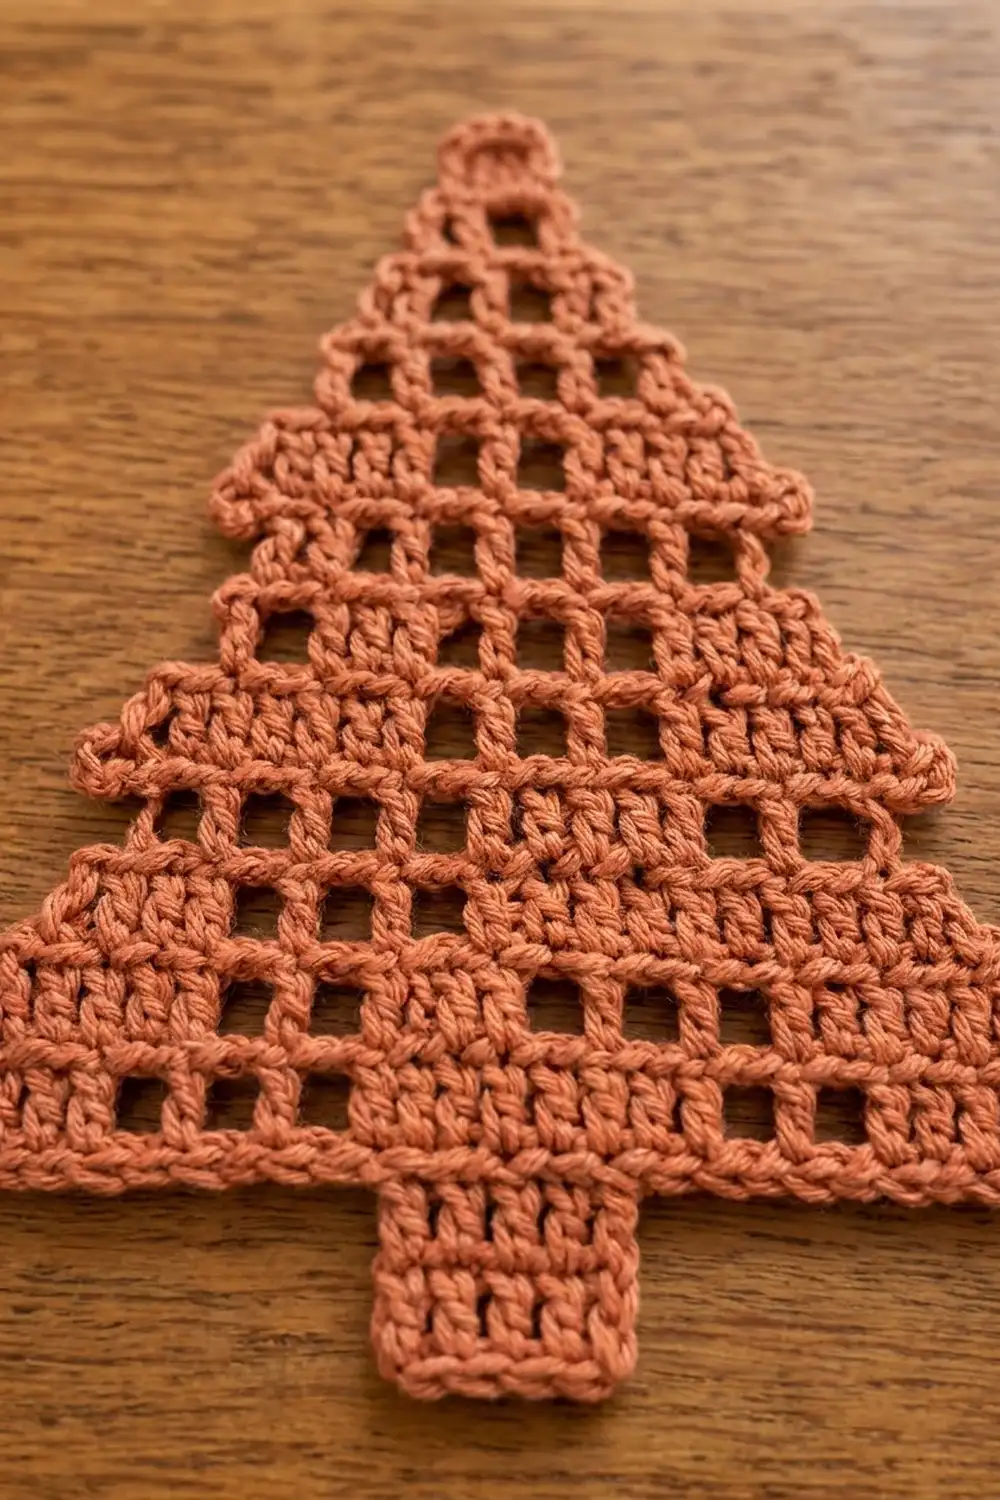
Tree Motif (Make 114)
Canopy
Foundation: Ch 36.
Row 1 (11 blocks, all S): Dc in 4th ch from hook (the skipped ch count as the first dc) and in each ch across. Turn. (34 sts)
Row 2 (11 blocks: S, 9 O, S): Ch 3, dc in next 3 sts, ch 2, skip 2 sts, dc in next dc 9 times, dc in last 3 sts (the last one goes into the top of the tch). Turn. (34 sts)
Row 3 (9 blocks: S, 7 O, S): Block decrease (sl st in first 4 sts, ch 3). Work 1 S, 7 O, 1 S, leaving the last 3 sts unworked. Turn. (28 sts)
Row 4 (9 blocks, all S): Ch 3, work 9 S. Turn. (28 sts)
Row 5 (7 blocks: S, 5 O, S): Block decrease. Work 1 S, 5 O, 1 S, leaving the last 3 sts unworked. Turn. (22 sts)
Row 6 (7 blocks: S, O, S, O, S, O, S): Ch 3, work the blocks as listed. Turn. (22 sts)
Row 7 (5 blocks: S, 3 O, S): Block decrease. Work 1 S, 3 O, 1 S, leaving the last 3 sts unworked. Turn. (16 sts)
Row 8 (5 blocks, all S): Ch 3, work 5 S. Turn. (16 sts)
Row 9 (3 blocks: S, O, S): Block decrease. Work S, O, S, leaving the last 3 sts unworked. Turn. (10 sts)
Row 10 (3 blocks: S, O, S): Ch 3, work S, O, S. Turn. (10 sts)
Row 11 (1 block, S): Block decrease. Work 1 S, leaving the last 3 sts unworked. Turn. (4 sts)
Row 12 (1 block, S): Ch 3, dc in next 2 dc, dc in top of tch. Fasten off. (4 sts)
Because each pair of rows narrows by one block on each side, the sides form even 0.5 in (1.3 cm) stair steps. The solid Rows 1, 4, and 8 create horizontal bands across the canopy.
Trunk
Turn the canopy upside down so the foundation chain is on top. Counting along the underside of the chain, the base has 34 sts (the 3 skipped ch count as 1). Place markers in sts 13 and 22. This leaves 12 sts free on each side of the trunk.
Row T1: Join yarn with a sl st in st 13, ch 3, dc in each st up to and including st 22. Turn. (10 sts, 3 blocks)
Rows T2–T3: Ch 3, dc in next 9 sts. Turn. (10 sts)
Fasten off. The trunk measures 1.5 × 1.2 in (3.8 × 3.0 cm). Weave in all ends along solid stitches so they don’t show in the open squares.
Make All Pieces
All pieces are in terracotta.
- Per panel: 57 trees (3 strands of 10 and 3 strands of 9)
- Total for two panels: 114 trees and 2 header bands
Block the trees in batches before joining them (see Final Blocking). It is much easier to pin flat trees than a finished strand.
Layout for one panel (each column is one strand, numbered from the top):
Strand:  A    B    A    B    A    B
         T1        T1        T1
              T1        T1        T1
         T2        T2        T2
              T2        T2        T2
         ...  ...  ...  ...  ...  ...
         T9        T9        T9
              T9        T9        T9
         T10       T10       T10
The B strands sit 4 in (10.2 cm) lower than the A strands. For the second panel, mirror the order (B, A, B, A, B, A) so that both outer edges of the window end with a 9-tree strand.
Joining
Method: Each strand is joined from the top down, using chain links that run from the tip of the lower tree to the trunk of the tree above it.
Stitch-to-stitch logic:
- Lay two trees upright, one above the other.
- On the lower tree, join yarn with a sl st into the space between the 2nd and 3rd dc of Row 12. This is the exact center of the tip.
- Ch 10.
- Sl st into the space between the 5th and 6th dc of Row T3 on the upper tree’s trunk. This is the exact center of the trunk.
- Fasten off and weave in the ends along the chain.
Each link is 2 in (5.1 cm) long, so trees repeat every 8 in (20.3 cm) down the strand (6 in tree + 2 in link).
Top links: Join yarn at the tip of the top tree of each strand, the same way as above.
– Strand A: Ch 10 for a 2 in (5.1 cm) link.
– Strand B: Ch 30 for a 6 in (15.2 cm) link.
Fasten off, leaving a 6 in (15.2 cm) tail. The extra 4 in (10.2 cm) on strand B creates the half-drop.
Tension: Chain at the same relaxed tension as your gauge chain. Measure every few links, because tight links pull the strand up and loose links make it sag. Every link should measure 2 in (5.1 cm) when lightly stretched.
Size checkpoint:
– Strand A: 2 + (10 × 6) + (9 × 2) = 80 in (203.2 cm)
– Strand B: 6 + (9 × 6) + (8 × 2) = 76 in (193.0 cm)
Border (Header Band)
The header is the only border. The sides and bottom are left as free-hanging strands, as shown in the photo.
Border gauge: 6 sc = 1 in (2.5 cm).
Header foundation: Ch 217.
Row 1: Sc in 2nd ch from hook and in each ch across. (216 sc)
On sc numbers 18, 54, 90, 126, 162, and 198, insert the hook through the chain and through the last chain of a strand’s top link, then complete the sc. This attaches the strands to the header in order (A, B, A, B, A, B). Turn.
Rows 2–3: Ch 1, sc in each sc across. Turn. (216 sc)
Row 4 (loops): Ch 1, sc in first 9 sts, ch 24, skip 6 sts, sc in next 18 sts 8 times, ch 24, skip 6 sts, sc in last 9 sts. Turn.
This row has 162 sc and 9 ch-24 loops. Check that it uses all 216 sts: 9 + 8 × (6 + 18) + 6 + 9 = 216.
Row 5 (trim): Ch 1, sc in each sc and work 30 sc into each ch-24 loop. Fasten off.
This is a conversion row: 162 sc (1 per existing sc) + 270 sc (30 in each of 9 loops) = 432 sc. The sc covering makes the loops firm and strong enough to slide along the rod.
Why the math works: Each strand gets 36 header sts, which is 6 in (15.2 cm) at 6 sc per inch. That fits a 5.5 in (14.0 cm) tree plus a 0.5 in (1.3 cm) gap. Six strands × 36 sts = 216 sts = 36 in (91.4 cm). No extra stitches are added between strands. Each strand is attached at st 18 of its own 36-st section, so every tree hangs centered.
The solid band (Rows 1–5) is 1.25 in (3.2 cm) deep. Total panel length is 80 + 1.25 = 81.25 in (206.4 cm). The loops spaced every 4 in (10.2 cm) fit rods up to 1.25 in (3.2 cm) in diameter.
Final Blocking
- Before joining, wet each tree, or spray it until it is damp all the way through.
- Pin the tree to 5.5 × 6 in (14.0 × 15.2 cm). Put one pin in each stair-step corner and one at each trunk corner.
- Use a pin to open up any squares that have closed, so the mesh is even.
- If you want crisper edges, mist the trees lightly with spray starch.
- Let the trees dry completely before unpinning.
- After joining and adding the header, pin the header band flat to 36 × 1.25 in (91.4 × 3.2 cm), mist it, and let it dry.
- Hang the panel and mist all the strands lightly. Let them hang for 24 hours so the links settle to their final length.
Final Quality-Control Checklist
- Every tree measures 5.5 × 6 in (14.0 × 15.2 cm), within 0.25 in (0.6 cm).
- The stair steps are even on both sides of every canopy.
- Each trunk has 12 free base sts on each side.
- All links measure 2 in (5.1 cm).
- The B strands hang exactly 4 in (10.2 cm) lower than the A strands.
- The header has 216 sc in Rows 1–3, and 432 sc in Row 5.
- The strand join points are 36 sts apart, at sts 18, 54, 90, 126, 162, and 198.
- No yarn tails show inside any open squares.
Troubleshooting
- Canopy leans to one side: You probably skipped a block decrease or worked an extra block. Count each row against the stitch totals in the pattern.
- Open squares look slanted: The ch-2 is too tight. Chain a little looser, or block the squares open with pins.
- Trunk is off-center: Re-count the base sts. There should be 12 free sts on each side before the trunk starts.
- Strands are too long: The links are loose. Rework them with ch 9, or chain more tightly.
- Header ripples: The header is longer than the strand spacing allows. Go down a hook size and re-check that you have 6 sc per inch.
- Rod loops are too small: Change Row 4 to ch 28 and work 34 sc into each loop in Row 5. This makes Row 5 162 + 306 = 468 sc.
Care
Hand wash in cool water with mild soap, press the water out with a towel, and dry flat. Lightly re-block and re-hang the panels to bring each strand back to its proper length.
Final Notes
All the measurements build on each other:
- Gauge of 8 blocks to 4 in (10.2 cm) gives a 5.5 × 6 in (14.0 × 15.2 cm) tree.
- Each tree plus a 2 in (5.1 cm) link repeats every 8 in (20.3 cm).
- That gives strands of 80 in (203.2 cm) and 76 in (193.0 cm).
- Six 6 in (15.2 cm) columns make a 216-st header, 36 in (91.4 cm) wide.
- With the header, each panel is 81.25 in (206.4 cm) long.
If you check each of these numbers as you go, both panels will hang straight and even.
Happy crocheting!